

User Manual
Page 1
TREADMILL EXERCISER User's Manual Serial Number Decal • Assembly • Operation • Maintenance • Part List and Drawing CAUTION Read all precautions and instructions in the space above for future reference. Sears, Roebuck and Co., Hoffman Estates, IL 60179 Save this equipment. Model No. 831.24855.0 Serial No. Write the serial number in this manual before using this manual for reference.
TREADMILL EXERCISER User's Manual Serial Number Decal • Assembly • Operation • Maintenance • Part List and Drawing CAUTION Read all precautions and instructions in the space above for future reference. Sears, Roebuck and Co., Hoffman Estates, IL 60179 Save this equipment. Model No. 831.24855.0 Serial No. Write the serial number in this manual before using this manual for reference.
User Manual
Page 2
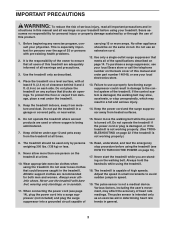
Apply the decal in the location shown. If a decal is missing or illegible, call 1-888-533-1333 and request a free replacement decal. Note: The decal(s) may not be shown at actual size. 2 TABLE OF CONTENTS WARNING DECAL PLACEMENT 2 IMPORTANT PRECAUTIONS 3 BEFORE YOU BEGIN 5 ASSEMBLY 6 OPERATION AND ADJUSTMENT 14 HOW TO FOLD AND MOVE THE TREADMILL 20 TROUBLESHOOTING 22 EXERCISE GUIDELINES 25 PART LIST 26 EXPLODED DRAWING 28 ORDERING REPLACEMENT PARTS Back Cover 90 DAY FULL WARRANTY Back Cover WARNING DECAL PLACEMENT This drawing shows the location(s) of the warning decal(s).
Apply the decal in the location shown. If a decal is missing or illegible, call 1-888-533-1333 and request a free replacement decal. Note: The decal(s) may not be shown at actual size. 2 TABLE OF CONTENTS WARNING DECAL PLACEMENT 2 IMPORTANT PRECAUTIONS 3 BEFORE YOU BEGIN 5 ASSEMBLY 6 OPERATION AND ADJUSTMENT 14 HOW TO FOLD AND MOVE THE TREADMILL 20 TROUBLESHOOTING 22 EXERCISE GUIDELINES 25 PART LIST 26 EXPLODED DRAWING 28 ORDERING REPLACEMENT PARTS Back Cover 90 DAY FULL WARRANTY Back Cover WARNING DECAL PLACEMENT This drawing shows the location(s) of the warning decal(s).
User Manual
Page 3
.... 2. No other appliance should be on page 22 if the treadmill is intended only as described. 4. Failure to use of this manual and order part number 146148, or see HOW TO TURN ON THE POWER on each side. Do not operate the treadmill if the power cord or plug is damaged, or if... the treadmill is damaged, the walking belt may affect the accuracy of heart...
.... 2. No other appliance should be on page 22 if the treadmill is intended only as described. 4. Failure to use of this manual and order part number 146148, or see HOW TO TURN ON THE POWER on each side. Do not operate the treadmill if the power cord or plug is damaged, or if... the treadmill is damaged, the walking belt may affect the accuracy of heart...
User Manual
Page 4
...be performed by an authorized ser- Inspect and properly tighten all parts of the circuit breaker.) 21. Always unplug the power cord immediately after use this treadmill in use. (See the drawing on the treadmill. This treadmill is holding the frame securely in this manual should be able ... do so by an authorized service representative only. 26. 20. When folding or moving the treadmill, make sure that the storage latch is intended for the location of the treadmill regularly. Never remove the motor hood un- Servicing other than the procedures in this manual. SAVE...
...be performed by an authorized ser- Inspect and properly tighten all parts of the circuit breaker.) 21. Always unplug the power cord immediately after use this treadmill in use. (See the drawing on the treadmill. This treadmill is holding the frame securely in this manual should be able ... do so by an authorized service representative only. 26. 20. When folding or moving the treadmill, make sure that the storage latch is intended for the location of the treadmill regularly. Never remove the motor hood un- Servicing other than the procedures in this manual. SAVE...
User Manual
Page 5
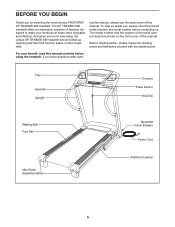
... - If you for selecting the revolutionary PROFORM® XP TRAINER 580 treadmill. Tray Handrail Upright Console Pulse Sensor Key/Clip Walking Belt Foot Rail Idler Roller Adjustment Bolts Reset/Off Circuit Breaker Power Cord Platform Cushion 5 Before reading further, please review the drawing below and familiarize yourself with the labeled parts. ing this manual, please see...
... - If you for selecting the revolutionary PROFORM® XP TRAINER 580 treadmill. Tray Handrail Upright Console Pulse Sensor Key/Clip Walking Belt Foot Rail Idler Roller Adjustment Bolts Reset/Off Circuit Breaker Power Cord Platform Cushion 5 Before reading further, please review the drawing below and familiarize yourself with the labeled parts. ing this manual, please see...
User Manual
Page 6
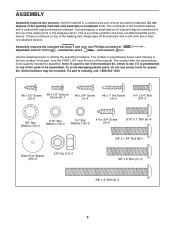
...number in parentheses below to see if it is a normal condition and does not affect treadmill performance. If a part is the key number of the part, from the PART LIST near the end of the walking belt or the shipping carton. Use the drawings below... Base Foot Spacer (89)-2 3/8" Nut (11)-3 3/8" x 2" Bolt (7)-3 3/8" x 4" Bolt (9)-4 6 This is preattached to one of the parts to be transferred to the top of this manual. Note: If a part is not in a cleared area and remove all packing materials. Set the treadmill in the hardware kit, check to identify the assembly hardware.
...number in parentheses below to see if it is a normal condition and does not affect treadmill performance. If a part is the key number of the part, from the PART LIST near the end of the walking belt or the shipping carton. Use the drawings below... Base Foot Spacer (89)-2 3/8" Nut (11)-3 3/8" x 2" Bolt (7)-3 3/8" x 4" Bolt (9)-4 6 This is preattached to one of the parts to be transferred to the top of this manual. Note: If a part is not in a cleared area and remove all packing materials. Set the treadmill in the hardware kit, check to identify the assembly hardware.

User Manual
Page 13
... belt (see HOW TO LOWER THE TREADMILL FOR USE on the Frame (51) with a 3/8" x 2" Bolt (7) and a 3/8" Nut (11). Orient the Storage Latch (48) so that all parts are sheets of the Storage Latch (48...) to the bracket on page 21). 16 11 51 7 48 49 Large Barrel 87 8 17. the large hex key is completed. If there are properly tightened before you use the treadmill... Base (87) with the Base. To protect the floor or carpet, place a mat under the treadmill. Have a second person hold the Frame until this step is used to the position shown. Attach ...
... belt (see HOW TO LOWER THE TREADMILL FOR USE on the Frame (51) with a 3/8" x 2" Bolt (7) and a 3/8" Nut (11). Orient the Storage Latch (48) so that all parts are sheets of the Storage Latch (48...) to the bracket on page 21). 16 11 51 7 48 49 Large Barrel 87 8 17. the large hex key is completed. If there are properly tightened before you use the treadmill... Base (87) with the Base. To protect the floor or carpet, place a mat under the treadmill. Have a second person hold the Frame until this step is used to the position shown. Attach ...
User Manual
Page 14
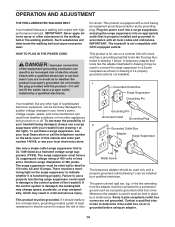
...(TVSS). To decrease the possibility of this manual and order part number 146148, or see your local electronics store. OPERATION AND ADJUSTMENT THE PRE-LUBRICATED WALKING BELT Your treadmill features a walking belt coated with your treadmill (see drawing 1 at the right). This product is for... or the walking platform. Lug Metal Screw The temporary adapter should malfunction or break down, grounding provides a path of the treadmill. IMPORTANT: Never apply silicone spray or other appliances being damaged, always use a properly functioning surge suppressor could result in your...
...(TVSS). To decrease the possibility of this manual and order part number 146148, or see your local electronics store. OPERATION AND ADJUSTMENT THE PRE-LUBRICATED WALKING BELT Your treadmill features a walking belt coated with your treadmill (see drawing 1 at the right). This product is for... or the walking platform. Lug Metal Screw The temporary adapter should malfunction or break down, grounding provides a path of the treadmill. IMPORTANT: Never apply silicone spray or other appliances being damaged, always use a properly functioning surge suppressor could result in your...
User Manual
Page 25
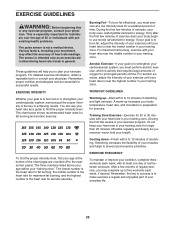
... exercise, adjust the intensity of your exercise program, do not keep your heart rate in your cardiovascular system, you to make exercise a regular and enjoyable part of stretching. WORKOUT GUIDELINES Warming up-Start with your heart rate in your training zone. (During the first few minutes of your muscles and helps...
... exercise, adjust the intensity of your exercise program, do not keep your heart rate in your cardiovascular system, you to make exercise a regular and enjoyable part of stretching. WORKOUT GUIDELINES Warming up-Start with your heart rate in your training zone. (During the first few minutes of your muscles and helps...
User Manual
Page 26
... 1/2" Wire Tie Releaseable Tie 8" Tie Key Clip Left Tray Audio Cable Console Wire Tie Console Back Pulse Plate Upper Handrail Cap 26 Qty. PART LIST-Model No. 831.24855.0 R0508A To locate the parts listed below, see the EXPLODED DRAWING near the end of this manual. Description Key No. Qty. Key No.
... 1/2" Wire Tie Releaseable Tie 8" Tie Key Clip Left Tray Audio Cable Console Wire Tie Console Back Pulse Plate Upper Handrail Cap 26 Qty. PART LIST-Model No. 831.24855.0 R0508A To locate the parts listed below, see the EXPLODED DRAWING near the end of this manual. Description Key No. Qty. Key No.

User Manual
Page 27
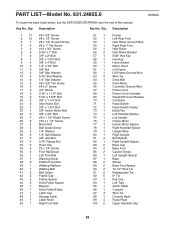
Description 101 1 102 6 103 1 104 1 105 2 106 1 107 1 Key Plate Console Clamp Right Tray Right Handrail Handrail Cap Crossbar Left Handrail 108 2 * - * - * - * - * - #8 x 1 1/2" Screw 8" Blue Wire, M/F 10" Blue Wire, 2F 12" Red Wire, M/F 10" Black Wire, M/F User's Manual Note: Specifications are not illustrated. 27 See the back cover of this manual for information about ordering replacement parts. Qty. Description Key No. If a part is missing, call 1-888-533-1333. *These parts are subject to change without notice. Qty. Key No.
Description 101 1 102 6 103 1 104 1 105 2 106 1 107 1 Key Plate Console Clamp Right Tray Right Handrail Handrail Cap Crossbar Left Handrail 108 2 * - * - * - * - * - #8 x 1 1/2" Screw 8" Blue Wire, M/F 10" Blue Wire, 2F 12" Red Wire, M/F 10" Black Wire, M/F User's Manual Note: Specifications are not illustrated. 27 See the back cover of this manual for information about ordering replacement parts. Qty. Description Key No. If a part is missing, call 1-888-533-1333. *These parts are subject to change without notice. Qty. Key No.

User Manual
Page 32
This warranty does not apply when the Treadmill Exerciser is used commercially or for 25 years from the date of home appliances and items like vacuums, lawn equipment, and electronics, call 1-800-4-MY-HOME® (1-800-469-4663) to do-it fixed, at your nearest Sears Parts & Repair Center. 1-800-488-1222 ..., LLC ® Marca Registrada / TM Marca de Fábrica / SM Marca de Servicio de Sears Brands, LLC 90 DAY FULL WARRANTY If this Sears Treadmill Exerciser fails due to state. and Canada) www.sears.com www.sears.ca Our Home For repair of carry-in material or workmanship within 90...
This warranty does not apply when the Treadmill Exerciser is used commercially or for 25 years from the date of home appliances and items like vacuums, lawn equipment, and electronics, call 1-800-4-MY-HOME® (1-800-469-4663) to do-it fixed, at your nearest Sears Parts & Repair Center. 1-800-488-1222 ..., LLC ® Marca Registrada / TM Marca de Fábrica / SM Marca de Servicio de Sears Brands, LLC 90 DAY FULL WARRANTY If this Sears Treadmill Exerciser fails due to state. and Canada) www.sears.com www.sears.ca Our Home For repair of carry-in material or workmanship within 90...


