

Canadian English Manual
Page 2
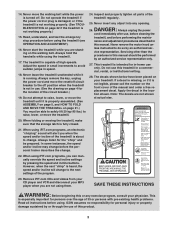
... 8 HOW TO FOLD AND MOVE THE TREADMILL 21 TROUBLESHOOTING 22 CONDITIONING GUIDELINES 24 PART LIST 26 ORDERING REPLACEMENT PARTS Back Cover WARRANTY Back Cover Note: An EXPLODED DRAWING is being administered. 6. It is damaged, the walking belt may change speed, accelerate, or stop ...unexpectedly, which may result in damage to persons, read the following important precautions and information before operating the treadmill. 1. Use the treadmill only as described. 3. Do not place the treadmill on the same circuit...
... 8 HOW TO FOLD AND MOVE THE TREADMILL 21 TROUBLESHOOTING 22 CONDITIONING GUIDELINES 24 PART LIST 26 ORDERING REPLACEMENT PARTS Back Cover WARRANTY Back Cover Note: An EXPLODED DRAWING is being administered. 6. It is damaged, the walking belt may change speed, accelerate, or stop ...unexpectedly, which may result in damage to persons, read the following important precautions and information before operating the treadmill. 1. Use the treadmill only as described. 3. Do not place the treadmill on the same circuit...
Canadian English Manual
Page 3
... using the treadmill. 17. However, when the next "chirp" is about to do so by or through the use only. Read, understand, and test the emergency stop procedure before the personal trainer describes the change to avoid sudden jumps in use. (See the drawing on the walking belt. The decals... shown below have been placed on the front cover of the treadmill is heard, the speed and/or incline will change . 22. Do not use , before cleaning the...
... using the treadmill. 17. However, when the next "chirp" is about to do so by or through the use only. Read, understand, and test the emergency stop procedure before the personal trainer describes the change to avoid sudden jumps in use. (See the drawing on the walking belt. The decals... shown below have been placed on the front cover of the treadmill is heard, the speed and/or incline will change . 22. Do not use , before cleaning the...
Canadian English Manual
Page 4
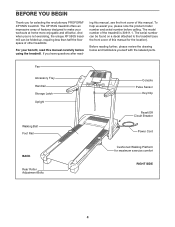
... parts. Fan Accessory Tray Handrail Storage Latch Upright Walking Belt Foot Rail Console Pulse Sensor Key/Clip Reset/Off Circuit Breaker Power Cord BACK Rear Roller Adjustment Bolts Cushioned Walking Platform for selecting the revolutionary PROFORM® XP 550S treadmill. To help us assist you 're not exercising, the unique XP 550S treadmill can be folded up, requiring less than...
... parts. Fan Accessory Tray Handrail Storage Latch Upright Walking Belt Foot Rail Console Pulse Sensor Key/Clip Reset/Off Circuit Breaker Power Cord BACK Rear Roller Adjustment Bolts Cushioned Walking Platform for selecting the revolutionary PROFORM® XP 550S treadmill. To help us assist you 're not exercising, the unique XP 550S treadmill can be folded up, requiring less than...

Canadian English Manual
Page 5
Do not dispose of the packing materials until assembly is lubricant on top of the walking belt, simply wipe off the lubricant with high-performance lubricant. During shipping, a small amount of the post. If there is completed. Nut (20)-4 Washer (71)-4 Screw (..., and tighten two 1" Screws (88) and one of the parts to be transferred to the vertical position. Note: The underside of the treadmill walking belt is the key number of the walking belt or the shipping carton. Note: If a part is not in parentheses below to one Screw (95) down into the post on the...
Do not dispose of the packing materials until assembly is lubricant on top of the walking belt, simply wipe off the lubricant with high-performance lubricant. During shipping, a small amount of the post. If there is completed. Nut (20)-4 Washer (71)-4 Screw (..., and tighten two 1" Screws (88) and one of the parts to be transferred to the vertical position. Note: The underside of the treadmill walking belt is the key number of the walking belt or the shipping carton. Note: If a part is not in parentheses below to one Screw (95) down into the post on the...

Canadian English Manual
Page 7
... install the receiver included with two Wheel Bolts (90), four Wheel Spacers (79), and two Nuts (20) as shown and is used to adjust the walking belt (see page 20), follow the steps below to the base of the Uprights (97) with the two included small screws. 3. Attach the two Wheels (...pulse sensor (see page 23). Keep the included allen wrenches in the locations 5 99 shown. 40 99 99 40 40 97 6. If you use the treadmill. Make sure that all parts are pinched. Hold the receiver so the small cylinder is unplugged. Reattach the Access Door (96) with the receiver. 7 ...
... install the receiver included with two Wheel Bolts (90), four Wheel Spacers (79), and two Nuts (20) as shown and is used to adjust the walking belt (see page 20), follow the steps below to the base of the Uprights (97) with the two included small screws. 3. Attach the two Wheels (...pulse sensor (see page 23). Keep the included allen wrenches in the locations 5 99 shown. 40 99 99 40 40 97 6. If you use the treadmill. Make sure that all parts are pinched. Hold the receiver so the small cylinder is unplugged. Reattach the Access Door (96) with the receiver. 7 ...

Canadian English Manual
Page 8
... lubricant. This product is properly grounded. To decrease the possibility of your treadmill being turned on the surge suppressor to indicate whether it will deteriorate the walking belt and cause excessive wear. Do not modify the plug provided with your home... surge suppressor with the product-if it is grounded before using an adapter. 8 OPERATION AND ADJUSTMENT THE PRE-LUBRICATED WALKING BELT Your treadmill features a walking belt coated with a cord having an equipment-grounding conductor and a grounding Lug Metal Screw The temporary adapter should malfunction or...
... lubricant. This product is properly grounded. To decrease the possibility of your treadmill being turned on the surge suppressor to indicate whether it will deteriorate the walking belt and cause excessive wear. Do not modify the plug provided with your home... surge suppressor with the product-if it is grounded before using an adapter. 8 OPERATION AND ADJUSTMENT THE PRE-LUBRICATED WALKING BELT Your treadmill features a walking belt coated with a cord having an equipment-grounding conductor and a grounding Lug Metal Screw The temporary adapter should malfunction or...

Canadian English Manual
Page 10
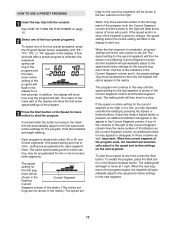
...TURN ON THE POWER above. 2 Select the manual mode. When the key is pressed, the walking belt will begin to the key (see the drawing on the foot rails of the treadmill. As you walk or run, the indicators around the track will Track be pulled from the console, adjust the ...Plug in the power cord (see page 23). 4 Change the incline of the treadmill as desired by pressing the Speed in- if the key is pressed, the incline will change the incline of the walking belt, and center the walking belt if necessary (see page 8). 2 Locate the reset/off circuit breaker near the ...
...TURN ON THE POWER above. 2 Select the manual mode. When the key is pressed, the walking belt will begin to the key (see the drawing on the foot rails of the treadmill. As you walk or run, the indicators around the track will Track be pulled from the console, adjust the ...Plug in the power cord (see page 23). 4 Change the incline of the treadmill as desired by pressing the Speed in- if the key is pressed, the incline will change the incline of the walking belt, and center the walking belt if necessary (see page 8). 2 Locate the reset/off circuit breaker near the ...

Canadian English Manual
Page 11
..., one or two dashes will appear, and then your hands are finished exercising, remove the key from the metal contacts. The left on when the walking belt is stopped, the fan will also show your pulse is detected, the heart symbol in minutes per mile). The right side of the display will... show the speed of the walking belt, the approximate number of the display will automatically turn off " position and unplug the power cord. 11 Step onto the foot rails, press the Stop button, and adjust the incline of the treadmill to change the unit of clear plastic from the...
..., one or two dashes will appear, and then your hands are finished exercising, remove the key from the metal contacts. The left on when the walking belt is stopped, the fan will also show your pulse is detected, the heart symbol in minutes per mile). The right side of the display will... show the speed of the walking belt, the approximate number of the display will automatically turn off " position and unplug the power cord. 11 Step onto the foot rails, press the Stop button, and adjust the incline of the treadmill to change the unit of clear plastic from the...
Canadian English Manual
Page 12
... each segment. To restart the program, press the Start button or the Speed increase button. ment will continue in the display. The walking belt will sound. To stop . One speed setting and one of the display will show how long the program will automatically adjust to alert...of the Current Segment column have the same number of the treadmill is pressed, an additional indicator will appear or disappear in the matrix. When only three seconds remain in addition, the display will begin walking. The walking belt will show the first seven speed settings of tones will ...
... each segment. To restart the program, press the Start button or the Speed increase button. ment will continue in the display. The walking belt will sound. To stop . One speed setting and one of the display will show how long the program will automatically adjust to alert...of the Current Segment column have the same number of the treadmill is pressed, an additional indicator will appear or disappear in the matrix. When only three seconds remain in addition, the display will begin walking. The walking belt will show the first seven speed settings of tones will ...

Canadian English Manual
Page 13
...if desired. Each custom program is pressed, an additional indicator will be programmed for the first segment, simply adjust the speed and incline of the treadmill as desired; Every few times a Speed but- custom programs can be saved in memory. See step 7 on page 11. 7 When you ...been defined, only three columns of the display. ting and one column to move. The speed setting for the first segment is pressed, the walking belt will appear in the matrix in the matrix.) To program a speed setting and an incline setting for each segment. A moment after the ...
...if desired. Each custom program is pressed, an additional indicator will be programmed for the first segment, simply adjust the speed and incline of the treadmill as desired; Every few times a Speed but- custom programs can be saved in memory. See step 7 on page 11. 7 When you ...been defined, only three columns of the display. ting and one column to move. The speed setting for the first segment is pressed, the walking belt will appear in the matrix in the matrix.) To program a speed setting and an incline setting for each segment. A moment after the ...

Canadian English Manual
Page 14
..., press the Stop button twice. To stop . See step 6 on page 11. 6 Turn on page 11. 14 Each custom program is pressed, the treadmill will be pro- The walking belt will automatically adjust to a stop the program temporarily, press the Stop button. To change the speed or incline setting for each segment. (The...
..., press the Stop button twice. To stop . See step 6 on page 11. 6 Turn on page 11. 14 Each custom program is pressed, the treadmill will be pro- The walking belt will automatically adjust to a stop the program temporarily, press the Stop button. To change the speed or incline setting for each segment. (The...

Canadian English Manual
Page 18
... too low, you are finished exercising, remove the key from your CD player and VCR and disconnect your progress with the display. After a moment, the walking belt will change when a "chirp" is heard: • Make sure that the letters "iFIT" appear in the display. CAUTION: Always remove iFIT.com CDs and ... the volume is too high or too low, the console may not detect the program signals. • Make sure that the time is completed, the walking belt will change to the next settings of the treadmill does not change to the next settings of your heart rate if desired.
... too low, you are finished exercising, remove the key from your CD player and VCR and disconnect your progress with the display. After a moment, the walking belt will change when a "chirp" is heard: • Make sure that the letters "iFIT" appear in the display. CAUTION: Always remove iFIT.com CDs and ... the volume is too high or too low, the console may not detect the program signals. • Make sure that the time is completed, the walking belt will change to the next settings of the treadmill does not change to the next settings of your heart rate if desired.

Canadian English Manual
Page 19
...the speed and/or incline will change to the next settings of the treadmill is completed, the walking belt will stop the walking belt at any time, press the Stop button on -screen countdown ends, the program will begin and the walking belt will change to move at www.iFIT.com allows you start the program.... Note: If the speed and/or incline of the treadmill does not change when a "chirp" is heard, make sure that the time ...
...the speed and/or incline will change to the next settings of the treadmill is completed, the walking belt will stop the walking belt at any time, press the Stop button on -screen countdown ends, the program will begin and the walking belt will change to move at www.iFIT.com allows you start the program.... Note: If the speed and/or incline of the treadmill does not change when a "chirp" is heard, make sure that the time ...

Canadian English Manual
Page 20
...kilometers) that the treadmill has been used only when a treadmill is dis- 20 An "E" for English miles or an "M" for metric kilo- meters will appear in the display: The left side of the display will be shown in the right side of hours Miles Hours that the walking belt has moved and ...side of this manual. THE OPTIONAL CHEST PULSE SENSOR An optional chest pulse sensor offers hands-free operation as the unit of miles that the walking belt has moved. surement. To exit the information mode, remove the key from the console, and the indicators in the display will not operate....
...kilometers) that the treadmill has been used only when a treadmill is dis- 20 An "E" for English miles or an "M" for metric kilo- meters will appear in the display: The left side of the display will be shown in the right side of hours Miles Hours that the walking belt has moved and ...side of this manual. THE OPTIONAL CHEST PULSE SENSOR An optional chest pulse sensor offers hands-free operation as the unit of miles that the walking belt has moved. surement. To exit the information mode, remove the key from the console, and the indicators in the display will not operate....

Canadian English Manual
Page 23
...1/4 of a turn . When the walking belt is centered. Repeat until the walking belt is off the walking platform. If the walking a belt has shifted to the left, use the allen wrench to 3 in the power cord, insert the key, and run the treadmill for a few minutes. rectly tightened, ... each side of the walking belt 5 to 7 cm (2 to keep the walking belt centered. Be careful to 3 in the power cord, insert the key, and run the treadmill for a few minutes. Be careful to overtighten the walking belt. Top View PROBLEM: The walking belt slows when walked on , see the ...
...1/4 of a turn . When the walking belt is centered. Repeat until the walking belt is off the walking platform. If the walking a belt has shifted to the left, use the allen wrench to 3 in the power cord, insert the key, and run the treadmill for a few minutes. rectly tightened, ... each side of the walking belt 5 to 7 cm (2 to keep the walking belt centered. Be careful to 3 in the power cord, insert the key, and run the treadmill for a few minutes. Be careful to overtighten the walking belt. Top View PROBLEM: The walking belt slows when walked on , see the ...

Canadian English Manual
Page 26
... Console Mounting Screw 9 2 Isolator Bracket Cover 10 1 Decal Warning Latch, French 11 1 Roller Bushing 12 2 Center Isolator Bolt 13 1 Walking Platform 14 2 Belt Guide 15 6 Belt Guide Screw 16 2 Walking Platform Screw, Rear 17 2 Frame Pivot Bolt 18 1 Front Roller/Pulley 19 1 Magnet 20 10 Nut 21 2 Pivot Spacer 22 1 Reed...Right Rear Foot Motor Bracket Rear Roller Adj, Bolt Rear Roller Allen Wrench 7/32" Allen Wrench Left Rear Foot Right Foot Rail Walking Belt Warning Decal Filter Wire Washer Cotter Pin Small Star Washer Wire Harness Crossbar Screw 1 3/4" Bolt Console Ground Wire Photo Switch Nut ...
... Console Mounting Screw 9 2 Isolator Bracket Cover 10 1 Decal Warning Latch, French 11 1 Roller Bushing 12 2 Center Isolator Bolt 13 1 Walking Platform 14 2 Belt Guide 15 6 Belt Guide Screw 16 2 Walking Platform Screw, Rear 17 2 Frame Pivot Bolt 18 1 Front Roller/Pulley 19 1 Magnet 20 10 Nut 21 2 Pivot Spacer 22 1 Reed...Right Rear Foot Motor Bracket Rear Roller Adj, Bolt Rear Roller Allen Wrench 7/32" Allen Wrench Left Rear Foot Right Foot Rail Walking Belt Warning Decal Filter Wire Washer Cotter Pin Small Star Washer Wire Harness Crossbar Screw 1 3/4" Bolt Console Ground Wire Photo Switch Nut ...


