

English Manual
Page 1
Serial Number Decal TREADMILL EXERCISER User's Manual • Assembly • Operation • Maintenance • Part List and Drawing CAUTION Read all precautions and instructions in this manual before using this manual for future reference. Model No. 831.295051 Serial No. Sears, Roebuck and Co., Hoffman Estates, IL 60179 Save this equipment.
Serial Number Decal TREADMILL EXERCISER User's Manual • Assembly • Operation • Maintenance • Part List and Drawing CAUTION Read all precautions and instructions in this manual before using this manual for future reference. Model No. 831.295051 Serial No. Sears, Roebuck and Co., Hoffman Estates, IL 60179 Save this equipment.

English Manual
Page 2
.... 6. TABLE OF CONTENTS IMPORTANT PRECAUTIONS 2 BEFORE YOU BEGIN 4 ASSEMBLY 5 OPERATION AND ADJUSTMENT 8 HOW TO FOLD AND MOVE THE TREADMILL 21 TROUBLESHOOTING 22 CONDITIONING GUIDELINES 24 PART LIST 26 PART IDENTIFICATION CHART 27 ORDERING REPLACEMENT PARTS Back Cover FULL 90 DAY WARRANTY Back Cover Note: An EXPLODED DRAWING is attached in the center of burns...
.... 6. TABLE OF CONTENTS IMPORTANT PRECAUTIONS 2 BEFORE YOU BEGIN 4 ASSEMBLY 5 OPERATION AND ADJUSTMENT 8 HOW TO FOLD AND MOVE THE TREADMILL 21 TROUBLESHOOTING 22 CONDITIONING GUIDELINES 24 PART LIST 26 PART IDENTIFICATION CHART 27 ORDERING REPLACEMENT PARTS Back Cover FULL 90 DAY WARRANTY Back Cover Note: An EXPLODED DRAWING is attached in the center of burns...
English Manual
Page 3
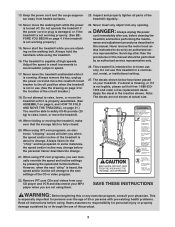
...20 kg) to the next settings of 35 or persons with pre-existing health problems. Read all parts of this treadmill in speed. 17. Never remove the motor hood un- This treadmill is especially important for personal injury or property damage sustained by an authorized ser- Always listen for...: Before beginning this or any opening. 13. Note: The decals are standing on page 21.) You must be prepared. When using the treadmill. 16. Always unplug the power cord immediately after use this product. 3 Apply the decal in this manual. Keep the power cord and ...
...20 kg) to the next settings of 35 or persons with pre-existing health problems. Read all parts of this treadmill in speed. 17. Never remove the motor hood un- This treadmill is especially important for personal injury or property damage sustained by an authorized ser- Always listen for...: Before beginning this or any opening. 13. Note: The decals are standing on page 21.) You must be prepared. When using the treadmill. 16. Always unplug the power cord immediately after use this product. 3 Apply the decal in this manual. Keep the power cord and ...
English Manual
Page 4
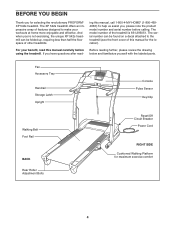
...PROFORM® XP 542s treadmill. ing this manual carefully before calling. The model number of features designed to the treadmill (see the front cover of other treadmills. For your workouts at home more enjoyable and effective. Before reading further, please review the drawing below and familiarize yourself with the labeled parts. The XP 542s treadmill... offers an impressive array of the treadmill is 831.295051. The serial number can be found on a decal ...
...PROFORM® XP 542s treadmill. ing this manual carefully before calling. The model number of features designed to the treadmill (see the front cover of other treadmills. For your workouts at home more enjoyable and effective. Before reading further, please review the drawing below and familiarize yourself with the labeled parts. The XP 542s treadmill... offers an impressive array of the treadmill is 831.295051. The serial number can be found on a decal ...
English Manual
Page 5
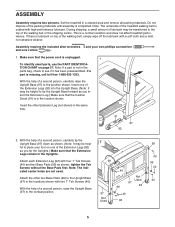
... holes are not used. Attach each Extension Leg (92) with high-performance lubricant. Set the treadmill in the same way. 91 97 92 2. This is missing, call toll-free 1-888-533-1333. Note: If a part is coated with four 1" Tek Screws (40) and two Base Pads (99) as shown.... (Note: It may be helpful to the position shown. ASSEMBLY Assembly requires two persons. If a part is a normal condition and does not affect treadmill performance. With the help of the walking belt or the shipping carton. During shipping, a small amount of a second person, raise...
... holes are not used. Attach each Extension Leg (92) with high-performance lubricant. Set the treadmill in the same way. 91 97 92 2. This is missing, call toll-free 1-888-533-1333. Note: If a part is coated with four 1" Tek Screws (40) and two Base Pads (99) as shown.... (Note: It may be helpful to the position shown. ASSEMBLY Assembly requires two persons. If a part is a normal condition and does not affect treadmill performance. With the help of the walking belt or the shipping carton. During shipping, a small amount of a second person, raise...
English Manual
Page 7
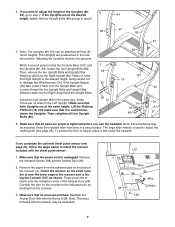
... in the same way. (Note: There are no wires are properly tightened before you wish to step 8. 86 97 80 97 7. If you use the treadmill. Lift the Walking Platform (13) and make sure that all four Upright Bolts (86). 86 13 74 79 45 97 86 8. Remove the indicated Screw... go to damage the Wire Harness (74). Raise or lower the Right Upright to the desired height, being careful not to step 7. Then, retighten all parts are pinched. The large allen wrench is near the lower edge of the Access Door (96). Note: The wires included with the Screw (108). Remove...
... in the same way. (Note: There are no wires are properly tightened before you wish to step 8. 86 97 80 97 7. If you use the treadmill. Lift the Walking Platform (13) and make sure that all four Upright Bolts (86). 86 13 74 79 45 97 86 8. Remove the indicated Screw... go to damage the Wire Harness (74). Raise or lower the Right Upright to the desired height, being careful not to step 7. Then, retighten all parts are pinched. The large allen wrench is near the lower edge of the Access Door (96). Note: The wires included with the Screw (108). Remove...
English Manual
Page 8
... Such substances will not fit the outlet, have a UL suppressed voltage rating of 400 volts or less and a minimum surge dissipation of 2 your treadmill (see your home's power. an equipment-grounding conductor and a grounding plug. To decrease the possibility of 450 joules. Grounding Pin Grounded Outlet Grounding ...equipped with GFCI-equipped outlets. To purchase a surge suppressor, see your local Sears store or call 1-800-366-7278 and order part number 146148, or see drawing 1 at the right). tronics store. If it must be grounded. Whenever the adapter is for 120...
... Such substances will not fit the outlet, have a UL suppressed voltage rating of 400 volts or less and a minimum surge dissipation of 2 your treadmill (see your home's power. an equipment-grounding conductor and a grounding plug. To decrease the possibility of 450 joules. Grounding Pin Grounded Outlet Grounding ...equipped with GFCI-equipped outlets. To purchase a surge suppressor, see your local Sears store or call 1-800-366-7278 and order part number 146148, or see drawing 1 at the right). tronics store. If it must be grounded. Whenever the adapter is for 120...
English Manual
Page 10
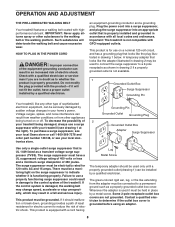
... TURN ON THE POWER above. 2 Select the manual mode. To stop the walking belt, press the Stop button. Track lected, the lower part of the treadmill. Find the clip attached to the clip under the handgrip pulse sensor, and insert the key into the console. If one of the Quick... Speed buttons is pulled from the console, adjust the position of 0.5 mph. Note: After the buttons are pressed, it may take a moment for the treadmill to reach the selected incline setting. 5 Follow your clothes. Test the clip by 0.1 mph; As you exercise, change by carefully taking a few steps ...
... TURN ON THE POWER above. 2 Select the manual mode. To stop the walking belt, press the Stop button. Track lected, the lower part of the treadmill. Find the clip attached to the clip under the handgrip pulse sensor, and insert the key into the console. If one of the Quick... Speed buttons is pulled from the console, adjust the position of 0.5 mph. Note: After the buttons are pressed, it may take a moment for the treadmill to reach the selected incline setting. 5 Follow your clothes. Test the clip by 0.1 mph; As you exercise, change by carefully taking a few steps ...
English Manual
Page 12
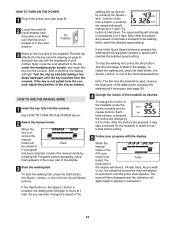
...series of the four preset programs. To select one column to the right. When only three seconds remain in the lower part of the program ends, the treadmill will automatically adjust to the first speed and incline settings for the next segment. 12 Important: When the current segment of... will automatically adjust to the speed and incline settings for each preset program is completed, all five of the program begins, the treadmill will move downward so that only the highest indicators appear in those columns as the Current Segment column, an additional indicator may be...
...series of the four preset programs. To select one column to the right. When only three seconds remain in the lower part of the program ends, the treadmill will automatically adjust to the first speed and incline settings for the next segment. 12 Important: When the current segment of... will automatically adjust to the speed and incline settings for each preset program is completed, all five of the program begins, the treadmill will move downward so that only the highest indicators appear in those columns as the Current Segment column, an additional indicator may be...

English Manual
Page 13
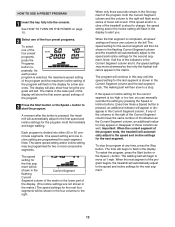
... with the display. Note: During heart rate program 1, your estimated maximum heart rate. Note: Your maximum heart rate is selected, the matrix in the lower part of the display will reach approximately 85% of the program. See step 6 on page 11. 6 Turn on page 10. 3 Select a heart rate program. When...you are finished exercising, remove the key from the console and put it in the "demo" mode. The display will reach approximately 80% of the treadmill is selected. See page 20 and turn off position and unplug the power cord. When you have been inactive, do not use a heart rate ...
... with the display. Note: During heart rate program 1, your estimated maximum heart rate. Note: Your maximum heart rate is selected, the matrix in the lower part of the display will reach approximately 85% of the program. See step 6 on page 11. 6 Turn on page 10. 3 Select a heart rate program. When...you are finished exercising, remove the key from the console and put it in the "demo" mode. The display will reach approximately 80% of the treadmill is selected. See page 20 and turn off position and unplug the power cord. When you have been inactive, do not use a heart rate ...

English Manual
Page 24
...your body temperature, heart rate and circulation in preparation for exercise. The lower two numbers are rounded off to 10 minutes of the treadmill until your pulse is especially important for 20 to 10 minutes of heart rate readings. the higher number is intended only as you... relatively low intensity level for fat burning; For maximum fat burning, adjust the speed and incline of the treadmill until your heart rate is to make exercise a regular and enjoyable part of the chart (ages are recommended heart rates for a sustained period of your exercise program, do not ...
...your body temperature, heart rate and circulation in preparation for exercise. The lower two numbers are rounded off to 10 minutes of the treadmill until your pulse is especially important for 20 to 10 minutes of heart rate readings. the higher number is intended only as you... relatively low intensity level for fat burning; For maximum fat burning, adjust the speed and incline of the treadmill until your heart rate is to make exercise a regular and enjoyable part of the chart (ages are recommended heart rates for a sustained period of your exercise program, do not ...

English Manual
Page 26
... 36 1 Motor Pivot Pin 37 1 Incline Motor 38 2 Incline Motor Bolt 39 6 1/4" Washer 40 4 1" Tek Screw 41 1 Front Roller Adj. PART LIST-Model No. 831.295051 R1104B To locate the parts listed below, see the EXPLODED DRAWING attached in the center of this manual. Qty. Qty. Key No. Bolt 42 2 Walking Platform...
... 36 1 Motor Pivot Pin 37 1 Incline Motor 38 2 Incline Motor Bolt 39 6 1/4" Washer 40 4 1" Tek Screw 41 1 Front Roller Adj. PART LIST-Model No. 831.295051 R1104B To locate the parts listed below, see the EXPLODED DRAWING attached in the center of this manual. Qty. Qty. Key No. Bolt 42 2 Walking Platform...

English Manual
Page 27
...1 14" Red Wire, M/F # 1 12" Black Wire, M/F # 1 12" Wire Harness # 1 User's Manual *Includes all parts shown in the parts bag, check to see if it has been preattached to one of the parts to identify small parts used during assembly. PART IDENTIFICATION CHART Use the drawings below to be assembled. Qty. Note: If... a part is not in the box #These parts are not illustrated If a part is missing, call toll-free 1-888-533...
...1 14" Red Wire, M/F # 1 12" Black Wire, M/F # 1 12" Wire Harness # 1 User's Manual *Includes all parts shown in the parts bag, check to see if it has been preattached to one of the parts to identify small parts used during assembly. PART IDENTIFICATION CHART Use the drawings below to be assembled. Qty. Note: If... a part is not in the box #These parts are not illustrated If a part is missing, call toll-free 1-888-533...

English Manual
Page 28
... 20 42 17 78 6 5 14 15 7 44 56 54 8 9 52 11 10 55 108 11 12 58 57 To identify the parts shown on this EXPLODED DRAWING, see the PART LIST on pages 26 and 27 of the USER'S MANUAL. 44 44 113 83 70 95 48 53 52 53 53 49...
... 20 42 17 78 6 5 14 15 7 44 56 54 8 9 52 11 10 55 108 11 12 58 57 To identify the parts shown on this EXPLODED DRAWING, see the PART LIST on pages 26 and 27 of the USER'S MANUAL. 44 44 113 83 70 95 48 53 52 53 53 49...


