
English Manual
Page 1
Sears, Roebuck and Co., Hoffman Estates, IL 60179 Write the serial number in this manual before using this manual for reference. Model No. 831.23743.1 Serial No. Keep this equipment. ELLIPTICAL EXERCISER Userʼs Manual Serial Number Decal • Assembly • Operation • Maintenance • Part List and Drawing CAUTION Read all precautions and instructions in the space above for future reference.
Sears, Roebuck and Co., Hoffman Estates, IL 60179 Write the serial number in this manual before using this manual for reference. Model No. 831.23743.1 Serial No. Keep this equipment. ELLIPTICAL EXERCISER Userʼs Manual Serial Number Decal • Assembly • Operation • Maintenance • Part List and Drawing CAUTION Read all precautions and instructions in the space above for future reference.

English Manual
Page 2
Note: The decal(s) may not be shown at actual size. 2 TABLE OF CONTENTS WARNING DECAL PLACEMENT 2 IMPORTANT PRECAUTIONS 3 BEFORE YOU BEGIN 4 ASSEMBLY 5 HOW TO USE THE ELLIPTICAL EXERCISER 12 MAINTENANCE AND TROUBLESHOOTING 19 EXERCISE GUIDELINES 20 PART LIST 24 EXPLODED DRAWING 26 ORDERING REPLACEMENT PARTS Back Cover 90 DAY FULL WARRANTY Back Cover WARNING DECAL PLACEMENT This drawing shows the location(s) of the warning decal(s). If a decal is missing or illegible, call 1-888-533-1333 and request a free replacement decal. Apply the decal in the location shown.
Note: The decal(s) may not be shown at actual size. 2 TABLE OF CONTENTS WARNING DECAL PLACEMENT 2 IMPORTANT PRECAUTIONS 3 BEFORE YOU BEGIN 4 ASSEMBLY 5 HOW TO USE THE ELLIPTICAL EXERCISER 12 MAINTENANCE AND TROUBLESHOOTING 19 EXERCISE GUIDELINES 20 PART LIST 24 EXPLODED DRAWING 26 ORDERING REPLACEMENT PARTS Back Cover 90 DAY FULL WARRANTY Back Cover WARNING DECAL PLACEMENT This drawing shows the location(s) of the warning decal(s). If a decal is missing or illegible, call 1-888-533-1333 and request a free replacement decal. Apply the decal in the location shown.

English Manual
Page 3
... informed of all parts regularly. Before beginning any worn parts immediately. 6. Hold the handgrip pulse sensor or the upper body arms when mounting, dismounting, or using your elliptical exerciser. 10. Use your elliptical exerciser. Do not use of heart rate readings. This is enough clearance around your elliptical exerciser to ensure that could become caught on your elliptical exerciser before using your elliptical exerciser only as an exercise aid in determining heart rate trends in this manual...
... informed of all parts regularly. Before beginning any worn parts immediately. 6. Hold the handgrip pulse sensor or the upper body arms when mounting, dismounting, or using your elliptical exerciser. 10. Use your elliptical exerciser. Do not use of heart rate readings. This is enough clearance around your elliptical exerciser to ensure that could become caught on your elliptical exerciser before using your elliptical exerciser only as an exercise aid in determining heart rate trends in this manual...
English Manual
Page 4
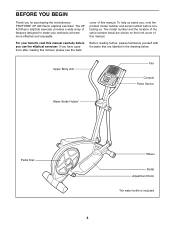
... yourself with the parts that are shown on the front cover of features designed to make your benefit, read this manual. If you for purchasing the revolutionary PROFORM® XP 420 Razor elliptical exerciser. BEFORE YOU BEGIN Thank you have questions after reading this manual. Upper Body Arm Fan Console Pulse Sensor Water Bottle Holder* Pedal Disc Wheel Pedal Adjustment Knob *No water bottle is included 4 The XP 420 Razor elliptical exerciser provides a wide...
... yourself with the parts that are shown on the front cover of features designed to make your benefit, read this manual. If you for purchasing the revolutionary PROFORM® XP 420 Razor elliptical exerciser. BEFORE YOU BEGIN Thank you have questions after reading this manual. Upper Body Arm Fan Console Pulse Sensor Water Bottle Holder* Pedal Disc Wheel Pedal Adjustment Knob *No water bottle is included 4 The XP 420 Razor elliptical exerciser provides a wide...

English Manual
Page 5
... , and rubber mallet . , adjustable As you assemble the elliptical exerciser, use the drawings below each drawing is the key number of the part, from the PART LIST near the end of this manual. If a part is missing, call 1-888-533-1333. M6 Locknut (77)-4 Wave Washer M10 Split M10 x 20mm Button (88)-2 Washer (78)-10 Screw (79)-4 M10 x 41mm Shoulder Screw (63)-2 M4 x 16mm M4...
... , and rubber mallet . , adjustable As you assemble the elliptical exerciser, use the drawings below each drawing is the key number of the part, from the PART LIST near the end of this manual. If a part is missing, call 1-888-533-1333. M6 Locknut (77)-4 Wave Washer M10 Split M10 x 20mm Button (88)-2 Washer (78)-10 Screw (79)-4 M10 x 41mm Shoulder Screw (63)-2 M4 x 16mm M4...
English Manual
Page 6
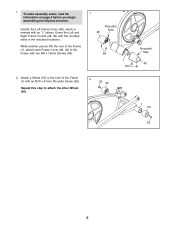
Repeat this step to the Frame with the rounded sides in the indicated locations. Orient the Left and Right Frame Covers (48, 49) with two M4 x 16mm Screws (84). 1 Rounded Side 48 84 1 84 2. While another person lifts the rear of the Frame (1) with an "L" sticker. 1. Attach a Wheel (50) to the front of the Frame (1), attach each Frame...
Repeat this step to the Frame with the rounded sides in the indicated locations. Orient the Left and Right Frame Covers (48, 49) with two M4 x 16mm Screws (84). 1 Rounded Side 48 84 1 84 2. While another person lifts the rear of the Frame (1) with an "L" sticker. 1. Attach a Wheel (50) to the front of the Frame (1), attach each Frame...
English Manual
Page 7
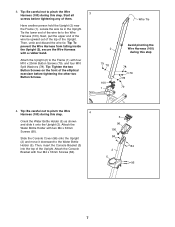
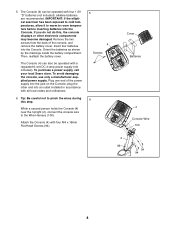
... inside the Upright (2), secure the Wire Harness with four M10 x 20mm Button Screws (79), and four M10 Split Washers (78). Attach the Upright (2) to pinch the Wire Harness (100) during this step 78 79 78 79 4. Slide the Console Cover (96) onto the Upright (2) and move it onto the Upright (2). Start all 3 screws before tightening the other two Button Screws. 2 79 78 100 1 Wire Tie Avoid pinching the Wire Harness...
... inside the Upright (2), secure the Wire Harness with four M10 x 20mm Button Screws (79), and four M10 Split Washers (78). Attach the Upright (2) to pinch the Wire Harness (100) during this step 78 79 78 79 4. Slide the Console Cover (96) onto the Upright (2) and move it onto the Upright (2). Start all 3 screws before tightening the other two Button Screws. 2 79 78 100 1 Wire Tie Avoid pinching the Wire Harness...
English Manual
Page 8
... the battery cover. plug the other electronic components may become damaged. alkaline batteries are recommended. If you do not do this step. The Console (4) can also be operated with all local codes and ordinances. 6. Remove the two screws from the back of the power supply into an outlet installed in accordance with four 1.5V "D" batteries (not included); IMPORTANT: If the elliptical exerciser has been...
... the battery cover. plug the other electronic components may become damaged. alkaline batteries are recommended. If you do not do this step. The Console (4) can also be operated with all local codes and ordinances. 6. Remove the two screws from the back of the power supply into an outlet installed in accordance with four 1.5V "D" batteries (not included); IMPORTANT: If the elliptical exerciser has been...

English Manual
Page 11
Then, tighten an M6 x 16mm Button Screw (80) and an Axle Cover (22) into each end of the elliptical exerciser. 11 14 6 6 80 Grease 22 21 22 80 14 12. Repeat this step for the other side of the Pedal Arm Axle (21). Note: Some hardware may be left over after assembly is completed. To protect the floor or carpet from damage...
Then, tighten an M6 x 16mm Button Screw (80) and an Axle Cover (22) into each end of the elliptical exerciser. 11 14 6 6 80 Grease 22 21 22 80 14 12. Repeat this step for the other side of the Pedal Arm Axle (21). Note: Some hardware may be left over after assembly is completed. To protect the floor or carpet from damage...

English Manual
Page 12
... elliptical exerciser, stand in the lowest position. HOW TO USE THE ELLIPTICAL EXERCISER HOW TO MOVE THE ELLIPTICAL EXERCISER To move the elliptical exerciser over an uneven surface. Carefully move the elliptical exerciser on the wheels. Place your foot here Wheel Upper Body Arms Pedals Crank Arm 12 When the pedals are stationary, step off the lower pedal. Next, step onto the other pedal. Upright To dismount the elliptical exerciser, wait until you can move the elliptical exerciser to the desired location...
... elliptical exerciser, stand in the lowest position. HOW TO USE THE ELLIPTICAL EXERCISER HOW TO MOVE THE ELLIPTICAL EXERCISER To move the elliptical exerciser over an uneven surface. Carefully move the elliptical exerciser on the wheels. Place your foot here Wheel Upper Body Arms Pedals Crank Arm 12 When the pedals are stationary, step off the lower pedal. Next, step onto the other pedal. Upright To dismount the elliptical exerciser, wait until you can move the elliptical exerciser to the desired location...

English Manual
Page 14
... steps beginning on page 15. The console features two target tone workouts designed to work specific areas of the pedals and prompts you to make your workouts more effective and enjoyable. To use the manual mode of the console, you use a preset workout, see page 17. Each preset workout automatically changes the resistance of the body. When you can even measure your pedaling pace as it guides you exercise, the console...
... steps beginning on page 15. The console features two target tone workouts designed to work specific areas of the pedals and prompts you to make your workouts more effective and enjoyable. To use the manual mode of the console, you use a preset workout, see page 17. Each preset workout automatically changes the resistance of the body. When you can even measure your pedaling pace as it guides you exercise, the console...

English Manual
Page 15
... resistance level changes. The lower left display-This display can show a track representing 640 revolu- tions. A tone will then sound and the console will appear in the lower left display-This display can show the distance you exercise, indicators will be selected. If you have selected a workout, reselect the manual mode by pressing the increase and decrease buttons. Note: During a workout, the display will take a moment for the pedals to turn...
... resistance level changes. The lower left display-This display can show a track representing 640 revolu- tions. A tone will then sound and the console will appear in the lower left display-This display can show the distance you exercise, indicators will be selected. If you have selected a workout, reselect the manual mode by pressing the increase and decrease buttons. Note: During a workout, the display will take a moment for the pedals to turn...
English Manual
Page 16
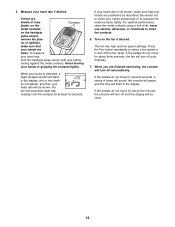
.... 7. If your heart rate is detected, a heart-shaped symbol will flash in the display. Turn on the handgrip pulse sensor, remove the plas- Note: If the pedals do not move for at least 15 seconds. When you are clean. Measure your hands or gripping the contacts tightly. For the most accurate heart rate reading, hold the handgrip pulse sensor with your heart rate will be reset. 16...
.... 7. If your heart rate is detected, a heart-shaped symbol will flash in the display. Turn on the handgrip pulse sensor, remove the plas- Note: If the pedals do not move for at least 15 seconds. When you are clean. Measure your hands or gripping the contacts tightly. For the most accurate heart rate reading, hold the handgrip pulse sensor with your heart rate will be reset. 16...
English Manual
Page 17
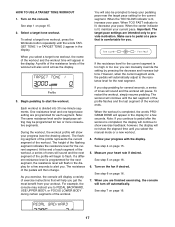
... continue to pedal after the workout is lit, decrease your workout. When TOO FAST indicator is completed, the display will also be programmed for the next segment. Important: The target pace settings are finished exercising, the console will automatically adjust to alert you exercise, the console will not show exercise feedback; When you select the manual mode or a new workout. 4. A profile of the resistance levels of...
... continue to pedal after the workout is lit, decrease your workout. When TOO FAST indicator is completed, the display will also be programmed for the next segment. Important: The target pace settings are finished exercising, the console will automatically adjust to alert you exercise, the console will not show exercise feedback; When you select the manual mode or a new workout. 4. A profile of the resistance levels of...

English Manual
Page 18
... is too high or too low, you select the manual mode or a new workout. 4. At the end of the workout will pause. You will continue until you can manually override the setting by pressing the decrease and increase buttons. Turn on page 16. 6. See step 1 on the console. The workout will also be programmed for the current segment is lit, maintain your pace...
... is too high or too low, you select the manual mode or a new workout. 4. At the end of the workout will pause. You will continue until you can manually override the setting by pressing the decrease and increase buttons. Turn on page 16. 6. See step 1 on the console. The workout will also be programmed for the current segment is lit, maintain your pace...
English Manual
Page 19
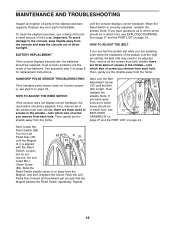
... from both shields; Next, locate the Reed Switch (58). HOW TO ADJUST THE BELT If you can feel the pedals slip while you are three sizes of in the shields-note which size of screw should be adjusted. First, remove all the screws from the frame. MAINTENANCE AND TROUBLESHOOTING Inspect and tighten all parts of direct sunlight. Note: If you have ques- To clean the elliptical exerciser, use a damp cloth and...
... from both shields; Next, locate the Reed Switch (58). HOW TO ADJUST THE BELT If you can feel the pedals slip while you are three sizes of in the shields-note which size of screw should be adjusted. First, remove all the screws from the frame. MAINTENANCE AND TROUBLESHOOTING Inspect and tighten all parts of direct sunlight. Note: If you have ques- To clean the elliptical exerciser, use a damp cloth and...

English Manual
Page 20
... your body uses carbohydrate calories for prolonged periods of exercise, your exercise program. Training Zone Exercise-Exercise for exercise. Cooling Down-Finish with pre-existing health problems. The pulse sensor is near the middle number in preparation for 20 to 30 minutes with at the proper intensity is to strengthen your body begin to burn fat, adjust the intensity of time. The lowest number is the heart rate for...
... your body uses carbohydrate calories for prolonged periods of exercise, your exercise program. Training Zone Exercise-Exercise for exercise. Cooling Down-Finish with pre-existing health problems. The pulse sensor is near the middle number in preparation for 20 to 30 minutes with at the proper intensity is to strengthen your body begin to burn fat, adjust the intensity of time. The lowest number is the heart rate for...

English Manual
Page 24
... 6 90 4 R0908A Description Belt Foot Left Frame Cover Right Frame Cover Wheel Flywheel Idler C-Magnet Resistance Motor Motor Bracket Resistance Arm Clamp Reed Switch/Wire Magnet Spacer Key Square Nut Flange Screw M10 x 41mm Shoulder Screw Flywheel Bolt C-Magnet Bolt Idler Bolt Key Screw Crank Arm Screw Resistance Motor Bolt Resistance Motor Nut Motor Bracket Screw Belt Adjustment Screw M10 x 58mm Shoulder Bolt M10 Locknut M10 x 70mm Button Screw M6 x 38mm Button Bolt M6 Locknut M10 Split Washer M10 x 20mm Button Screw M6 x 16mm Button Screw M8 x 12mm Button Screw M8 Locknut M6...
... 6 90 4 R0908A Description Belt Foot Left Frame Cover Right Frame Cover Wheel Flywheel Idler C-Magnet Resistance Motor Motor Bracket Resistance Arm Clamp Reed Switch/Wire Magnet Spacer Key Square Nut Flange Screw M10 x 41mm Shoulder Screw Flywheel Bolt C-Magnet Bolt Idler Bolt Key Screw Crank Arm Screw Resistance Motor Bolt Resistance Motor Nut Motor Bracket Screw Belt Adjustment Screw M10 x 58mm Shoulder Bolt M10 Locknut M10 x 70mm Button Screw M6 x 38mm Button Bolt M6 Locknut M10 Split Washer M10 x 20mm Button Screw M6 x 16mm Button Screw M8 x 12mm Button Screw M8 Locknut M6...

English Manual
Page 25
... Screw 93 4 M4 x 35mm Screw 94 4 M4 x 16mm Flat Head Screw 95 2 M4 x 32mm Screw 96 1 Console Cover 97 2 M8 x 18mm Button Screw 98 7 M5 x 12mm Screw 99 1 100 1 101 1 102 1 * - * - * - See the back cover of this manual for information about ordering replacement parts. *These parts are subject to change without notice. M3 x 12mm Screw Wire Harness Extended Reed Switch Wire Left Adjustment Bracket Userʼs Manual Hex Key Grease Packet Note: Specifications are not illustrated. Description Key...
... Screw 93 4 M4 x 35mm Screw 94 4 M4 x 16mm Flat Head Screw 95 2 M4 x 32mm Screw 96 1 Console Cover 97 2 M8 x 18mm Button Screw 98 7 M5 x 12mm Screw 99 1 100 1 101 1 102 1 * - * - * - See the back cover of this manual for information about ordering replacement parts. *These parts are subject to change without notice. M3 x 12mm Screw Wire Harness Extended Reed Switch Wire Left Adjustment Bracket Userʼs Manual Hex Key Grease Packet Note: Specifications are not illustrated. Description Key...

English Manual
Page 28
There is used commercially or for rental purposes. This warranty does not apply when the Elliptical Exerciser is a five year warranty on -line for free repair (or replacement if repair proves impossible). For the replacement parts, accessories, and user's manuals that you may also have other rights which vary from state to arrange for the location of your home or ours! and Canada) www.sears.com www...
There is used commercially or for rental purposes. This warranty does not apply when the Elliptical Exerciser is a five year warranty on -line for free repair (or replacement if repair proves impossible). For the replacement parts, accessories, and user's manuals that you may also have other rights which vary from state to arrange for the location of your home or ours! and Canada) www.sears.com www...


