
Instruction Manual
Page 2
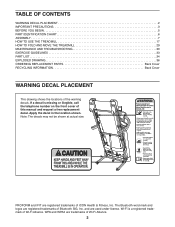
... decals may not be shown at actual size. PROFORM and IFIT are trademarks of Wi-Fi Alliance. TABLE OF CONTENTS WARNING DECAL PLACEMENT 2 IMPORTANT PRECAUTIONS 3 BEFORE YOU BEGIN 5 PART IDENTIFICATION CHART 6 ASSEMBLY 7 HOW TO USE THE TREADMILL 17 HOW TO FOLD AND MOVE THE TREADMILL 29 MAINTENANCE AND TROUBLESHOOTING 30 EXERCISE GUIDELINES 33 PART...
... decals may not be shown at actual size. PROFORM and IFIT are trademarks of Wi-Fi Alliance. TABLE OF CONTENTS WARNING DECAL PLACEMENT 2 IMPORTANT PRECAUTIONS 3 BEFORE YOU BEGIN 5 PART IDENTIFICATION CHART 6 ASSEMBLY 7 HOW TO USE THE TREADMILL 17 HOW TO FOLD AND MOVE THE TREADMILL 29 MAINTENANCE AND TROUBLESHOOTING 30 EXERCISE GUIDELINES 33 PART...
Instruction Manual
Page 4
...You must be performed by an authorized ser- When folding or moving the treadmill, make sure that the storage latch is not in use , before performing the maintenance and adjustment procedures described in small increments to move the treadmill. 25. ing the treadmill, and before clean...procedures in general. 23. SAVE THESE INSTRUCTIONS 4 Never leave the treadmill unattended while it is properly assembled. (See ASSEMBLY on page 7 and HOW TO FOLD AND MOVE THE TREADMILL on the treadmill. 28. The treadmill is running. Do not attempt to avoid sudden jumps in serious injury...
...You must be performed by an authorized ser- When folding or moving the treadmill, make sure that the storage latch is not in use , before performing the maintenance and adjustment procedures described in small increments to move the treadmill. 25. ing the treadmill, and before clean...procedures in general. 23. SAVE THESE INSTRUCTIONS 4 Never leave the treadmill unattended while it is properly assembled. (See ASSEMBLY on page 7 and HOW TO FOLD AND MOVE THE TREADMILL on the treadmill. 28. The treadmill is running. Do not attempt to avoid sudden jumps in serious injury...
Instruction Manual
Page 7
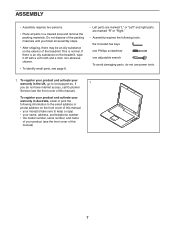
... parts are marked "L" or "Left" and right parts are marked "R" or "Right." • Assembly requires the following information to the email address or postal address on the exterior of the treadmill. ASSEMBLY • Assembly requires two persons. • Place all assembly steps. • After shipping, there may be an oily substance on the front cover...
... parts are marked "L" or "Left" and right parts are marked "R" or "Right." • Assembly requires the following information to the email address or postal address on the exterior of the treadmill. ASSEMBLY • Assembly requires two persons. • Place all assembly steps. • After shipping, there may be an oily substance on the front cover...
Instruction Manual
Page 15
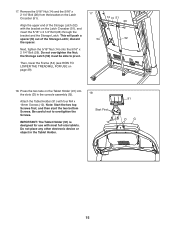
... overtighten the Screws. Attach the Tablet Holder (91) with most full-size tablets. Do not place any other electronic device or object in the console assembly (G). Note: Start the two top Screws first, and then start the two bottom Screws. IMPORTANT: The Tablet Holder (91) is designed for use... with four M4 x 16mm Screws (12). Then, lower the Frame (54) (see HOW TO LOWER THE TREADMILL FOR USE on the Latch Crossbar (51). Next, tighten the 5/16" Nut (14) onto the 5/16" x 2 1/4" Bolt (26). Remove the 5/16" Nut (14) and ...
... overtighten the Screws. Attach the Tablet Holder (91) with most full-size tablets. Do not place any other electronic device or object in the console assembly (G). Note: Start the two top Screws first, and then start the two bottom Screws. IMPORTANT: The Tablet Holder (91) is designed for use... with four M4 x 16mm Screws (12). Then, lower the Frame (54) (see HOW TO LOWER THE TREADMILL FOR USE on the Latch Crossbar (51). Next, tighten the 5/16" Nut (14) onto the 5/16" x 2 1/4" Bolt (26). Remove the 5/16" Nut (14) and ...


