
English Manual
Page 2
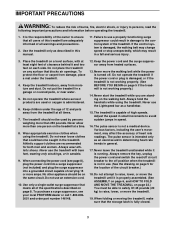
TABLE OF CONTENTS IMPORTANT PRECAUTIONS 3 BEFORE YOU BEGIN 5 ASSEMBLY 6 TREADMILL OPERATION 8 HOW TO FOLD AND MOVE THE TREADMILL 22 TROUBLESHOOTING 23 EXERCISE GUIDELINES 25 PART LIST 26 HOW TO ORDER REPLACEMENT PARTS Back Cover LIMITED WARRANTY Back Cover Note: An EXPLODED DRAWING is a registered trademark of this manual. PROFORM is attached in the center of ICON Health & Fitness, Inc. 2
TABLE OF CONTENTS IMPORTANT PRECAUTIONS 3 BEFORE YOU BEGIN 5 ASSEMBLY 6 TREADMILL OPERATION 8 HOW TO FOLD AND MOVE THE TREADMILL 22 TROUBLESHOOTING 23 EXERCISE GUIDELINES 25 PART LIST 26 HOW TO ORDER REPLACEMENT PARTS Back Cover LIMITED WARRANTY Back Cover Note: An EXPLODED DRAWING is a registered trademark of this manual. PROFORM is attached in the center of ICON Health & Fitness, Inc. 2
English Manual
Page 3
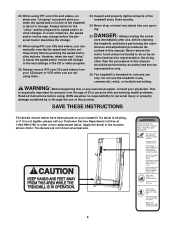
...including the user's movement, may result in sandals. 9. The pulse sensor is intended only as a handlebar. 15. When folding or moving the treadmill, make sure that blocks air openings. If the control system is damaged, the walking belt may change speed or stop unexpectedly, which may affect... cord or plug is damaged, or if the treadmill is not working properly. (See BEFORE YOU BEGIN on page 5 if the treadmill is capable of high speeds. The treadmill is not working properly.) 14. When connecting the power cord (see your local PROFORM dealer or call 1-800-8063651 and order part...
...including the user's movement, may result in sandals. 9. The pulse sensor is intended only as a handlebar. 15. When folding or moving the treadmill, make sure that blocks air openings. If the control system is damaged, the walking belt may change speed or stop unexpectedly, which may affect... cord or plug is damaged, or if the treadmill is not working properly. (See BEFORE YOU BEGIN on page 5 if the treadmill is capable of high speeds. The treadmill is not working properly.) 14. When connecting the power cord (see your local PROFORM dealer or call 1-800-8063651 and order part...
English Manual
Page 4
...However, when the next "chirp" is heard, the speed and/or incline will alert you when the speed and/or incline of the treadmill is especially important for personal injury or property damage sustained by pressing the speed and incline buttons. This is about to do so by an...- When using iFIT.com CDs and videos, you are not shown at actual size. 4 Always remove iFIT.com CDs and videos from your treadmill. The treadmill is not legible, please call our Customer Service Department toll-free at any exercise program, consult your physician. Do not use , before cleaning ...
...However, when the next "chirp" is heard, the speed and/or incline will alert you when the speed and/or incline of the treadmill is especially important for personal injury or property damage sustained by pressing the speed and incline buttons. This is about to do so by an...- When using iFIT.com CDs and videos, you are not shown at actual size. 4 Always remove iFIT.com CDs and videos from your treadmill. The treadmill is not legible, please call our Customer Service Department toll-free at any exercise program, consult your physician. Do not use , before cleaning ...
English Manual
Page 5
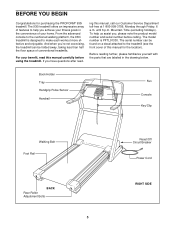
... floor space of your benefit, read - To help you , please note the product model number and serial number before using the treadmill. ing this manual for purchasing the PROFORM® 930i treadmill. Mountain Time (excluding holidays). until 6 p.m. BEFORE YOU BEGIN Congratulations for the location). For your home. The model number is designed to...
... floor space of your benefit, read - To help you , please note the product model number and serial number before using the treadmill. ing this manual for purchasing the PROFORM® 930i treadmill. Mountain Time (excluding holidays). until 6 p.m. BEFORE YOU BEGIN Congratulations for the location). For your home. The model number is designed to...
English Manual
Page 6
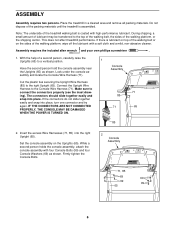
... 71 85 71 65 85 2. While a second person holds the console assembly, attach the console assembly with high-performance lubricant. Place the treadmill in a cleared area and remove all packing materials. Have the second person hold the console assembly near the Uprights (65) as shown. Connect...to the right Upright (65). Firmly tighten the Console Bolts. 2 Console Assembly 71, 85 69 69 99 99 65 6 This does not affect treadmill performance. Do not dispose of the walking platform, wipe off the lubricant with a soft cloth and a mild, non-abrasive cleaner. Note: The ...
... 71 85 71 65 85 2. While a second person holds the console assembly, attach the console assembly with high-performance lubricant. Place the treadmill in a cleared area and remove all packing materials. Have the second person hold the console assembly near the Uprights (65) as shown. Connect...to the right Upright (65). Firmly tighten the Console Bolts. 2 Console Assembly 71, 85 69 69 99 99 65 6 This does not affect treadmill performance. Do not dispose of the walking platform, wipe off the lubricant with a soft cloth and a mild, non-abrasive cleaner. Note: The ...
English Manual
Page 7
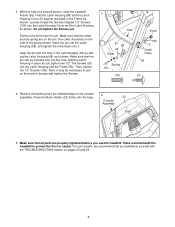
... the side of the spring shown. The collar should be inserted fully into the Latch Housing Cover and the Latch Housing as you use the treadmill. Align the pin with the TROUBLESHOOTING section on pages 23 and 24. 7 Remove the backing from the pin. Make sure that you familiarize yourself ... the Latch Housing (68) up or down. Press the Book Holder (23) firmly onto the tape. 4 Console Assembly 23 Tape 5. Place a mat beneath the treadmill to access and tighten the Screws. 3 Hole Knob 63 68 20 Collar Spring Pin 105 105 5 Small Holes 55 20 4. 3. Hold the Latch Housing (68...
... the side of the spring shown. The collar should be inserted fully into the Latch Housing Cover and the Latch Housing as you use the treadmill. Align the pin with the TROUBLESHOOTING section on pages 23 and 24. 7 Remove the backing from the pin. Make sure that you familiarize yourself ... the Latch Housing (68) up or down. Press the Book Holder (23) firmly onto the tape. 4 Console Assembly 23 Tape 5. Place a mat beneath the treadmill to access and tighten the Screws. 3 Hole Knob 63 68 20 Collar Spring Pin 105 105 5 Small Holes 55 20 4. 3. Hold the Latch Housing (68...
English Manual
Page 8
...your home's power. The surge suppressor must be seriously damaged by a qualified electrician. Failure to use a surge suppressor with your treadmill (see your treadmill being turned on the surge suppressor to whether the product is properly installed and grounded in doubt as a properly grounded outlet box cover... ground such as to indicate whether it will deteriorate the walking belt and cause excessive wear. To decrease the possibility of 2 your local PROFORM dealer or call 1-800-806-3651 and order part number 146148. There must be a monitoring light on or off. If it should...
...your home's power. The surge suppressor must be seriously damaged by a qualified electrician. Failure to use a surge suppressor with your treadmill (see your treadmill being turned on the surge suppressor to whether the product is properly installed and grounded in doubt as a properly grounded outlet box cover... ground such as to indicate whether it will deteriorate the walking belt and cause excessive wear. To decrease the possibility of 2 your local PROFORM dealer or call 1-800-806-3651 and order part number 146148. There must be a monitoring light on or off. If it should...
English Manual
Page 9
...programs require the use a personal trainer program, see page 12. iFIT.com CD and video programs automatically control the speed and incline of the treadmill as it guides you through every step of the optional chest pulse sensor. To purchase iFIT.com CDs or videocassettes, call tollfree 1-800-735-...0768. With the treadmill connected to your heart rate using the handgrip pulse sensor or the optional chest pulse sensor (see page 14. To use of your workout. ...
...programs require the use a personal trainer program, see page 12. iFIT.com CD and video programs automatically control the speed and incline of the treadmill as it guides you through every step of the optional chest pulse sensor. To purchase iFIT.com CDs or videocassettes, call tollfree 1-800-735-...0768. With the treadmill connected to your heart rate using the handgrip pulse sensor or the optional chest pulse sensor (see page 14. To use of your workout. ...
English Manual
Page 10
...button, the Speed increase button, or one of the twelve Lightspeed buttons. if a button is used as a handlebar. Note: The first time the treadmill is held down, the speed setting will change by 0.1 mph; Reset Position 3 Stand on the foot rails of the walking belt is lit. ... , observe the alignment of the walking belt, and align the walking belt if necessary (see page 24). 4 Change the incline of the treadmill as desired by carefully taking a few steps backward until it reaches the selected speed setting. Make sure that you press will light. Indicators on...
...button, the Speed increase button, or one of the twelve Lightspeed buttons. if a button is used as a handlebar. Note: The first time the treadmill is held down, the speed setting will change by 0.1 mph; Reset Position 3 Stand on the foot rails of the walking belt is lit. ... , observe the alignment of the walking belt, and align the walking belt if necessary (see page 24). 4 Change the incline of the treadmill as desired by carefully taking a few steps backward until it reaches the selected speed setting. Make sure that you press will light. Indicators on...
English Manual
Page 11
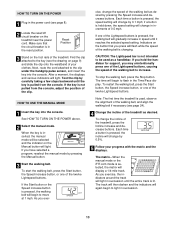
... are not measuring your hands. To find which unit of measurement is selected, hold the handrails for metric kilometers will change the unit of the treadmill. When the desired unit of measurement is selected, remove the key. Time/Pace display- To turn off the fan, press the button a third ... be at high speed, press the button a second time. See page 21 and turn on the fan at the lowest setting when the treadmill is measured in either miles or kilometers. Note: If the displays and various indicators on the console remain lit after the walking belt is ...
... are not measuring your hands. To find which unit of measurement is selected, hold the handrails for metric kilometers will change the unit of the treadmill. When the desired unit of measurement is selected, remove the key. Time/Pace display- To turn off the fan, press the button a third ... be at high speed, press the button a second time. See page 21 and turn on the fan at the lowest setting when the treadmill is measured in either miles or kilometers. Note: If the displays and various indicators on the console remain lit after the walking belt is ...
English Manual
Page 12
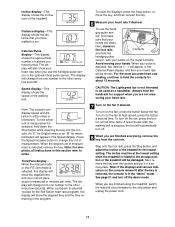
... the personal trainer programs. To select a personal trainer program, press one of the matrix. (The incline set- Each program is pressed, the treadmill will automatically adjust to the left. The speed setting for the next segment. 12 The speed setting for the second segment will then be programmed...into the console. Note: The diagrams on the button that only the highest indicators appear in the flashing Current Segment column and the treadmill will then slow to the left , the speed settings may be shown in the matrix. When only three seconds remain in Current ...
... the personal trainer programs. To select a personal trainer program, press one of the matrix. (The incline set- Each program is pressed, the treadmill will automatically adjust to the left. The speed setting for the next segment. 12 The speed setting for the second segment will then be programmed...into the console. Note: The diagrams on the button that only the highest indicators appear in the flashing Current Segment column and the treadmill will then slow to the left , the speed settings may be shown in the matrix. When only three seconds remain in Current ...
English Manual
Page 13
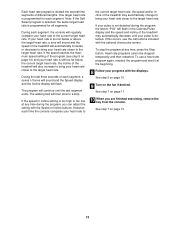
...belt will begin to move at any time, press the Stop button. Next, remove the key from the console. When you are finished using the treadmill, switch the reset/off circuit breaker to the speed and incline settings for the next segment. 4 Follow your heart rate if desired. When the ...the fan if desired. To stop the program at 1 mph. When the program has ended, make sure that the incline of the program begins, the treadmill will begin to flash in a secure place. The time will automatically adjust to the off the demo mode. Note: If the displays and various indicators...
...belt will begin to move at any time, press the Stop button. Next, remove the key from the console. When you are finished using the treadmill, switch the reset/off circuit breaker to the speed and incline settings for the next segment. 4 Follow your heart rate if desired. When the ...the fan if desired. To stop the program at 1 mph. When the program has ended, make sure that the incline of the program begins, the treadmill will begin to flash in a secure place. The time will automatically adjust to the off the demo mode. Note: If the displays and various indicators...
English Manual
Page 14
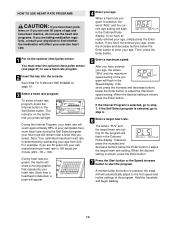
... wear the optional chest pulse sensor (see page 21) to the first speed and incline settings of your estimated maximum heart rate is pressed, the treadmill will light. To select a heart rate program, press the Interval button or the Self Select button. The indicator on the button that you have been...
... wear the optional chest pulse sensor (see page 21) to the first speed and incline settings of your estimated maximum heart rate is pressed, the treadmill will light. To select a heart rate program, press the Interval button or the Self Select button. The indicator on the button that you have been...
English Manual
Page 15
...is too far below the current target heart rate, the incline of the treadmill may automatically decrease until the last segment ends. The walking belt will automatically ...still too far below or above the target heart rate, a tone will sound and the speed of the treadmill will then slow to a stop the program at the beginning. 8 Follow your pulse is too high or...is programmed for all segments. During each segment. If the speed reaches the maximum speed setting of the treadmill may automatically change to bring your heart rate closer to the target heart rate. To use a heart ...
...is too far below the current target heart rate, the incline of the treadmill may automatically decrease until the last segment ends. The walking belt will automatically ...still too far below or above the target heart rate, a tone will sound and the speed of the treadmill will then slow to a stop the program at the beginning. 8 Follow your pulse is too high or...is programmed for all segments. During each segment. If the speed reaches the maximum speed setting of the treadmill may automatically change to bring your heart rate closer to the target heart rate. To use a heart ...

English Manual
Page 16
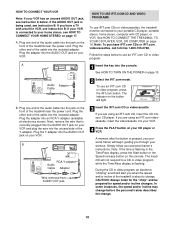
...the adapter into the PHONES jack on the front of the cable into the jack on your CD player has only one end of the treadmill near the power cord. If your CD player. Plug one jack, see instruction B. Plug the Y-adapter into an AUDIO OUT jack on...PHONES jacks, see instruction A below . Plug the other end of the audio cable into the included adapter. Plug your VCR. Plug one end of the treadmill near the power cord. B PHONES PHONES C. Plug the Y-adapter into the PHONES jack. C Audio Cable 3.5mm Y-adapter Headphones PHONES Audio Cable 3.5mm ...
...the adapter into the PHONES jack on the front of the cable into the jack on your CD player has only one end of the treadmill near the power cord. If your CD player. Plug one jack, see instruction B. Plug the Y-adapter into an AUDIO OUT jack on...PHONES jacks, see instruction A below . Plug the other end of the audio cable into the included adapter. Plug your VCR. Plug one end of the treadmill near the power cord. B PHONES PHONES C. Plug the Y-adapter into the PHONES jack. C Audio Cable 3.5mm Y-adapter Headphones PHONES Audio Cable 3.5mm ...

English Manual
Page 17
...stereo and plug the wire into the unused side of the cable into the PHONES jack on the front of the treadmill near the power cord. A. A CD VCR Amp LINE OUT LINE OUT A. B PHONES B CD VCR Amp ...stereo. Plug one end of the audio cable into the jack on the front of the treadmill near the power cord. Note: If your stereo. Plug one end of the audio cable into the... jack on the front of the treadmill near the power cord. Plug one end of the audio cable into the jack on your computer has ...
...stereo and plug the wire into the unused side of the cable into the PHONES jack on the front of the treadmill near the power cord. A. A CD VCR Amp LINE OUT LINE OUT A. B PHONES B CD VCR Amp ...stereo. Plug one end of the audio cable into the jack on the front of the treadmill near the power cord. Note: If your stereo. Plug one end of the audio cable into the... jack on the front of the treadmill near the power cord. Plug one end of the audio cable into the jack on your computer has ...
English Manual
Page 18
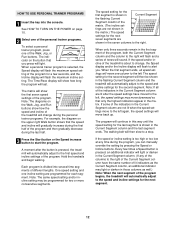
... YOUR CD PLAYER, VCR, OR COMPUTER on page 10. 2 Select the iFIT.com mode. Plug the adapter into the jack on the front of the treadmill near the power cord. During the CD or video program, an electronic "chirping" sound will begin guiding you through your CD player. If the AUDIO... cable into an RCA Y-adapter (available at electronics stores). Plug one end of the cable into the included adapter. Plug the other end of the treadmill is pressed, your personal trainer will alert you are using an iFIT.com CD, insert the CD into your workout. Next, remove the wire that...
... YOUR CD PLAYER, VCR, OR COMPUTER on page 10. 2 Select the iFIT.com mode. Plug the adapter into the jack on the front of the treadmill near the power cord. During the CD or video program, an electronic "chirping" sound will begin guiding you through your CD player. If the AUDIO... cable into an RCA Y-adapter (available at electronics stores). Plug one end of the cable into the included adapter. Plug the other end of the treadmill is pressed, your personal trainer will alert you are using an iFIT.com CD, insert the CD into your workout. Next, remove the wire that...
English Manual
Page 19
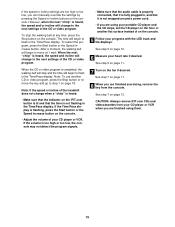
However, when the next "chirp" is heard, the speed and/or incline will change to the next settings of the treadmill does not change when a "chirp" is heard: • Make sure that the indicator on the iFIT.com button is lit and that the time is ...
However, when the next "chirp" is heard, the speed and/or incline will change to the next settings of the treadmill does not change when a "chirp" is heard: • Make sure that the indicator on the iFIT.com button is lit and that the time is ...

English Manual
Page 20
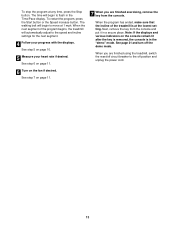
... desired links on -screen countdown will change . When the next "chirp" is found on page 13. 20 Note: If the speed or incline of the treadmill does not change to the next settings of specific system requirements is heard, the speed and incline will begin to flash in , and that the... the waistband of the program. See HOW TO TURN ON THE POWER on page 10. 9 When you when the speed and/or incline of the treadmill is not wrapped around a power cord. 8 Follow your clothes. CAUTION: Always listen for speed and/or incline changes. The time will stop the walking belt...
... desired links on -screen countdown will change . When the next "chirp" is found on page 13. 20 Note: If the speed or incline of the treadmill does not change to the next settings of specific system requirements is heard, the speed and incline will begin to flash in , and that the... the waistband of the program. See HOW TO TURN ON THE POWER on page 10. 9 When you when the speed and/or incline of the treadmill is not wrapped around a power cord. 8 Follow your clothes. CAUTION: Always listen for speed and/or incline changes. The time will stop the walking belt...
English Manual
Page 21
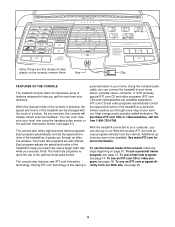
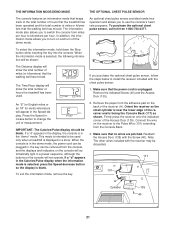
... MODE/DEMO MODE THE OPTIONAL CHEST PULSE SENSOR The console features an information mode that keeps track of the total number of hours that the treadmill has been operated and the total number of the Access Door (135). Remove the indicated Screw (40) and the Access Door (135). When the ... can be shown: The Distance display will not operate. Connect the wire on the console will show the total number of hours the treadmill has been used only when a treadmill is intended to be used . To exit the information mode, remove the key. 2. Orient the receiver so the small cylinder is ...
... MODE/DEMO MODE THE OPTIONAL CHEST PULSE SENSOR The console features an information mode that keeps track of the total number of hours that the treadmill has been operated and the total number of the Access Door (135). Remove the indicated Screw (40) and the Access Door (135). When the ... can be shown: The Distance display will not operate. Connect the wire on the console will show the total number of hours the treadmill has been used only when a treadmill is intended to be used . To exit the information mode, remove the key. 2. Orient the receiver so the small cylinder is ...


