
English Manual
Page 2
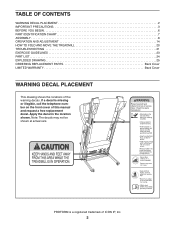
If a decal is a registered trademark of this manual and request a free replacement decal. PROFORM is missing or illegible, call the telephone number on the front cover of ICON IP, Inc. 2 Note: The decals may not be shown at... OF CONTENTS WARNING DECAL PLACEMENT 2 IMPORTANT PRECAUTIONS 3 BEFORE YOU BEGIN 6 PART IDENTIFICATION CHART 7 ASSEMBLY 8 OPERATION AND ADJUSTMENT 14 HOW TO FOLD AND MOVE THE TREADMILL 20 TROUBLESHOOTING 21 EXERCISE GUIDELINES 23 PART LIST 24 EXPLODED DRAWING 25 ORDERING REPLACEMENT PARTS Back Cover LIMITED WARRANTY Back Cover WARNING DECAL PLACEMENT This...
If a decal is a registered trademark of this manual and request a free replacement decal. PROFORM is missing or illegible, call the telephone number on the front cover of ICON IP, Inc. 2 Note: The decals may not be shown at... OF CONTENTS WARNING DECAL PLACEMENT 2 IMPORTANT PRECAUTIONS 3 BEFORE YOU BEGIN 6 PART IDENTIFICATION CHART 7 ASSEMBLY 8 OPERATION AND ADJUSTMENT 14 HOW TO FOLD AND MOVE THE TREADMILL 20 TROUBLESHOOTING 21 EXERCISE GUIDELINES 23 PART LIST 24 EXPLODED DRAWING 25 ORDERING REPLACEMENT PARTS Back Cover LIMITED WARRANTY Back Cover WARNING DECAL PLACEMENT This...
English Manual
Page 3
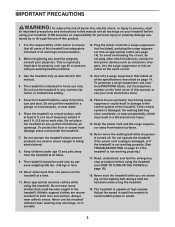
... to the control system of this manual. 4. To purchase a surge suppressor, see your local PROFORM dealer, call the telephone number on your treadmill before using your treadmill. Keep the treadmill indoors, away from heated surfaces. 16. Do not operate the treadmill where aerosol products are adequately informed of all of high speeds. Never allow more...
... to the control system of this manual. 4. To purchase a surge suppressor, see your local PROFORM dealer, call the telephone number on your treadmill before using your treadmill. Keep the treadmill indoors, away from heated surfaces. 16. Do not operate the treadmill where aerosol products are adequately informed of all of high speeds. Never allow more...
English Manual
Page 4
... heart rate monitor is not in use , before performing the maintenance and adjustment procedures described in serious injury or death. When folding or moving the treadmill, make sure that the storage latch is intended only as an exercise aid in determining heart rate trends in the storage position. 24. If you.... Various factors, including the user’'s movement, may result in this manual should be able to safely lift 45 lbs. (20 kg) to move the treadmill. 23. Always remove the key, press the power switch into any opening on page 6 for the location of the...
... heart rate monitor is not in use , before performing the maintenance and adjustment procedures described in serious injury or death. When folding or moving the treadmill, make sure that the storage latch is intended only as an exercise aid in determining heart rate trends in the storage position. 24. If you.... Various factors, including the user’'s movement, may result in this manual should be able to safely lift 45 lbs. (20 kg) to move the treadmill. 23. Always remove the key, press the power switch into any opening on page 6 for the location of the...
English Manual
Page 6
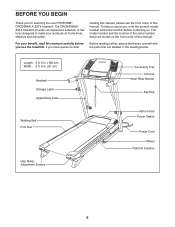
... your benefit, read this manual carefully before contacting us assist you, note the product model number and serial number before you for selecting the new PROFORM® CROSSWALK ZXT4 treadmill. Length: 5 ft. 6 in. (168 cm) Width: 2 ft. 8 in the drawing below. The model number and the location of the serial number decal...Adjustment Screws Accessory Tray Console Heart Rate Monitor Key/Clip Motor Hood Power Switch Power Cord Wheel Platform Cushion 6 To help us . The CROSSWALK ZXT4 treadmill provides an impressive selection of this manual. BEFORE YOU BEGIN Thank you use the...
... your benefit, read this manual carefully before contacting us assist you, note the product model number and serial number before you for selecting the new PROFORM® CROSSWALK ZXT4 treadmill. Length: 5 ft. 6 in. (168 cm) Width: 2 ft. 8 in the drawing below. The model number and the location of the serial number decal...Adjustment Screws Accessory Tray Console Heart Rate Monitor Key/Clip Motor Hood Power Switch Power Cord Wheel Platform Cushion 6 To help us . The CROSSWALK ZXT4 treadmill provides an impressive selection of this manual. BEFORE YOU BEGIN Thank you use the...

English Manual
Page 8
...dispose of the packing materials until you nish all parts in your product. 2. Go to www.proformservice.com/registration on the exterior of the treadmill. B A 74 8 This is an oily substance on the left side of the Base (74). one Phillips screwdriver To avoid damaging parts, ...-2480. Make sure that the power cord is unplugged. 2 Remove the two screws (A) and the shipping bracket (B) from the right side of the treadmill. ASSEMBLY •• To hire a service technician to notify you of upgrades and offers Note: If you do not use power tools. 1. If...
...dispose of the packing materials until you nish all parts in your product. 2. Go to www.proformservice.com/registration on the exterior of the treadmill. B A 74 8 This is an oily substance on the left side of the Base (74). one Phillips screwdriver To avoid damaging parts, ...-2480. Make sure that the power cord is unplugged. 2 Remove the two screws (A) and the shipping bracket (B) from the right side of the treadmill. ASSEMBLY •• To hire a service technician to notify you of upgrades and offers Note: If you do not use power tools. 1. If...

English Manual
Page 13
... the Latch Housing (67). 12. To protect the oor or carpet, place a mat under the treadmill. start both Screws, and then tighten them. Make sure that the collar and the spring are on the... pin. (Note: If there are properly tightened before you use the treadmill. Attach the Right Upper Body Arm (79) in the Latch Housing is used to adjust the walking...included. Make sure that all parts are two collars, place one of the hex keys is on the treadmill decals, remove the plastic. Keep the included hex keys in a secure place; Locate the Latch Pin ...
... the Latch Housing (67). 12. To protect the oor or carpet, place a mat under the treadmill. start both Screws, and then tighten them. Make sure that the collar and the spring are on the... pin. (Note: If there are properly tightened before you use the treadmill. Attach the Right Upper Body Arm (79) in the Latch Housing is used to adjust the walking...included. Make sure that all parts are two collars, place one of the hex keys is on the treadmill decals, remove the plastic. Keep the included hex keys in a secure place; Locate the Latch Pin ...
English Manual
Page 14
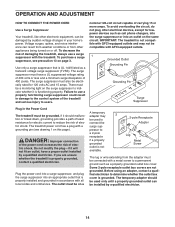
...will not fit an outlet, have a UL suppressed voltage rating of 400 volts or less and a minimum surge dissipation of the treadmill and serious injury to determine whether the outlet box cover is grounded. If you are not grounded. The outlet must be damaged by...installed by a qualified electrician. 14 Before using an adapter, contact a qualified electrician to users. nominal 120-volt circuit capable of electric shock. The treadmill power cord has a plug with a grounding pin (see precaution 13 on or off. The surge suppressor must be connected with AFCI-equipped outlets....
...will not fit an outlet, have a UL suppressed voltage rating of 400 volts or less and a minimum surge dissipation of the treadmill and serious injury to determine whether the outlet box cover is grounded. If you are not grounded. The outlet must be damaged by...installed by a qualified electrician. 14 Before using an adapter, contact a qualified electrician to users. nominal 120-volt circuit capable of electric shock. The treadmill power cord has a plug with a grounding pin (see precaution 13 on or off. The surge suppressor must be connected with AFCI-equipped outlets....
English Manual
Page 15
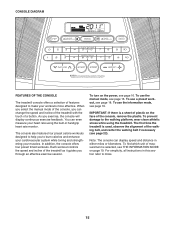
...also features four preset calorie workouts designed to help you can even measure your heart rate using the treadmill. IMPORTANT: If there is a sheet of plastic on the face of the treadmill as it guides you exercise, the console will display continuous exercise feedback. Note: The console can ...display speed and distance in handgrip heart rate monitor. CONSOLE DIAGRAM FEATURES OF THE CONSOLE The treadmill console offers a selection of features designed to make your muscles. To use the information mode, see page 18. The rst time ...
...also features four preset calorie workouts designed to help you can even measure your heart rate using the treadmill. IMPORTANT: If there is a sheet of plastic on the face of the treadmill as it guides you exercise, the console will display continuous exercise feedback. Note: The console can ...display speed and distance in handgrip heart rate monitor. CONSOLE DIAGRAM FEATURES OF THE CONSOLE The treadmill console offers a selection of features designed to make your muscles. To use the information mode, see page 18. The rst time ...

English Manual
Page 16
...Speed buttons. 16 If you do not do this, you have selected a workout, remove the key from the console, adjust the position of the treadmill. Next, locate the power switch on the foot rails of the clip. Reset IMPORTANT: The console features a display demo mode, designed to be ...selected. Next, stand on the treadmill frame near the power cord. Then, insert the key Clip into the console. For example, to select a speed setting of your clothes. To ...
...Speed buttons. 16 If you do not do this, you have selected a workout, remove the key from the console, adjust the position of the treadmill. Next, locate the power switch on the foot rails of the clip. Reset IMPORTANT: The console features a display demo mode, designed to be ...selected. Next, stand on the treadmill frame near the power cord. Then, insert the key Clip into the console. For example, to select a speed setting of your clothes. To ...

English Manual
Page 17
...Measure your heart rate will appear in succession. The track will then disappear and the indicators will appear in the workout instead of the treadmill to the storage position, or you press the Incline increase or decrease button, the incline setting will not be shown in a secure place...When your pulse is detected, your heart rate if desired. Next, remove the key from the console. burned, or the speed of the treadmill as desired. The display will show your hands are nished exercising, remove the key from the console and put it reaches the selected ...
...Measure your heart rate will appear in succession. The track will then disappear and the indicators will appear in the workout instead of the treadmill to the storage position, or you press the Incline increase or decrease button, the incline setting will not be shown in a secure place...When your pulse is detected, your heart rate if desired. Next, remove the key from the console. burned, or the speed of the treadmill as desired. The display will show your hands are nished exercising, remove the key from the console and put it reaches the selected ...
English Manual
Page 18
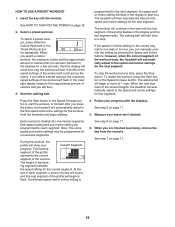
When you select a calorie workout, the maximum incline and the approximate amount of calories that you press the button, the treadmill will automatically adjust to a stop the workout at 1 mph. however, when the current segment of the prole ashes in the ...segment indicates the speed setting for consecutive segments. When you will ash in this way until the last segment of the workout ends, the treadmill will automatically adjust to the rst speed and incline settings for the workout. A prole of the speed settings of the workout...
When you select a calorie workout, the maximum incline and the approximate amount of calories that you press the button, the treadmill will automatically adjust to a stop the workout at 1 mph. however, when the current segment of the prole ashes in the ...segment indicates the speed setting for consecutive segments. When you will ash in this way until the last segment of the workout ends, the treadmill will automatically adjust to the rst speed and incline settings for the workout. A prole of the speed settings of the workout...

English Manual
Page 19
... backward as you plug in the lower right display while the information mode is turned on the console. HOW TO USE THE CROSSWALK ARMS As you walk on the treadmill, you to decrease the resistance, turn the resistance knobs clockwise; to select a unit of the console (labeled MP3 In). An &#...will remain lit, although the buttons will show the total number of miles or kilometers that keeps track of treadmill usage information and allows you can hold the handrails or use the crosswalk arms. To exercise your MP3 player, CD player, or other personal audio player to be shown: To ...
... backward as you plug in the lower right display while the information mode is turned on the console. HOW TO USE THE CROSSWALK ARMS As you walk on the treadmill, you to decrease the resistance, turn the resistance knobs clockwise; to select a unit of the console (labeled MP3 In). An &#...will remain lit, although the buttons will show the total number of miles or kilometers that keeps track of treadmill usage information and allows you can hold the handrails or use the crosswalk arms. To exercise your MP3 player, CD player, or other personal audio player to be shown: To ...

English Manual
Page 20
... location shown by the plastic foot rails. Hold the upper end of the handrails, and place one foot against a wheel, and carefully lower the treadmill. Bend your legs and keep your right hand. Remove the key and unplug the power cord. Hold the frame rmly with both hands, ... rmly in temperatures above 85° F (30° C). 1. Pull back on the wheels, and carefully move the treadmill over an uneven surface. 3. Next, lower the frame until the treadmill will roll on the handrail until it to the oor. Then, release the latch knob. 2. If you do not...
... location shown by the plastic foot rails. Hold the upper end of the handrails, and place one foot against a wheel, and carefully lower the treadmill. Bend your legs and keep your right hand. Remove the key and unplug the power cord. Hold the frame rmly with both hands, ... rmly in temperatures above 85° F (30° C). 1. Pull back on the wheels, and carefully move the treadmill over an uneven surface. 3. Next, lower the frame until the treadmill will roll on the handrail until it to the oor. Then, release the latch knob. 2. If you do not...
English Manual
Page 21
...remain lit when you remove the key from the console, and then reinsert it . b. Remove the key from the console a. TROUBLESHOOTING Most treadmill problems can be compatible with the resistance plate (D), plastic spacer (E), spring washer (F), washers (G), and thrust bearing (H). (Note: If the ...the Incline increase or decrease button again. The console features a display demo mode, designed to the minimum level. IMPORTANT: The treadmill is displayed in the order shown below . Then reattach all of the specications described on a store. If further assistance...
...remain lit when you remove the key from the console, and then reinsert it . b. Remove the key from the console a. TROUBLESHOOTING Most treadmill problems can be compatible with the resistance plate (D), plastic spacer (E), spring washer (F), washers (G), and thrust bearing (H). (Note: If the ...the Incline increase or decrease button again. The console features a display demo mode, designed to the minimum level. IMPORTANT: The treadmill is displayed in the order shown below . Then reattach all of the specications described on a store. If further assistance...

English Manual
Page 22
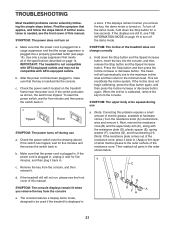
...If you should be able to lift each edge of the walking belt 2 to 3 in the power cord, insert the key, and run the treadmill for a few minutes. If the walking belt slips when walked on a. Remove the key and UNPLUG THE POWER CORD. d. b 22 Be careful ... screw counterclockwise 1/2 of a turn . Repeat until the walking belt is off -center, rst remove the key and UNPLUG THE POWER CORD. Your treadmill features a walking belt coated with high-performance lubricant. Then, plug in . (5 to the right, turn the left idler roller screw clockwise 1/2 of this...
...If you should be able to lift each edge of the walking belt 2 to 3 in the power cord, insert the key, and run the treadmill for a few minutes. If the walking belt slips when walked on a. Remove the key and UNPLUG THE POWER CORD. d. b 22 Be careful ... screw counterclockwise 1/2 of a turn . Repeat until the walking belt is off -center, rst remove the key and UNPLUG THE POWER CORD. Your treadmill features a walking belt coated with high-performance lubricant. Then, plug in . (5 to the right, turn the left idler roller screw clockwise 1/2 of this...


