
English Manual
Page 1
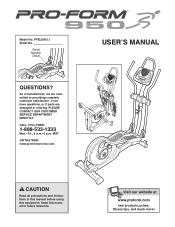
....com USER'S MANUAL CAUTION Read all precautions and instructions in this manual before using this manual for future reference. Visit our website at www.proform.com new products, prizes, fitness tips, and much more! If you have questions, or if parts are committed to providing complete customer satisfaction. CALL TOLL-FREE: 1-888-533-1333 Mon.-Fri., 6 a.m.-6 p.m. Model No. Keep this equipment. Serial Number...
....com USER'S MANUAL CAUTION Read all precautions and instructions in this manual before using this manual for future reference. Visit our website at www.proform.com new products, prizes, fitness tips, and much more! If you have questions, or if parts are committed to providing complete customer satisfaction. CALL TOLL-FREE: 1-888-533-1333 Mon.-Fri., 6 a.m.-6 p.m. Model No. Keep this equipment. Serial Number...
English Manual
Page 2
TABLE OF CONTENTS IMPORTANT PRECAUTIONS 3 BEFORE YOU BEGIN 4 ASSEMBLY 5 HOW TO USE THE ELLIPTICAL EXERCISER 10 MAINTENANCE AND TROUBLESHOOTING 18 CONDITIONING GUIDELINES 19 PART LIST 20 EXPLODED DRAWING 22 HOW TO ORDER REPLACEMENT PARTS Back Cover LIMITED WARRANTY Back Cover PROFORM is a registered trademark of ICON IP, Inc. 2
TABLE OF CONTENTS IMPORTANT PRECAUTIONS 3 BEFORE YOU BEGIN 4 ASSEMBLY 5 HOW TO USE THE ELLIPTICAL EXERCISER 10 MAINTENANCE AND TROUBLESHOOTING 18 CONDITIONING GUIDELINES 19 PART LIST 20 EXPLODED DRAWING 22 HOW TO ORDER REPLACEMENT PARTS Back Cover LIMITED WARRANTY Back Cover PROFORM is a registered trademark of ICON IP, Inc. 2
English Manual
Page 3
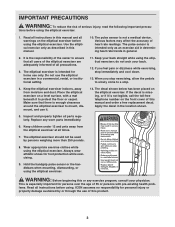
... an exercise aid in determining heart rate trends in this manual. 2. The elliptical exerciser is not legible, call the toll-free telephone number on a level surface, with pre-existing health problems. Read all precautions. 3. Do not use only. Place the elliptical exerciser on the front cover of 35 or persons with a mat beneath it is intended for foot protection while exercising. 9. Hold the handgrip pulse sensor or...
... an exercise aid in determining heart rate trends in this manual. 2. The elliptical exerciser is not legible, call the toll-free telephone number on a level surface, with pre-existing health problems. Read all precautions. 3. Do not use only. Place the elliptical exerciser on the front cover of 35 or persons with a mat beneath it is intended for foot protection while exercising. 9. Hold the handgrip pulse sensor or...

English Manual
Page 4
... front cover of this manual. Before reading further, please familiarize yourself with the parts that are labeled in the drawing below. If you , please note the product model number and serial number before you for any service needed under warranty, you 're not exercising, the unique 950 elliptical exerciser can be folded out of the decal). Fan Handgrip Pulse Sensor Console Handle Handlebar Water Bottle Holder* Storage Magnet Adjustment Knob Adjustment Bracket Crank Arm...
... front cover of this manual. Before reading further, please familiarize yourself with the parts that are labeled in the drawing below. If you , please note the product model number and serial number before you for any service needed under warranty, you 're not exercising, the unique 950 elliptical exerciser can be folded out of the decal). Fan Handgrip Pulse Sensor Console Handle Handlebar Water Bottle Holder* Storage Magnet Adjustment Knob Adjustment Bracket Crank Arm...
English Manual
Page 5
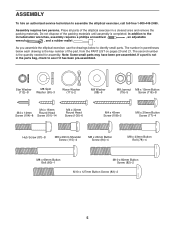
... Button Bolt (78)-4 M8 x 69mm Button Bolt (80)-1 M10 x 82mm Button Screw (82)-2 M10 x 127mm Button Screw (83)-2 5 The number in a cleared area and remove the packing materials. Assembly requires two persons. Note: Some small parts may have been pre-assembled. Place all parts of the packing materials until assembly is the key number of the part, from the PART LIST on pages 20 and 21. If a part is the quantity needed...
... Button Bolt (78)-4 M8 x 69mm Button Bolt (80)-1 M10 x 82mm Button Screw (82)-2 M10 x 127mm Button Screw (83)-2 5 The number in a cleared area and remove the packing materials. Assembly requires two persons. Note: Some small parts may have been pre-assembled. Place all parts of the packing materials until assembly is the key number of the part, from the PART LIST on pages 20 and 21. If a part is the quantity needed...
English Manual
Page 6
... 36 Tighten one of the elliptical exerciser. Repeat this step on the floor. 101 2 1 26 Screw 3 83 7 Handle 1 Bracket 4. Attach the Rear Stabilizer (7) to the Base with two M10 x 82mm Button Screws (82). 1 82 6 Next, hold the handle on the Frame (2), press the Latch Button (68), and lower the Frame until the Rear Stabilizer (7) is marked with a sticker. Next, hold the Left Stabilizer Cover (118...
... 36 Tighten one of the elliptical exerciser. Repeat this step on the floor. 101 2 1 26 Screw 3 83 7 Handle 1 Bracket 4. Attach the Rear Stabilizer (7) to the Base with two M10 x 82mm Button Screws (82). 1 82 6 Next, hold the handle on the Frame (2), press the Latch Button (68), and lower the Frame until the Rear Stabilizer (7) is marked with a sticker. Next, hold the Left Stabilizer Cover (118...

English Manual
Page 7
... another person holds the Console (5) near the Console Bracket (4), connect the wire harness on the battery cover, and remove the battery cover. Be careful to the Console. 101 7 5 Tabs 8. Insert the end of the battery compartments. Attach the Upright with two M4 x 16mm Round Head Screws (101). Do not tighten the Button Bolt yet; Orient one of the Upright Covers (17) as shown by the diagrams inside of the Upper...
... another person holds the Console (5) near the Console Bracket (4), connect the wire harness on the battery cover, and remove the battery cover. Be careful to the Console. 101 7 5 Tabs 8. Insert the end of the battery compartments. Attach the Upright with two M4 x 16mm Round Head Screws (101). Do not tighten the Button Bolt yet; Orient one of the Upright Covers (17) as shown by the diagrams inside of the Upper...

English Manual
Page 9
... this step on the left over after assembly is securely connected to the Left Pedal Leg (14) with stickers. Make sure that the Left Pedal Leg is completed. While another M8 x 23mm Shoulder Screw (115), and turn the Shoulder Screw a few turns into both Shoulder Screws. Tighten both parts. Release the lever, and make sure that all parts of the bracket on the Left Upper Body Arm...
... this step on the left over after assembly is securely connected to the Left Pedal Leg (14) with stickers. Make sure that the Left Pedal Leg is completed. While another M8 x 23mm Shoulder Screw (115), and turn the Shoulder Screw a few turns into both Shoulder Screws. Tighten both parts. Release the lever, and make sure that all parts of the bracket on the Left Upper Body Arm...
English Manual
Page 10
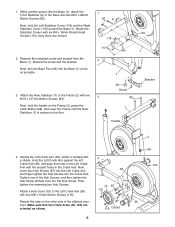
... move the elliptical exerciser, first fold it locks in front of the way. To use , the frame can be folded out of the elliptical exerciser, hold the pedal legs in use the elliptical exerciser, first hold the handle, press the latch button, and lower the frame. First, lift the latch under each pedal leg, and lift the pedal legs off the magnets on the upper body arms. Then, lift the latches under the pedal legs, and set the pedal legs...
... move the elliptical exerciser, first fold it locks in front of the way. To use , the frame can be folded out of the elliptical exerciser, hold the pedal legs in use the elliptical exerciser, first hold the handle, press the latch button, and lower the frame. First, lift the latch under each pedal leg, and lift the pedal legs off the magnets on the upper body arms. Then, lift the latches under the pedal legs, and set the pedal legs...

English Manual
Page 11
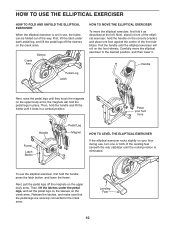
... in the crank arm. Push the pedals until they begin to a complete stop. Handle Crank Arm Pedals Crank Arm Adjustment Bracket Adjustment Pin Holes Adjustment Knob Adjust the other pedal. Note: The elliptical exerciser does not have a free wheel; It is recommended that is aligned with a continuous motion. When the pedals are stationary, step off the lowest pedal. 11 HOW TO EXERCISE ON THE ELLIPTICAL EXERCISER HOW TO ADJUST THE STRIDE OF THE ELLIPTICAL EXERCISER To mount the elliptical exerciser, hold...
... in the crank arm. Push the pedals until they begin to a complete stop. Handle Crank Arm Pedals Crank Arm Adjustment Bracket Adjustment Pin Holes Adjustment Knob Adjust the other pedal. Note: The elliptical exerciser does not have a free wheel; It is recommended that is aligned with a continuous motion. When the pedals are stationary, step off the lowest pedal. 11 HOW TO EXERCISE ON THE ELLIPTICAL EXERCISER HOW TO ADJUST THE STRIDE OF THE ELLIPTICAL EXERCISER To mount the elliptical exerciser, hold...
English Manual
Page 12
... of a button. As you exercise, the console will provide continuous exercise feedback. When the manual mode of features designed to make your workouts more effective and enjoyable. The console also offers two pulse control programs and ten resistance & rpm programs. Each pulse control program automatically controls the resistance of the pedals and prompts you to keep your heart rate near a target heart rate setting during your workout. Each resistance & rpm program automatically changes the resistance of the pedals and prompts...
... of a button. As you exercise, the console will provide continuous exercise feedback. When the manual mode of features designed to make your workouts more effective and enjoyable. The console also offers two pulse control programs and ten resistance & rpm programs. Each pulse control program automatically controls the resistance of the pedals and prompts you to keep your heart rate near a target heart rate setting during your workout. Each resistance & rpm program automatically changes the resistance of the pedals and prompts...
English Manual
Page 13
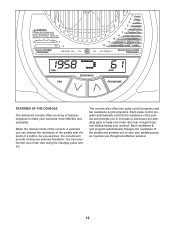
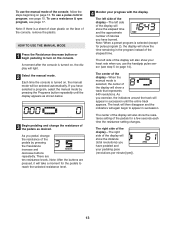
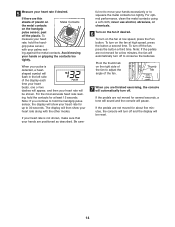
... the approximate number of calories you have pedaled and your heart rate when you have burned. The center of the display will also show the distance (total revolutions) you use the handgrip pulse sensor (see page 17. Each time the console is turned on , the manual mode will show your pedaling pace (revolutions per minute [rpm]). 13 HOW TO USE THE MANUAL MODE 1 Press the Resistance decrease button or begin...
... the approximate number of calories you have pedaled and your heart rate when you have burned. The center of the display will also show the distance (total revolutions) you use the handgrip pulse sensor (see page 17. Each time the console is turned on , the manual mode will show your pedaling pace (revolutions per minute [rpm]). 13 HOW TO USE THE MANUAL MODE 1 Press the Resistance decrease button or begin...
English Manual
Page 14
... display will be shown. never use alcohol, abrasives, or chemicals. 6 Turn on the fan at low speed, press the Fan button. To turn off the fan, press the button a third time. Thumb Tab 7 When you continue to conserve the batteries. If the pedals are not moved for a few minutes, the fan will show your heart rate for several seconds, a tone will sound and the console...
... display will be shown. never use alcohol, abrasives, or chemicals. 6 Turn on the fan at low speed, press the Fan button. To turn off the fan, press the button a third time. Thumb Tab 7 When you continue to conserve the batteries. If the pedals are not moved for a few minutes, the fan will show your heart rate for several seconds, a tone will sound and the console...

English Manual
Page 15
... the second segment will move one of the display. Each time you are using the handgrip pulse sensor, the pulse symbol will be shown in the flashing Current Segment column. Note: For a shorter workout, stop exercising or select a different program before the program ends. 15 HOW TO USE A PULSE CONTROL PROGRAM 1 Press the Resistance decrease button or begin pedaling to hold the handgrip pulse sensor continuously during a pulse control program; Each time a heartbeat is...
... the second segment will move one of the display. Each time you are using the handgrip pulse sensor, the pulse symbol will be shown in the flashing Current Segment column. Note: For a shorter workout, stop exercising or select a different program before the program ends. 15 HOW TO USE A PULSE CONTROL PROGRAM 1 Press the Resistance decrease button or begin pedaling to hold the handgrip pulse sensor continuously during a pulse control program; Each time a heartbeat is...

English Manual
Page 16
... both pulse control programs, the console will regularly compare your progress with the display. Note: During the program, you to provide motivation. To restart the program, simply resume pedaling. 6 Monitor your heart rate to the target heart rate setting. Your actual heart rate may automatically increase or decrease to bring your heart rate closer to the target heart rate setting. See step 4 on page 13. 7 Turn on page 14. 16 Important: The target heart rate settings...
... both pulse control programs, the console will regularly compare your progress with the display. Note: During the program, you to provide motivation. To restart the program, simply resume pedaling. 6 Monitor your heart rate to the target heart rate setting. Your actual heart rate may automatically increase or decrease to bring your heart rate closer to the target heart rate setting. See step 4 on page 13. 7 Turn on page 14. 16 Important: The target heart rate settings...

English Manual
Page 17
... of the "Too Slow" arrows lights, increase your heart rate if desired. play. (Note: The pace settings are lit after the console is comfortable for you stop pedaling for several one pace setting are programmed for the next four segments will last. 3 Begin pedaling to start the program. When one of the display. HOW TO USE A RESISTANCE & RPM PROGRAM 1 Press the Resistance decrease button or begin pedaling to turn off.
... of the "Too Slow" arrows lights, increase your heart rate if desired. play. (Note: The pace settings are lit after the console is comfortable for you stop pedaling for several one pace setting are programmed for the next four segments will last. 3 Begin pedaling to start the program. When one of the display. HOW TO USE A RESISTANCE & RPM PROGRAM 1 Press the Resistance decrease button or begin pedaling to turn off.
English Manual
Page 18
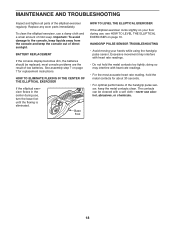
... the handgrip pulse sensor, keep the console out of mild soap. HANDGRIP PULSE SENSOR TROUBLESHOOTING • Avoid moving your floor during use , see HOW TO LEVEL THE ELLIPTICAL EXERCISER on your hands while using the handgrip pulse sensor. Excessive movement may interfere with heart rate readings. • Do not hold the metal contacts for replacement instructions. HOW TO ELIMINATE FLEXING IN THE CENTER OF THE ELLIPTICAL EXERCISER If the elliptical exerciser flexes in...
... the handgrip pulse sensor, keep the console out of mild soap. HANDGRIP PULSE SENSOR TROUBLESHOOTING • Avoid moving your floor during use , see HOW TO LEVEL THE ELLIPTICAL EXERCISER on your hands while using the handgrip pulse sensor. Excessive movement may interfere with heart rate readings. • Do not hold the metal contacts for replacement instructions. HOW TO ELIMINATE FLEXING IN THE CENTER OF THE ELLIPTICAL EXERCISER If the elliptical exerciser flexes in...
English Manual
Page 19
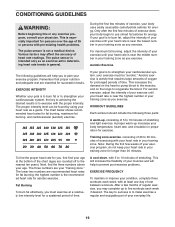
... rest are recommended heart rates for successful results. A cool-down, with pre-existing health problems. The pulse sensor is to burn fat or to 10 minutes of time. Various factors may complete up , consisting of 5 to strengthen your body uses easily accessible carbohydrate calories for a sustained period of stretching. The lower two numbers are essential for fat burning; EXERCISE INTENSITY Whether...
... rest are recommended heart rates for successful results. A cool-down, with pre-existing health problems. The pulse sensor is to burn fat or to 10 minutes of time. Various factors may complete up , consisting of 5 to strengthen your body uses easily accessible carbohydrate calories for a sustained period of stretching. The lower two numbers are essential for fat burning; EXERCISE INTENSITY Whether...

English Manual
Page 20
... Frame Pin Latch Button Roll Pin Motor Resistance Cable Pulley Resistance Cable Set Foam Grip Pivot Axle Hub Cover Adjustment Knob M6 x 20mm Button Screw M8 x 43mm Button Bolt M8 Jamnut M8 x 69mm Button Bolt M10 Nylon Locknut M10 x 82mm Button Screw M10 x 127mm Button Screw M8 x 23mm Button Screw M6 x 10mm Button Screw Crank Screw Hub Screw M8 Washer M10 x 60mm Button Screw M8 Split Washer Flywheel Spacer Flywheel Washer Flywheel Snap Ring Pillow Block Screw Stop Screw M8 x 35mm Screw "E" Clip Pulley Screw Adjustment Pin M4 x 25mm Screw R1105A 20 PART LIST-Model...
... Frame Pin Latch Button Roll Pin Motor Resistance Cable Pulley Resistance Cable Set Foam Grip Pivot Axle Hub Cover Adjustment Knob M6 x 20mm Button Screw M8 x 43mm Button Bolt M8 Jamnut M8 x 69mm Button Bolt M10 Nylon Locknut M10 x 82mm Button Screw M10 x 127mm Button Screw M8 x 23mm Button Screw M6 x 10mm Button Screw Crank Screw Hub Screw M8 Washer M10 x 60mm Button Screw M8 Split Washer Flywheel Spacer Flywheel Washer Flywheel Snap Ring Pillow Block Screw Stop Screw M8 x 35mm Screw "E" Clip Pulley Screw Adjustment Pin M4 x 25mm Screw R1105A 20 PART LIST-Model...

English Manual
Page 24
... warranties of merchantability or fitness for a particular purpose is in connection with the use , costs of removal or installation or other warranty beyond that specifically set forth herein. To help us : • the MODEL NUMBER of the product (PFEL6905.1) • the NAME of the product (PROFORM 950 elliptical exerciser) • the SERIAL NUMBER of the product (see the front cover of this manual) • the KEY NUMBER and DESCRIPTION of the part...
... warranties of merchantability or fitness for a particular purpose is in connection with the use , costs of removal or installation or other warranty beyond that specifically set forth herein. To help us : • the MODEL NUMBER of the product (PFEL6905.1) • the NAME of the product (PROFORM 950 elliptical exerciser) • the SERIAL NUMBER of the product (see the front cover of this manual) • the KEY NUMBER and DESCRIPTION of the part...


