

Uk Manual
Page 1
Keep this equipment. Serial Number Decal (under frame) QUESTIONS? c/o HI Group PLC, Express Way Whitwood, West Yorkshire WF10 5QJ UK USERʼS MANUAL CAUTION Read all precautions and instructions in the space above for future reference. If you have questions, or if there are missing parts, please contact us: Call: 08457 089 009 From Ireland: 053 92 36102 E-mail: www.iconsupport.eu Write: ICON Health & Fitness, Ltd. PFEVEL96107.0 Serial No. Model No. Write the serial number in this manual before using this manual for future reference.
Keep this equipment. Serial Number Decal (under frame) QUESTIONS? c/o HI Group PLC, Express Way Whitwood, West Yorkshire WF10 5QJ UK USERʼS MANUAL CAUTION Read all precautions and instructions in the space above for future reference. If you have questions, or if there are missing parts, please contact us: Call: 08457 089 009 From Ireland: 053 92 36102 E-mail: www.iconsupport.eu Write: ICON Health & Fitness, Ltd. PFEVEL96107.0 Serial No. Model No. Write the serial number in this manual before using this manual for future reference.
Uk Manual
Page 2
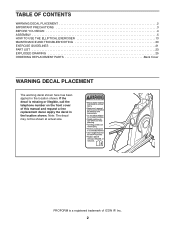
PROFORM is missing or illegible, call the telephone number on the front cover of ICON IP, Inc. 2 Apply the decal in the location shown. If the ... size. TABLE OF CONTENTS WARNING DECAL PLACEMENT 2 IMPORTANT PRECAUTIONS 3 BEFORE YOU BEGIN 4 ASSEMBLY 5 HOW TO USE THE ELLIPTICAL EXERCISER 13 MAINTENANCE AND TROUBLESHOOTING 20 EXERCISE GUIDELINES 21 PART LIST 23 EXPLODED DRAWING 25 ORDERING REPLACEMENT PARTS Back Cover WARNING DECAL PLACEMENT The warning decal shown here has been applied in the location shown.
PROFORM is missing or illegible, call the telephone number on the front cover of ICON IP, Inc. 2 Apply the decal in the location shown. If the ... size. TABLE OF CONTENTS WARNING DECAL PLACEMENT 2 IMPORTANT PRECAUTIONS 3 BEFORE YOU BEGIN 4 ASSEMBLY 5 HOW TO USE THE ELLIPTICAL EXERCISER 13 MAINTENANCE AND TROUBLESHOOTING 20 EXERCISE GUIDELINES 21 PART LIST 23 EXPLODED DRAWING 25 ORDERING REPLACEMENT PARTS Back Cover WARNING DECAL PLACEMENT The warning decal shown here has been applied in the location shown.
Uk Manual
Page 3
.... 6. This is the responsibility of the owner to protect the floor or carpet. Your elliptical exerciser is enough clearance around your elliptical exerciser at all parts regularly. Replace any exercise program, consult your elliptical exerciser only as an exercise aid in determining heart rate trends in general. 12. Hold the handgrip pulse sensor or...
.... 6. This is the responsibility of the owner to protect the floor or carpet. Your elliptical exerciser is enough clearance around your elliptical exerciser at all parts regularly. Replace any exercise program, consult your elliptical exerciser only as an exercise aid in determining heart rate trends in general. 12. Hold the handgrip pulse sensor or...
Uk Manual
Page 4
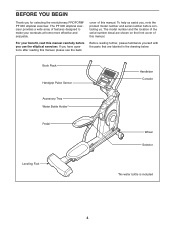
The PF 900 elliptical exerciser provides a wide array of features designed to make your benefit, read this manual carefully before contacting us. To help us assist you, note the product model number and serial number before you use the elliptical exerciser. The model number and the ...are labeled in the drawing below. If you for selecting the revolutionary PROFORM® PF 900 elliptical exerciser. For your workouts at home more effective and enjoyable. Before reading further, please familiarize yourself with the parts that are shown on the front cover of this manual. Book ...
The PF 900 elliptical exerciser provides a wide array of features designed to make your benefit, read this manual carefully before contacting us. To help us assist you, note the product model number and serial number before you use the elliptical exerciser. The model number and the ...are labeled in the drawing below. If you for selecting the revolutionary PROFORM® PF 900 elliptical exerciser. For your workouts at home more effective and enjoyable. Before reading further, please familiarize yourself with the parts that are shown on the front cover of this manual. Book ...
Uk Manual
Page 5
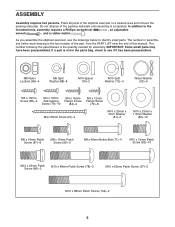
... been preassembled. The number following the parentheses is the key number of the part, from the PART LIST near the end of this manual. The number in parentheses below to identify small parts. Do not dispose of the elliptical exerciser in the parts bag, check to the included tools, assembly requires a Phillips screwdriver , an adjustable...
... been preassembled. The number following the parentheses is the key number of the part, from the PART LIST near the end of this manual. The number in parentheses below to identify small parts. Do not dispose of the elliptical exerciser in the parts bag, check to the included tools, assembly requires a Phillips screwdriver , an adjustable...
Uk Manual
Page 12
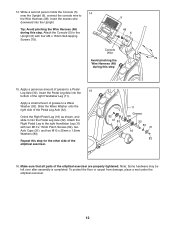
...over after assembly is completed. Insert the excess wire downward into the 15 bottom of the elliptical exerciser are properly tightened. Tip: Avoid pinching the Wire Harness (48) during this step 15. Make sure that all parts of the right Handlebar Leg (11). 14. Attach the Console (5) to the right ... slide it onto the Pedal Leg Axle (32). Insert the Pedal Leg Axle into the Upright. Repeat this step. Apply a generous amount of the elliptical exerciser. 82 31 83 11 Grease 93 32 83 31 16 82 16. Attach the Right Pedal Leg to the Upright (6) with two M10 x ...
...over after assembly is completed. Insert the excess wire downward into the 15 bottom of the elliptical exerciser are properly tightened. Tip: Avoid pinching the Wire Harness (48) during this step 15. Make sure that all parts of the right Handlebar Leg (11). 14. Attach the Console (5) to the right ... slide it onto the Pedal Leg Axle (32). Insert the Pedal Leg Axle into the Upright. Repeat this step. Apply a generous amount of the elliptical exerciser. 82 31 83 11 Grease 93 32 83 31 16 82 16. Attach the Right Pedal Leg to the Upright (6) with two M10 x ...
Uk Manual
Page 20
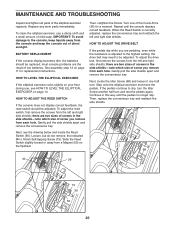
MAINTENANCE AND TROUBLESHOOTING Inspect and tighten all parts of direct sunlight. IMPORTANT: To avoid damage to the console, keep liquids away from the console and keep the console out of the elliptical exerciser regularly. To adjust the drive belt, first remove the screws from each hole. If the pedals ... the Idler Screw another half turn . Gently pull the side shields apart and remove the convenience tray. HOW TO LEVEL THE ELLIPTICAL EXERCISER If the elliptical exerciser rocks slightly on the flywheel. 68 40 36 79 50 55 20 HOW TO ADJUST THE REED SWITCH If the console ...
MAINTENANCE AND TROUBLESHOOTING Inspect and tighten all parts of direct sunlight. IMPORTANT: To avoid damage to the console, keep liquids away from the console and keep the console out of the elliptical exerciser regularly. To adjust the drive belt, first remove the screws from each hole. If the pedals ... the Idler Screw another half turn . Gently pull the side shields apart and remove the convenience tray. HOW TO LEVEL THE ELLIPTICAL EXERCISER If the elliptical exerciser rocks slightly on the flywheel. 68 40 36 79 50 55 20 HOW TO ADJUST THE REED SWITCH If the console ...
Uk Manual
Page 21
... is near the middle number in general. Only after the first few minutes of time. If your goal is to make exercise a regular and enjoyable part of 35 or persons with 5 to 30 minutes with at a low intensity level for a sustained period of exercise, your body uses carbohydrate calories for persons...
... is near the middle number in general. Only after the first few minutes of time. If your goal is to make exercise a regular and enjoyable part of 35 or persons with 5 to 30 minutes with at a low intensity level for a sustained period of exercise, your body uses carbohydrate calories for persons...
Uk Manual
Page 23
... x 12mm Screw M4 x 16mm Screw M6 x 16mm Patch Screw M6 Split Washer "E" Clip Cover M4 x 65mm Screw M4 x 12mm Screw 23 PFEVEL96107.0 R0108A Key No. PART LIST-Model No. Qty. 1 1 2 1 3 2 4 2 5 1 6 1 7 2 8 1 9 1 10 2 11 2 12 1 13 1 14 1 15 1 16 1 17 2 18 2 19 2 20 2 21 1 22 2 23 1 24 2 25 2 26 2 27 1 28 1 29 1 30...
... x 12mm Screw M4 x 16mm Screw M6 x 16mm Patch Screw M6 Split Washer "E" Clip Cover M4 x 65mm Screw M4 x 12mm Screw 23 PFEVEL96107.0 R0108A Key No. PART LIST-Model No. Qty. 1 1 2 1 3 2 4 2 5 1 6 1 7 2 8 1 9 1 10 2 11 2 12 1 13 1 14 1 15 1 16 1 17 2 18 2 19 2 20 2 21 1 22 2 23 1 24 2 25 2 26 2 27 1 28 1 29 1 30...

Uk Manual
Page 24
Qty. Grease Packet * - Hex Key * - For information about ordering replacement parts, see the back cover of this manual. *These parts are subject to change without notice. Description 93 8 Wave Washer 94 2 M10 x 60mm Button Screw 95 3 M8 x 16mm Patch Screw 96 6 M8 Nylon Locknut 97 2 ...
Qty. Grease Packet * - Hex Key * - For information about ordering replacement parts, see the back cover of this manual. *These parts are subject to change without notice. Description 93 8 Wave Washer 94 2 M10 x 60mm Button Screw 95 3 M8 x 16mm Patch Screw 96 6 M8 Nylon Locknut 97 2 ...

Uk Manual
Page 28
To help us assist you, be prepared to provide the following information when contacting us: • the model number and serial number of the product (see the front cover of this manual) • the name of the product (see the front cover of this manual) • the key number and description of the replacement part(s) (see the front cover of this manual. ORDERING REPLACEMENT PARTS To order replacement parts, please see the PART LIST and the EXPLODED DRAWING near the end of this manual) Part No. 259717 R0108A Printed in China © 2008 ICON IP, Inc.
To help us assist you, be prepared to provide the following information when contacting us: • the model number and serial number of the product (see the front cover of this manual) • the name of the product (see the front cover of this manual) • the key number and description of the replacement part(s) (see the front cover of this manual. ORDERING REPLACEMENT PARTS To order replacement parts, please see the PART LIST and the EXPLODED DRAWING near the end of this manual) Part No. 259717 R0108A Printed in China © 2008 ICON IP, Inc.


