

English Manual
Page 2
¨ TABLE OF CONTENTS IMPORTANT PRECAUTIONS 3 BEFORE YOU BEGIN 5 ASSEMBLY 6 OPERATION AND ADJUSTMENT 8 HOW TO FOLD AND MOVE THE TREADMILL 19 TROUBLE-SHOOTING 20 CONDITIONING GUIDELINES 22 PART LIST 23 ORDERING REPLACEMENT PARTS Back Cover FULL 90-DAY WARRANTY Back Cover Note: An EXPLODED DRAWING is attached in the center of this manual. 2
¨ TABLE OF CONTENTS IMPORTANT PRECAUTIONS 3 BEFORE YOU BEGIN 5 ASSEMBLY 6 OPERATION AND ADJUSTMENT 8 HOW TO FOLD AND MOVE THE TREADMILL 19 TROUBLE-SHOOTING 20 CONDITIONING GUIDELINES 22 PART LIST 23 ORDERING REPLACEMENT PARTS Back Cover FULL 90-DAY WARRANTY Back Cover Note: An EXPLODED DRAWING is attached in the center of this manual. 2

English Manual
Page 3
... cord. 15. No other appliance should not be electrically rated for both men and women. Use only a single-outlet surge suppressor that the storage latch is not working properly.) 5. Never move the walking belt while the power is turned off position when the treadmill is properly assembled. (See ASSEMBLY on page 6, and HOW TO FOLD AND MOVE THE TREADMILL on /off switch.) 18. Wear appropriate exercise clothing when using the treadmill...
... cord. 15. No other appliance should not be electrically rated for both men and women. Use only a single-outlet surge suppressor that the storage latch is not working properly.) 5. Never move the walking belt while the power is turned off position when the treadmill is properly assembled. (See ASSEMBLY on page 6, and HOW TO FOLD AND MOVE THE TREADMILL on /off switch.) 18. Wear appropriate exercise clothing when using the treadmill...

English Manual
Page 4
... using . scribed in -home use this manual should be prepared for persons over the age of the CD or video program. 24. SEARS assumes no responsibility for in this or any commercial, rental, or institutional setting. Inspect and tighten all instructions before using them. 27. tenance and adjustment procedures de- DANGER: 26. Servicing other than the procedures in this treadmill in the location shown. Always remove iFIT...
... using . scribed in -home use this manual should be prepared for persons over the age of the CD or video program. 24. SEARS assumes no responsibility for in this or any commercial, rental, or institutional setting. Inspect and tighten all instructions before using them. 27. tenance and adjustment procedures de- DANGER: 26. Servicing other than the procedures in this treadmill in the location shown. Always remove iFIT...

English Manual
Page 5
... front cover of other treadmills. until 7 p.m. For your home. The model number of your benefit, read this manual for selecting the revolutionary PROFORM¨ 735CS treadmill. Water Bottle Holder (Bottle not included) Pulse Sensor LEFT SIDE Lock Knob Key/Clip Book Holder Console Handrail RIGHT SIDE Walking Belt Foot Rail Rear Roller Adjustment Bolts On/Off Switch Circuit Breaker Power Cord Front Wheel Cushioned Walking Platform 5 To help you get the most from your exercise program...
... front cover of other treadmills. until 7 p.m. For your home. The model number of your benefit, read this manual for selecting the revolutionary PROFORM¨ 735CS treadmill. Water Bottle Holder (Bottle not included) Pulse Sensor LEFT SIDE Lock Knob Key/Clip Book Holder Console Handrail RIGHT SIDE Walking Belt Foot Rail Rear Roller Adjustment Bolts On/Off Switch Circuit Breaker Power Cord Front Wheel Cushioned Walking Platform 5 To help you get the most from your exercise program...
English Manual
Page 6
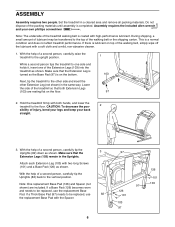
... the walking belt, simply wipe off the lubricant with a soft cloth and a mild, non-abrasive cleaner. 1. Note: One replacement Base Pad (126) and Spacer (not shown) are resting flat on the bottom. Lower the side of a second person, carefully raise the treadmill to the vertical position. With the help of the treadmill so that the Extension Leg is turned...
... the walking belt, simply wipe off the lubricant with a soft cloth and a mild, non-abrasive cleaner. 1. Note: One replacement Base Pad (126) and Spacer (not shown) are resting flat on the bottom. Lower the side of a second person, carefully raise the treadmill to the vertical position. With the help of the treadmill so that the Extension Leg is turned...
English Manual
Page 7
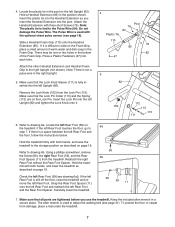
... use the treadmill. The Pulse Wire is used with both hands, and lower the treadmill as described on the Lock Pin. Make sure that all parts are on page 19. Remove the Lock Knob (102) from the treadmill. Insert the Lock Pin into each hole. If the left Rear Foot (59 [see drawing 6a]). Using a phillips screwdriver, remove the Screw (60), the right Rear Foot (59), and the Rear...
... use the treadmill. The Pulse Wire is used with both hands, and lower the treadmill as described on the Lock Pin. Make sure that all parts are on page 19. Remove the Lock Knob (102) from the treadmill. Insert the Lock Pin into each hole. If the left Rear Foot (59 [see drawing 6a]). Using a phillips screwdriver, remove the Screw (60), the right Rear Foot (59), and the Rear...

English Manual
Page 8
... the walking belt and cause excessive wear. Some 2-pole receptacle outlet box covers are in doubt as shown in drawing 2 if a properly grounded outlet is UL 1449 listed as a properly grounded outlet box cover. HOW TO PLUG IN THE POWER CORD DANGER: Improper connection of the equipment-grounding conductor can result from weather conditions or from the adapter must be installed...
... the walking belt and cause excessive wear. Some 2-pole receptacle outlet box covers are in doubt as shown in drawing 2 if a properly grounded outlet is UL 1449 listed as a properly grounded outlet box cover. HOW TO PLUG IN THE POWER CORD DANGER: Improper connection of the equipment-grounding conductor can result from weather conditions or from the adapter must be installed...

English Manual
Page 9
.... ¥ Do not stand on the walking belt when turning on the face of the console, remove it guides you can connect the treadmill to learn about other iFIT.com features. When the console is in the manual mode, the speed and incline of the treadmill can also go to your heart rate using the built-in pulse sensor. As you can be controlled with a class and an instructorÑthe...
.... ¥ Do not stand on the walking belt when turning on the face of the console, remove it guides you can connect the treadmill to learn about other iFIT.com features. When the console is in the manual mode, the speed and incline of the treadmill can also go to your heart rate using the built-in pulse sensor. As you can be controlled with a class and an instructorÑthe...

English Manual
Page 10
... 17. DISTANCE/LAPS displayÑThis display shows Arrow the distance that you have walked or run and the number of laps you have completed 1/4 mile. When you exercise, the indicators around the track will change the incline of the treadmill, press the INCLINE buttons. exercise, change the speed of the walking belt as shown by pressing the SPEED buttons. The incline range is selected, press the PROGRAM button repeatedly to select the manual mode. 3 Press the START button or the SPEED v button to...
... 17. DISTANCE/LAPS displayÑThis display shows Arrow the distance that you have walked or run and the number of laps you have completed 1/4 mile. When you exercise, the indicators around the track will change the incline of the treadmill, press the INCLINE buttons. exercise, change the speed of the walking belt as shown by pressing the SPEED buttons. The incline range is selected, press the PROGRAM button repeatedly to select the manual mode. 3 Press the START button or the SPEED v button to...

English Manual
Page 11
... in the display. Note: The SPEED/MIN-MILE display can show your hands. An ÒE,Ó for english miles, or an ÒM,Ó for about 15 seconds. 7 When you are finished using the treadmill, move the on/off switch near the power cord to the off the demo mode. Press the SPEED v button to page 18 and turn off position. 11 Note: To reset the displays, press the STOP button, remove the key, and...
... in the display. Note: The SPEED/MIN-MILE display can show your hands. An ÒE,Ó for english miles, or an ÒM,Ó for about 15 seconds. 7 When you are finished using the treadmill, move the on/off switch near the power cord to the off the demo mode. Press the SPEED v button to page 18 and turn off position. 11 Note: To reset the displays, press the STOP button, remove the key, and...

English Manual
Page 12
... ÒdemoÓ mode. When the program has ended, remove the key from the console. See step 6 on page 10. 5 Measure your progress with the LED track and the four displays. The walking belt will automatically adjust to flash. HOW TO USE PERSONAL TRAINER PROGRAMS 1 Insert the key into several time segments of 5% during the programs. The numbers beside the profiles show how the speed and incline of the treadmill will...
... ÒdemoÓ mode. When the program has ended, remove the key from the console. See step 6 on page 10. 5 Measure your progress with the LED track and the four displays. The walking belt will automatically adjust to flash. HOW TO USE PERSONAL TRAINER PROGRAMS 1 Insert the key into several time segments of 5% during the programs. The numbers beside the profiles show how the speed and incline of the treadmill will...

English Manual
Page 15
... AND VIDEO PROGRAMS To use an iFIT.com CD Audio Cable Adapter or video program, press the PROGRAM button. B VIDEO AUDIO IN ANT. IN 2 Press the PROGRAM button. A ANT. RCA Adapter To use iFIT.com CDÕs or videocassettes, the treadmill must be selected. Plug the adapter into the console. RF OUT CH 34 OUT When the key is being used, see HOW TO CONNECT YOUR HOME STEREO on page 13. Plug the adapter into your home stereo, see instruction B. Follow the steps...
... AND VIDEO PROGRAMS To use an iFIT.com CD Audio Cable Adapter or video program, press the PROGRAM button. B VIDEO AUDIO IN ANT. IN 2 Press the PROGRAM button. A ANT. RCA Adapter To use iFIT.com CDÕs or videocassettes, the treadmill must be selected. Plug the adapter into the console. RF OUT CH 34 OUT When the key is being used, see HOW TO CONNECT YOUR HOME STEREO on page 13. Plug the adapter into your home stereo, see instruction B. Follow the steps...

English Manual
Page 16
... audio cable is properly connected, that it is about to flash. The treadmill will begin to a CD or video program when the TIME/INCLINE/SEG TIME display is flashing, press the START button or the SPEED v button on the console. CAUTION: Always listen for speed and/or incline changes. After a moment, the walking belt will alert you through your personal trainer will not respond to move the on the console. 5 Follow your pulse...
... audio cable is properly connected, that it is about to flash. The treadmill will begin to a CD or video program when the TIME/INCLINE/SEG TIME display is flashing, press the START button or the SPEED v button on the console. CAUTION: Always listen for speed and/or incline changes. After a moment, the walking belt will alert you through your personal trainer will not respond to move the on the console. 5 Follow your pulse...

English Manual
Page 17
... play iFIT.com audio and video programs directly from our internet site. 1 Insert the key fully into the console. When the key is not flashing. To restart the program, press the START button or the SPEED v button. When the next ÒchirpÓ is fully plugged in the on page 14. To use a program from our internet site, the treadmill must have at any time by pressing the SPEED or INCLINE buttons...
... play iFIT.com audio and video programs directly from our internet site. 1 Insert the key fully into the console. When the key is not flashing. To restart the program, press the START button or the SPEED v button. When the next ÒchirpÓ is fully plugged in the on page 14. To use a program from our internet site, the treadmill must have at any time by pressing the SPEED or INCLINE buttons...

English Manual
Page 18
... ÒdemoÓ mode. To exit the information mode, remove the key from the console. To purchase the optional chest pulse sensor, call the toll-free telephone number listed on the back cover of measurement. OPTIONAL HAND WEIGHTS Optional hand weights let you are finished using the treadmill, move the on page 10. 9 Measure your workouts. This mode is in the SPEED/ MIN-MILE display. The chest pulse sensor offers hands-free operation and continuously monitors your heart rate during your pulse...
... ÒdemoÓ mode. To exit the information mode, remove the key from the console. To purchase the optional chest pulse sensor, call the toll-free telephone number listed on the back cover of measurement. OPTIONAL HAND WEIGHTS Optional hand weights let you are finished using the treadmill, move the on page 10. 9 Measure your workouts. This mode is in the SPEED/ MIN-MILE display. The chest pulse sensor offers hands-free operation and continuously monitors your heart rate during your pulse...

English Manual
Page 20
...: a. Reinsert the key fully into the console. Remove the screws from the console and unplug the power cord. Top View Re-attach the hood, and run , please call our toll-free HELPLINE at 1-800-736-6879, Monday through Saturday, 7 a.m. To reset the circuit breaker, wait for five minutes and then press the switch back in . TROUBLE-SHOOTING Most treadmill problems can be electrically rated for 120 volts...
...: a. Reinsert the key fully into the console. Remove the screws from the console and unplug the power cord. Top View Re-attach the hood, and run , please call our toll-free HELPLINE at 1-800-736-6879, Monday through Saturday, 7 a.m. To reset the circuit breaker, wait for five minutes and then press the switch back in . TROUBLE-SHOOTING Most treadmill problems can be electrically rated for 120 volts...
English Manual
Page 21
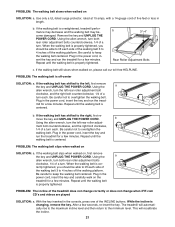
... incline is off the walking platform. PROBLEM: The walking belt slips when walked on , first remove the key and UNPLUG THE POWER CORD. Using the allen wrench, turn both rear roller adjustment bolts clockwise, 1/4 of a turn . ment bolt counterclockwise, and the right bolt clockwise, 1/4 of a turn each side of the walking belt 3 to keep the walking belt centered. b. If the walking belt slips when walked on SOLUTION: a. Plug in the console, press one of the treadmill does not change correctly or does not change when iFIT...
... incline is off the walking platform. PROBLEM: The walking belt slips when walked on , first remove the key and UNPLUG THE POWER CORD. Using the allen wrench, turn both rear roller adjustment bolts clockwise, 1/4 of a turn . ment bolt counterclockwise, and the right bolt clockwise, 1/4 of a turn each side of the walking belt 3 to keep the walking belt centered. b. If the walking belt slips when walked on SOLUTION: a. Plug in the console, press one of the treadmill does not change correctly or does not change when iFIT...
English Manual
Page 22
... a guide. The chart below shows recommended heart rates for energy. If your goal is to burn fat, adjust the speed and incline of the treadmill until your heart rate is activity that requires large amounts of oxygen for energy. For aerobic exercise, adjust the speed and incline of your muscles and will help prevent post-exercise problems. To measure your Òtraining zone.Ó The lower two numbers are...
... a guide. The chart below shows recommended heart rates for energy. If your goal is to burn fat, adjust the speed and incline of the treadmill until your heart rate is activity that requires large amounts of oxygen for energy. For aerobic exercise, adjust the speed and incline of your muscles and will help prevent post-exercise problems. To measure your Òtraining zone.Ó The lower two numbers are...

English Manual
Page 23
... 5 1 Incline Motor Bolt 54 4 Cable Tie 105 1 Shock 6 2 Incline Motor Spacer 55 1 Walking Belt 106 1 Choke 7 1 Incline Motor 56 1 24Ó Reed Harness 107 2 Pulse Bar Bolt 8 1 Stop Bracket 57 1 Rear Roller 108 2 Pulse Bar Washer 9* 1 Latch Assembly 58 1 Belly Pan Spacer 109 1 Pulse Bar 10** 1 Hand Weight Set 59 2 Rear Foot 110 2 Handrail Foam Grip 11 1 Rear Foot Spacer 60 2 Rear Foot Screw 111 1 Lock Knob Sleeve 12 1 Frame 61 1 Ground Wire 112 1 Spring 13 1 Optic Switch Bolt 62 5 Ground Wire Screw 113 1 Lock Pin...
... 5 1 Incline Motor Bolt 54 4 Cable Tie 105 1 Shock 6 2 Incline Motor Spacer 55 1 Walking Belt 106 1 Choke 7 1 Incline Motor 56 1 24Ó Reed Harness 107 2 Pulse Bar Bolt 8 1 Stop Bracket 57 1 Rear Roller 108 2 Pulse Bar Washer 9* 1 Latch Assembly 58 1 Belly Pan Spacer 109 1 Pulse Bar 10** 1 Hand Weight Set 59 2 Rear Foot 110 2 Handrail Foam Grip 11 1 Rear Foot Spacer 60 2 Rear Foot Screw 111 1 Lock Knob Sleeve 12 1 Frame 61 1 Ground Wire 112 1 Spring 13 1 Optic Switch Bolt 62 5 Ground Wire Screw 113 1 Lock Pin...

English Manual
Page 26
... need help or service, or ordering parts, please be replaced, call the toll-free numbers listed at the left. Model No. 831.299263 QUESTIONS? To request service or to state. See the front cover of your nearest SEARS Service Center. FULL 90 DAY WARRANTY For 90 days from state to order parts by telephone, call the following information: ¥ The NAME OF THE PRODUCT (PROFORM¨ 735CS treadmill...
... need help or service, or ordering parts, please be replaced, call the toll-free numbers listed at the left. Model No. 831.299263 QUESTIONS? To request service or to state. See the front cover of your nearest SEARS Service Center. FULL 90 DAY WARRANTY For 90 days from state to order parts by telephone, call the following information: ¥ The NAME OF THE PRODUCT (PROFORM¨ 735CS treadmill...


