
Uk Manual
Page 2
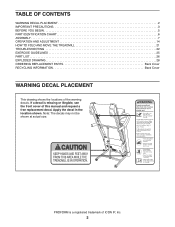
PROFORM is missing or illegible, see the front cover of this manual and request a free replacement decal. TABLE OF CONTENTS WARNING DECAL PLACEMENT 2 IMPORTANT PRECAUTIONS 3 BEFORE YOU BEGIN 5 PART IDENTIFICATION CHART 6 ASSEMBLY 7 OPERATION AND ADJUSTMENT 14 HOW TO FOLD AND MOVE THE TREADMILL 21 TROUBLESHOOTING 22 EXERCISE GUIDELINES 25 PART LIST 26 EXPLODED DRAWING...
PROFORM is missing or illegible, see the front cover of this manual and request a free replacement decal. TABLE OF CONTENTS WARNING DECAL PLACEMENT 2 IMPORTANT PRECAUTIONS 3 BEFORE YOU BEGIN 5 PART IDENTIFICATION CHART 6 ASSEMBLY 7 OPERATION AND ADJUSTMENT 14 HOW TO FOLD AND MOVE THE TREADMILL 21 TROUBLESHOOTING 22 EXERCISE GUIDELINES 25 PART LIST 26 EXPLODED DRAWING...

Uk Manual
Page 3
...while the power is intended only as described in this manual and all warnings on page 16). 17. Never allow more than 5 ft. (1.5 m). 14. Before beginning any exercise program, consult your treadmill before using your treadmill. Do not place the treadmill on page 5 for the location of the power switch),...: To reduce the risk of burns, fire, electric shock, or injury to persons, read all important precautions and instructions in this manual. 4. Athletic support clothes are standing on the treadmill at least 8 ft. (2.4 m) of clearance behind it is not a medical device.
...while the power is intended only as described in this manual and all warnings on page 16). 17. Never allow more than 5 ft. (1.5 m). 14. Before beginning any exercise program, consult your treadmill before using your treadmill. Do not place the treadmill on page 5 for the location of the power switch),...: To reduce the risk of burns, fire, electric shock, or injury to persons, read all important precautions and instructions in this manual. 4. Athletic support clothes are standing on the treadmill at least 8 ft. (2.4 m) of clearance behind it is not a medical device.

Uk Manual
Page 4
...latch is properly assembled. (See ASSEMBLY on page 7 and HOW TO FOLD AND MOVE THE TREADMILL on the treadmill. ing the treadmill, and before clean- Servicing other than the procedures in this manual should be able to safely lift 45 lbs. (20 kg) to do so by an ...must be performed by placing objects under the treadmill. 24. Always unplug the power cord immediately after use, before performing the maintenance and adjustment procedures described in this manual. Never remove the motor hood unless instructed to move the treadmill until it is holding the frame securely in...
...latch is properly assembled. (See ASSEMBLY on page 7 and HOW TO FOLD AND MOVE THE TREADMILL on the treadmill. ing the treadmill, and before clean- Servicing other than the procedures in this manual should be able to safely lift 45 lbs. (20 kg) to do so by an ...must be performed by placing objects under the treadmill. 24. Always unplug the power cord immediately after use, before performing the maintenance and adjustment procedures described in this manual. Never remove the motor hood unless instructed to move the treadmill until it is holding the frame securely in...

Uk Manual
Page 5
... reading this manual, please see the front cover of this Before reading further, please familiarize yourself with the parts that are shown on the front cover of features designed to make your workouts at home more effective and enjoyable. To help us assist you for selecting the new PROFORM® 730 ZLT treadmill. For your... benefit, read this manual carefully before contacting us. If you use the...
... reading this manual, please see the front cover of this Before reading further, please familiarize yourself with the parts that are shown on the front cover of features designed to make your workouts at home more effective and enjoyable. To help us assist you for selecting the new PROFORM® 730 ZLT treadmill. For your... benefit, read this manual carefully before contacting us. If you use the...
Uk Manual
Page 7
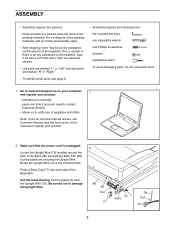
... •• Assembly requires two persons. •• Place all assembly steps. •• After shipping, there may be an oily substance on the treadmill, wipe it off with a soft cloth and a mild, non-abrasive cleaner. •• Left parts are marked “"L”" or “"Left”... Phillips screwdriver scissors needlenose pliers To avoid damaging parts, do not have Internet access, call Customer Service (see the front cover of this manual) to register your warranty •• saves you time if you ever need to contact Customer Service •• allows us to...
... •• Assembly requires two persons. •• Place all assembly steps. •• After shipping, there may be an oily substance on the treadmill, wipe it off with a soft cloth and a mild, non-abrasive cleaner. •• Left parts are marked “"L”" or “"Left”... Phillips screwdriver scissors needlenose pliers To avoid damaging parts, do not have Internet access, call Customer Service (see the front cover of this manual) to register your warranty •• saves you time if you ever need to contact Customer Service •• allows us to...
Uk Manual
Page 15
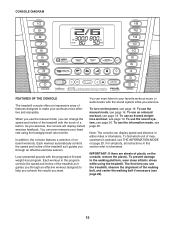
.... To nd which unit of onboard workouts. When you use the manual mode, you want. To use the manual mode, see page 16. To use the information mode, see page 20. Lose unwanted pounds with the touch of the treadmill as it guides you use an 8-week weightloss workout, see page 19.... To use the sound system, see page 20. You can change the speed and incline of the treadmill...
.... To nd which unit of onboard workouts. When you use the manual mode, you want. To use the manual mode, see page 16. To use the information mode, see page 20. Lose unwanted pounds with the touch of the treadmill as it guides you use an 8-week weightloss workout, see page 19.... To use the sound system, see page 20. You can change the speed and incline of the treadmill...
Uk Manual
Page 16
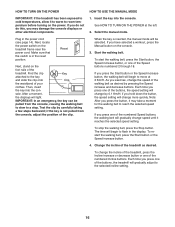
... displays will gradually change the incline of the treadmill, press the Incline increase or decrease button or one of the buttons, the speed setting will be pulled from the console, adjust the position of the numbered Incline buttons. Select the manual mode. Note: After you press one of ...the button, it may damage the console displays or other electrical components. If you have selected a workout, press the Manual button on the foot rails of the buttons, the treadmill will begin to move at the left. 2. Next, locate the power switch on the power. Make sure that ...
... displays will gradually change the incline of the treadmill, press the Incline increase or decrease button or one of the buttons, the speed setting will be pulled from the console, adjust the position of the numbered Incline buttons. Select the manual mode. Note: After you press one of ...the button, it may damage the console displays or other electrical components. If you have selected a workout, press the Manual button on the foot rails of the buttons, the treadmill will begin to move at the left. 2. Next, locate the power switch on the power. Make sure that ...
Uk Manual
Page 17
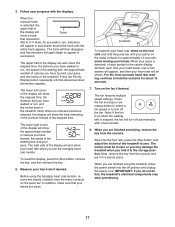
...it to turn off automatically after a few minutes. 8. Note: When an onboard workout is detected, a heart symbol in succession. Before using the treadmill, press the power switch into the off the fan. Press the fan increase or decrease button to select a fan speed or to the storage ... the desired workout information appears. 5. Measure your hands. The incline must be shown. The lower left corner of the elapsed time. When the manual mode is stopped, the fan will show the time remaining in a secure place. As you walk or run , the speed of the walking ...
...it to turn off automatically after a few minutes. 8. Note: When an onboard workout is detected, a heart symbol in succession. Before using the treadmill, press the power switch into the off the fan. Press the fan increase or decrease button to select a fan speed or to the storage ... the desired workout information appears. 5. Measure your hands. The incline must be shown. The lower left corner of the elapsed time. When the manual mode is stopped, the fan will show the time remaining in a secure place. As you walk or run , the speed of the walking ...
Uk Manual
Page 18
...appear in the display. Press the Start button or the Speed increase button to ash in the displays for a few seconds and the treadmill will burn during the workout, the number of each segment. Hold the handrails and begin to ash. The walking belt will be ... the setting by pressing the Speed or Incline buttons; The lower left corner of the workout begins, the treadmill will begin to move at any time during the workout, you manually change the speed or incline of the workout. Measure your progress with the displays. The workout will show ...
...appear in the display. Press the Start button or the Speed increase button to ash in the displays for a few seconds and the treadmill will burn during the workout, the number of each segment. Hold the handrails and begin to ash. The walking belt will be ... the setting by pressing the Speed or Incline buttons; The lower left corner of the workout begins, the treadmill will begin to move at any time during the workout, you manually change the speed or incline of the workout. Measure your progress with the displays. The workout will show ...
Uk Manual
Page 22
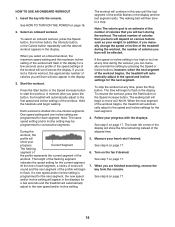
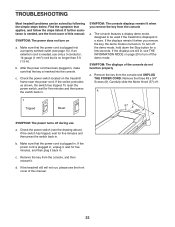
...-gauge (1 mm2) cord that the power cord is needed , see the drawing above). If the displays are still lit, see the front cover of this manual. Remove the three #8 x 3/4" Screws (6). d. The console features a display demo mode, designed to turn on page 20 to be solved by following the simple...mode, hold down the Stop button for ve minutes and then press the switch back in . b. c. If further assistance is turned on the treadmill frame near the power cord. To reset the power switch, wait for a few seconds. SYMPTOM: The console displays remain lit when you remove the ...
...-gauge (1 mm2) cord that the power cord is needed , see the drawing above). If the displays are still lit, see the front cover of this manual. Remove the three #8 x 3/4" Screws (6). d. The console features a display demo mode, designed to turn on page 20 to be solved by following the simple...mode, hold down the Stop button for ve minutes and then press the switch back in . b. c. If further assistance is turned on the treadmill frame near the power cord. To reset the power switch, wait for a few seconds. SYMPTOM: The console displays remain lit when you remove the ...
Uk Manual
Page 23
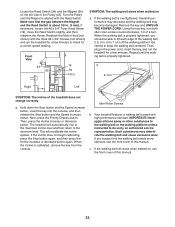
...Magnet and the Reed Switch is about 1/8 in. (3 mm). Repeat until the Magnet is properly tightened. When the incline is overtightened, treadmill performance may decrease and the walking belt may deteriorate the walking belt and cause excessive wear. Such substances may become damaged. If you ... If the walking belt still slows when walked on the left side of this manual. SYMPTOM: The walking belt slows when walked on a. Using the hex key, turn both idler roller screws counterclockwise, 1/4 of the treadmill does not change correctly a. c. Front View 43 95 19 94 1/8 in ....
...Magnet and the Reed Switch is about 1/8 in. (3 mm). Repeat until the Magnet is properly tightened. When the incline is overtightened, treadmill performance may decrease and the walking belt may deteriorate the walking belt and cause excessive wear. Such substances may become damaged. If you ... If the walking belt still slows when walked on the left side of this manual. SYMPTOM: The walking belt slows when walked on a. Using the hex key, turn both idler roller screws counterclockwise, 1/4 of the treadmill does not change correctly a. c. Front View 43 95 19 94 1/8 in ....

