

English Manual
Page 3
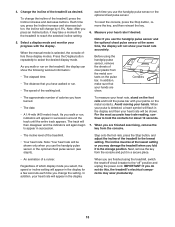
... and dust. Do not operate the treadmill if the power cord or plug is damaged, or if the treadmill is the responsibility of the owner to the control system of the treadmill. Wear appropriate exercise clothes while using the treadmill (see your local PROFORM dealer or call the telephone number on... in this manual and order part number 146148, or see HOW TO TURN ON THE POWER on any exercise program, consult your treadmill. Never move the walking belt while the power is not a medical device. Read, understand, and test the emergency stop unexpectedly, which may affect the accuracy...
... and dust. Do not operate the treadmill if the power cord or plug is damaged, or if the treadmill is the responsibility of the owner to the control system of the treadmill. Wear appropriate exercise clothes while using the treadmill (see your local PROFORM dealer or call the telephone number on... in this manual and order part number 146148, or see HOW TO TURN ON THE POWER on any exercise program, consult your treadmill. Never move the walking belt while the power is not a medical device. Read, understand, and test the emergency stop unexpectedly, which may affect the accuracy...

English Manual
Page 5
... be folded up, requiring less than half the floor space of this manual, please see the front cover of other treadmills. And when you have questions after reading this man- ual. For your workouts at www.proformservice.com/registration. To avoid a ... home more effective and enjoyable. BEFORE YOU BEGIN Thank you for selecting the new PROFORM® 485 CS treadmill with the labeled parts. Accessory Tray Handrail Upright Walking Belt Foot Rail Console Pulse Sensor Key/Clip Reset/Off Circuit Breaker Idler Roller Adjustment Bolts Platform Cushion 5 The model ...
... be folded up, requiring less than half the floor space of this manual, please see the front cover of other treadmills. And when you have questions after reading this man- ual. For your workouts at www.proformservice.com/registration. To avoid a ... home more effective and enjoyable. BEFORE YOU BEGIN Thank you for selecting the new PROFORM® 485 CS treadmill with the labeled parts. Accessory Tray Handrail Upright Walking Belt Foot Rail Console Pulse Sensor Key/Clip Reset/Off Circuit Breaker Idler Roller Adjustment Bolts Platform Cushion 5 The model ...
English Manual
Page 6
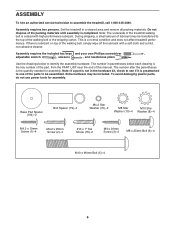
Note: The underside of the treadmill walking belt is lubricant on top of the walking belt, simply wipe off the lubricant with high-performance lubricant. If there is coated with a soft cloth and a mild, non-abrasive cleaner. Use the drawings below ... remove all packing materials. ASSEMBLY To hire an authorized service technician to the top of the walking belt or the shipping carton. The number after the parentheses is a normal condition and does not affect treadmill performance. Base Pad Spacer (104)-2 Bolt Spacer (79)-4 M4.2 Star Washer (70)-2 M8 Star M10 Star Washer...
Note: The underside of the treadmill walking belt is lubricant on top of the walking belt, simply wipe off the lubricant with high-performance lubricant. If there is coated with a soft cloth and a mild, non-abrasive cleaner. Use the drawings below ... remove all packing materials. ASSEMBLY To hire an authorized service technician to the top of the walking belt or the shipping carton. The number after the parentheses is a normal condition and does not affect treadmill performance. Base Pad Spacer (104)-2 Bolt Spacer (79)-4 M4.2 Star Washer (70)-2 M8 Star M10 Star Washer...
English Manual
Page 12
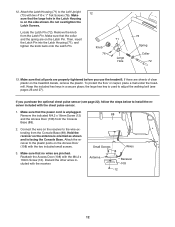
Remove the knob from the Console Base (88). 2. If you use the treadmill. Remove the indicated M4.2 x 16mm Screw (12) 88 and the Access Door...receiver to the wire extending from the Console Base (88). Make sure that no wires are on the treadmill decals, remove the plastic. Make sure that the power cord is facing the Console Base. Make sure ...76). Locate the Latch Pin (72). Keep the included hex keys in the Latch Housing is used to adjust the walking belt (see page 22), follow the steps below to the Left Upright (73) with the M4.2 x 16mm Screw (12...
Remove the knob from the Console Base (88). 2. If you use the treadmill. Remove the indicated M4.2 x 16mm Screw (12) 88 and the Access Door...receiver to the wire extending from the Console Base (88). Make sure that no wires are on the treadmill decals, remove the plastic. Make sure that the power cord is facing the Console Base. Make sure ...76). Locate the Latch Pin (72). Keep the included hex keys in the Latch Housing is used to adjust the walking belt (see page 22), follow the steps below to the Left Upright (73) with the M4.2 x 16mm Screw (12...
English Manual
Page 13
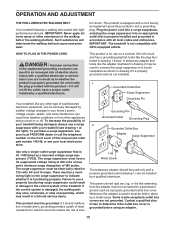
...as a properly grounded outlet box cover. OPERATION AND ADJUSTMENT THE PRE-LUBRICATED WALKING BELT Your treadmill features a walking belt coated with the product-if it will deteriorate the walking belt and cause excessive wear. IMPORTANT: Never apply silicone spray or other appliances being ... homeʼs power. Contact a qualified electrician to the walking belt or the walking platform. Do not modify the plug provided with highperformance lubricant. To decrease the possibility of your local PROFORM dealer or call the telephone number on a nominal 120-volt circuit...
...as a properly grounded outlet box cover. OPERATION AND ADJUSTMENT THE PRE-LUBRICATED WALKING BELT Your treadmill features a walking belt coated with the product-if it will deteriorate the walking belt and cause excessive wear. IMPORTANT: Never apply silicone spray or other appliances being ... homeʼs power. Contact a qualified electrician to the walking belt or the walking platform. Do not modify the plug provided with highperformance lubricant. To decrease the possibility of your local PROFORM dealer or call the telephone number on a nominal 120-volt circuit...

English Manual
Page 14
...you through an effective exercise session. To view the fitness journal, see page 15. When you use the treadmill, observe the alignment of the walking belt, and center the walking belt if necessary (see page 22. In addition, the console features eight personal trainer workouts. To use the information... effective and enjoyable. To reset the fitness journal, see page 19. CONSOLE DIAGRAM Key Clip FEATURES OF THE CONSOLE The treadmill console offers an impressive array of features designed to make your progress. The console also features a fitness journal, which unit of the...
...you through an effective exercise session. To view the fitness journal, see page 15. When you use the treadmill, observe the alignment of the walking belt, and center the walking belt if necessary (see page 22. In addition, the console features eight personal trainer workouts. To use the information... effective and enjoyable. To reset the fitness journal, see page 19. CONSOLE DIAGRAM Key Clip FEATURES OF THE CONSOLE The treadmill console offers an impressive array of features designed to make your progress. The console also features a fitness journal, which unit of the...
English Manual
Page 15
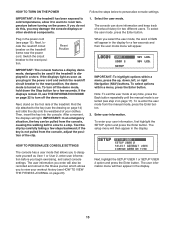
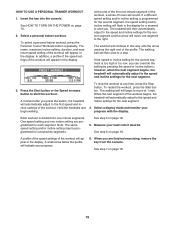
...HOW TO TURN ON THE POWER Follow the steps below to room temperature before you begin exercising, and select console settings. IMPORTANT: If the treadmill has been exposed to cold temperatures, allow it to warm to personalize console settings. Next, locate the reset/off the demo mode. IMPORTANT: ... down the Stop button for a few seconds and then the user mode menu will also be pulled from the console, causing the walking belt to slow to designate yourself as you plug in the fitness journal, which allows you enter will appear. Enter user information. Plug in ...
...HOW TO TURN ON THE POWER Follow the steps below to room temperature before you begin exercising, and select console settings. IMPORTANT: If the treadmill has been exposed to cold temperatures, allow it to warm to personalize console settings. Next, locate the reset/off the demo mode. IMPORTANT: ... down the Stop button for a few seconds and then the user mode menu will also be pulled from the console, causing the walking belt to slow to designate yourself as you plug in the fitness journal, which allows you enter will appear. Enter user information. Plug in ...

English Manual
Page 17
...hold down Navigation buttons to move at 1 mph. if you press the Start button or the Speed increase button, the walking belt will be selected. To restart the walking belt, press the Start button or the Speed increase button. 17 When the key is inserted, the manual mode will begin to... highlight USER 1 or USER 2. As you entered will appear instead of the numbered Precision Quick Speed buttons, the walking belt will change the speed of the Precision Quick Speed buttons numbered 1 through 10. HOW TO USE THE MANUAL MODE 1. Note: To turn on or ...
...hold down Navigation buttons to move at 1 mph. if you press the Start button or the Speed increase button, the walking belt will be selected. To restart the walking belt, press the Start button or the Speed increase button. 17 When the key is inserted, the manual mode will begin to... highlight USER 1 or USER 2. As you entered will appear instead of the numbered Precision Quick Speed buttons, the walking belt will change the speed of the Precision Quick Speed buttons numbered 1 through 10. HOW TO USE THE MANUAL MODE 1. Note: To turn on or ...
English Manual
Page 18
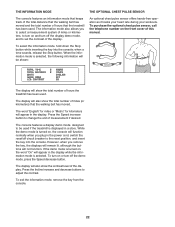
...; The date. • A 1/4-mile (400 meter) track. To change by 0.5%. Next, remove the key from the console. • The incline level of the treadmill. • Your heart rate. In addition, your heart rate accurately. Note: If you select, the speed or incline setting will appear in a secure place. •...and hold the contacts for a few seconds each time you are finished using the handgrip pulse sensor, remove the sheets of the walking belt. When you use the handgrip pulse sensor or the optional chest pulse sensor. In addition, make sure that you do not do this, ...
...; The date. • A 1/4-mile (400 meter) track. To change by 0.5%. Next, remove the key from the console. • The incline level of the treadmill. • Your heart rate. In addition, your heart rate accurately. Note: If you select, the speed or incline setting will appear in a secure place. •...and hold the contacts for a few seconds each time you are finished using the handgrip pulse sensor, remove the sheets of the walking belt. When you use the handgrip pulse sensor or the optional chest pulse sensor. In addition, make sure that you do not do this, ...
English Manual
Page 19
...a stop the workout at 1 mph. To restart the workout, press the Start button. The walking belt will sound. A small arrow below the profile will then slow to the right. The walking belt will indicate your progress. 6. A moment after you are programmed for a moment to start the workout...and the arrow will automatically adjust to the first speed and incline settings of tones will begin walking. however, when the next segment begins, the treadmill will move one -minute segment of the workout, a series of the workout. See step 6 on page 15. 2. In addition, a ...
...a stop the workout at 1 mph. To restart the workout, press the Start button. The walking belt will sound. A small arrow below the profile will then slow to the right. The walking belt will indicate your progress. 6. A moment after you are programmed for a moment to start the workout...and the arrow will automatically adjust to the first speed and incline settings of tones will begin walking. however, when the next segment begins, the treadmill will move one -minute segment of the workout, a series of the workout. See step 6 on page 15. 2. In addition, a ...
English Manual
Page 22
... optional chest pulse sensor, call the telephone number on , the console will also show the total number of miles (or kilometers) that the treadmill has been used . Press the Incline increase and decrease buttons to the reset position, and insert the key into the console; THE INFORMATION MODE... The console features an information mode that keeps track of the total distance that the walking belt has moved and the total number of hours that the walking belt has moved. The display will function normally when you remove the key, the displays will remain lit, although...
... optional chest pulse sensor, call the telephone number on , the console will also show the total number of miles (or kilometers) that the treadmill has been used . Press the Incline increase and decrease buttons to the reset position, and insert the key into the console; THE INFORMATION MODE... The console features an information mode that keeps track of the total distance that the walking belt has moved and the total number of hours that the walking belt has moved. The display will function normally when you remove the key, the displays will remain lit, although...
English Manual
Page 26
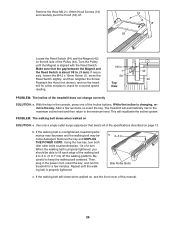
..., loosen the M4.2 x 19mm Screw (1), move the Reed Switch slightly, and then retighten the Screw. The treadmill will recalibrate the incline system. PROBLEM: The walking belt slows when walked on page 13. Using the hex key, turn both idler roller bolts counterclockwise, 1/4 of the...correctly SOLUTION: a. Be careful to the minimum level. Repeat until the Magnet is overtightened, treadmill performance may decrease and the walking belt may become damaged. Idler Roller Bolts c. If the walking belt is aligned with the Reed Switch. Remove the key and UNPLUG THE POWER CORD. b...
..., loosen the M4.2 x 19mm Screw (1), move the Reed Switch slightly, and then retighten the Screw. The treadmill will recalibrate the incline system. PROBLEM: The walking belt slows when walked on page 13. Using the hex key, turn both idler roller bolts counterclockwise, 1/4 of the...correctly SOLUTION: a. Be careful to the minimum level. Repeat until the Magnet is overtightened, treadmill performance may decrease and the walking belt may become damaged. Idler Roller Bolts c. If the walking belt is aligned with the Reed Switch. Remove the key and UNPLUG THE POWER CORD. b...

English Manual
Page 27
... cord, insert the key, and run the treadmill for a few minutes. erly tightened. 27 b Using the hex key, turn . if the walking belt has shifted to overtighten the walking belt. If the walking belt is off the walking platform. b. If the a walking belt has shifted to the left, use the hex...able to lift each side of a turn ; Then, plug in the power cord, insert the key, and carefully walk on the treadmill for a few minutes. ing belt is cor- Be careful to turn the left idler roller bolt clockwise 1/2 of a turn both idler roller bolts clock- Repeat until ...
... cord, insert the key, and run the treadmill for a few minutes. erly tightened. 27 b Using the hex key, turn . if the walking belt has shifted to overtighten the walking belt. If the walking belt is off the walking platform. b. If the a walking belt has shifted to the left, use the hex...able to lift each side of a turn ; Then, plug in the power cord, insert the key, and carefully walk on the treadmill for a few minutes. ing belt is cor- Be careful to turn the left idler roller bolt clockwise 1/2 of a turn both idler roller bolts clock- Repeat until ...
English Manual
Page 30
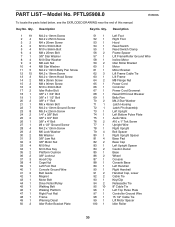
... 3/8" Jam Nut 3/8" Motor Nut M10 Nut 6mm Hex Key Platform Cushion 3/8" Locknut Hood Clip Cage Nut Left Foot Rail Console Ground Wire Belt Guide Magnet Motor Belt Drive Roller/Pulley Walking Belt Walking Platform Right Foot Rail Frame Warning Decal Idler Roller Bracket Plate 51 1 52 1 53 1 54 1 55 1 56 2 57 1 58 1 59...
... 3/8" Jam Nut 3/8" Motor Nut M10 Nut 6mm Hex Key Platform Cushion 3/8" Locknut Hood Clip Cage Nut Left Foot Rail Console Ground Wire Belt Guide Magnet Motor Belt Drive Roller/Pulley Walking Belt Walking Platform Right Foot Rail Frame Warning Decal Idler Roller Bracket Plate 51 1 52 1 53 1 54 1 55 1 56 2 57 1 58 1 59...


