

User Manual
Page 1
... serial number in the space above for future reference. ¨ USER'S MANUAL Patent Pending Visit our website at www.proform.com new products, prizes, fitness tips, and much more! PROFORM¨ is a registered trademark of this equipment. Model No. If you have questions, or if there are missing ...parts, we are committed to give the following information: ¥ The MODEL NUMBER OF THE PRODUCT (PETL61591) ¥ The NAME OF THE PRODUCT (PROFORM¨ 615 treadmill) ¥ The SERIAL NUMBER OF THE PRODUCT (see the front cover of this manual) ¥ The KEY NUMBER OF THE PART(S) (see ...
... serial number in the space above for future reference. ¨ USER'S MANUAL Patent Pending Visit our website at www.proform.com new products, prizes, fitness tips, and much more! PROFORM¨ is a registered trademark of this equipment. Model No. If you have questions, or if there are missing ...parts, we are committed to give the following information: ¥ The MODEL NUMBER OF THE PRODUCT (PETL61591) ¥ The NAME OF THE PRODUCT (PROFORM¨ 615 treadmill) ¥ The SERIAL NUMBER OF THE PRODUCT (see the front cover of this manual) ¥ The KEY NUMBER OF THE PART(S) (see ...

User Manual
Page 2
... parts listed below, refer to ensure that the location and position permit access to persons, read the following important precautions and information before operating the treadmill. 1. Description Key No. Description 1 1 Motor Belt 50 1 Book Holder 102 1 Lock Knob 2 1 Pulley/Flywheel/Fan 51 1 Front Belly Pan... 22 PART LIST 23 HOW TO ORDER REPLACEMENT PARTS Back Cover Note: An EXPLODED DRAWING is attached in the centre of this treadmill are adequately informed of all warnings and precautions. 6. IMPORTANT PRECAUTIONS WARNING: To reduce the risk of this manual. 7. It is...
... parts listed below, refer to ensure that the location and position permit access to persons, read the following important precautions and information before operating the treadmill. 1. Description Key No. Description 1 1 Motor Belt 50 1 Book Holder 102 1 Lock Knob 2 1 Pulley/Flywheel/Fan 51 1 Front Belly Pan... 22 PART LIST 23 HOW TO ORDER REPLACEMENT PARTS Back Cover Note: An EXPLODED DRAWING is attached in the centre of this treadmill are adequately informed of all warnings and precautions. 6. IMPORTANT PRECAUTIONS WARNING: To reduce the risk of this manual. 7. It is...

User Manual
Page 3
...To find the proper heart rate for individuals over the age of the on page 5 for speed and/or incline changes. Never leave the treadmill unattended whilst it is not working properly.) 15. Always remove i-Fit.com CDÕs and videos from heated surfaces. 14. CONDITIONING GUIDELINES.... Inspect and tighten all instructions before using i-Fit.com CDÕs and videos, you when the speed and/or incline of the treadmill by an authorised service representative. When using them. 26. tenance and adjustment procedures de- When replacing the fuse, an ASTA approved BS1362...
...To find the proper heart rate for individuals over the age of the on page 5 for speed and/or incline changes. Never leave the treadmill unattended whilst it is not working properly.) 15. Always remove i-Fit.com CDÕs and videos from heated surfaces. 14. CONDITIONING GUIDELINES.... Inspect and tighten all instructions before using i-Fit.com CDÕs and videos, you when the speed and/or incline of the treadmill by an authorised service representative. When using them. 26. tenance and adjustment procedures de- When replacing the fuse, an ASTA approved BS1362...

User Manual
Page 4
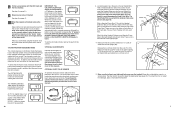
...below have been placed on , first remove the key and UNPLUG THE POWER CORD. Plug in the power cord, insert the key and run the treadmill for a few minutes. Plug in the power cord, insert the key and run the tread- Using the allen wrench, turn both rear roller adjustment.... cally rise to the maximum incline level and then return to 7 inches off -centre SOLUTION: a. With the key inserted in the location shown. The treadmill will recalibrate the incline. 21 Repeat until the walking belt is off the walking platform. PROBLEM: The walking belt slips when walked on , please call...
...below have been placed on , first remove the key and UNPLUG THE POWER CORD. Plug in the power cord, insert the key and run the treadmill for a few minutes. Plug in the power cord, insert the key and run the tread- Using the allen wrench, turn both rear roller adjustment.... cally rise to the maximum incline level and then return to 7 inches off -centre SOLUTION: a. With the key inserted in the location shown. The treadmill will recalibrate the incline. 21 Repeat until the walking belt is off the walking platform. PROBLEM: The walking belt slips when walked on , please call...

User Manual
Page 5
... and the Magnet (43) on page 10. Re-at 0345-089009. And when you for selecting the revolutionary PROFORM¨ 615 treadmill. For your exercise program in . TROUBLE-SHOOTING Most treadmill problems can be - 21 43 tween the Magnet and the Reed Switch is about 3mm. c. Check the circuit...76) and move Top the Reed Switch slightly. If you , please note the product model number and serial number before using the PROFORM¨ 615 treadmill. Water Bottle Holder (Bottle not included) Pulse Sensor LEFT SIDE Latch Knob Latch Pin Key/Clip Book Holder Console Handrail RIGHT SIDE...
... and the Magnet (43) on page 10. Re-at 0345-089009. And when you for selecting the revolutionary PROFORM¨ 615 treadmill. For your exercise program in . TROUBLE-SHOOTING Most treadmill problems can be - 21 43 tween the Magnet and the Reed Switch is about 3mm. c. Check the circuit...76) and move Top the Reed Switch slightly. If you , please note the product model number and serial number before using the PROFORM¨ 615 treadmill. Water Bottle Holder (Bottle not included) Pulse Sensor LEFT SIDE Latch Knob Latch Pin Key/Clip Book Holder Console Handrail RIGHT SIDE...

User Manual
Page 6
... temperatures above . Assembly requires the included allen wrench and your back straight. With the help of a second person, carefully raise the treadmill to the other side and insert the other Extension Leg (not shown) in the catch. With the help of a second person,... carefully tip the Uprights (82) down until it . Carefully move the treadmill over an uneven surface. 3. Pivot the treadmill down as shown. Refer to the vertical position. 2. Attach each Extension Leg (103) with your right hand as shown....
... temperatures above . Assembly requires the included allen wrench and your back straight. With the help of a second person, carefully raise the treadmill to the other side and insert the other Extension Leg (not shown) in the catch. With the help of a second person,... carefully tip the Uprights (82) down until it . Carefully move the treadmill over an uneven surface. 3. Pivot the treadmill down as shown. Refer to the vertical position. 2. Attach each Extension Leg (103) with your right hand as shown....
User Manual
Page 7
... include upper-body exercise in the post on and turn off the demo mode. In addition, the information mode allows you are finished using the treadmill, move the on page 10. 9 Measure your pulse, if desired. OPTIONAL HAND WEIGHTS Optional hand weights let you to switch the console from ...will automatically light in a store. Locate the plastic tie in your workouts. Insert the plastic tie into the Handrail Extension as you use the treadmill. Attach the other Handrail Extension and Handrail Foam Grip to change the unit of warm water and dish soap in the Foam Grip.) There are...
... include upper-body exercise in the post on and turn off the demo mode. In addition, the information mode allows you are finished using the treadmill, move the on page 10. 9 Measure your pulse, if desired. OPTIONAL HAND WEIGHTS Optional hand weights let you to switch the console from ...will automatically light in a store. Locate the plastic tie in your workouts. Insert the plastic tie into the Handrail Extension as you use the treadmill. Attach the other Handrail Extension and Handrail Foam Grip to change the unit of warm water and dish soap in the Foam Grip.) There are...

User Manual
Page 8
...internet site. Note: To use a program from our internet site, press the PROGRAM button. OPERATION AND ADJUSTMENT THE PERFORMANT LUBETM WALKING BELT Your treadmill features a walking belt coated with a country recognised plug and an appliance coupler. If it should malfunction or break down, earthing provides a ... an internet connection. 4 Start your specific exercise goals. DANGER: Improper connection of the program. See HOW TO CONNECT YOUR COMPUTER on the treadmill. When the next ÒchirpÓ is not wrapped around a power cord. 17 When the key is not flashing. When the on...
...internet site. Note: To use a program from our internet site, press the PROGRAM button. OPERATION AND ADJUSTMENT THE PERFORMANT LUBETM WALKING BELT Your treadmill features a walking belt coated with a country recognised plug and an appliance coupler. If it should malfunction or break down, earthing provides a ... an internet connection. 4 Start your specific exercise goals. DANGER: Improper connection of the program. See HOW TO CONNECT YOUR COMPUTER on the treadmill. When the next ÒchirpÓ is not wrapped around a power cord. 17 When the key is not flashing. When the on...

User Manual
Page 9
...Do not stand on the walking belt when turning on the power. ¥ Always wear the clip (see the drawing above) whilst operating the treadmill. ¥ Adjust the speed in pulse sensor. High-energy music provides added motivation. The console also features advanced iFit.com interactive technology. Visit ...connected, that it is fully plugged in the water bottle holder. IFit.com CD programs automatically control the speed and incline of the treadmill as it is pressed, your personal trainer will stop the program at health clubs. Each CD features two different programs designed by ...
...Do not stand on the walking belt when turning on the power. ¥ Always wear the clip (see the drawing above) whilst operating the treadmill. ¥ Adjust the speed in pulse sensor. High-energy music provides added motivation. The console also features advanced iFit.com interactive technology. Visit ...connected, that it is fully plugged in the water bottle holder. IFit.com CD programs automatically control the speed and incline of the treadmill as it is pressed, your personal trainer will stop the program at health clubs. Each CD features two different programs designed by ...

User Manual
Page 10
...If your progress with CD player, or VCR. Plug the adapter into the jack on the front of PROFORM treadmills. The TIME/INCLINE/SEG TIME display will change the incline of the treadmill as desired. Find the clip attached to move at 1 mph. pressed, the incline will begin to ...the INCLINE buttons. To use iFit.com CDÕs or videocassettes, the treadmill must be selected and the ÒMÓ indicator will be connected to flash. either miles or kilometers (see instruction A below to purchase iFit...
...If your progress with CD player, or VCR. Plug the adapter into the jack on the front of PROFORM treadmills. The TIME/INCLINE/SEG TIME display will change the incline of the treadmill as desired. Find the clip attached to move at 1 mph. pressed, the incline will begin to ...the INCLINE buttons. To use iFit.com CDÕs or videocassettes, the treadmill must be selected and the ÒMÓ indicator will be connected to flash. either miles or kilometers (see instruction A below to purchase iFit...

User Manual
Page 11
...seven seconds, the display will change from LINE OUT jack 14 CALS/FAT CALS/ PULSE displayÑThis display shows the approximate numbers of the treadmill near the power cord to page 18 and turn off position. 11 Note: For simplicity, all instructions in a secure place. If the ... from the console. A. Plug the Y-adapter into the included adapter. For the most accurate heart rate read- When you are finished using the treadmill, move the on/off switch near the power cord. A. This display will appear in the display. Stand on the foot rails and Sensors place...
...seven seconds, the display will change from LINE OUT jack 14 CALS/FAT CALS/ PULSE displayÑThis display shows the approximate numbers of the treadmill near the power cord to page 18 and turn off position. 11 Note: For simplicity, all instructions in a secure place. If the ... from the console. A. Plug the Y-adapter into the included adapter. For the most accurate heart rate read- When you are finished using the treadmill, move the on/off switch near the power cord. A. This display will appear in the display. Stand on the foot rails and Sensors place...

User Manual
Page 12
...Plug the Y-adapter into several time segments of the Y-adapter. cator will reach a maximum speed of 4.5 mph and a maximum incline of the treadmill near the power cord. A. Plug one end of the audio cable into the jack on the front of 5% during the first program. 3 Press... OUT jack on the front of the cable into a 3.5mm Y-adapter (available at electronics stores). Plug the other end of the treadmill will change during the programs. The numbers beside the profiles show the maximum speed and incline settings for connecting instructions. A. Plug one ...
...Plug the Y-adapter into several time segments of the Y-adapter. cator will reach a maximum speed of 4.5 mph and a maximum incline of the treadmill near the power cord. A. Plug one end of the audio cable into the jack on the front of 5% during the first program. 3 Press... OUT jack on the front of the cable into a 3.5mm Y-adapter (available at electronics stores). Plug the other end of the treadmill will change during the programs. The numbers beside the profiles show the maximum speed and incline settings for connecting instructions. A. Plug one ...


