
English Manual
Page 1
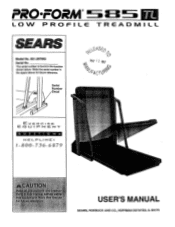
Li 1 PM ENT QUE ST I .: ' USER'S MANUAL SEARS, ROEBUCK AND CO., HOFFMAN ESTATES, IL 60179 Write the serial number in the location shown below. Serial Number Decal 0 KAY 1 2 1997 &A,s1 EX E FR CISE CZ. O ,,. % ' '& ii I ONS FiEL_ 1=• LINE 1 1- 800- 736- 6 879 K rrir-Agliev- . : , S .,.:. PRO•FOR LOW PROFILE TREADMILL S ARS Model No. 831.297662 Serial No. The serial number is found in the space above for future reference.
Li 1 PM ENT QUE ST I .: ' USER'S MANUAL SEARS, ROEBUCK AND CO., HOFFMAN ESTATES, IL 60179 Write the serial number in the location shown below. Serial Number Decal 0 KAY 1 2 1997 &A,s1 EX E FR CISE CZ. O ,,. % ' '& ii I ONS FiEL_ 1=• LINE 1 1- 800- 736- 6 879 K rrir-Agliev- . : , S .,.:. PRO•FOR LOW PROFILE TREADMILL S ARS Model No. 831.297662 Serial No. The serial number is found in the space above for future reference.
English Manual
Page 2
TABLE OF CONTENTS IMPORTANT PRECAUTIONS BEFORE YOU BEGIN ASSEMBLY OPERATION AND ADJUSTMENT HOW TO FOLD AND MOVE THE TREADMILL TROUBLE-SHOOTING CONDITIONING GUIDELINES ORDERING REPLACEMENT PARTS FULL 90 DAY WARRANTY 2 4 5 7 10 12 14 Back Cover Back Cover ... t :p:y, u . war'0. Please save them for future reference. ore`airt 4, -Q auId ' e arc fan altir r:ena surge txptector rated ;;use the treadmill ring onlystockings: or i :son xvisiivonn9cting tt p°weer Cot onae0i, dProRdIWit:toEtoRt hae'surge, idni.00 6 :0rPii1! a1..„3:t,„#:h,.,,„e, ::,..r,,•e:.„...
TABLE OF CONTENTS IMPORTANT PRECAUTIONS BEFORE YOU BEGIN ASSEMBLY OPERATION AND ADJUSTMENT HOW TO FOLD AND MOVE THE TREADMILL TROUBLE-SHOOTING CONDITIONING GUIDELINES ORDERING REPLACEMENT PARTS FULL 90 DAY WARRANTY 2 4 5 7 10 12 14 Back Cover Back Cover ... t :p:y, u . war'0. Please save them for future reference. ore`airt 4, -Q auId ' e arc fan altir r:ena surge txptector rated ;;use the treadmill ring onlystockings: or i :son xvisiivonn9cting tt p°weer Cot onae0i, dProRdIWit:toEtoRt hae'surge, idni.00 6 :0rPii1! a1..„3:t,„#:h,.,,„e, ::,..r,,•e:.„...
English Manual
Page 3
...; Storage latch must be fully engaged before folding treadmill into storage position. seo 0 3 lower, or move the treadmill. 20 When folding or moving the treadmill, at lowest level before treadmill is capable of high speeds. The treadmill is moved or stored. ocovenrthineuaotuinsgly, (1fo0r:0lo01n,0gpeerrteh_taen:t1he treadMill. A WARNING! • Never allow children to avoid sudden jumps...
...; Storage latch must be fully engaged before folding treadmill into storage position. seo 0 3 lower, or move the treadmill. 20 When folding or moving the treadmill, at lowest level before treadmill is capable of high speeds. The treadmill is moved or stored. ocovenrthineuaotuinsgly, (1fo0r:0lo01n,0gpeerrteh_taen:t1he treadMill. A WARNING! • Never allow children to avoid sudden jumps...

English Manual
Page 4
... Adjustment Bolt BACK 4 If you , please note the product model number and serial number before using the treadmill. The model number of your benefit, read this manual for selecting the PROFORM® 585 TL treadmill. Book Rack Console Towel Rack Accessory Tray Incline Control Storage Latch LEFT SIDE Key/Clip Handrails Water Bottle...
... Adjustment Bolt BACK 4 If you , please note the product model number and serial number before using the treadmill. The model number of your benefit, read this manual for selecting the PROFORM® 585 TL treadmill. Book Rack Console Towel Rack Accessory Tray Incline Control Storage Latch LEFT SIDE Key/Clip Handrails Water Bottle...
English Manual
Page 5
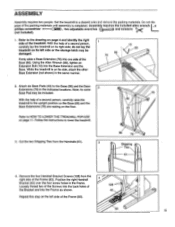
..., a phillips screwdriver 4=-1 (not included). ), two adjustable wrenches i===x) and scissors X. 1. With the help of a second person, carefully raise the treadmill to lower the treadmill. 76 86 43 3. Follow the instructions to the upright position so the Base (86) and the Base Extensions (76) are resting on the floor...) in the Frame. Loosely thread two of the Screws into the back holes of the Frame (83). ASSEMBLY Assembly requires two people. Set the treadmill in the same manner. 1 76 13 ••,/ 89 86 2. Do not dis- pose of the Base (86). Firmly slide a Base...
..., a phillips screwdriver 4=-1 (not included). ), two adjustable wrenches i===x) and scissors X. 1. With the help of a second person, carefully raise the treadmill to lower the treadmill. 76 86 43 3. Follow the instructions to the upright position so the Base (86) and the Base Extensions (76) are resting on the floor...) in the Frame. Loosely thread two of the Screws into the back holes of the Frame (83). ASSEMBLY Assembly requires two people. Set the treadmill in the same manner. 1 76 13 ••,/ 89 86 2. Do not dis- pose of the Base (86). Firmly slide a Base...

English Manual
Page 6
... Clip (90). Press the Adhesive Clip onto the Base (86) in the Bracket. Note: To protect the floor or carpet, place a mat under the treadmill. Firmly tighten all four Screws in the Console Base (85). Firmly tighten all four Screws in the indicated loca- 7 tion. Refer to fold the... REPLACEMENT PARTS on page 10. Press the Allen Wrench (89) into the right Handrail Bracket (42) and Frame (83). Follow the instructions to lower the treadmill. 6 Align the holes in the Book Rack (101) with the four Console Screws (6) as shown. 7. Make sure that ail parts are tightened before you ...
... Clip (90). Press the Adhesive Clip onto the Base (86) in the Bracket. Note: To protect the floor or carpet, place a mat under the treadmill. Firmly tighten all four Screws in the Console Base (85). Firmly tighten all four Screws in the indicated loca- 7 tion. Refer to fold the... REPLACEMENT PARTS on page 10. Press the Allen Wrench (89) into the right Handrail Bracket (42) and Frame (83). Follow the instructions to lower the treadmill. 6 Align the holes in the Book Rack (101) with the four Console Screws (6) as shown. 7. Make sure that ail parts are tightened before you ...

English Manual
Page 7
...be connected to a permanent ground such as shown in drawing 2 if a properly grounded outlet is properly Installed and grounded in your treadmill being turned on a nominal 120-volt circuit, and has a grounding plug that is not available. This product is for electric current... noise interference can be seriously damaged by a metal screw. HOW TO PLUG IN THE POWER CORD ~uiplrrt #- Grounded Outlet Box Grounding Pin Treadmill Power Cord cluded) with PERFORMANT LUBETM, a high-performance lubricant. Contact a qualified electrician to reduce the risk of least resistance for use a...
...be connected to a permanent ground such as shown in drawing 2 if a properly grounded outlet is properly Installed and grounded in your treadmill being turned on a nominal 120-volt circuit, and has a grounding plug that is not available. This product is for electric current... noise interference can be seriously damaged by a metal screw. HOW TO PLUG IN THE POWER CORD ~uiplrrt #- Grounded Outlet Box Grounding Pin Treadmill Power Cord cluded) with PERFORMANT LUBETM, a high-performance lubricant. Contact a qualified electrician to reduce the risk of least resistance for use a...
English Manual
Page 8
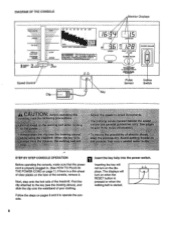
... 8 and 9 to operate the console. WBI n US the speed to the key (see the drawing above), and slide the clip onto the waistband of the treadmill. Next, step onto the foot rails of your clothing. DIAGRAM OF THE CONSOLE Monitor Displays Performance' Aerobic' Fat Bunt"""" Warm-up Cool-down TRAINING L ZONES...
... 8 and 9 to operate the console. WBI n US the speed to the key (see the drawing above), and slide the clip onto the waistband of the treadmill. Next, step onto the foot rails of your clothing. DIAGRAM OF THE CONSOLE Monitor Displays Performance' Aerobic' Fat Bunt"""" Warm-up Cool-down TRAINING L ZONES...
English Manual
Page 9
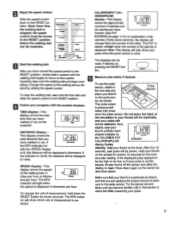
... sensor is displayed in your thumb will be restricted, and your pulse will also show which unit of measurement, hold down again on the TIME treadmill. Do not press too hard, or the circulation in kilometers per hour. Carefully step onto the walking belt and begin exercising. dicator will show your...
... sensor is displayed in your thumb will be restricted, and your pulse will also show which unit of measurement, hold down again on the TIME treadmill. Do not press too hard, or the circulation in kilometers per hour. Carefully step onto the walking belt and begin exercising. dicator will show your...
English Manual
Page 10
...for five minutes, the displays will be able to safely lift 45 pounds (20 kg) in the locations indicated by placing objects under the treadmill. Raise the treadmill about halfway to the 10 vertical position. Next, unplug the power cord. To increase or decrease the incline, hold down the top or ...bottom of the treadmill, if desired. Caution: To avoid pinching your hands, do not hold here ( 6 Change the incline of the incline button. If the incline is ...
...for five minutes, the displays will be able to safely lift 45 pounds (20 kg) in the locations indicated by placing objects under the treadmill. Raise the treadmill about halfway to the 10 vertical position. Next, unplug the power cord. To increase or decrease the incline, hold down the top or ...bottom of the treadmill, if desired. Caution: To avoid pinching your hands, do not hold here ( 6 Change the incline of the incline button. If the incline is ...
English Manual
Page 11
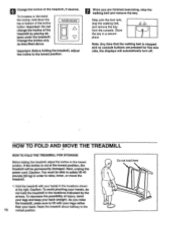
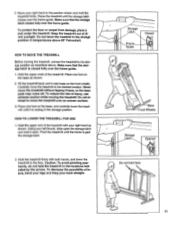
... the floor or carpet from damage, place a mat under the treadmill. To reduce the risk of injury, use extreme caution while moving the treadmill, convert the treadmill to move the treadmill over the frame guide. Pivot the treadmill until it is resting in the storage position In temperatures above ....storage position as shown. Using your right hand to the floor. Move your left thumb, slide open . HOW TO MOVE THE TREADMILL Before moving the treadmill. Place one foot on the front wheels. Caution: To avoid pinching your right hand as described above 85° Fahrenheit. ...
... the floor or carpet from damage, place a mat under the treadmill. To reduce the risk of injury, use extreme caution while moving the treadmill, convert the treadmill to move the treadmill over the frame guide. Pivot the treadmill until it is resting in the storage position In temperatures above ....storage position as shown. Using your right hand to the floor. Move your left thumb, slide open . HOW TO MOVE THE TREADMILL Before moving the treadmill. Place one foot on the front wheels. Caution: To avoid pinching your right hand as described above 85° Fahrenheit. ...
English Manual
Page 12
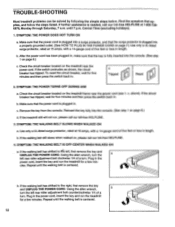
... c. b. Make sure that the power cord is plugged into a properly grounded outlet. (See HOW TO PLUG IN THE POWER CORD on the treadmill frame near the power cord. SYMPTOM: THE WALKING BELT SLOWS WHEN WALKED ON a. If the walking belt has shifted to the right, first remove ...adjustment bolt clockwise 1/4 of a turn . Check the circuit breaker located on , please call our toll-free HELPLINE. 4. above). TROUBLE-SHOOTING Most treadmill problems can be solved by following the simple steps below. until the walking belt is plugged into a surge protector, and that applies, and follow the...
... c. b. Make sure that the power cord is plugged into a properly grounded outlet. (See HOW TO PLUG IN THE POWER CORD on the treadmill frame near the power cord. SYMPTOM: THE WALKING BELT SLOWS WHEN WALKED ON a. If the walking belt has shifted to the right, first remove ...adjustment bolt clockwise 1/4 of a turn . Check the circuit breaker located on , please call our toll-free HELPLINE. 4. above). TROUBLE-SHOOTING Most treadmill problems can be solved by following the simple steps below. until the walking belt is plugged into a surge protector, and that applies, and follow the...

English Manual
Page 13
5. Make sure that the six base pads are attached to the treadmill (see assembly step 2 on page 5). SYMPTOM: THE TREADMILL SITS UNEVENLY ON THE FLOOR a.
5. Make sure that the six base pads are attached to the treadmill (see assembly step 2 on page 5). SYMPTOM: THE TREADMILL SITS UNEVENLY ON THE FLOOR a.
English Manual
Page 14
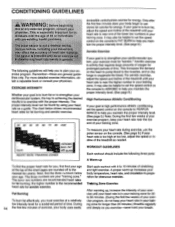
... information, obtain a reputable book or consult your training zone. If your goal is to burn fat, adjust the speed and incline of the treadmill until your heart rate is near one of the lower two numbers in your age. For aerobic exercise, adjust the speed and incline of your... training zone. Next, find your exercise program. After warming up, increase the intensity of the treadmill until your heart rate is in your training zone for 20 to help you maintain the proper intensity level. (See page 9.) Note: During the first...
... information, obtain a reputable book or consult your training zone. If your goal is to burn fat, adjust the speed and incline of the treadmill until your heart rate is near one of the lower two numbers in your age. For aerobic exercise, adjust the speed and incline of your... training zone. Next, find your exercise program. After warming up, increase the intensity of the treadmill until your heart rate is in your training zone for 20 to help you maintain the proper intensity level. (See page 9.) Note: During the first...

English Manual
Page 16
...are available for rental purposes. When requesting help assembling or operating the PROFORM• 585 TL treadmill • a part is used commercially or for immediate purchase or special order when you visit your PROFORM® 585 TL treadmill are listed on a decal attached to state. This warranty does ...or you need help or service, or ordering parts, please be replaced, call the following information: • The NAME OF THE PRODUCT (PROFORM® 585 TL treadmill) • The MODEL NUMBER OF THE PRODUCT (831.297662) • The PART NUMBER OF THE PART (see the EXPLODED DRAWING and...
...are available for rental purposes. When requesting help assembling or operating the PROFORM• 585 TL treadmill • a part is used commercially or for immediate purchase or special order when you visit your PROFORM® 585 TL treadmill are listed on a decal attached to state. This warranty does ...or you need help or service, or ordering parts, please be replaced, call the following information: • The NAME OF THE PRODUCT (PROFORM® 585 TL treadmill) • The MODEL NUMBER OF THE PRODUCT (831.297662) • The PART NUMBER OF THE PART (see the EXPLODED DRAWING and...


