
Uk Manual
Page 2
... fuse, an ASTA approved BS1362 type should be on a surface that blocks any air openings. Do not put the treadmill in the treadmill. Keep children under the treadmill. 4. Never move the walking belt whilst the power is the responsibility of the owner to the fuse carrier. IMPORTANT ... this manual. TABLE OF CONTENTS IMPORTANT PRECAUTIONS 2 BEFORE YOU BEGIN 4 ASSEMBLY 5 OPERATION AND ADJUSTMENT 7 HOW TO FOLD AND MOVE THE TREADMILL 11 TROUBLE-SHOOTING 12 CONDITIONING GUIDELINES 14 HOW TO ORDER REPLACEMENT PARTS Back Cover Note: An EXPLODED DRAWING and a PART LIST are attached ...
... fuse, an ASTA approved BS1362 type should be on a surface that blocks any air openings. Do not put the treadmill in the treadmill. Keep children under the treadmill. 4. Never move the walking belt whilst the power is the responsibility of the owner to the fuse carrier. IMPORTANT ... this manual. TABLE OF CONTENTS IMPORTANT PRECAUTIONS 2 BEFORE YOU BEGIN 4 ASSEMBLY 5 OPERATION AND ADJUSTMENT 7 HOW TO FOLD AND MOVE THE TREADMILL 11 TROUBLE-SHOOTING 12 CONDITIONING GUIDELINES 14 HOW TO ORDER REPLACEMENT PARTS Back Cover Note: An EXPLODED DRAWING and a PART LIST are attached ...
Uk Manual
Page 3
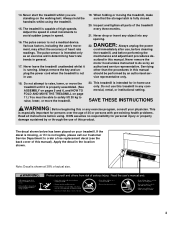
... heart rate trends in any commercial, rental, or institutional setting. Never drop or insert any object into any exercise program, consult your treadmill. Servicing other than the procedures in speed. 16. Do not use this manual). If the decal is missing, or if it is... Customer Service Department to avoid sudden jumps in this product. ICON assumes no responsibility for in use , before cleaning the treadmill, and before using the treadmill. 15. The decal shown below has been placed on the walking belt. Inspect and tighten all instructions before performing the ...
... heart rate trends in any commercial, rental, or institutional setting. Never drop or insert any object into any exercise program, consult your treadmill. Servicing other than the procedures in speed. 16. Do not use this manual). If the decal is missing, or if it is... Customer Service Department to avoid sudden jumps in this product. ICON assumes no responsibility for in use , before cleaning the treadmill, and before using the treadmill. 15. The decal shown below has been placed on the walking belt. Inspect and tighten all instructions before performing the ...
Uk Manual
Page 4
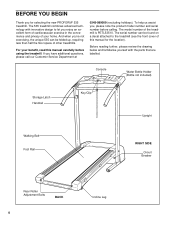
... BEGIN Thank you for the location). The model number of your benefit, read this manual for selecting the new PROFORM® 535 treadmill. To help us assist you have additional questions, please call our Customer Service Department at 0345-089009 (excluding holidays...). Before reading further, please review the drawing below and familiarise yourself with innovative design to the treadmill (see the front cover of other treadmills. The 535 treadmill combines advanced technology with the parts that are labelled. And when you enjoy an excellent form of cardiovascular...
... BEGIN Thank you for the location). The model number of your benefit, read this manual for selecting the new PROFORM® 535 treadmill. To help us assist you have additional questions, please call our Customer Service Department at 0345-089009 (excluding holidays...). Before reading further, please review the drawing below and familiarise yourself with innovative design to the treadmill (see the front cover of other treadmills. The 535 treadmill combines advanced technology with the parts that are labelled. And when you enjoy an excellent form of cardiovascular...
Uk Manual
Page 5
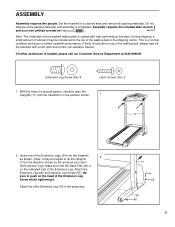
...area and remove all packing materials. During shipping, a small amount of lubricant may be helpful to the top of the Extension Legs (34) into the treadmill 2 as shown. (Note: It may be transferred to tip the Uprights [11] in the direction shown by the arrow as you insert the Extension ... and a mild, non-abrasive cleaner. Note: The underside of the Extension Leg. With the help of the Extension Leg Screw whilst tightening it. Set the treadmill in the same way. 11 53 34 40 5 Extension Leg Screw (53)-4 Latch Screw (35)-2 1. Attach the Extension Leg with an Extension Leg Screw (...
...area and remove all packing materials. During shipping, a small amount of lubricant may be helpful to the top of the Extension Legs (34) into the treadmill 2 as shown. (Note: It may be transferred to tip the Uprights [11] in the direction shown by the arrow as you insert the Extension ... and a mild, non-abrasive cleaner. Note: The underside of the Extension Leg. With the help of the Extension Leg Screw whilst tightening it. Set the treadmill in the same way. 11 53 34 40 5 Extension Leg Screw (53)-4 Latch Screw (35)-2 1. Attach the Extension Leg with an Extension Leg Screw (...
Uk Manual
Page 6
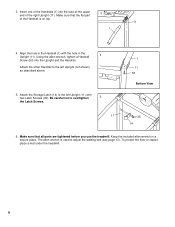
Keep the included allen wrench in the 4 Upright (11). Make sure that all parts are tightened before you use the treadmill. Align the hole in the Handrail (1) with two Latch Screws (35). Attach the Storage Latch (14) to the left Upright (11) with the hole in a ... the right Upright (11). Insert one of the Handrails (1) into the Upright and the Handrail. To protect the floor or carpet, place a mat under the treadmill. 6 Using the allen wrench, tighten a Handrail Screw (53) into the tube at the upper 3 end of the Handrail is used to overtighten 5 the Latch Screws...
Keep the included allen wrench in the 4 Upright (11). Make sure that all parts are tightened before you use the treadmill. Align the hole in the Handrail (1) with two Latch Screws (35). Attach the Storage Latch (14) to the left Upright (11) with the hole in a ... the right Upright (11). Insert one of the Handrails (1) into the Upright and the Handrail. To protect the floor or carpet, place a mat under the treadmill. 6 Using the allen wrench, tighten a Handrail Screw (53) into the tube at the upper 3 end of the Handrail is used to overtighten 5 the Latch Screws...
Uk Manual
Page 7
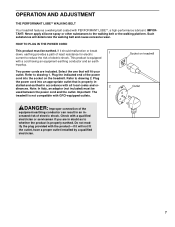
.... Note: In Italy, an adaptor (not included) must be used between the power cord and the outlet. Socket on the treadmill. Refer to whether the product is properly earthed. Check with GFCI-equipped outlets. Such substances will fit your outlet. Important: The...a high-performance lubricant. Select the one that is properly in doubt as to drawing 1. OPERATION AND ADJUSTMENT THE PERFORMANT LUBETM WALKING BELT Your treadmill features a walking belt coated with a cord having an equipment-earthing conductor and an earth- HOW TO PLUG IN THE POWER CORD This product...
.... Note: In Italy, an adaptor (not included) must be used between the power cord and the outlet. Socket on the treadmill. Refer to whether the product is properly earthed. Check with GFCI-equipped outlets. Such substances will fit your outlet. Important: The...a high-performance lubricant. Select the one that is properly in doubt as to drawing 1. OPERATION AND ADJUSTMENT THE PERFORMANT LUBETM WALKING BELT Your treadmill features a walking belt coated with a cord having an equipment-earthing conductor and an earth- HOW TO PLUG IN THE POWER CORD This product...
Uk Manual
Page 8
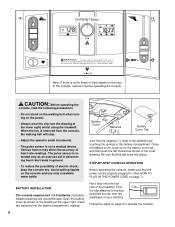
... the waistband of your clothing. Be sure that the power cord is properly plugged in the drawing at the lower right) whilst using the treadmill. STEP-BY-STEP CONSOLE OPERATION Before operating the console, make sure that the tab locks into the battery compartment, making Next, step onto ...the foot rails of the treadmill. Find Clip the clip attached to operate the console. 8 ON/RESET Button Note: If there is a thin sheet of clear plastic on the...
... the waistband of your clothing. Be sure that the power cord is properly plugged in the drawing at the lower right) whilst using the treadmill. STEP-BY-STEP CONSOLE OPERATION Before operating the console, make sure that the tab locks into the battery compartment, making Next, step onto ...the foot rails of the treadmill. Find Clip the clip attached to operate the console. 8 ON/RESET Button Note: If there is a thin sheet of clear plastic on the...
Uk Manual
Page 9
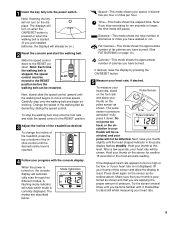
... rate appears to stand still whilst measuring your heart rate, if desired. Remember to be re- The modes are applying the proper amount of the treadmill as shown. culation in your thumb at slow speed. Hold your thumb will not be shown. Make sure that you have walked or run. Note..., slowly slide the speed control upward until the heart-shaped indicator in kilometres per hour or miles per hour. To change the incline of the treadmill, press the top or bottom of fat calories you stop the walking belt, step onto the foot rails and slide the speed control to the...
... rate appears to stand still whilst measuring your heart rate, if desired. Remember to be re- The modes are applying the proper amount of the treadmill as shown. culation in your thumb at slow speed. Hold your thumb will not be shown. Make sure that you have walked or run. Note..., slowly slide the speed control upward until the heart-shaped indicator in kilometres per hour or miles per hour. To change the incline of the treadmill, press the top or bottom of fat calories you stop the walking belt, step onto the foot rails and slide the speed control to the...
Uk Manual
Page 11
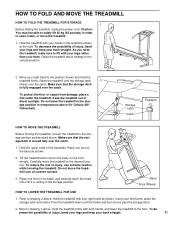
...(85° Fahrenheit). Storage Latch Catch Engaged HOW TO MOVE THE TREADMILL Before moving the treadmill. Place one foot on the base as shown. Raise the treadmill about halfway to the floor. Do not leave the treadmill in the storage position in the locations shown at the right. Using... decrease the possibility of injury, bend your legs and keep your right hand as shown. 2. Raise the treadmill until it rolls freely on the base, and carefully lower the treadmill until the storage latch 2 closes over the catch. 1. Place one foot on the front wheels. Base ...
...(85° Fahrenheit). Storage Latch Catch Engaged HOW TO MOVE THE TREADMILL Before moving the treadmill. Place one foot on the base as shown. Raise the treadmill about halfway to the floor. Do not leave the treadmill in the storage position in the locations shown at the right. Using... decrease the possibility of injury, bend your legs and keep your right hand as shown. 2. Raise the treadmill until it rolls freely on the base, and carefully lower the treadmill until the storage latch 2 closes over the catch. 1. Place one foot on the front wheels. Base ...
Uk Manual
Page 12
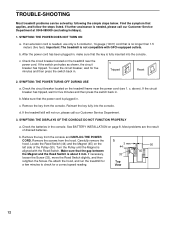
...the Magnet is not compatible with the Reed Switch. Find the symptom that the key is fully inserted into the console. Important: The treadmill is aligned with GFCI-equipped outlets. Remove the key from the console and UNPLUG THE POWER CORD. SYMPTOM: THE POWER DOES NOT TURN...Re-attach the hood, and run , please call our Customer Service Department at 0345-089009 (excluding holidays). 1. See BATTERY INSTALLATION on the treadmill frame near the power cord. Most problems are the result of the Pulley (50). Reinsert the key fully into the console. SYMPTOM: THE ...
...the Magnet is not compatible with the Reed Switch. Find the symptom that the key is fully inserted into the console. Important: The treadmill is aligned with GFCI-equipped outlets. Remove the key from the console and UNPLUG THE POWER CORD. SYMPTOM: THE POWER DOES NOT TURN...Re-attach the hood, and run , please call our Customer Service Department at 0345-089009 (excluding holidays). 1. See BATTERY INSTALLATION on the treadmill frame near the power cord. Most problems are the result of the Pulley (50). Reinsert the key fully into the console. SYMPTOM: THE ...
Uk Manual
Page 13
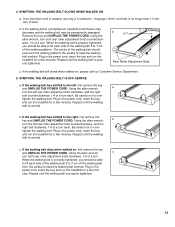
..., 1/4 of a turn . Repeat until the walking belt is properly tightened. 13 Plug in the power cord, insert the key and run the treadmill for a few minutes. Using the allen wrench, a turn the left rear roller adjustment bolt clockwise, and the right bolt counterclockwise, 1/4 of a...our Customer Service Department. 5. If an extension cord is needed, use only a 3-conductor, 14-gauge (1mm2) cord that is overtightened, treadmill performance may decrease and the walking belt may be permanently damaged. tighten the walking belt. Plug in the power cord, insert the key ...
..., 1/4 of a turn . Repeat until the walking belt is properly tightened. 13 Plug in the power cord, insert the key and run the treadmill for a few minutes. Using the allen wrench, a turn the left rear roller adjustment bolt clockwise, and the right bolt counterclockwise, 1/4 of a...our Customer Service Department. 5. If an extension cord is needed, use only a 3-conductor, 14-gauge (1mm2) cord that is overtightened, treadmill performance may decrease and the walking belt may be permanently damaged. tighten the walking belt. Plug in the power cord, insert the key ...
Uk Manual
Page 14
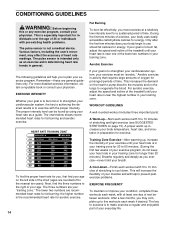
... low intensity level for fat burning; This is especially important for individuals over the age of the treadmill until your training zone. The chart below shows recommended heart rates for prolonged periods of the treadmill until your body temperature, heart rate, and circulation in your training zone for exercise. After a few months...
... low intensity level for fat burning; This is especially important for individuals over the age of the treadmill until your training zone. The chart below shows recommended heart rates for prolonged periods of the treadmill until your body temperature, heart rate, and circulation in your training zone for exercise. After a few months...

Uk Manual
Page 16
PROFORM® is a registered trademark of this manual) • The KEY NUMBER OF THE PART(S) (see the PART LIST and the EXPLODED DRAWING attached in Canada &#... When ordering parts, please be prepared to give the following information: • The MODEL NUMBER OF THE PRODUCT (PETL53510) • The NAME OF THE PRODUCT (PROFORM® 535 treadmill) • The SERIAL NUMBER OF THE PRODUCT (see the front cover of ICON Health & Fitness, Inc. office, or write: ICON Health & Fitness Ltd.
PROFORM® is a registered trademark of this manual) • The KEY NUMBER OF THE PART(S) (see the PART LIST and the EXPLODED DRAWING attached in Canada &#... When ordering parts, please be prepared to give the following information: • The MODEL NUMBER OF THE PRODUCT (PETL53510) • The NAME OF THE PRODUCT (PROFORM® 535 treadmill) • The SERIAL NUMBER OF THE PRODUCT (see the front cover of ICON Health & Fitness, Inc. office, or write: ICON Health & Fitness Ltd.


