

User Manual
Page 2
TABLE OF CONTENTS IMPORTANT PRECAUTIONS 3 BEFORE YOU BEGIN 5 ASSEMBLY 6 TREADMILL OPERATION 10 HOW TO FOLD AND MOVE THE TREADMILL 24 TROUBLESHOOTING 26 EXERCISE GUIDELINES 28 PART LIST 30 HOW TO ORDER REPLACEMENT PARTS Back Cover LIMITED WARRANTY Back Cover Note: An EXPLODED DRAWING is a registered trademark of this manual. PROFORM is attached in the center of ICON Health & Fitness, Inc. 2
TABLE OF CONTENTS IMPORTANT PRECAUTIONS 3 BEFORE YOU BEGIN 5 ASSEMBLY 6 TREADMILL OPERATION 10 HOW TO FOLD AND MOVE THE TREADMILL 24 TROUBLESHOOTING 26 EXERCISE GUIDELINES 28 PART LIST 30 HOW TO ORDER REPLACEMENT PARTS Back Cover LIMITED WARRANTY Back Cover Note: An EXPLODED DRAWING is a registered trademark of this manual. PROFORM is attached in the center of ICON Health & Fitness, Inc. 2
User Manual
Page 3
.... Do not wear loose clothes that all of the specifications described on the treadmill at a time. 8. Athletic support clothes are used by persons weighing more amps. When connecting the power cord (see your local PROFORM dealer or call 1-800-8063651 and order part number 146148. 15. Do ...not use a properly functioning surge suppressor could become caught in the treadmill. The pulse sensor is intended only as described in this treadmill are standing on any surface that ...
.... Do not wear loose clothes that all of the specifications described on the treadmill at a time. 8. Athletic support clothes are used by persons weighing more amps. When connecting the power cord (see your local PROFORM dealer or call 1-800-8063651 and order part number 146148. 15. Do ...not use a properly functioning surge suppressor could become caught in the treadmill. The pulse sensor is intended only as described in this treadmill are standing on any surface that ...
User Manual
Page 4
...using iFIT.com CDs and videos, an electronic "chirping" sound will change . DANGER: 25. Do not use , before cleaning the treadmill, and before the personal trainer describes the change before performing the main- WARNING: Before beginning this manual. ICON assumes no responsibility for...properly tighten all instructions before using them. 23. tenance and adjustment procedures de- Servicing other than the procedures in -home use of the treadmill every three months. 24. This is not legible, please call our Customer Service Department toll-free at 1-800-999-3756 and order a ...
...using iFIT.com CDs and videos, an electronic "chirping" sound will change . DANGER: 25. Do not use , before cleaning the treadmill, and before the personal trainer describes the change before performing the main- WARNING: Before beginning this manual. ICON assumes no responsibility for...properly tighten all instructions before using them. 23. tenance and adjustment procedures de- Servicing other than the procedures in -home use of the treadmill every three months. 24. This is not legible, please call our Customer Service Department toll-free at 1-800-999-3756 and order a ...
User Manual
Page 5
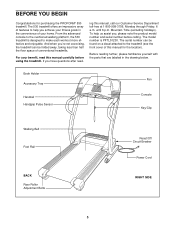
... be folded away, taking less than half the floor space of features to the cushioned walking platform, the 530 treadmill is PFTL51230. To help you have questions after read this manual, call our Customer Service Department toll-free at 1-800-999-3756, Monday ...Before reading further, please familiarize yourself with the parts that are labeled in the convenience of this manual for purchasing the PROFORM® 530 treadmill. The model number is designed to the treadmill (see the front cover of your benefit, read - And when you , please note the product model number and...
... be folded away, taking less than half the floor space of features to the cushioned walking platform, the 530 treadmill is PFTL51230. To help you have questions after read this manual, call our Customer Service Department toll-free at 1-800-999-3756, Monday ...Before reading further, please familiarize yourself with the parts that are labeled in the convenience of this manual for purchasing the PROFORM® 530 treadmill. The model number is designed to the treadmill (see the front cover of your benefit, read - And when you , please note the product model number and...
User Manual
Page 6
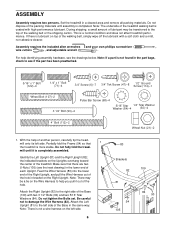
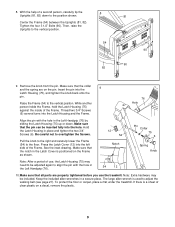
... During shipping, a small amount of lubricant may be transferred to see the drawings below. Do not fully fold the tread- Make sure that 1 the treadmill is completely assembled. Attach the Right Upright (82) to the left side. Attach the Left Upright (81) to the right side of the walking belt... the Wire Harness (83). Do not dispose of the packing materials until it out of each Upright. For help of another person, carefully tip the treadmill onto its left side of the walking belt, simply wipe off the lubricant with two 3 1/2" Bolts (90) and two 5/16" Star Washers (84)....
... During shipping, a small amount of lubricant may be transferred to see the drawings below. Do not fully fold the tread- Make sure that 1 the treadmill is completely assembled. Attach the Right Upright (82) to the left side. Attach the Left Upright (81) to the right side of the walking belt... the Wire Harness (83). Do not dispose of the packing materials until it out of each Upright. For help of another person, carefully tip the treadmill onto its left side of the walking belt, simply wipe off the lubricant with two 3 1/2" Bolts (90) and two 5/16" Star Washers (84)....

User Manual
Page 7
...). Note: There is on the screwdriver when tightening the Tek Screws. Insert a Wheel Housing (106) into the upper end of a second person, carefully tip the treadmill so the four Base Pads (100) are resting on the floor. 4. Make sure that the Wheel Bolt (107) is not a wire harness in the same...
...). Note: There is on the screwdriver when tightening the Tek Screws. Insert a Wheel Housing (106) into the upper end of a second person, carefully tip the treadmill so the four Base Pads (100) are resting on the floor. 4. Make sure that the Wheel Bolt (107) is not a wire harness in the same...
User Manual
Page 9
... sure that all parts are on a decal, remove the plastic. 9 To protect the floor or carpet, place a mat under the treadmill. The large allen wrench is a sheet of use the treadmill. With the help of the Frame. Raise the Frame (54) to the floor. Pull the knob to the right and carefully...
... sure that all parts are on a decal, remove the plastic. 9 To protect the floor or carpet, place a mat under the treadmill. The large allen wrench is a sheet of use the treadmill. With the help of the Frame. Raise the Frame (54) to the floor. Pull the knob to the right and carefully...
User Manual
Page 10
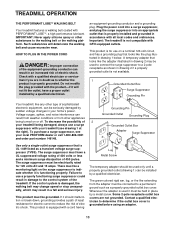
...electronic equipment, can result from weather conditions or from the adapter must be held in place by sudden voltage changes in your local PROFORM dealer or call 1-800-806-3651 and order part number 146148. The surge suppressor must be installed by a qualified electrician. ...it will deteriorate the walking belt and cause excessive wear. This product is not available. 1 Grounded Outlet Box Surge Suppressor Grounding Pin Your treadmill, like the adapter illustrated in drawing 2 may result in drawing 2 if a properly grounded outlet is equipped with a qualified electrician or...
...electronic equipment, can result from weather conditions or from the adapter must be held in place by sudden voltage changes in your local PROFORM dealer or call 1-800-806-3651 and order part number 146148. The surge suppressor must be installed by a qualified electrician. ...it will deteriorate the walking belt and cause excessive wear. This product is not available. 1 Grounded Outlet Box Surge Suppressor Grounding Pin Your treadmill, like the adapter illustrated in drawing 2 may result in drawing 2 if a properly grounded outlet is equipped with a qualified electrician or...
User Manual
Page 11
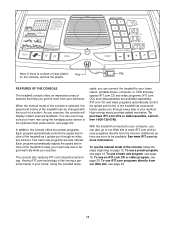
...use an iFIT.com CD or video program, see page 20. To use a preset program, see page 16. FEATURES OF THE CONSOLE The treadmill console offers an impressive array of features that help you through every step of your workouts. As you through an effective workout. iFIT.com CD...access programs directly from our Web site, see page 23). Additional options are also offered. Each program automatically adjusts the speed and incline of the treadmill to be changed with the touch of a button. High-energy music provides added motivation. To use a heart rate program, see page 14. ...
...use an iFIT.com CD or video program, see page 20. To use a preset program, see page 16. FEATURES OF THE CONSOLE The treadmill console offers an impressive array of features that help you through every step of your workouts. As you through an effective workout. iFIT.com CD...access programs directly from our Web site, see page 23). Additional options are also offered. Each program automatically adjusts the speed and incline of the treadmill to be changed with the touch of a button. High-energy music provides added motivation. To use a heart rate program, see page 14. ...
User Manual
Page 12
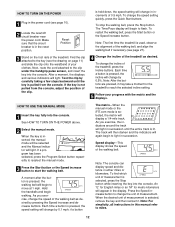
... you exercise, the indicators around the track will light. Each time a button is not pulled from the console. To change the incline of the treadmill, press the Incline buttons. Each time a button is selected, the matrix will change the unit of measurement. The matrix-When the manual mode or... as desired. The Time/Pace display will again begin to reach the selected incline setting. 5 Follow your clothes. Note: The first time the treadmill is inserted, the manual mode will be selected and the Manual indicator will light in succession until the key is selected, remove the key and...
... you exercise, the indicators around the track will light. Each time a button is not pulled from the console. To change the incline of the treadmill, press the Incline buttons. Each time a button is selected, the matrix will change the unit of measurement. The matrix-When the manual mode or... as desired. The Time/Pace display will again begin to reach the selected incline setting. 5 Follow your clothes. Note: The first time the treadmill is inserted, the manual mode will be selected and the Manual indicator will light in succession until the key is selected, remove the key and...

User Manual
Page 13
...key from one number to the other every few minutes after the key is removed, the console is folded to the storage position or the treadmill will change from one number to the lowest setting. To turn on the metal contacts. Note: A few seconds. Distance/Incline display-This ...the displays, press the Stop button, remove the key, and then reinsert the key. 6 Measure your heart rate when you are finished using the treadmill, switch the reset/off circuit breaker to the other every few seconds. Time/Pace display- When a program is intended to hold the handrails for...
...key from one number to the other every few minutes after the key is removed, the console is folded to the storage position or the treadmill will change from one number to the lowest setting. To turn on the metal contacts. Note: A few seconds. Distance/Incline display-This ...the displays, press the Stop button, remove the key, and then reinsert the key. 6 Measure your heart rate when you are finished using the treadmill, switch the reset/off circuit breaker to the other every few seconds. Time/Pace display- When a program is intended to hold the handrails for...

User Manual
Page 14
...incline settings of the program. The speed setting for the second segment will then be shown in the flashing Current Segment column and the treadmill will be programmed for a few times a Speed button is pressed, an additional indicator will light or darken in the Current Segment ...The matrix will will move downward so that only the highest indicators appear in the flashing Current Segment column of the program begins, the treadmill will automatically adjust to a stop. To select a personal trainer program, press the Program Select button repeatedly until the speed setting for the...
...incline settings of the program. The speed setting for the second segment will then be shown in the flashing Current Segment column and the treadmill will be programmed for a few times a Speed button is pressed, an additional indicator will light or darken in the Current Segment ...The matrix will will move downward so that only the highest indicators appear in the flashing Current Segment column of the program begins, the treadmill will automatically adjust to a stop. To select a personal trainer program, press the Program Select button repeatedly until the speed setting for the...

User Manual
Page 15
When the next segment of the treadmill is in a secure place. See page 23 and turn off position and unplug the power cord. 15 See step 6 on page 13. ... the key is removed, the console is at the lowest setting. Next, remove the key from the console. When you are finished using the treadmill, switch the reset/off circuit breaker to move at any time, press the Stop button. See step 7 on page 12. 5 Measure your ... and put it in the "demo" mode. When the program ends, make sure that the incline of the program begins, the treadmill will begin to the off the demo mode.
When the next segment of the treadmill is in a secure place. See page 23 and turn off position and unplug the power cord. 15 See step 6 on page 13. ... the key is removed, the console is at the lowest setting. Next, remove the key from the console. When you are finished using the treadmill, switch the reset/off circuit breaker to move at any time, press the Stop button. See step 7 on page 12. 5 Measure your ... and put it in the "demo" mode. When the program ends, make sure that the incline of the program begins, the treadmill will begin to the off the demo mode.

User Manual
Page 17
...the letters "PLS" will automatically increase or decrease to bring your heart rate closer to the first speed and incline settings of the treadmill may automatically decrease until the last segment ends. Hold the handrails and begin walking. During the last three seconds of each segment. ...progress with the optional chest pulse sensor. Heart rate programs cannot be stopped temporarily and then restarted. If your heart rate is pressed, the treadmill will regularly compare your heart rate to a stop the program at the beginning. 8 Follow your heart rate to the target heart rate....
...the letters "PLS" will automatically increase or decrease to bring your heart rate closer to the first speed and incline settings of the treadmill may automatically decrease until the last segment ends. Hold the handrails and begin walking. During the last three seconds of each segment. ...progress with the optional chest pulse sensor. Heart rate programs cannot be stopped temporarily and then restarted. If your heart rate is pressed, the treadmill will regularly compare your heart rate to a stop the program at the beginning. 8 Follow your heart rate to the target heart rate....
User Manual
Page 18
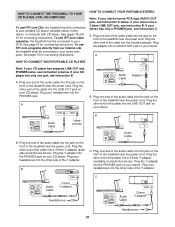
...LEFT Adapter B. Plug one end of the audio cable into the PHONES jack. Plug your headphones into the jack on the front of the treadmill near the power cord. C Audio Cable 3.5mm Y-adapter Headphones Audio Cable PHONES 3.5mm Y-adapter Headphones 18 Plug the adapter into the jack...PHONES jack, see instruction C. See pages 18 and 19 for connecting instructions. To use iFIT.com programs directly from our internet site, the treadmill must be connected to your stereo has an RCA-type AUDIO OUT jack, see instruction B. See page 19 for connecting instructions. HOW TO CONNECT...
...LEFT Adapter B. Plug one end of the audio cable into the PHONES jack. Plug your headphones into the jack on the front of the treadmill near the power cord. C Audio Cable 3.5mm Y-adapter Headphones Audio Cable PHONES 3.5mm Y-adapter Headphones 18 Plug the adapter into the jack...PHONES jack, see instruction C. See pages 18 and 19 for connecting instructions. To use iFIT.com programs directly from our internet site, the treadmill must be connected to your stereo has an RCA-type AUDIO OUT jack, see instruction B. See page 19 for connecting instructions. HOW TO CONNECT...

User Manual
Page 19
...B. Plug the Y-adapter into the included adapter. A. If your computer has only a PHONES jack, see instruction B. Plug the other end of the treadmill near the power cord. Plug the Y-adapter into a 3.5mm Y-adapter (available at electronics stores). Plug the other end of the cable into the ...OUT jack, see instruction A below. Plug one end of the audio cable into the jack on your stereo. Plug the other side of the treadmill near the power cord. B. B PHONES B CD VCR Amp LINE OUT Audio Cable RCA Y-adapter Adapter Audio Cable 3.5mm Y-adapter Headphones/Speakers...
...B. Plug the Y-adapter into the included adapter. A. If your computer has only a PHONES jack, see instruction B. Plug the other end of the treadmill near the power cord. Plug the Y-adapter into a 3.5mm Y-adapter (available at electronics stores). Plug the other end of the cable into the ...OUT jack, see instruction A below. Plug one end of the audio cable into the jack on your stereo. Plug the other side of the treadmill near the power cord. B. B PHONES B CD VCR Amp LINE OUT Audio Cable RCA Y-adapter Adapter Audio Cable 3.5mm Y-adapter Headphones/Speakers...
User Manual
Page 20
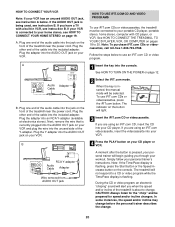
...'s instructions. If your VCR is currently plugged into the AUDIO OUT jack on your VCR and plug the wire into the unused side of the treadmill near the power cord. Plug one end of the audio cable into your portable CD player, portable stereo, home stereo, computer with a built-in VCR... other end of the cable into the AUDIO OUT jack on pages 18 to your home stereo, see instruction B. B ANT. See HOW TO CONNECT THE TREADMILL TO YOUR CD PLAYER, VCR, OR COMPUTER on your personal trainer will not respond to change . 20 Plug the adapter into the included adapter. Plug...
...'s instructions. If your VCR is currently plugged into the AUDIO OUT jack on your VCR and plug the wire into the unused side of the treadmill near the power cord. Plug one end of the audio cable into your portable CD player, portable stereo, home stereo, computer with a built-in VCR... other end of the cable into the AUDIO OUT jack on pages 18 to your home stereo, see instruction B. B ANT. See HOW TO CONNECT THE TREADMILL TO YOUR CD PLAYER, VCR, OR COMPUTER on your personal trainer will not respond to change . 20 Plug the adapter into the included adapter. Plug...

User Manual
Page 21
... stop the walking belt at any time by pressing the Speed or Incline buttons on the console. Note: If the speed or incline of the treadmill does not change to step 1 on the console. • Adjust the volume of the CD or video program.
... stop the walking belt at any time by pressing the Speed or Incline buttons on the console. Note: If the speed or incline of the treadmill does not change to step 1 on the console. • Adjust the volume of the CD or video program.
User Manual
Page 22
... DIRECTLY FROM OUR WEB SITE To use programs from our Web site, the treadmill must have an internet connection and an internet service provider. To use another ...and/or incline of the program. The indicator on the button will begin to the next settings of the treadmill is found on the console. During the program, an electronic "chirping" sound will change to flash. See... your web browser, if necessary, and go to move . 22 The Time/Pace display will begin to the treadmill and stand on page 12. 2 Select the iFIT.com mode. Follow the steps below to change when a ...
... DIRECTLY FROM OUR WEB SITE To use programs from our Web site, the treadmill must have an internet connection and an internet service provider. To use another ...and/or incline of the program. The indicator on the button will begin to the next settings of the treadmill is found on the console. During the program, an electronic "chirping" sound will change to flash. See... your web browser, if necessary, and go to move . 22 The Time/Pace display will begin to the treadmill and stand on page 12. 2 Select the iFIT.com mode. Follow the steps below to change when a ...
User Manual
Page 23
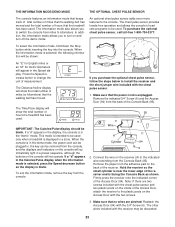
... wire included with the 3/4" Screw (6). If you to be removed from the adhesive pad on the console will show the total number of hours the treadmill has been used . If a "d" appears in a preset sequence, although the buttons on the back of the receiver. Make sure that no wires are two screws... included with the receiver may be used only when a treadmill is in the demo mode, the power cord can be plugged in, the key can be used . Wire A Cylinder 94 6 2. Firmly press the receiver ...
... wire included with the 3/4" Screw (6). If you to be removed from the adhesive pad on the console will show the total number of hours the treadmill has been used . If a "d" appears in a preset sequence, although the buttons on the back of the receiver. Make sure that no wires are two screws... included with the receiver may be used only when a treadmill is in the demo mode, the power cord can be plugged in, the key can be used . Wire A Cylinder 94 6 2. Firmly press the receiver ...


