
Instruction Manual
Page 1
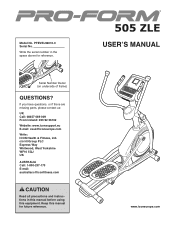
...: UK Call: 08457 089 009 From Ireland: 053 92 36102 Website: www.iconsupport.eu E-mail: [email protected] Write: ICON Health & Fitness, Ltd. USERʼS MANUAL www.iconeurope.com c/o HI Group PLC Express Way Whitwood, West Yorkshire WF10 5QJ UK AUSTRALIA Call: 1-800-237-173 E-mail: [email protected] CAUTION Read... space above for future reference. Keep this equipment. PFEVEL96010.0 Serial No. Serial Number Decal (on underside of frame) QUESTIONS? Write the serial number in this manual before using this manual for reference. Model No.
...: UK Call: 08457 089 009 From Ireland: 053 92 36102 Website: www.iconsupport.eu E-mail: [email protected] Write: ICON Health & Fitness, Ltd. USERʼS MANUAL www.iconeurope.com c/o HI Group PLC Express Way Whitwood, West Yorkshire WF10 5QJ UK AUSTRALIA Call: 1-800-237-173 E-mail: [email protected] CAUTION Read... space above for future reference. Keep this equipment. PFEVEL96010.0 Serial No. Serial Number Decal (on underside of frame) QUESTIONS? Write the serial number in this manual before using this manual for reference. Model No.
Instruction Manual
Page 2
Apply the decal in the location shown. PROFORM is missing or illegible, see the front cover of this manual and request a free replacement decal. TABLE OF CONTENTS WARNING DECAL PLACEMENT 2 IMPORTANT PRECAUTIONS 3 BEFORE YOU BEGIN 4 ASSEMBLY 5 HOW TO USE THE CHEST PULSE SENSOR 12 ...
Apply the decal in the location shown. PROFORM is missing or illegible, see the front cover of this manual and request a free replacement decal. TABLE OF CONTENTS WARNING DECAL PLACEMENT 2 IMPORTANT PRECAUTIONS 3 BEFORE YOU BEGIN 4 ASSEMBLY 5 HOW TO USE THE CHEST PULSE SENSOR 12 ...
Instruction Manual
Page 3
... become caught on the elliptical. The pulse sensor is not a medical device. The pulse sensor is intended only as described in this manual. 9. The elliptical should not be used by or through the use of this product. 1. IMPORTANT PRECAUTIONS WARNING: To reduce the risk... of serious injury, read all important precautions and instructions in this manual and all warnings on your elliptical before using your back straight while using the elliptical. 4. Always wear athletic shoes for personal injury...
... become caught on the elliptical. The pulse sensor is not a medical device. The pulse sensor is intended only as described in this manual. 9. The elliptical should not be used by or through the use of this product. 1. IMPORTANT PRECAUTIONS WARNING: To reduce the risk... of serious injury, read all important precautions and instructions in this manual and all warnings on your elliptical before using your back straight while using the elliptical. 4. Always wear athletic shoes for personal injury...
Instruction Manual
Page 4
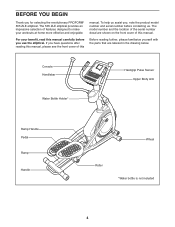
...designed to make your benefit, read this manual carefully before contacting us. The 505 ZLE elliptical provides an impressive selection of this manual. The model number and the location of this manual. BEFORE YOU BEGIN Thank you have questions after reading this manual, please see the front cover of ...the serial number decal are labeled in the drawing below. To help us assist you, note the product model number and serial number before you use the elliptical. If you for selecting the revolutionary PROFORM® 505 ZLE elliptical....
...designed to make your benefit, read this manual carefully before contacting us. The 505 ZLE elliptical provides an impressive selection of this manual. The model number and the location of this manual. BEFORE YOU BEGIN Thank you have questions after reading this manual, please see the front cover of ...the serial number decal are labeled in the drawing below. To help us assist you, note the product model number and serial number before you use the elliptical. If you for selecting the revolutionary PROFORM® 505 ZLE elliptical....

Instruction Manual
Page 5
... needed for assembly. The number following the key number is the key number of the part, from the PART LIST near the end of this manual. Place all parts of the packing materials until assembly is not in the hardware kit, check to identify the small parts needed for assembly. Note...
... needed for assembly. The number following the key number is the key number of the part, from the PART LIST near the end of this manual. Place all parts of the packing materials until assembly is not in the hardware kit, check to identify the small parts needed for assembly. Note...

Instruction Manual
Page 15
... pulse sensor or the included chest pulse sensor. To turn off the console, see page 16. iFit cards are available separately. To use the manual mode of the pedals and prompts you through your pedaling pace as it guides you to www.iFit.com or see page 19. To change... help you achieve specific fitness goals. To purchase iFit cards, go to vary your workouts. Note: If there is a sheet of this manual. When you use the manual mode, see page 16. While you exercise. Each workout automatically changes the resistance of the console, you through an effective workout. You can...
... pulse sensor or the included chest pulse sensor. To turn off the console, see page 16. iFit cards are available separately. To use the manual mode of the pedals and prompts you through your pedaling pace as it guides you to www.iFit.com or see page 19. To change... help you achieve specific fitness goals. To purchase iFit cards, go to vary your workouts. Note: If there is a sheet of this manual. When you use the manual mode, see page 16. While you exercise. Each workout automatically changes the resistance of the console, you through an effective workout. You can...
Instruction Manual
Page 16
...pressed, the console will turn off and the display will pause. Change the resistance of revolutions) that you have selected a workout, reselect the manual mode by pressing the Resistance increase and decrease buttons. As you press the buttons, it will take a moment for several seconds, a tone... , the displays will light and the console will be selected. If the pedals do this, the electrical components on the console, the manual mode will be ready for several minutes and the buttons are finished exercising, unplug the power adapter. IMPORTANT: If you turn on page ...
...pressed, the console will turn off and the display will pause. Change the resistance of revolutions) that you have selected a workout, reselect the manual mode by pressing the Resistance increase and decrease buttons. As you press the buttons, it will take a moment for several seconds, a tone... , the displays will light and the console will be selected. If the pedals do this, the electrical components on the console, the manual mode will be ready for several minutes and the buttons are finished exercising, unplug the power adapter. IMPORTANT: If you turn on page ...
Instruction Manual
Page 18
... 16. See HOW TO TURN OFF THE CONSOLE on page 17. 6. Make sure to pedal at any button on the console to alert you can manually override the setting by pressing the Resistance buttons. See step 4 on the fan if desired. The flashing segment of the profile represents the current segment...
... 16. See HOW TO TURN OFF THE CONSOLE on page 17. 6. Make sure to pedal at any button on the console to alert you can manually override the setting by pressing the Resistance buttons. See step 4 on the fan if desired. The flashing segment of the profile represents the current segment...
Instruction Manual
Page 19
... workouts function in a secure place. 19 To purchase iFit cards, go to www.iFit.com or see steps 3 to turn on the side of this manual. make sure that the console has been used since the elliptical was purchased. The AUTO option keeps the backlight on page 16. iFit cards are...
... workouts function in a secure place. 19 To purchase iFit cards, go to www.iFit.com or see steps 3 to turn on the side of this manual. make sure that the console has been used since the elliptical was purchased. The AUTO option keeps the backlight on page 16. iFit cards are...
Instruction Manual
Page 21
... left disc from the Magnet (43). then, wipe off any excess grease. 69 43 38 21 Turn the Pulley (19) until a thin film of this manual. HOW TO ADJUST THE REED SWITCH If the console does not display correct feedback, the reed switch should be adjusted. Repeat these actions until the...
... left disc from the Magnet (43). then, wipe off any excess grease. 69 43 38 21 Turn the Pulley (19) until a thin film of this manual. HOW TO ADJUST THE REED SWITCH If the console does not display correct feedback, the reed switch should be adjusted. Repeat these actions until the...
Instruction Manual
Page 24
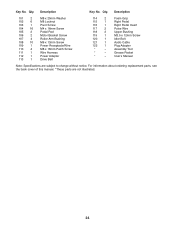
... Bushing M3.5 x 12mm Screw Idler Bolt Audio Cable Plug Adapter Assembly Tool Grease Packet Userʼs Manual Note: Specifications are not illustrated. 24 For information about ordering replacement parts, see the back cover of this manual. *These parts are subject to change without notice. Description 101 2 102 6 103 1 104 16 105 2 106...
... Bushing M3.5 x 12mm Screw Idler Bolt Audio Cable Plug Adapter Assembly Tool Grease Packet Userʼs Manual Note: Specifications are not illustrated. 24 For information about ordering replacement parts, see the back cover of this manual. *These parts are subject to change without notice. Description 101 2 102 6 103 1 104 16 105 2 106...
Instruction Manual
Page 28
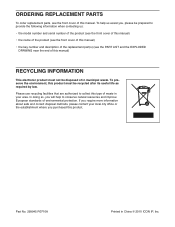
... : • the model number and serial number of the product (see the front cover of this manual) • the name of the product (see the front cover of this manual) • the key number and description of the replacement part(s) (see the front cover of this... manual) RECYCLING INFORMATION This electronic product must be disposed of in China © 2010 ICON IP, Inc. Part No. 299945...REPLACEMENT PARTS To order replacement parts, see the PART LIST and the EXPLODED DRAWING near the end of this manual.
... : • the model number and serial number of the product (see the front cover of this manual) • the name of the product (see the front cover of this manual) • the key number and description of the replacement part(s) (see the front cover of this... manual) RECYCLING INFORMATION This electronic product must be disposed of in China © 2010 ICON IP, Inc. Part No. 299945...REPLACEMENT PARTS To order replacement parts, see the PART LIST and the EXPLODED DRAWING near the end of this manual.


