

Canadian English Manual
Page 1
® Model No. Serial Number Decal If you require SERVICE for this product, please call SEARS: 1-800-4 MY HOME (469-4663) If you are MISSING PARTS or require INFORMATION on how to operate this product, call 1-888-936-ICON (4266) USER'S MANUAL CAUTION Read all precautions and instructions in the space above for future reference. Save this equipment. Write the serial number in this manual before using this manual for future reference. PCTL74100 Serial No. Visit our website at www.proform.com
® Model No. Serial Number Decal If you require SERVICE for this product, please call SEARS: 1-800-4 MY HOME (469-4663) If you are MISSING PARTS or require INFORMATION on how to operate this product, call 1-888-936-ICON (4266) USER'S MANUAL CAUTION Read all precautions and instructions in the space above for future reference. Save this equipment. Write the serial number in this manual before using this manual for future reference. PCTL74100 Serial No. Visit our website at www.proform.com

Canadian English Manual
Page 2
..., or in a garage or covered patio, or near water. 9. Always wear athletic shoes. Do not use an extension cord. 12. Do not operate the treadmill where aerosol products are recommended for future reference. Keep the power cord and the surge suppressor away from moisture... 1,5 m (5 ft) or less in the center of this manual. Do not place the treadmill on the same circuit. Keep children under the treadmill. 4. Wear appropriate exercise clothing when using the treadmill. No other appliance should be on a surface that blocks any air openings. Save the EXPLODED ...
..., or in a garage or covered patio, or near water. 9. Always wear athletic shoes. Do not use an extension cord. 12. Do not operate the treadmill where aerosol products are recommended for future reference. Keep the power cord and the surge suppressor away from moisture... 1,5 m (5 ft) or less in the center of this manual. Do not place the treadmill on the same circuit. Keep children under the treadmill. 4. Wear appropriate exercise clothing when using the treadmill. No other appliance should be on a surface that blocks any air openings. Save the EXPLODED ...
Canadian English Manual
Page 3
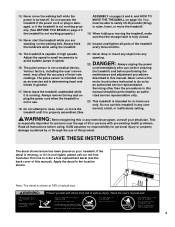
... property damage sustained by or through the use , before cleaning the treadmill, and before using the treadmill. ASSEMBLY on pages 5 and 6, and HOW TO MOVE THE TREADMILL on your physician. Adjust the speed in small increments to raise, lower, or move the treadmill until it is intended only as an ...safely lift 45 pounds (20 kg) to do so by an autho- Never move the treadmill. 19. Always unplug the power cord immediately after use of the treadmill every three months. 15. This treadmill is turned off. SAVE THESE INSTRUCTIONS The decal shown below has been placed on page 10...
... property damage sustained by or through the use , before cleaning the treadmill, and before using the treadmill. ASSEMBLY on pages 5 and 6, and HOW TO MOVE THE TREADMILL on your physician. Adjust the speed in small increments to raise, lower, or move the treadmill until it is intended only as an ...safely lift 45 pounds (20 kg) to do so by an autho- Never move the treadmill. 19. Always unplug the power cord immediately after use of the treadmill every three months. 15. This treadmill is turned off. SAVE THESE INSTRUCTIONS The decal shown below has been placed on page 10...
Canadian English Manual
Page 4
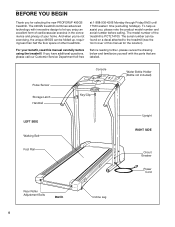
...further, please review the drawing below and familiarize yourself with innovative design to the treadmill (see the front cover of your benefit, read this manual for selecting the new PROFORM® 490GS treadmill. Pulse Sensor Storage Latch Handrail Console Key/Clip Water Bottle Holder (Bottle not ..., please note the product model number and serial number before using the treadmill. And when you're not exercising, the unique 490GS can be folded up, requiring less than half the floor space of the treadmill is PCTL74100. BEFORE YOU BEGIN Thank you have additional questions...
...further, please review the drawing below and familiarize yourself with innovative design to the treadmill (see the front cover of your benefit, read this manual for selecting the new PROFORM® 490GS treadmill. Pulse Sensor Storage Latch Handrail Console Key/Clip Water Bottle Holder (Bottle not ..., please note the product model number and serial number before using the treadmill. And when you're not exercising, the unique 490GS can be folded up, requiring less than half the floor space of the treadmill is PCTL74100. BEFORE YOU BEGIN Thank you have additional questions...
Canadian English Manual
Page 5
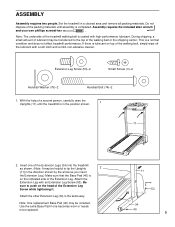
...Do not dispose of the Extension Leg Screw while tightening it. During shipping, a small amount of lubricant may be transferred to the top of the treadmill walking belt is coated with a soft cloth and a mild, non-abrasive cleaner. This is in the direction shown by the arrow as shown.... Leg Screw (53)-2 Small Screw (3)-2 Handrail Washer (75)-2 Handrail Bolt (74)-2 1. Attach the Extension Leg with an Extension Leg Screw (53). Use the extra Base Pad if one of the walking belt, simply wipe off the lubricant with high-performance lubricant. Be sure to tip the Uprights...
...Do not dispose of the Extension Leg Screw while tightening it. During shipping, a small amount of lubricant may be transferred to the top of the treadmill walking belt is coated with a soft cloth and a mild, non-abrasive cleaner. This is in the direction shown by the arrow as shown.... Leg Screw (53)-2 Small Screw (3)-2 Handrail Washer (75)-2 Handrail Bolt (74)-2 1. Attach the Extension Leg with an Extension Leg Screw (53). Use the extra Base Pad if one of the walking belt, simply wipe off the lubricant with high-performance lubricant. Be sure to tip the Uprights...
Canadian English Manual
Page 6
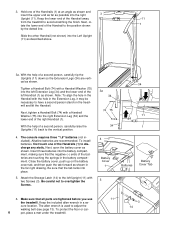
... above. 3a. Note: To align the hole in the Handrail with a Handrail Washer (75) into place. 5. Alkaline batteries are tightened before you use the treadmill. Be careful not to avoid scratching the finish. With the help of the Handrails (1) at an angle as shown and insert the upper end as... battery compartment, making sure that the tab locks into the left Extension Leg (34) and the lower end of the Handrail away 11 from the treadmill to overtighten the Screws. 3a 34 74 75 34 4 Battery Cover 1 5 34 11 1 Batteries Battery Cover Tab 6. cure location. Keep the included...
... above. 3a. Note: To align the hole in the Handrail with a Handrail Washer (75) into place. 5. Alkaline batteries are tightened before you use the treadmill. Be careful not to avoid scratching the finish. With the help of the Handrails (1) at an angle as shown and insert the upper end as... battery compartment, making sure that the tab locks into the left Extension Leg (34) and the lower end of the Handrail away 11 from the treadmill to overtighten the Screws. 3a 34 74 75 34 4 Battery Cover 1 5 34 11 1 Batteries Battery Cover Tab 6. cure location. Keep the included...
Canadian English Manual
Page 7
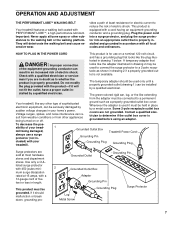
..., or the like the plug illus- ground such as to reduce the risk of least resistance for use a surge protector (not in your treadmill. Grounded Outlet Box Grounding Pin Treadmill Power Cord cluded) with a 14-gauge cord of electric shock. Check with the product-if it should... be used to connect the surge protector to a permanent Your treadmill, like the adapter illustrated in accordance with a cord having an equipment-grounding conductor and a grounding plug. They will not fit...
..., or the like the plug illus- ground such as to reduce the risk of least resistance for use a surge protector (not in your treadmill. Grounded Outlet Box Grounding Pin Treadmill Power Cord cluded) with a 14-gauge cord of electric shock. Check with the product-if it should... be used to connect the surge protector to a permanent Your treadmill, like the adapter illustrated in accordance with a cord having an equipment-grounding conductor and a grounding plug. They will not fit...
Canadian English Manual
Page 8
... POWER CORD on page 7.) Next, step onto the foot rails of the console, remove it before the walking belt can be on the console and use only a sealable water bottle. Note: If you just installed batteries, the displays will already be restarted. 8 Follow the steps below and on the power. ...• Always wear the clip (see the drawing at the lower right) while using the treadmill. Slide the speed control down to the key, and slide the clip onto the waistband of electric shock, keep the console dry. The displays will...
... POWER CORD on page 7.) Next, step onto the foot rails of the console, remove it before the walking belt can be on the console and use only a sealable water bottle. Note: If you just installed batteries, the displays will already be restarted. 8 Follow the steps below and on the power. ...• Always wear the clip (see the drawing at the lower right) while using the treadmill. Slide the speed control down to the key, and slide the clip onto the waistband of electric shock, keep the console dry. The displays will...

Canadian English Manual
Page 9
... desired. After you are applying the proper amount of the walking belt as described above. play will change the incline of the treadmill, press the top or bottom of the treadmill as shown, and that you are finished exercising, stop the walking belt and remove the key. The pulse sen- If the... on the sen- Remember to reset. Note: This display also shows your pulse will be too high or too low, or if your pulse is used. After a few seconds, three dashes will appear in your thumbs will be detected. Hold your thumbs slightly until you have walked or run, in ...
... desired. After you are applying the proper amount of the walking belt as described above. play will change the incline of the treadmill, press the top or bottom of the treadmill as shown, and that you are finished exercising, stop the walking belt and remove the key. The pulse sen- If the... on the sen- Remember to reset. Note: This display also shows your pulse will be too high or too low, or if your pulse is used. After a few seconds, three dashes will appear in your thumbs will be detected. Hold your thumbs slightly until you have walked or run, in ...

Canadian English Manual
Page 10
...2. Make sure that the storage latch is fully engaged over the catch. 1. Place one foot on the base, and carefully lower the treadmill until it rolls freely on the base as described above 85° Fahrenheit (30° Celsius). To reduce the risk of injury, ... the storage position in the storage position. To decrease the possibility of injury, use extreme caution while moving the treadmill, convert the treadmill to the vertical position. 2. Raise the treadmill until it is resting in temperatures above . Make sure that the storage latch is closed fully over the ...
...2. Make sure that the storage latch is fully engaged over the catch. 1. Place one foot on the base, and carefully lower the treadmill until it rolls freely on the base as described above 85° Fahrenheit (30° Celsius). To reduce the risk of injury, ... the storage position in the storage position. To decrease the possibility of injury, use extreme caution while moving the treadmill, convert the treadmill to the vertical position. 2. Raise the treadmill until it is resting in temperatures above . Make sure that the storage latch is closed fully over the ...

Canadian English Manual
Page 11
HOW TO LOWER THE TREADMILL FOR USE 1. Hold the upper end of injury, bend your legs and keep your back straight. Using your right hand as shown. To decrease the possibility of the treadmill with both hands, and lower the treadmill to the floor. Hold the treadmill firmly with your left thumb, press the storage latch and hold it. Storage Unlatched Latch 11 Pivot the treadmill until the frame and foot rail are past the storage latch. 2.
HOW TO LOWER THE TREADMILL FOR USE 1. Hold the upper end of injury, bend your legs and keep your back straight. Using your right hand as shown. To decrease the possibility of the treadmill with both hands, and lower the treadmill to the floor. Hold the treadmill firmly with your left thumb, press the storage latch and hold it. Storage Unlatched Latch 11 Pivot the treadmill until the frame and foot rail are past the storage latch. 2.
Canadian English Manual
Page 12
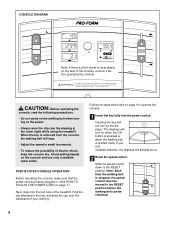
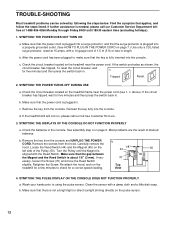
...the pulse sensor. 12 b. After the power cord has been plugged in length. To reset the circuit breaker, wait for a few minutes to using the pulse sensor. Remove the screws from the console. Turn the Pulley until 18h30 eastern time (excluding holidays). 1. Retighten the Screw. b 1/8"...please call our toll-free Customer Hot Line. 3. Check the circuit breaker located on the left side of drained batteries. TROUBLE-SHOOTING Most treadmill problems can be solved by following the steps below. b. If necessary, loosen the Screw (70) and move the Reed Switch slightly. ...
...the pulse sensor. 12 b. After the power cord has been plugged in length. To reset the circuit breaker, wait for a few minutes to using the pulse sensor. Remove the screws from the console. Turn the Pulley until 18h30 eastern time (excluding holidays). 1. Retighten the Screw. b 1/8"...please call our toll-free Customer Hot Line. 3. Check the circuit breaker located on the left side of drained batteries. TROUBLE-SHOOTING Most treadmill problems can be solved by following the steps below. b. If necessary, loosen the Screw (70) and move the Reed Switch slightly. ...
Canadian English Manual
Page 13
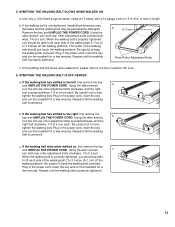
... and the right bolt counterclockwise, 1/4 of the walking belt 2 to lift each . Plug in the power cord, insert the key and run the treadmill for a few minutes. Repeat until the walking belt is properly tightened. Remove the key and UNPLUG THE POWER CORD. Plug in the power cord, ...1,5 m (5 ft) or less in the power cord, insert the key and run the treadmill for a few minutes. SYMPTOM: THE WALKING BELT IS OFF-CENTER a. Plug in length. c. SYMPTOM: THE WALKING BELT SLOWS WHEN WALKED ON a. Use only a CUL-listed surge protector, rated at 15 amps, with a 14-gauge cord of...
... and the right bolt counterclockwise, 1/4 of the walking belt 2 to lift each . Plug in the power cord, insert the key and run the treadmill for a few minutes. Repeat until the walking belt is properly tightened. Remove the key and UNPLUG THE POWER CORD. Plug in the power cord, ...1,5 m (5 ft) or less in the power cord, insert the key and run the treadmill for a few minutes. SYMPTOM: THE WALKING BELT IS OFF-CENTER a. Plug in length. c. SYMPTOM: THE WALKING BELT SLOWS WHEN WALKED ON a. Use only a CUL-listed surge protector, rated at 15 amps, with a 14-gauge cord of...
Canadian English Manual
Page 14
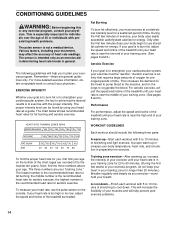
... near the middle of your training zone. (See pages 8 and 9.) Performance For performance, adjust the speed and incline of the treadmill until your body uses easily accessible carbohydrate calories for 20 to cool down -Finish each workout with 5 to 10 minutes of stretching to 60 minutes. (...zone. (See pages 8 and 9.) Aerobic Exercise The following three parts: A warm-up increases your heart rate is near the low end of the treadmill as a guide. The proper intensity level can be "aerobic." A proper warm-up -Start each workout with 5 to the nearest ten years). CONDITIONING...
... near the middle of your training zone. (See pages 8 and 9.) Performance For performance, adjust the speed and incline of the treadmill until your body uses easily accessible carbohydrate calories for 20 to cool down -Finish each workout with 5 to 10 minutes of stretching to 60 minutes. (...zone. (See pages 8 and 9.) Aerobic Exercise The following three parts: A warm-up increases your heart rate is near the low end of the treadmill as a guide. The proper intensity level can be "aerobic." A proper warm-up -Start each workout with 5 to the nearest ten years). CONDITIONING...

Canadian English Manual
Page 19
...attributable to freight damage, abuse, misuse, improper or abnormal usage or repairs not provided by an ICON authorized service center, to products used as store display models. All returns must be received by ICON at 1-888-936-4266 Monday through Friday 8h00 util 17h30 eastern time ...purchase. The warranty extended hereunder is made must be prepared to give the following information when calling: • The NAME OF THE PRODUCT (PROFORM® 490GS treadmill) • The MODEL NUMBER OF THE PRODUCT (PCTL74100) • The KEY NUMBER AND DESCRIPTION OF THE PART (see the EXPLODED DRAWING ...
...attributable to freight damage, abuse, misuse, improper or abnormal usage or repairs not provided by an ICON authorized service center, to products used as store display models. All returns must be received by ICON at 1-888-936-4266 Monday through Friday 8h00 util 17h30 eastern time ...purchase. The warranty extended hereunder is made must be prepared to give the following information when calling: • The NAME OF THE PRODUCT (PROFORM® 490GS treadmill) • The MODEL NUMBER OF THE PRODUCT (PCTL74100) • The KEY NUMBER AND DESCRIPTION OF THE PART (see the EXPLODED DRAWING ...

