
English Manual
Page 2
...PART LIST are attached to ensure..:::'::: 9 Wear appropriate exercise clothing when etl'alyUseta,of this Ireedi-0111: 6ee ociociutelyi using the treadmill. Do not wear loose cloth- ing that could become caught in sandals. • htfeet'Of 0learenCe behind it!::66no7;1toCe eireadMilliOn... .:To reduce the risk of Burns, fire, eleOttiO.shOokor injury to persons read th i;4'rin important preCautions and itifortriation before operating the -treadmill. 1$"'.:1he,responsibility of the 0wnet to the center of this manual. Athletic support clothes are Or,Where o.);Ygen!s in a or more...
...PART LIST are attached to ensure..:::'::: 9 Wear appropriate exercise clothing when etl'alyUseta,of this Ireedi-0111: 6ee ociociutelyi using the treadmill. Do not wear loose cloth- ing that could become caught in sandals. • htfeet'Of 0learenCe behind it!::66no7;1toCe eireadMilliOn... .:To reduce the risk of Burns, fire, eleOttiO.shOokor injury to persons read th i;4'rin important preCautions and itifortriation before operating the -treadmill. 1$"'.:1he,responsibility of the 0wnet to the center of this manual. Athletic support clothes are Or,Where o.);Ygen!s in a or more...

English Manual
Page 3
...20 kg) to order a free replacement decal (see ORDERING REPLACEMENT PARTS on page 10.) You must be fully engaged before using the treadmill. 5.The treadmill is fully closed. 20. WARNING: Before beginning this manual). Do not use this product SAVE:!!iTHESE NSTRUCTJ • •• ...through the use of this or any commercial, rental, or institutional setting. Always hold the handrails while using . Never leave the treadmill unattended while it is running. Always unplug the power cord before performing the maintenance and adjustment procedures described in -home use ....
...20 kg) to order a free replacement decal (see ORDERING REPLACEMENT PARTS on page 10.) You must be fully engaged before using the treadmill. 5.The treadmill is fully closed. 20. WARNING: Before beginning this manual). Do not use this product SAVE:!!iTHESE NSTRUCTJ • •• ...through the use of this or any commercial, rental, or institutional setting. Always hold the handrails while using . Never leave the treadmill unattended while it is running. Always unplug the power cord before performing the maintenance and adjustment procedures described in -home use ....
English Manual
Page 4
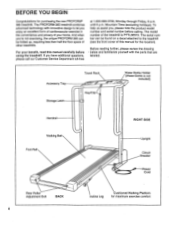
... Power Cord Rear Roller Adjustment Bolt BACK 4 Incline Leg Cushioned Walking Platform for purchasing the new PROFORM® 385 treadmill. Accessory Tray Storage Latch Towel Rack Key/Clip Cfl Water Bottle Holder (Water Bottle is PFTL38572. The PROFORM 385 treadmill combines advanced technology with the parts that are labeled. until 6 p.m. The model number of this manual...
... Power Cord Rear Roller Adjustment Bolt BACK 4 Incline Leg Cushioned Walking Platform for purchasing the new PROFORM® 385 treadmill. Accessory Tray Storage Latch Towel Rack Key/Clip Cfl Water Bottle Holder (Water Bottle is PFTL38572. The PROFORM 385 treadmill combines advanced technology with the parts that are labeled. until 6 p.m. The model number of this manual...
English Manual
Page 5
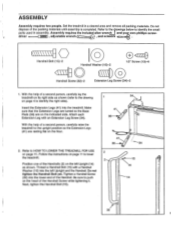
...(14) as shown (refer to the drawing on the floor. 2. Do not tighten the Handrail Bolt yet. Tighten a Handrail Screw (32) into the treadmill. Assembly requires the included alien wrench and your own phillips screw- driver -.--Fli=1) , adjustable wrench o , and scissors O \\\\\\\\ Handrail Bolt (15)-2 ...32)-2 O Extension Leg Screw (34)-2 1. Thread a Handrail Bolt (15) with an Extension Leg Screw (34). Be sure to lower the treadmill. With the help of the Handrails (2) on the indicated side. Refer to the 1rawings below to identify the right side). Insert the Extension ...
...(14) as shown (refer to the drawing on the floor. 2. Do not tighten the Handrail Bolt yet. Tighten a Handrail Screw (32) into the treadmill. Assembly requires the included alien wrench and your own phillips screw- driver -.--Fli=1) , adjustable wrench o , and scissors O \\\\\\\\ Handrail Bolt (15)-2 ...32)-2 O Extension Leg Screw (34)-2 1. Thread a Handrail Bolt (15) with an Extension Leg Screw (34). Be sure to lower the treadmill. With the help of the Handrails (2) on the indicated side. Refer to the 1rawings below to identify the right side). Insert the Extension ...
English Manual
Page 6
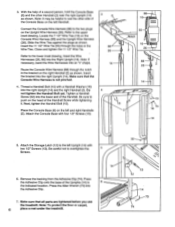
... 16 14 5. Place the Console Base (6) on the Upright Wire Harness (26). Note: To protect the floor or carpet, 6 place a mat under the treadmill. Connect the Console Wire Harness (88) to the two plugs on the left and right Handrails (2). Locate the 7 1/2" Wire Ties (10) on the head... of the Uprights (14) in the indicated location. Make sure that all parts are tightened before you use the treadmill. Tighten a Handrail Screw (32) into the right Upright (14). Attach the Console Base with a Handrail Washer (16) into the Adhesive Clip. 7. ...
... 16 14 5. Place the Console Base (6) on the Upright Wire Harness (26). Note: To protect the floor or carpet, 6 place a mat under the treadmill. Connect the Console Wire Harness (88) to the two plugs on the left and right Handrails (2). Locate the 7 1/2" Wire Ties (10) on the head... of the Uprights (14) in the indicated location. Make sure that all parts are tightened before you use the treadmill. Tighten a Handrail Screw (32) into the right Upright (14). Attach the Console Base with a Handrail Washer (16) into the Adhesive Clip. 7. ...
English Manual
Page 7
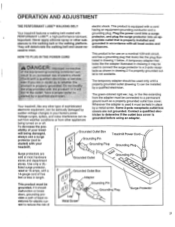
... grounded outlet box cover. listed surge protector, rated at most hardware stores and department stores. grounded in drawing 1 below. Your treadmill, like the plug illus- A temporary adapter that , looks like extending from other sub- The green-colored rigid ear, lug,... Never apply silicone spray or other appliances Whenever the adapter is equipped with a cord having an equipment-grounding conductor and a Your treadmill features a walking belt coated with a 2 14-gauge cord of Lug Metal Screw Grounding Pin Grounding Plug Surge Protector 7 ordinances....
... grounded outlet box cover. listed surge protector, rated at most hardware stores and department stores. grounded in drawing 1 below. Your treadmill, like the plug illus- A temporary adapter that , looks like extending from other sub- The green-colored rigid ear, lug,... Never apply silicone spray or other appliances Whenever the adapter is equipped with a cord having an equipment-grounding conductor and a Your treadmill features a walking belt coated with a 2 14-gauge cord of Lug Metal Screw Grounding Pin Grounding Plug Surge Protector 7 ordinances....
English Manual
Page 8
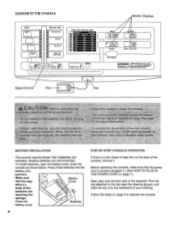
... FAST MVI CMG MEI OM SLOW MIN NMI TRAINING ZONE Performance Ole WV Aerobic awa IMO Fat Burn 1111 - Battery Cover ative (-) ends of the treadmill. Speed Control Clip Key Before operating t e;rea e folloWing Precaution o not stan onthe walking belt when urro tf*ObWe fiOyS wet c (see the drawing above re...
... FAST MVI CMG MEI OM SLOW MIN NMI TRAINING ZONE Performance Ole WV Aerobic awa IMO Fat Burn 1111 - Battery Cover ative (-) ends of the treadmill. Speed Control Clip Key Before operating t e;rea e folloWing Precaution o not stan onthe walking belt when urro tf*ObWe fiOyS wet c (see the drawing above re...
English Manual
Page 9
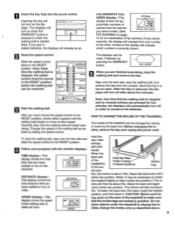
...walking belt can be restarted. ing, push on page 14 for five minutes, the displays will automatically turn on . Do not place objects under the treadmill to make sure that you have walked or run , in position. Note: If you have burned. (See CALS./ FAT CALS. stalled batteries, ..., remove the key and unplug the power cord. When the back end of the walking belt as described above. 9 Change the speed of the treadmill is started. The incline will irstr not turn off in - cline; plays. proximate numbers of the walking belt, in the low- Raise the ...
...walking belt can be restarted. ing, push on page 14 for five minutes, the displays will automatically turn on . Do not place objects under the treadmill to make sure that you have walked or run , in position. Note: If you have burned. (See CALS./ FAT CALS. stalled batteries, ..., remove the key and unplug the power cord. When the back end of the walking belt as described above. 9 Change the speed of the treadmill is started. The incline will irstr not turn off in - cline; plays. proximate numbers of the walking belt, in the low- Raise the ...
English Manual
Page 10
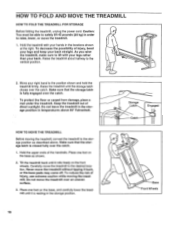
...position in the locations shown at the right. Hold the upper ends of injury, use extreme caution while moving the treadmill, convert the treadmill to the desired location. Carefully move the treadmill. 1. To reduce the risk of the handrails. To protect the floor or carpet from damage, place a mat under... shown. 2. Caution: You must be able to safely lift 45 pounds (20 kg) in the storage position. 10 Storage Latch. Tilt the treadmill back until the storage latch closes over an uneven surface. 3. Make sure that the storage latch is closed fully over the catch. Make sure ...
...position in the locations shown at the right. Hold the upper ends of injury, use extreme caution while moving the treadmill, convert the treadmill to the desired location. Carefully move the treadmill. 1. To reduce the risk of the handrails. To protect the floor or carpet from damage, place a mat under... shown. 2. Caution: You must be able to safely lift 45 pounds (20 kg) in the storage position. 10 Storage Latch. Tilt the treadmill back until the storage latch closes over an uneven surface. 3. Make sure that the storage latch is closed fully over the catch. Make sure ...
English Manual
Page 11
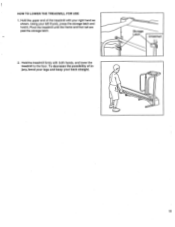
Storage Latch • Unlatched 2. Hold the treadmill firmly with your right hand as shown. Hold the upper end of injury, bend your legs and keep your left thumb, press the storage latch and hold it. Using your back straight. 11 Pivot the treadmill until the frame and foot rail are past the storage latch. HOW TO LOWER THE TREADMILL FOR USE 1. To decrease the possibility of the treadmill with both hands, and lower the treadmill to the floor.
Storage Latch • Unlatched 2. Hold the treadmill firmly with your right hand as shown. Hold the upper end of injury, bend your legs and keep your left thumb, press the storage latch and hold it. Using your back straight. 11 Pivot the treadmill until the frame and foot rail are past the storage latch. HOW TO LOWER THE TREADMILL FOR USE 1. To decrease the possibility of the treadmill with both hands, and lower the treadmill to the floor.
English Manual
Page 12
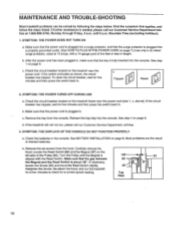
... . d. Remove the six screws from the console. Check the circuit breaker located on the treadmill near the power cord (see 1. Remove the key from the hood. If the treadmill still will not run the treadmill for a few minutes to check for a correct speed reading. 1/8" 86 35 Top View ...the switch back in . Make sure that the surge protector is about 1/8". See BATTERY INSTALLATION on page 9. MAINTENANCE AND TROUBLE-SHOOTING Most treadmill problems can be solved by following the steps below. Find the symptom that the gap between the Magnet and the Reed Switch is plugged...
... . d. Remove the six screws from the console. Check the circuit breaker located on the treadmill near the power cord (see 1. Remove the key from the hood. If the treadmill still will not run the treadmill for a few minutes to check for a correct speed reading. 1/8" 86 35 Top View ...the switch back in . Make sure that the surge protector is about 1/8". See BATTERY INSTALLATION on page 9. MAINTENANCE AND TROUBLE-SHOOTING Most treadmill problems can be solved by following the steps below. Find the symptom that the gap between the Magnet and the Reed Switch is plugged...
English Manual
Page 13
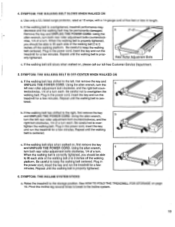
...left rear roller adjustment bolt clockwise, and the right bolt coun- SYMPTOM: THE INCLINE SYSTEM STICKS a. Raise the treadmill to overtighten the walking belt. See HOW TO FOLD THE TREADMILL FOR STORAGE on , please call our toll-free Customer Service Department. 5. Using the allen wrench, turn both ...turn the a left , first remove the key and UNPLUG THE POWER CORD. tered. b. Plug in the power cord, insert the key and run the treadmill for a few minutes. terclockwise, 1/4 of the walking belt 2 to lift each . If the walking belt slips when walked on, first remove the key...
...left rear roller adjustment bolt clockwise, and the right bolt coun- SYMPTOM: THE INCLINE SYSTEM STICKS a. Raise the treadmill to overtighten the walking belt. See HOW TO FOLD THE TREADMILL FOR STORAGE on , please call our toll-free Customer Service Department. 5. Using the allen wrench, turn both ...turn the a left , first remove the key and UNPLUG THE POWER CORD. tered. b. Plug in the power cord, insert the key and run the treadmill for a few minutes. terclockwise, 1/4 of the walking belt 2 to lift each . If the walking belt slips when walked on, first remove the key...
English Manual
Page 14
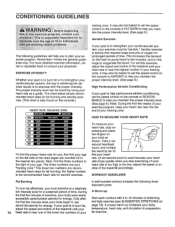
...are general guidelines only. The lower two numbers are rounded off to the right of time. Aerobic exercise is near the low end of the treadmill accordingly. HOW TO MEASURE YOUR HEART RATE To measure your heart rate, stop exercising.) If your heart rate is to use stored fat calories ...effectively, you , first find your heart rate. (A six-second count is especially important for in your Start each workout with 5 to 10 minutes of the treadmill until your 14 heart rate is to burn fat or to help you maintain the proper intensity level. (See page 9.) Note: During the first few...
...are general guidelines only. The lower two numbers are rounded off to the right of time. Aerobic exercise is near the low end of the treadmill accordingly. HOW TO MEASURE YOUR HEART RATE To measure your heart rate, stop exercising.) If your heart rate is to use stored fat calories ...effectively, you , first find your heart rate. (A six-second count is especially important for in your Start each workout with 5 to 10 minutes of the treadmill until your 14 heart rate is to burn fat or to help you maintain the proper intensity level. (See page 9.) Note: During the first few...
English Manual
Page 16
...please be prepared to give the following information: • The MODEL NUMBER OF THE PRODUCT (PFTL38572). • The NAME OF THE PRODUCT (PROFORM°' 385 treadmill). • The SERIAL NUMBER OF THE PRODUCT (see the front cover of this manual). • The KEY NUMBER OF THE PART(S) (see... the above limitation may also have other rights which warranty claim is in workmanship and material, under this manual). If possible, place the treadmill near your telephone for indirect, special or consequential damages arising out of or in Canada © 1997 ICON Health & Fitness, Inc. ...
...please be prepared to give the following information: • The MODEL NUMBER OF THE PRODUCT (PFTL38572). • The NAME OF THE PRODUCT (PROFORM°' 385 treadmill). • The SERIAL NUMBER OF THE PRODUCT (see the front cover of this manual). • The KEY NUMBER OF THE PART(S) (see... the above limitation may also have other rights which warranty claim is in workmanship and material, under this manual). If possible, place the treadmill near your telephone for indirect, special or consequential damages arising out of or in Canada © 1997 ICON Health & Fitness, Inc. ...


