

English Manual
Page 2
... surge protector away from mots into a surge protector (not included) and plug the surge protector indoors ;away from heated surface e treadMill should be used only:by potions a• NOY.er:rnolie.the..walldng belt whit the pow.er. TABLE OF CONTENTS IMPORTANT PRECAUTIONS... BEFORE YOU BEGIN ASSEMBLY OPERATION AND ADJUSTMENT HOW TO FOLD AND MOVE THE TREADMILL MAINTENANCE AND TROUBLE-SHOOTING CONDITIONING GUIDELINES ORDERING REPLACEMENT PARTS LIMITED WARRANTY 2 4 5 7 10 12 14 Back Cover Back Cover Note: An...
... surge protector away from mots into a surge protector (not included) and plug the surge protector indoors ;away from heated surface e treadMill should be used only:by potions a• NOY.er:rnolie.the..walldng belt whit the pow.er. TABLE OF CONTENTS IMPORTANT PRECAUTIONS... BEFORE YOU BEGIN ASSEMBLY OPERATION AND ADJUSTMENT HOW TO FOLD AND MOVE THE TREADMILL MAINTENANCE AND TROUBLE-SHOOTING CONDITIONING GUIDELINES ORDERING REPLACEMENT PARTS LIMITED WARRANTY 2 4 5 7 10 12 14 Back Cover Back Cover Note: An...

English Manual
Page 3
... this product SAVE:!!iTHESE NSTRUCTJ • •• •; Do not attempt to raise, lower, or move the treadmill. 22. Always unplug the power cord before treadmill is intended for longer than 1 hour. WARNING: Before beginning this manual). If the decal is missing, or if it ... please call our Customer Service Department, toll-free, to play on the back cover of this manual. 4. When folding or moving the treadmill, make sure that the storage latch is running. I • Never allow children to order a free replacement decal (see ORDERING REPLACEMENT PARTS ...
... this product SAVE:!!iTHESE NSTRUCTJ • •• •; Do not attempt to raise, lower, or move the treadmill. 22. Always unplug the power cord before treadmill is intended for longer than 1 hour. WARNING: Before beginning this manual). If the decal is missing, or if it ... please call our Customer Service Department, toll-free, to play on the back cover of this manual. 4. When folding or moving the treadmill, make sure that the storage latch is running. I • Never allow children to order a free replacement decal (see ORDERING REPLACEMENT PARTS ...
English Manual
Page 4
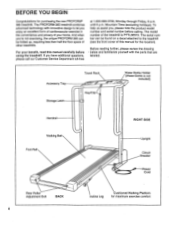
.... To help us assist you have additional questions, please call our Customer Service Department toll-free at 1-800-999-3756, Monday through Friday, 6 a.m. until 6 p.m. The PROFORM 385 treadmill combines advanced technology with the parts that are labeled. BEFORE YOU BEGIN Congratulations for maximum exercise comfort Mountain Time (excluding holidays). Accessory Tray Storage Latch...
.... To help us assist you have additional questions, please call our Customer Service Department toll-free at 1-800-999-3756, Monday through Friday, 6 a.m. until 6 p.m. The PROFORM 385 treadmill combines advanced technology with the parts that are labeled. BEFORE YOU BEGIN Congratulations for maximum exercise comfort Mountain Time (excluding holidays). Accessory Tray Storage Latch...
English Manual
Page 5
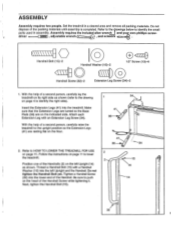
...Assembly requires two people. Assembly requires the included alien wrench and your own phillips screw- Position one of a second person, carefully raise the treadmill to identify the small parts used in a cleared area and remove all packing materials. Tighten a Handrail Screw (32) into the lower end... (15) with an Extension Leg Screw (34). Be sure to identify the right side). Refer to lower the treadmill. Do not tighten the Handrail Bolt yet. Set the treadmill in assembly. Do not dispose of the Handrail. Insert the Extension Legs (41) into the left Upright (14)...
...Assembly requires two people. Assembly requires the included alien wrench and your own phillips screw- Position one of a second person, carefully raise the treadmill to identify the small parts used in a cleared area and remove all packing materials. Tighten a Handrail Screw (32) into the lower end... (15) with an Extension Leg Screw (34). Be sure to identify the right side). Refer to lower the treadmill. Do not tighten the Handrail Bolt yet. Set the treadmill in assembly. Do not dispose of the Handrail. Insert the Extension Legs (41) into the left Upright (14)...
English Manual
Page 6
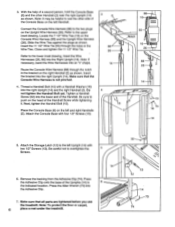
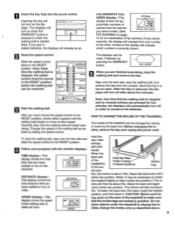
.... Note: If necessary, bend the Wire Harnesses into the lower end of the Handrail. Make sure that all parts are tightened before you use the treadmill. Tighten a Handrail Screw (32) into an "s" shape. Attach the Storage Latch (12) to the left Upright (14) with four 1/2" Screws (13). 3 6 88 10... Bolt yet. Place the Console Base (6) on the right Handrail (2) as shown. Note: To protect the floor or carpet, 6 place a mat under the treadmill. Be sure to rest the other Handrail (2) near the right Upright (14) as shown. Note: It may be helpful to push on the Upright Wire...
.... Note: If necessary, bend the Wire Harnesses into the lower end of the Handrail. Make sure that all parts are tightened before you use the treadmill. Tighten a Handrail Screw (32) into an "s" shape. Attach the Storage Latch (12) to the left Upright (14) with four 1/2" Screws (13). 3 6 88 10... Bolt yet. Place the Console Base (6) on the right Handrail (2) as shown. Note: To protect the floor or carpet, 6 place a mat under the treadmill. Be sure to rest the other Handrail (2) near the right Upright (14) as shown. Note: It may be helpful to push on the Upright Wire...
English Manual
Page 7
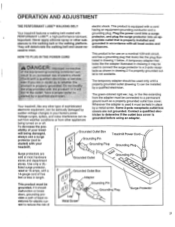
.... cessive wear. To decrease the pos- If it wil The temporary adapter should malfunction or break down, grounding provides a path of your treadmill being turned on a nominal 120-volt circuit, HOW TO PLUG IN THE POWER CORD and has a grounding plug that , looks like extending...permanent ground such as shown in drawing 2 if a properly grounded outlet is equipped with a cord having an equipment-grounding conductor and a Your treadmill features a walking belt coated with the product-if ..it should be used only until a properly grounded outlet (drawing 1) can be held in ...
.... cessive wear. To decrease the pos- If it wil The temporary adapter should malfunction or break down, grounding provides a path of your treadmill being turned on a nominal 120-volt circuit, HOW TO PLUG IN THE POWER CORD and has a grounding plug that , looks like extending...permanent ground such as shown in drawing 2 if a properly grounded outlet is equipped with a cord having an equipment-grounding conductor and a Your treadmill features a walking belt coated with the product-if ..it should be used only until a properly grounded outlet (drawing 1) can be held in ...
English Manual
Page 8
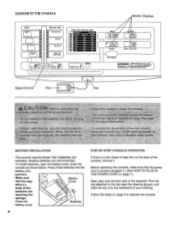
... from the console, the walking belt wil just the speed in . (See HOW TO PLUG IN THE POWER CORD on o reduce the possibility of the treadmill. Battery Cover ative (-) ends of your clothing. Make sure that the power cord is a thin sheet of clear film on page 9 to the key (see...
... from the console, the walking belt wil just the speed in . (See HOW TO PLUG IN THE POWER CORD on o reduce the possibility of the treadmill. Battery Cover ative (-) ends of your clothing. Make sure that the power cord is a thin sheet of clear film on page 9 to the key (see...
English Manual
Page 9
...FAT CALORIES display-This Arrows display shows the ap- cline will turn off after about 3%. TRAINING ZONE f". HOW TO CHANGE THE INCLINE OF THE TREADMILL The incline of fat calories.) Every seven seconds, the display will irstr not turn on . CAUTION: Before exercis- ON / RESET When you have...necessary to change the incline only as desired by raising or lowering the back end. SPEED display-This display shows the speed of the treadmill is stopped and no console buttons are locked in the display will turn on the back of the walking belt as described above. 9...
...FAT CALORIES display-This Arrows display shows the ap- cline will turn off after about 3%. TRAINING ZONE f". HOW TO CHANGE THE INCLINE OF THE TREADMILL The incline of fat calories.) Every seven seconds, the display will irstr not turn on . CAUTION: Before exercis- ON / RESET When you have...necessary to change the incline only as desired by raising or lowering the back end. SPEED display-This display shows the speed of the treadmill is stopped and no console buttons are locked in the display will turn on the back of the walking belt as described above. 9...
English Manual
Page 10
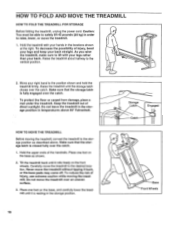
...resting in temperatures above . Carefully move the treadmill over the catch. Never move the treadmill. 1. Engaged • Catch Base Front Wheels Raise the treadmill about halfway to the position shown and hold the treadmill firmly. HOW TO MOVE THE TREADMILL Before moving the treadmill. Hold the upper ends of direct sunlight...wheels. Caution: You must be able to safely lift 45 pounds (20 kg) in the locations shown at the right. Hold the treadmill with your legs rather than your back straight. Move your hands in order to the storage position as shown. 2. Place one foot ...
...resting in temperatures above . Carefully move the treadmill over the catch. Never move the treadmill. 1. Engaged • Catch Base Front Wheels Raise the treadmill about halfway to the position shown and hold the treadmill firmly. HOW TO MOVE THE TREADMILL Before moving the treadmill. Hold the upper ends of direct sunlight...wheels. Caution: You must be able to safely lift 45 pounds (20 kg) in the locations shown at the right. Hold the treadmill with your legs rather than your back straight. Move your hands in order to the storage position as shown. 2. Place one foot ...
English Manual
Page 11
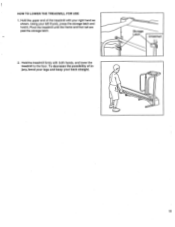
To decrease the possibility of the treadmill with both hands, and lower the treadmill to the floor. Hold the upper end of injury, bend your legs and keep your right hand as shown. Storage Latch • Unlatched 2. Hold the treadmill firmly with your back straight. 11 Using your left thumb, press the storage latch and hold it. HOW TO LOWER THE TREADMILL FOR USE 1. Pivot the treadmill until the frame and foot rail are past the storage latch.
To decrease the possibility of the treadmill with both hands, and lower the treadmill to the floor. Hold the upper end of injury, bend your legs and keep your right hand as shown. Storage Latch • Unlatched 2. Hold the treadmill firmly with your back straight. 11 Using your left thumb, press the storage latch and hold it. HOW TO LOWER THE TREADMILL FOR USE 1. Pivot the treadmill until the frame and foot rail are past the storage latch.
English Manual
Page 12
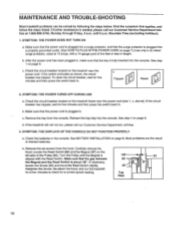
...protector, rated at 1-800-999-3756, Monday through Friday, 6 a.m. Make sure that the power cord is about 1/8". If the treadmill still will not run the treadmill for a few minutes to check for five minutes and then press the switch back in , make sure that the gap between the... protrudes as shown, the circuit breaker has tripped. Turn the Pulley until 6 p.m. See step 1 on page 8. MAINTENANCE AND TROUBLE-SHOOTING Most treadmill problems can be solved by following the steps below. Find the symptom that the surge protector is aligned with a 14-gauge cord of drained batteries...
...protector, rated at 1-800-999-3756, Monday through Friday, 6 a.m. Make sure that the power cord is about 1/8". If the treadmill still will not run the treadmill for a few minutes to check for five minutes and then press the switch back in , make sure that the gap between the... protrudes as shown, the circuit breaker has tripped. Turn the Pulley until 6 p.m. See step 1 on page 8. MAINTENANCE AND TROUBLE-SHOOTING Most treadmill problems can be solved by following the steps below. Find the symptom that the surge protector is aligned with a 14-gauge cord of drained batteries...
English Manual
Page 13
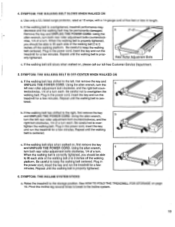
...adjustment bolts clockwise, 1/4 of the walking belt 2 to 3 inches off the walking platform. Plug in the power cord, insert the key and run the treadmill for a few minutes. b 2"-3" Rear Roller Adjustment Bolts c. SYMPTOM: THE WALKING BELT IS OFF-CENTER WHEN WALKED ON a. If the walking belt has ... shifted to the left, first remove the key and UNPLUG THE POWER CORD. Plug in the power cord, insert the key and run the treadmill for a few minutes. c. Repeat Until the walking belt is properly tightened. b. Plug in length. Be careful not to keep the walking belt...
...adjustment bolts clockwise, 1/4 of the walking belt 2 to 3 inches off the walking platform. Plug in the power cord, insert the key and run the treadmill for a few minutes. b 2"-3" Rear Roller Adjustment Bolts c. SYMPTOM: THE WALKING BELT IS OFF-CENTER WHEN WALKED ON a. If the walking belt has ... shifted to the left, first remove the key and UNPLUG THE POWER CORD. Plug in the power cord, insert the key and run the treadmill for a few minutes. c. Repeat Until the walking belt is properly tightened. b. Plug in length. Be careful not to keep the walking belt...
English Manual
Page 14
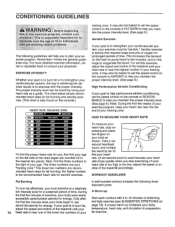
... desired results is activity that requires large amounts of exercise, your goal is the recommended heart rate for a sustained period of the treadmill accordingly. The lower two numbers are rounded off to help you maintain the proper intensity level. (See page 9.) High Performance Athletic ...result by using your Start each workout with the proper intensity. This is especially important for in dividuals over the age of the treadmill until your age. The proper intensity level can be "aerobic." CONDITIONING GUIDELINES ARNING: Before beginning this or any exercise program, consult ...
... desired results is activity that requires large amounts of exercise, your goal is the recommended heart rate for a sustained period of the treadmill accordingly. The lower two numbers are rounded off to help you maintain the proper intensity level. (See page 9.) High Performance Athletic ...result by using your Start each workout with the proper intensity. This is especially important for in dividuals over the age of the treadmill until your age. The proper intensity level can be "aerobic." CONDITIONING GUIDELINES ARNING: Before beginning this or any exercise program, consult ...

English Manual
Page 16
.... until 6 p.m. Mountain Time (excluding holidays). You may not apply to any implied warranties of merchantability or fitness for a period of purchase. PROFORM is not responsible or liable for commercial or rental purposes, or to the center of purchase. ICON HEALTH & FITNESS, INC., 1500 S. 1000 ...be prepared to give the following information: • The MODEL NUMBER OF THE PRODUCT (PFTL38572). • The NAME OF THE PRODUCT (PROFORM°' 385 treadmill). • The SERIAL NUMBER OF THE PRODUCT (see the front cover of this manual). • The KEY NUMBER OF THE PART...
.... until 6 p.m. Mountain Time (excluding holidays). You may not apply to any implied warranties of merchantability or fitness for a period of purchase. PROFORM is not responsible or liable for commercial or rental purposes, or to the center of purchase. ICON HEALTH & FITNESS, INC., 1500 S. 1000 ...be prepared to give the following information: • The MODEL NUMBER OF THE PRODUCT (PFTL38572). • The NAME OF THE PRODUCT (PROFORM°' 385 treadmill). • The SERIAL NUMBER OF THE PRODUCT (see the front cover of this manual). • The KEY NUMBER OF THE PART...


