

English Manual
Page 1
... DELAYS, PLEASE CALL DIRECT TO OUR TOLLFREE CUSTOMER HOT LINE. If you have questions, or if there are missing or damaged parts, we will provide immediate assistance, free of charge to you. MST CAUTION Read all precautions and instructions in this manual before using.... The trained technicians on our Customer Hot Line will guarantee complete satisfaction through direct assistance from our factory. USER'S MANUAL Visit our website at www.proform.com new products, prizes, fitness tips, and much more! Serial Number Decal QUESTIONS? CUSTOMER HOT LINE: 1-800-999-3756 Mon.-Fri., 6 a.m.-6 ...
... DELAYS, PLEASE CALL DIRECT TO OUR TOLLFREE CUSTOMER HOT LINE. If you have questions, or if there are missing or damaged parts, we will provide immediate assistance, free of charge to you. MST CAUTION Read all precautions and instructions in this manual before using.... The trained technicians on our Customer Hot Line will guarantee complete satisfaction through direct assistance from our factory. USER'S MANUAL Visit our website at www.proform.com new products, prizes, fitness tips, and much more! Serial Number Decal QUESTIONS? CUSTOMER HOT LINE: 1-800-999-3756 Mon.-Fri., 6 a.m.-6 ...

English Manual
Page 2
...damaged, the walking belt may change speed or stop unexpectedly, which may result in the treadmill. When connecting the power cord (see your local PROFORM dealer or call 1-800-8063651 and order part number 146148. 12. To purchase a surge suppressor, see page 8), plug the power... ADJUSTMENT 8 HOW TO FOLD AND MOVE THE TREADMILL 18 TROUBLESHOOTING 20 CONDITIONING GUIDELINES 22 ORDERING REPLACEMENT PARTS Back Cover LIMITED WARRANTY Back Cover Note: An EXPLODED DRAWING and a PART LIST are attached in the center of this treadmill are standing on the walking belt. IMPORTANT PRECAUTIONS...
...damaged, the walking belt may change speed or stop unexpectedly, which may result in the treadmill. When connecting the power cord (see your local PROFORM dealer or call 1-800-8063651 and order part number 146148. 12. To purchase a surge suppressor, see page 8), plug the power... ADJUSTMENT 8 HOW TO FOLD AND MOVE THE TREADMILL 18 TROUBLESHOOTING 20 CONDITIONING GUIDELINES 22 ORDERING REPLACEMENT PARTS Back Cover LIMITED WARRANTY Back Cover Note: An EXPLODED DRAWING and a PART LIST are attached in the center of this treadmill are standing on the walking belt. IMPORTANT PRECAUTIONS...

English Manual
Page 3
.... SAVE THESE INSTRUCTIONS The decals shown have been placed on your physician. Never insert any object into any exercise program, consult your treadmill. Never remove the motor hood un- Servicing other than the procedures in this product. ICON assumes no responsibility for personal injury or property... location shown. using iFIT.com CD's and videos, you when the speed of 35 or persons with pre-existing health problems. Read all parts of this manual. Do not attempt to change . 21. When using iFIT.com CD's and videos, an electronic "chirping" sound will ...
.... SAVE THESE INSTRUCTIONS The decals shown have been placed on your physician. Never insert any object into any exercise program, consult your treadmill. Never remove the motor hood un- Servicing other than the procedures in this product. ICON assumes no responsibility for personal injury or property... location shown. using iFIT.com CD's and videos, you when the speed of 35 or persons with pre-existing health problems. Read all parts of this manual. Do not attempt to change . 21. When using iFIT.com CD's and videos, an electronic "chirping" sound will ...
English Manual
Page 4
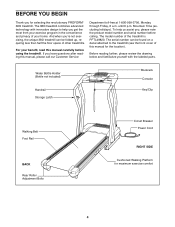
... Bolts Circuit Breaker Power Cord RIGHT SIDE Cushioned Walking Platform for the location). If you for selecting the revolutionary PROFORM® 380i treadmill. Before reading further, please review the drawing below and familiarize yourself with innovative design to help us assist you...up, requiring less than half the floor space of your benefit, read this manual carefully before calling. The 380i treadmill combines advanced technology with the labeled parts. The model number of this manual for maximum exercise comfort 4 Mountain Time (excluding holidays). until 6 ...
... Bolts Circuit Breaker Power Cord RIGHT SIDE Cushioned Walking Platform for the location). If you for selecting the revolutionary PROFORM® 380i treadmill. Before reading further, please review the drawing below and familiarize yourself with innovative design to help us assist you...up, requiring less than half the floor space of your benefit, read this manual carefully before calling. The 380i treadmill combines advanced technology with the labeled parts. The model number of this manual for maximum exercise comfort 4 Mountain Time (excluding holidays). until 6 ...
English Manual
Page 5
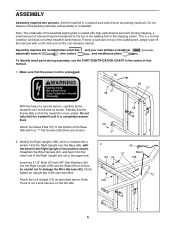
...assembly, use the PART IDENTIFICATION CHART in the center of the upper end. 2 69 38 42 37 Bend 108 Insert two 2 1/2" Bolts (37) with the bend in the Right Upright in a cleared area and remove all packing materials. bled. Make sure that the treadmill is not a... and your own phillips screwdriver , adjustable wrench , wire cutters , and needlenose pliers . Do not fully fold the treadmill until assembly is a normal condition and does not affect treadmill performance. Identify the Right Upright (108), which is marked with four 1" Tek Screws (58) (three are shown)....
...assembly, use the PART IDENTIFICATION CHART in the center of the upper end. 2 69 38 42 37 Bend 108 Insert two 2 1/2" Bolts (37) with the bend in the Right Upright in a cleared area and remove all packing materials. bled. Make sure that the treadmill is not a... and your own phillips screwdriver , adjustable wrench , wire cutters , and needlenose pliers . Do not fully fold the treadmill until assembly is a normal condition and does not affect treadmill performance. Identify the Right Upright (108), which is marked with four 1" Tek Screws (58) (three are shown)....

English Manual
Page 7
... the Wire Harness from slipping. The large allen wrench is centered between the Handrails. To protect the floor or carpet, place a mat under the treadmill. 7 Firmly tighten the 3 1/2" Bolts (61) and the 2 1/2" Bolts (37). Firmly tighten the 1" Bolts (63). Do not 8 overtighten the Nut.... Make sure that all parts are properly tightened before you connected the Audio Cable (56) in step 5, route it through the indicated opening in the Console Base (47). Note: ...
... the Wire Harness from slipping. The large allen wrench is centered between the Handrails. To protect the floor or carpet, place a mat under the treadmill. 7 Firmly tighten the 3 1/2" Bolts (61) and the 2 1/2" Bolts (37). Firmly tighten the 1" Bolts (63). Do not 8 overtighten the Nut.... Make sure that all parts are properly tightened before you connected the Audio Cable (56) in step 5, route it through the indicated opening in the Console Base (47). Note: ...

English Manual
Page 8
... the product-if it must have a proper outlet installed by a qualified electrician. Do not modify the plug provided with your treadmill (see your local PROFORM dealer or call 1-800-806-3651 and order part number 146148. Voltage surges, spikes, and noise interference can be used to connect the surge suppressor to a 2-pole receptacle...
... the product-if it must have a proper outlet installed by a qualified electrician. Do not modify the plug provided with your treadmill (see your local PROFORM dealer or call 1-800-806-3651 and order part number 146148. Voltage surges, spikes, and noise interference can be used to connect the surge suppressor to a 2-pole receptacle...

English Manual
Page 22
...effectively, you must be found by using your training zone. The following three parts: A Warm-up increases your body temperature, heart rate and circulation in preparation for a sustained period of the treadmill. The chart below shows recommended heart rates for you exercise-never hold your ... regularly and deeply as an exercise aid in determining heart rate trends in your physician. This will increase the flexibility of the treadmill until your heart rate is to strengthen your cardiovascular system, your exercise program. If your goal is near the bottom of time...
...effectively, you must be found by using your training zone. The following three parts: A Warm-up increases your body temperature, heart rate and circulation in preparation for a sustained period of the treadmill. The chart below shows recommended heart rates for you exercise-never hold your ... regularly and deeply as an exercise aid in determining heart rate trends in your physician. This will increase the flexibility of the treadmill until your heart rate is to strengthen your cardiovascular system, your exercise program. If your goal is near the bottom of time...

English Manual
Page 24
... other consequential damages of incidental or consequential damages. When ordering parts, please be prepared to give the following information: • The MODEL NUMBER OF THE PRODUCT (PFTL49820) • The NAME OF THE PRODUCT (PROFORM® 380i treadmill) • The SERIAL NUMBER OF THE PRODUCT (see the... front cover of this manual) • The KEY NUMBER AND DESCRIPTION OF THE PART(S) (see the EXPLODED DRAWING and PART LIST attached in the center of merchantability or fitness...
... other consequential damages of incidental or consequential damages. When ordering parts, please be prepared to give the following information: • The MODEL NUMBER OF THE PRODUCT (PFTL49820) • The NAME OF THE PRODUCT (PROFORM® 380i treadmill) • The SERIAL NUMBER OF THE PRODUCT (see the... front cover of this manual) • The KEY NUMBER AND DESCRIPTION OF THE PART(S) (see the EXPLODED DRAWING and PART LIST attached in the center of merchantability or fitness...

English Manual
Page 25
PART IDENTIFICATION CHART Remove this chart and the EXPLODED DRAWING/PART LIST for future reference. 1/2" Silver Screw (49)-1 3/4" Screw (2)-6 1" Latch Screw (112)-2 Crossbar Screw (39)-2 Silver Ground Screw (113)-1 Flat Washer (76)-2 5/16" Washer (48)-2 3/8" Star Washer (38)-4 1" Tek Screw (58)-4 1" Bolt (63)-2 2 1/2" Bolt (37)-4 Wheel Bolt (64)-2 3 1/2" Bolt (61)-2 Nut (13)-2 Upright Nut (109)-4 Save this chart and use it to identify small parts during assembly.
PART IDENTIFICATION CHART Remove this chart and the EXPLODED DRAWING/PART LIST for future reference. 1/2" Silver Screw (49)-1 3/4" Screw (2)-6 1" Latch Screw (112)-2 Crossbar Screw (39)-2 Silver Ground Screw (113)-1 Flat Washer (76)-2 5/16" Washer (48)-2 3/8" Star Washer (38)-4 1" Tek Screw (58)-4 1" Bolt (63)-2 2 1/2" Bolt (37)-4 Wheel Bolt (64)-2 3 1/2" Bolt (61)-2 Nut (13)-2 Upright Nut (109)-4 Save this chart and use it to identify small parts during assembly.

English Manual
Page 26
... # 1 8" Green Wire, 2 Ring 37 4 2 1/2" Bolt 80 1 Power Cord Grommet # 1 User's Manual 38 4 3/8" Star Washer 81 1 Belly Pan 39 2 Crossbar Screw 82 2 Belt Guide * Includes all parts shown in the box 40 1 Crossbar 83 4 Belt Guide Screw # These parts are not illustrated 41 1 5/32" Allen Wrench 84 4 Plastic Fastener PFTL49820 R1102A Key No...
... # 1 8" Green Wire, 2 Ring 37 4 2 1/2" Bolt 80 1 Power Cord Grommet # 1 User's Manual 38 4 3/8" Star Washer 81 1 Belly Pan 39 2 Crossbar Screw 82 2 Belt Guide * Includes all parts shown in the box 40 1 Crossbar 83 4 Belt Guide Screw # These parts are not illustrated 41 1 5/32" Allen Wrench 84 4 Plastic Fastener PFTL49820 R1102A Key No...


