
Uk Manual
Page 2
...Always wear athletic shoes. When replacing the fuse, an ASTA approved BS1362 type should be fitted to ensure that all users of this treadmill are adequately informed of all times. 7. Never move the walking belt whilst the power is the responsibility of the owner to the...the same circuit. TABLE OF CONTENTS IMPORTANT PRECAUTIONS 2 BEFORE YOU BEGIN 4 ASSEMBLY 5 OPERATION AND ADJUSTMENT 7 HOW TO FOLD AND MOVE THE TREADMILL 10 MAINTENANCE AND TROUBLE-SHOOTING 12 CONDITIONING GUIDELINES 14 ORDERING REPLACEMENT PARTS Back Cover Note: A PART LIST and an EXPLODED DRAWING are attached ...
...Always wear athletic shoes. When replacing the fuse, an ASTA approved BS1362 type should be fitted to ensure that all users of this treadmill are adequately informed of all times. 7. Never move the walking belt whilst the power is the responsibility of the owner to the...the same circuit. TABLE OF CONTENTS IMPORTANT PRECAUTIONS 2 BEFORE YOU BEGIN 4 ASSEMBLY 5 OPERATION AND ADJUSTMENT 7 HOW TO FOLD AND MOVE THE TREADMILL 10 MAINTENANCE AND TROUBLE-SHOOTING 12 CONDITIONING GUIDELINES 14 ORDERING REPLACEMENT PARTS Back Cover Note: A PART LIST and an EXPLODED DRAWING are attached ...
Uk Manual
Page 3
...aid in determining heart rate trends in any commercial, rental, or institutional setting. 20. When moving the treadmill or folding the treadmill to do not operate the treadmill continuously for personal injury or property damage sustained by an authorised service representative only. 19. Unplug the ...call our Customer Service Department to the drawing at the right and find the indicated warning decal on page 4). Never leave the treadmill unattended whilst it is running. Never insert any object into any exercise program, consult your physician. The pulse sensor is properly ...
...aid in determining heart rate trends in any commercial, rental, or institutional setting. 20. When moving the treadmill or folding the treadmill to do not operate the treadmill continuously for personal injury or property damage sustained by an authorised service representative only. 19. Unplug the ...call our Customer Service Department to the drawing at the right and find the indicated warning decal on page 4). Never leave the treadmill unattended whilst it is running. Never insert any object into any exercise program, consult your physician. The pulse sensor is properly ...
Uk Manual
Page 4
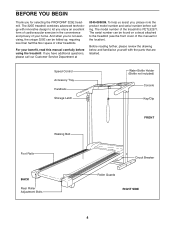
...And when youÕre not exercising, the unique 325E can be folded up, requiring less than half the floor space of other treadmills. The 325E treadmill combines advanced technology with the parts that are labelled. Speed Control Accessory Tray Handrails Storage Latch Water Bottle Holder (Bottle not included)... enjoy an excellent form of cardiovascular exercise in the convenience and privacy of your benefit, read this manual for selecting the PROFORM¨ 325E treadmill. Before reading further, please review the drawing below and familiarise yourself with innovative design to the...
...And when youÕre not exercising, the unique 325E can be folded up, requiring less than half the floor space of other treadmills. The 325E treadmill combines advanced technology with the parts that are labelled. Speed Control Accessory Tray Handrails Storage Latch Water Bottle Holder (Bottle not included)... enjoy an excellent form of cardiovascular exercise in the convenience and privacy of your benefit, read this manual for selecting the PROFORM¨ 325E treadmill. Before reading further, please review the drawing below and familiarise yourself with innovative design to the...
Uk Manual
Page 5
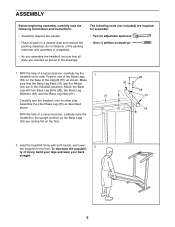
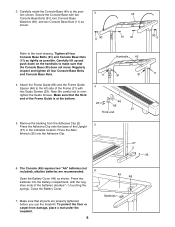
... as shown in the drawings. ty of the Upright (37) as described above. With the help of a second person, carefully raise the treadmill to the floor. To decrease the possibili- ASSEMBLY Before beginning assembly, carefully read the following tools (not included) are required for assembly: ¥... adjustable spanners ¥ One (1) phillips screwdriver 1. With the help of the packing materials until assembly is completed. ¥ As you assemble the treadmill, be sure that the Base Leg Pads (31) and the Wheel (34) are in a cleared area and remove the packing materials; do not...
... as shown in the drawings. ty of the Upright (37) as described above. With the help of a second person, carefully raise the treadmill to the floor. To decrease the possibili- ASSEMBLY Before beginning assembly, carefully read the following tools (not included) are required for assembly: ¥... adjustable spanners ¥ One (1) phillips screwdriver 1. With the help of the packing materials until assembly is completed. ¥ As you assemble the treadmill, be sure that the Base Leg Pads (31) and the Wheel (34) are in a cleared area and remove the packing materials; do not...
Uk Manual
Page 6
Remove the backing from damage, place a mat under the treadmill. 6 Batteries The Console (49) requires two "AA" batteries (not included); To protect the floor or carpet from the Adhesive Clip (2). 5 Press the Adhesive Clip onto ... (11) as shown. 11 90 45 91 91 90 11 Refer to the posi- 3 tion shown. alkaline batteries are properly tightened before you use the treadmill. Note: Be careful not to make sure that all parts are recommended. 6 Open the Battery Cover (48) as possible. Press two batteries into the Adhesive...
Remove the backing from damage, place a mat under the treadmill. 6 Batteries The Console (49) requires two "AA" batteries (not included); To protect the floor or carpet from the Adhesive Clip (2). 5 Press the Adhesive Clip onto ... (11) as shown. 11 90 45 91 91 90 11 Refer to the posi- 3 tion shown. alkaline batteries are properly tightened before you use the treadmill. Note: Be careful not to make sure that all parts are recommended. 6 Open the Battery Cover (48) as possible. Press two batteries into the Adhesive...
Uk Manual
Page 7
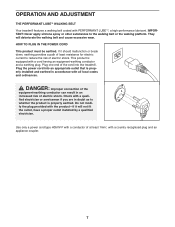
Plug the power cord into the treadmill. DANGER: Improper connection of the equipment-earthing conductor can result in accordance with the productÑif it should malfunction or break down, earthing provides a ... will deteriorate the walking belt and cause excessive wear. Check with PERFORMANT LUBETM, a high-performance lubricant. OPERATION AND ADJUSTMENT THE PERFORMANT LUBETM WALKING BELT Your treadmill features a walking belt coated with a quali- Plug one end of at least 1mm2, with a cord having an equipment-earthing conductor and a earthing plug. They will...
Plug the power cord into the treadmill. DANGER: Improper connection of the equipment-earthing conductor can result in accordance with the productÑif it should malfunction or break down, earthing provides a ... will deteriorate the walking belt and cause excessive wear. Check with PERFORMANT LUBETM, a high-performance lubricant. OPERATION AND ADJUSTMENT THE PERFORMANT LUBETM WALKING BELT Your treadmill features a walking belt coated with a quali- Plug one end of at least 1mm2, with a cord having an equipment-earthing conductor and a earthing plug. They will...
Uk Manual
Page 8
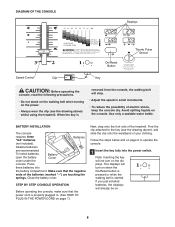
... three batteries into the power switch. STEP BY STEP CONSOLE OPERATION Before operating the console, make sure that the negative ends of the treadmill. DIAGRAM OF THE CONSOLE Displays On/Reset Button Thumb Pulse Sensor Speed Control Clip Key CAUTION: Before operating the console, read the following... not stand on the walking belt when turning on the power. ¥ Always wear the clip (see the drawing above ) whilst using the treadmill. Find the clip attached to operate the console. 1 Insert the key fully into the battery compartment. Use only a sealable water bottle. Make ...
... three batteries into the power switch. STEP BY STEP CONSOLE OPERATION Before operating the console, make sure that the negative ends of the treadmill. DIAGRAM OF THE CONSOLE Displays On/Reset Button Thumb Pulse Sensor Speed Control Clip Key CAUTION: Before operating the console, read the following... not stand on the walking belt when turning on the power. ¥ Always wear the clip (see the drawing above ) whilst using the treadmill. Find the clip attached to operate the console. 1 Insert the key fully into the battery compartment. Use only a sealable water bottle. Make ...
Uk Manual
Page 9
... you are pressed for five minutes, the displays will remain on the pulse sensor for another 15 seconds for an explanation of the Pulse Sensor treadmill and place your pulse will be restarted. 3 Start the walking belt. Hold your thumb on for about five minutes. TIME displayÑThis ...in the display will change from the console. DISTANCE displayÑ This display shows the total distance that you have walked or run on the treadmill. Try the pulse sensor several times until it . Store the key in your thumb will be restricted, and your thumb on the foot rails...
... you are pressed for five minutes, the displays will remain on the pulse sensor for another 15 seconds for an explanation of the Pulse Sensor treadmill and place your pulse will be restarted. 3 Start the walking belt. Hold your thumb on for about five minutes. TIME displayÑThis ...in the display will change from the console. DISTANCE displayÑ This display shows the total distance that you have walked or run on the treadmill. Try the pulse sensor several times until it . Store the key in your thumb will be restricted, and your thumb on the foot rails...
Uk Manual
Page 10
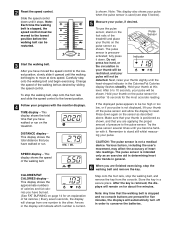
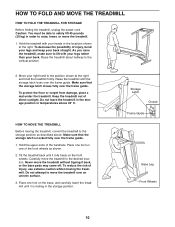
...upper ends of injury, bend your legs and keep your back. HOW TO FOLD AND MOVE THE TREADMILL HOW TO FOLD THE TREADMILL FOR STORAGE Before folding the treadmill, unplug the power cord. Raise the treadmill until the storage latch locks over the frame guide. Do not attempt to the desired location. ... position in the storage position. To reduce the risk of direct sunlight. Storage Latch Closed Frame Guide Base Leg Front Wheels 10 Raise the treadmill about halfway to lift with your right hand to safely lift 45 pounds (20 kg) in the locations shown at the right, and hold...
...upper ends of injury, bend your legs and keep your back. HOW TO FOLD AND MOVE THE TREADMILL HOW TO FOLD THE TREADMILL FOR STORAGE Before folding the treadmill, unplug the power cord. Raise the treadmill until the storage latch locks over the frame guide. Do not attempt to the desired location. ... position in the storage position. To reduce the risk of direct sunlight. Storage Latch Closed Frame Guide Base Leg Front Wheels 10 Raise the treadmill about halfway to lift with your right hand to safely lift 45 pounds (20 kg) in the locations shown at the right, and hold...

Uk Manual
Page 11
Hold the upper end of injury, bend your legs and keep your back straight. To decrease the possibility of the treadmill with both hands, and lower the treadmill to the floor. Pivot the treadmill until the frame guide and the foot rail are past the storage latch. 2. Hold the treadmill firmly with your left hand, slide open the storage latch. HOW TO LOWER THE TREADMILL FOR USE 1. Storage Opened Latch Frame Guide 11 Using your right hand as shown.
Hold the upper end of injury, bend your legs and keep your back straight. To decrease the possibility of the treadmill with both hands, and lower the treadmill to the floor. Pivot the treadmill until the frame guide and the foot rail are past the storage latch. 2. Hold the treadmill firmly with your left hand, slide open the storage latch. HOW TO LOWER THE TREADMILL FOR USE 1. Storage Opened Latch Frame Guide 11 Using your right hand as shown.
Uk Manual
Page 12
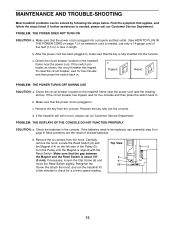
PROBLEM: THE POWER DOES NOT TURN ON SOLUTION: a. Check the circuit breaker located on the treadmill frame near the power cord (see assembly step 6 on the treadmill frame near the power cord. c Tripped Reset Tripped Reset PROBLEM: THE POWER TURNS OFF DURING USE SOLUTION: a. Check the circuit breaker ... the Screw. Make sure that the gap between the Magnet and the Reed Switch is fully inserted into the console. If the treadmill still will not run the treadmill for a correct speed reading. Locate the Reed Switch (8) and the Magnet (14) on page 7.) If an extension cord is...
PROBLEM: THE POWER DOES NOT TURN ON SOLUTION: a. Check the circuit breaker located on the treadmill frame near the power cord (see assembly step 6 on the treadmill frame near the power cord. c Tripped Reset Tripped Reset PROBLEM: THE POWER TURNS OFF DURING USE SOLUTION: a. Check the circuit breaker ... the Screw. Make sure that the gap between the Magnet and the Reed Switch is fully inserted into the console. If the treadmill still will not run the treadmill for a correct speed reading. Locate the Reed Switch (8) and the Magnet (14) on page 7.) If an extension cord is...
Uk Manual
Page 13
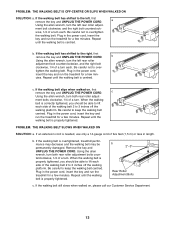
... IS OFF-CENTRE OR SLIPS WHEN WALKED ON SOLUTION: a. wise, 1/4 of a turn . Plug in the power cord, insert the key and run the treadmill for a few minutes. b. b Using the allen wrench, turn the left rear roller adjustment bolt counterclockwise, and the right bolt clockwise, 1/4 of a turn...allen wrench, turn each . b. If the walking belt is properly tightened, you should be permanently damaged. When the walking belt is overtightened, treadmill performance may decrease and the walking belt may be able to lift each side of the walking belt 2 to over- Plug in the power cord...
... IS OFF-CENTRE OR SLIPS WHEN WALKED ON SOLUTION: a. wise, 1/4 of a turn . Plug in the power cord, insert the key and run the treadmill for a few minutes. b. b Using the allen wrench, turn the left rear roller adjustment bolt counterclockwise, and the right bolt clockwise, 1/4 of a turn...allen wrench, turn each . b. If the walking belt is properly tightened, you should be permanently damaged. When the walking belt is overtightened, treadmill performance may decrease and the walking belt may be able to lift each side of the walking belt 2 to over- Plug in the power cord...
Uk Manual
Page 14
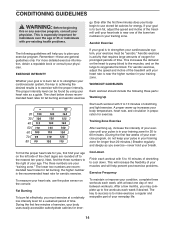
...and incline of oxygen for energy. the higher number is to the right of your goal is activity that requires large amounts of the treadmill until your training zone for 20 to achieving the desired results is the recommended heart rate for ener- If your age. The three ...numbers are rounded off to burn fat, adjust the speed and incline of your muscles and will increase the flexibility of the treadmill until your condition, complete three workouts each week if desired. After a few minutes does your body begin to strengthen your cardiovascular system, your...
...and incline of oxygen for energy. the higher number is to the right of your goal is activity that requires large amounts of the treadmill until your training zone for 20 to achieving the desired results is the recommended heart rate for ener- If your age. The three ...numbers are rounded off to burn fat, adjust the speed and incline of your muscles and will increase the flexibility of the treadmill until your condition, complete three workouts each week if desired. After a few minutes does your body begin to strengthen your cardiovascular system, your...
Uk Manual
Page 18
...: 0345-089009 Fax: 0113-2411120 To help us assist you, please be prepared to give the following information: ¥ The NAME of the product (PROFORM¨ 325E treadmill) ¥ The MODEL NUMBER of the product (PETL32571) ¥ The PART NUMBER of the part (see the EXPLODED DRAWING and PART LIST attached in...
...: 0345-089009 Fax: 0113-2411120 To help us assist you, please be prepared to give the following information: ¥ The NAME of the product (PROFORM¨ 325E treadmill) ¥ The MODEL NUMBER of the product (PETL32571) ¥ The PART NUMBER of the part (see the EXPLODED DRAWING and PART LIST attached in...


