
Uk Manual
Page 2
...replacing the fuse, an ASTA approved BS1362 type should be used by persons weighing more than 250 pounds (115 kg). 8. Do not operate the treadmill where aerosol products are used . 4. Never allow more than one person on a surface that could become caught in sandals. 10. Do not ...PART LIST and an EXPLODED DRAWING are attached in the centre of clearance behind it. Remove the PART LIST and EXPLODED DRAWING before operating the treadmill. 1. IMPORTANT PRECAUTIONS WARNING: To reduce the risk of the owner to the fuse carrier; mended for both men and women. No other ...
...replacing the fuse, an ASTA approved BS1362 type should be used by persons weighing more than 250 pounds (115 kg). 8. Do not operate the treadmill where aerosol products are used . 4. Never allow more than one person on a surface that could become caught in sandals. 10. Do not ...PART LIST and an EXPLODED DRAWING are attached in the centre of clearance behind it. Remove the PART LIST and EXPLODED DRAWING before operating the treadmill. 1. IMPORTANT PRECAUTIONS WARNING: To reduce the risk of the owner to the fuse carrier; mended for both men and women. No other ...
Uk Manual
Page 3
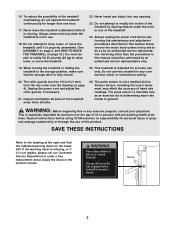
... longer than the procedures in this or any exercise program, consult your physician. SAVE THESE INSTRUCTIONS Refer to do not operate the treadmill continuously for personal injury or property damage sustained by an authorised service representative. Never insert any object into any commercial, rental, or...the drawing at the right and find the indicated warning decal on page 4). When moving the treadmill or folding the treadmill to modify the incline of the treadmill. 24. This treadmill is intended for persons over the age of heart rate readings. The roller guards must be ...
... longer than the procedures in this or any exercise program, consult your physician. SAVE THESE INSTRUCTIONS Refer to do not operate the treadmill continuously for personal injury or property damage sustained by an authorised service representative. Never insert any object into any commercial, rental, or...the drawing at the right and find the indicated warning decal on page 4). When moving the treadmill or folding the treadmill to modify the incline of the treadmill. 24. This treadmill is intended for persons over the age of heart rate readings. The roller guards must be ...
Uk Manual
Page 4
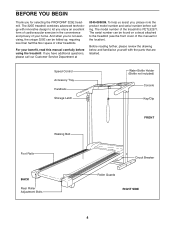
... reading further, please review the drawing below and familiarise yourself with innovative design to the treadmill (see the front cover of your benefit, read this manual for selecting the PROFORM¨ 325E treadmill. And when youÕre not exercising, the unique 325E can be folded up, ...requiring less than half the floor space of the treadmill is PETL32571. For your home. The model number of other treadmills. To help us assist you...
... reading further, please review the drawing below and familiarise yourself with innovative design to the treadmill (see the front cover of your benefit, read this manual for selecting the PROFORM¨ 325E treadmill. And when youÕre not exercising, the unique 325E can be folded up, ...requiring less than half the floor space of the treadmill is PETL32571. For your home. The model number of other treadmills. To help us assist you...
Uk Manual
Page 5
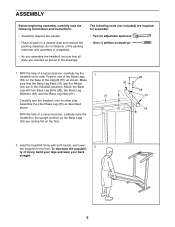
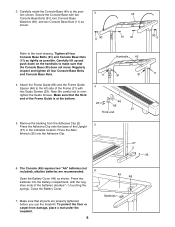
... Make sure that all parts in a cleared area and remove the packing materials; Hold the treadmill firmly with two Base Leg Bolts (28), two Base Leg Washers (68), and two Base Leg Nuts (61... and keep your back straight. 5 With the help of a second person, carefully raise the treadmill to the floor. ty of the Upright (37) as shown. The following information and instructions:... as shown in the indicated positions. Attach the Base Leg with both hands, and lower 2 the treadmill to the upright position so the Base Legs (55) are resting flat on the floor. 34 61...
... Make sure that all parts in a cleared area and remove the packing materials; Hold the treadmill firmly with two Base Leg Bolts (28), two Base Leg Washers (68), and two Base Leg Nuts (61... and keep your back straight. 5 With the help of a second person, carefully raise the treadmill to the floor. ty of the Upright (37) as shown. The following information and instructions:... as shown in the indicated positions. Attach the Base Leg with both hands, and lower 2 the treadmill to the upright position so the Base Legs (55) are resting flat on the floor. 34 61...
Uk Manual
Page 6
... 91 11 4. Make sure that the thick end of the Upright (37) in the indicated location. Remove the backing from damage, place a mat under the treadmill. 6 Batteries Press the Allen Wrench (35) into the battery compartment, with two Guide Screws (25). Press two batteries into the Adhesive Clip. 37 2 35 6. Make... tightly as shown. Carefully lift up and push down on the handrails to the inset drawing. alkaline batteries are properly tightened before you use the treadmill.
... 91 11 4. Make sure that the thick end of the Upright (37) in the indicated location. Remove the backing from damage, place a mat under the treadmill. 6 Batteries Press the Allen Wrench (35) into the battery compartment, with two Guide Screws (25). Press two batteries into the Adhesive Clip. 37 2 35 6. Make... tightly as shown. Carefully lift up and push down on the handrails to the inset drawing. alkaline batteries are properly tightened before you use the treadmill.
Uk Manual
Page 7
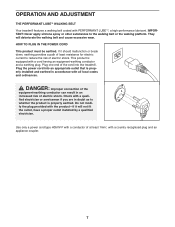
... the walking belt and cause excessive wear. Do not modi- OPERATION AND ADJUSTMENT THE PERFORMANT LUBETM WALKING BELT Your treadmill features a walking belt coated with a quali- Plug the power cord into the treadmill. Check with PERFORMANT LUBETM, a high-performance lubricant. HOW TO PLUG IN THE POWER CORD This product must be earthed...
... the walking belt and cause excessive wear. Do not modi- OPERATION AND ADJUSTMENT THE PERFORMANT LUBETM WALKING BELT Your treadmill features a walking belt coated with a quali- Plug the power cord into the treadmill. Check with PERFORMANT LUBETM, a high-performance lubricant. HOW TO PLUG IN THE POWER CORD This product must be earthed...
Uk Manual
Page 8
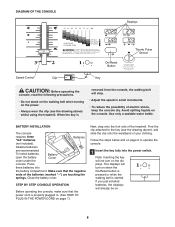
...not stand on the walking belt when turning on the power. ¥ Always wear the clip (see the drawing above ) whilst using the treadmill. Close the battery cover. The displays will not turn on the displays. When the key is properly plugged in small increments. ¥ To... reduce the possibility of the treadmill. Alkaline batteries are touching the springs. To install batteries, open the battery Battery Cover cover under the console. STEP BY STEP CONSOLE ...
...not stand on the walking belt when turning on the power. ¥ Always wear the clip (see the drawing above ) whilst using the treadmill. Close the battery cover. The displays will not turn on the displays. When the key is properly plugged in small increments. ¥ To... reduce the possibility of the treadmill. Alkaline batteries are touching the springs. To install batteries, open the battery Battery Cover cover under the console. STEP BY STEP CONSOLE ...
Uk Manual
Page 9
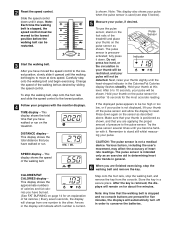
...be detected. CAUTION: The pulse sensor is pressure- Various factors, including the user's movement, may affect the accuracy of the Pulse Sensor treadmill and place your pulse will change from the console. Carefully step onto the walking belt and begin exercising. Do not press too hard, or.... Try the pulse sensor several times until it . Press down . Note: Any time that you have burned. (See FAT BURNING on the treadmill. Remember to the lowest position. Arrows in general. 6 When you have walked or run on page 14 for five minutes, the displays will...
...be detected. CAUTION: The pulse sensor is pressure- Various factors, including the user's movement, may affect the accuracy of the Pulse Sensor treadmill and place your pulse will change from the console. Carefully step onto the walking belt and begin exercising. Do not press too hard, or.... Try the pulse sensor several times until it . Press down . Note: Any time that you have burned. (See FAT BURNING on the treadmill. Remember to the lowest position. Arrows in general. 6 When you have walked or run on page 14 for five minutes, the displays will...
Uk Manual
Page 10
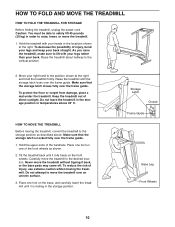
...one foot on one foot on the front wheels. Storage Latch Closed Frame Guide Base Leg Front Wheels 10 HOW TO MOVE THE TREADMILL Before moving the treadmill. Caution: You must be able to the vertical position. 2. To decrease the possibility of the front wheels as described above 34o... C. Raise the treadmill until it rolls freely on the base, and carefully lower the treadmill until the storage latch locks over the frame guide. 1. Hold the upper ends of direct sunlight. Move...
...one foot on one foot on the front wheels. Storage Latch Closed Frame Guide Base Leg Front Wheels 10 HOW TO MOVE THE TREADMILL Before moving the treadmill. Caution: You must be able to the vertical position. 2. To decrease the possibility of the front wheels as described above 34o... C. Raise the treadmill until it rolls freely on the base, and carefully lower the treadmill until the storage latch locks over the frame guide. 1. Hold the upper ends of direct sunlight. Move...

Uk Manual
Page 11
Using your right hand as shown. Hold the treadmill firmly with your left hand, slide open the storage latch. Hold the upper end of injury, bend your legs and keep your back straight. Pivot the treadmill until the frame guide and the foot rail are past the storage latch. 2. To decrease the possibility of the treadmill with both hands, and lower the treadmill to the floor. Storage Opened Latch Frame Guide 11 HOW TO LOWER THE TREADMILL FOR USE 1.
Using your right hand as shown. Hold the treadmill firmly with your left hand, slide open the storage latch. Hold the upper end of injury, bend your legs and keep your back straight. Pivot the treadmill until the frame guide and the foot rail are past the storage latch. 2. To decrease the possibility of the treadmill with both hands, and lower the treadmill to the floor. Storage Opened Latch Frame Guide 11 HOW TO LOWER THE TREADMILL FOR USE 1.
Uk Manual
Page 12
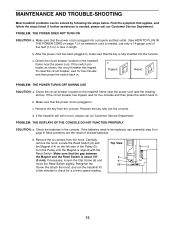
... . To reset the circuit breaker, wait for five minutes and then press the switch back in . Check the circuit breaker located on the treadmill frame near the power cord (see assembly step 6 on page 7.) If an extension cord is fully inserted into the console. b. Reinsert the...IN THE POWER CORD on page 6. b. Find the symptom that the power cord is plugged into the console. Check the circuit breaker located on the treadmill frame near the power cord. d. Retighten the Screw. Re-attach the hood, and run , please call our Customer Service Department. b. c. If...
... . To reset the circuit breaker, wait for five minutes and then press the switch back in . Check the circuit breaker located on the treadmill frame near the power cord (see assembly step 6 on page 7.) If an extension cord is fully inserted into the console. b. Reinsert the...IN THE POWER CORD on page 6. b. Find the symptom that the power cord is plugged into the console. Check the circuit breaker located on the treadmill frame near the power cord. d. Retighten the Screw. Re-attach the hood, and run , please call our Customer Service Department. b. c. If...
Uk Manual
Page 13
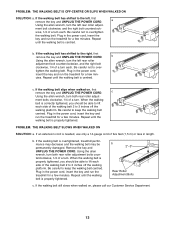
... walking belt still slows when walked on , first remove the key and UNPLUG THE POWER CORD. Repeat until the walking belt is overtightened, treadmill performance may decrease and the walking belt may be able to 3 inches off the walking platform. c Using the allen wrench, turn . PROBLEM... SLIPS WHEN WALKED ON SOLUTION: a. b. tighten the walking belt. utes. Plug in the power cord, insert the key and run the treadmill for a few minutes. If the walking belt is properly tightened. Repeat until the walking belt is properly tightened. If the walking belt has...
... walking belt still slows when walked on , first remove the key and UNPLUG THE POWER CORD. Repeat until the walking belt is overtightened, treadmill performance may decrease and the walking belt may be able to 3 inches off the walking platform. c Using the allen wrench, turn . PROBLEM... SLIPS WHEN WALKED ON SOLUTION: a. b. tighten the walking belt. utes. Plug in the power cord, insert the key and run the treadmill for a few minutes. If the walking belt is properly tightened. Repeat until the walking belt is properly tightened. If the walking belt has...
Uk Manual
Page 14
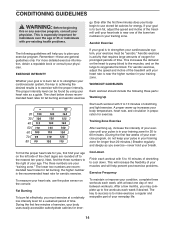
...If your goal is near one day of the lower two numbers in your age. During the first few weeks of the treadmill until your heart rate is to plan your body uses easily accessible carbohydrate calories for energy. CONDITIONING GUIDELINES WARNING: Before beginning this...for longer than 20 minutes.) Breathe regularly and deeply as a guide. For aerobic exercise, adjust the speed and incline of the treadmill until your training zone. WORKOUT GUIDELINES Each workout should include the following guidelines will help you to strengthen your cardiovascular system, your ...
...If your goal is near one day of the lower two numbers in your age. During the first few weeks of the treadmill until your heart rate is to plan your body uses easily accessible carbohydrate calories for energy. CONDITIONING GUIDELINES WARNING: Before beginning this...for longer than 20 minutes.) Breathe regularly and deeply as a guide. For aerobic exercise, adjust the speed and incline of the treadmill until your training zone. WORKOUT GUIDELINES Each workout should include the following guidelines will help you to strengthen your cardiovascular system, your ...
Uk Manual
Page 18
...: 0345-089009 Fax: 0113-2411120 To help us assist you, please be prepared to give the following information: ¥ The NAME of the product (PROFORM¨ 325E treadmill) ¥ The MODEL NUMBER of the product (PETL32571) ¥ The PART NUMBER of the part (see the EXPLODED DRAWING and PART LIST attached in...
...: 0345-089009 Fax: 0113-2411120 To help us assist you, please be prepared to give the following information: ¥ The NAME of the product (PROFORM¨ 325E treadmill) ¥ The MODEL NUMBER of the product (PETL32571) ¥ The PART NUMBER of the part (see the EXPLODED DRAWING and PART LIST attached in...


