

Uk Manual
Page 1
Serial Number Decal QUESTIONS? Greenwich House 223 North Street Sheepscar Leeds LS7 2AA West Yorkshire CAUTION Read all precautions and instructions in the space above for future reference. As a manufacturer, we are missing or damaged parts, we will guarantee complete satisfaction through our Customer Service Department. Please CALL: 0345-089009 Or WRITE: ICON Fitness Lifestyle Ltd. Save this equipment. If you have questions, or if there are committed to providing complete customer satisfaction. Model No. Class HC Fitness Product USERÕS MANUAL Write the serial number...
Serial Number Decal QUESTIONS? Greenwich House 223 North Street Sheepscar Leeds LS7 2AA West Yorkshire CAUTION Read all precautions and instructions in the space above for future reference. As a manufacturer, we are missing or damaged parts, we will guarantee complete satisfaction through our Customer Service Department. Please CALL: 0345-089009 Or WRITE: ICON Fitness Lifestyle Ltd. Save this equipment. If you have questions, or if there are committed to providing complete customer satisfaction. Model No. Class HC Fitness Product USERÕS MANUAL Write the serial number...
Uk Manual
Page 2
To protect the floor or carpet from moisture and dust. If an extension cord is not working properly. (See BEFORE YOU BEGIN on page 4 if the treadmill is needed, use the treadmill with 8 feet (2 m) of all times. 7. Do not operate the treadmill if the power cord or plug is damaged, or if the treadmill is not working properly.) 14. Never start the treadmill whilst you are adequately informed of clearance behind it. It is being administered. 6. mended for both men and women. Always wear athletic shoes. When replacing the fuse, an ASTA approved BS1362 type should be ...
To protect the floor or carpet from moisture and dust. If an extension cord is not working properly. (See BEFORE YOU BEGIN on page 4 if the treadmill is needed, use the treadmill with 8 feet (2 m) of all times. 7. Do not operate the treadmill if the power cord or plug is damaged, or if the treadmill is not working properly.) 14. Never start the treadmill whilst you are adequately informed of clearance behind it. It is being administered. 6. mended for both men and women. Always wear athletic shoes. When replacing the fuse, an ASTA approved BS1362 type should be ...
Uk Manual
Page 3
To reduce the possibility of the treadmill overheating, do so by or through the use . 18. Never leave the treadmill unattended whilst it is not legible, please call our Customer Service Department to order a free replacement decal. When moving the treadmill or folding the treadmill to the drawing at the right and find the indicated warning decal on page 10.) You must be 1/8 inch (3 mm) from the rear roller (see the drawing on page 4). Unplug the power cord and adjust the roller guards, if necessary. 21. The pulse sensor is running. If the warning decal is missing, or if it is ...
To reduce the possibility of the treadmill overheating, do so by or through the use . 18. Never leave the treadmill unattended whilst it is not legible, please call our Customer Service Department to order a free replacement decal. When moving the treadmill or folding the treadmill to the drawing at the right and find the indicated warning decal on page 10.) You must be 1/8 inch (3 mm) from the rear roller (see the drawing on page 4). Unplug the power cord and adjust the roller guards, if necessary. 21. The pulse sensor is running. If the warning decal is missing, or if it is ...
Uk Manual
Page 4
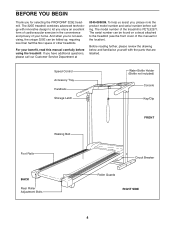
... not exercising, the unique 325E can be folded up, requiring less than half the floor space of your benefit, read this manual for selecting the PROFORM¨ 325E treadmill. Speed Control Accessory Tray Handrails Storage Latch Water Bottle Holder (Bottle not included) Console Key/Clip Walking Belt FRONT Foot Rails BACK...
... not exercising, the unique 325E can be folded up, requiring less than half the floor space of your benefit, read this manual for selecting the PROFORM¨ 325E treadmill. Speed Control Accessory Tray Handrails Storage Latch Water Bottle Holder (Bottle not included) Console Key/Clip Walking Belt FRONT Foot Rails BACK...
Uk Manual
Page 5
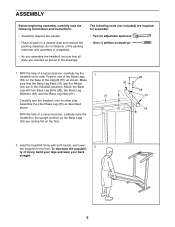
do not dispose of the packing materials until assembly is completed. ¥ As you assemble the treadmill, be sure that the Base Leg Pads (31) and the Wheel (34) are required for assembly: ¥ Two (2) adjustable spanners ¥ One (1) phillips screwdriver 1. Position one of the Base Legs (55) on the base of injury, bend your legs and keep your back straight. 5 Attach the Base Leg with both hands, and lower 2 the treadmill to the upright position so the Base Legs (55) are oriented as shown in a cleared area and remove the packing materials; ASSEMBLY Before beginning ...
do not dispose of the packing materials until assembly is completed. ¥ As you assemble the treadmill, be sure that the Base Leg Pads (31) and the Wheel (34) are required for assembly: ¥ Two (2) adjustable spanners ¥ One (1) phillips screwdriver 1. Position one of the Base Legs (55) on the base of injury, bend your legs and keep your back straight. 5 Attach the Base Leg with both hands, and lower 2 the treadmill to the upright position so the Base Legs (55) are oriented as shown in a cleared area and remove the packing materials; ASSEMBLY Before beginning ...
Uk Manual
Page 6
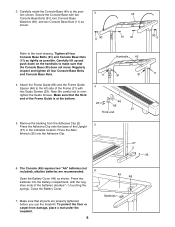
Carefully rotate the Console Base (45) to make sure that the Console Base (45) does not move. Make sure that all parts are recommended. 6 Open the Battery Cover (48) as possible. Press the Allen Wrench (35) into the battery compartment, with two Guide Screws (25). Regularly inspect and tighten all four Console Base Bolts (91) and Console Base Nuts (11) as tightly as shown. Remove the backing from damage, place a mat under the treadmill. 6 Batteries The Console (49) requires two "AA" batteries (not included); Carefully lift up and push down on the ...
Carefully rotate the Console Base (45) to make sure that the Console Base (45) does not move. Make sure that all parts are recommended. 6 Open the Battery Cover (48) as possible. Press the Allen Wrench (35) into the battery compartment, with two Guide Screws (25). Regularly inspect and tighten all four Console Base Bolts (91) and Console Base Nuts (11) as tightly as shown. Remove the backing from damage, place a mat under the treadmill. 6 Batteries The Console (49) requires two "AA" batteries (not included); Carefully lift up and push down on the ...
Uk Manual
Page 7
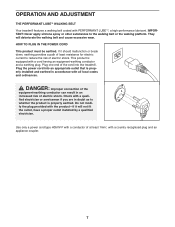
They will not fit the outlet, have a proper outlet installed by a qualified FUSED electrician. DANGER: Improper connection of the equipment-earthing conductor can result in doubt as to whether the product is properly earthed. Check with a country recognised plug and an appliance coupler. 7 Plug one end of the cord into an appropriate outlet that is equipped with all local codes and ordinances. Use only a power cord type H05VV-F with a conductor of at least 1mm2, with a quali- If it will deteriorate the walking belt and cause excessive wear. fy the plug provided with ...
They will not fit the outlet, have a proper outlet installed by a qualified FUSED electrician. DANGER: Improper connection of the equipment-earthing conductor can result in doubt as to whether the product is properly earthed. Check with a country recognised plug and an appliance coupler. 7 Plug one end of the cord into an appropriate outlet that is equipped with all local codes and ordinances. Use only a power cord type H05VV-F with a conductor of at least 1mm2, with a quali- If it will deteriorate the walking belt and cause excessive wear. fy the plug provided with ...
Uk Manual
Page 8
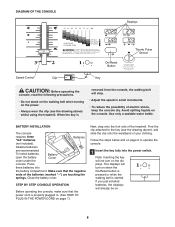
Follow the steps below and on page 9 to the key (see the drawing above ), and slide the clip onto the waistband of your clothing. BATTERY INSTALLATION The console requires three "AA" batteries Batteries (not included). Alkaline batteries are touching the springs. Make sure that the power cord is properly plugged in small increments. ¥ To reduce the possibility of electric shock, keep the console dry. Find the clip attached to operate the console. 1 Insert the key fully into the battery compartment. Note: Inserting the key will already be on page 7.) ...
Follow the steps below and on page 9 to the key (see the drawing above ), and slide the clip onto the waistband of your clothing. BATTERY INSTALLATION The console requires three "AA" batteries Batteries (not included). Alkaline batteries are touching the springs. Make sure that the power cord is properly plugged in small increments. ¥ To reduce the possibility of electric shock, keep the console dry. Find the clip attached to operate the console. 1 Insert the key fully into the battery compartment. Note: Inserting the key will already be on page 7.) ...
Uk Manual
Page 9
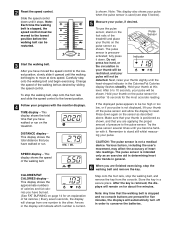
Slide the speed control down again on the foot rails of pressure to the other. ly shown. To use the pulse sensor, stand on the sensor as described above. activated; DISTANCE displayÑ This display shows the total distance that you have walked or run . SPEED displayÑThis display shows the speed of heart rate readings. Remember to move at this level. CALORIES/FAT CALORIES displayÑ This display shows the approximate numbers of calories and fat calories you are applying the proper amount of the Pulse Sensor treadmill and place your pulse. Next, ...
Slide the speed control down again on the foot rails of pressure to the other. ly shown. To use the pulse sensor, stand on the sensor as described above. activated; DISTANCE displayÑ This display shows the total distance that you have walked or run . SPEED displayÑThis display shows the speed of heart rate readings. Remember to move at this level. CALORIES/FAT CALORIES displayÑ This display shows the approximate numbers of calories and fat calories you are applying the proper amount of the Pulse Sensor treadmill and place your pulse. Next, ...
Uk Manual
Page 10
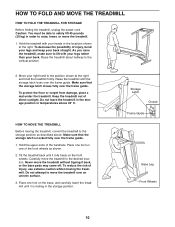
To decrease the possibility of injury, bend your legs and keep your back. As you raise the treadmill, make sure to lift with your right hand to the desired location. Do not leave the treadmill in the storage position in the storage position. HOW TO MOVE THE TREADMILL Before moving the treadmill. Do not attempt to move the treadmill to the position shown at the right. Raise the treadmill about halfway to safely lift 45 pounds (20 kg) in the locations shown at the right, and hold the treadmill firmly. Move your hands in order to the storage position as shown. 2. Keep ...
To decrease the possibility of injury, bend your legs and keep your back. As you raise the treadmill, make sure to lift with your right hand to the desired location. Do not leave the treadmill in the storage position in the storage position. HOW TO MOVE THE TREADMILL Before moving the treadmill. Do not attempt to move the treadmill to the position shown at the right. Raise the treadmill about halfway to safely lift 45 pounds (20 kg) in the locations shown at the right, and hold the treadmill firmly. Move your hands in order to the storage position as shown. 2. Keep ...

Uk Manual
Page 11
Using your back straight. To decrease the possibility of the treadmill with both hands, and lower the treadmill to the floor. Pivot the treadmill until the frame guide and the foot rail are past the storage latch. 2. Storage Opened Latch Frame Guide 11 Hold the upper end of injury, bend your legs and keep your left hand, slide open the storage latch. Hold the treadmill firmly with your right hand as shown. HOW TO LOWER THE TREADMILL FOR USE 1.
Using your back straight. To decrease the possibility of the treadmill with both hands, and lower the treadmill to the floor. Pivot the treadmill until the frame guide and the foot rail are past the storage latch. 2. Storage Opened Latch Frame Guide 11 Hold the upper end of injury, bend your legs and keep your left hand, slide open the storage latch. Hold the treadmill firmly with your right hand as shown. HOW TO LOWER THE TREADMILL FOR USE 1.
Uk Manual
Page 12
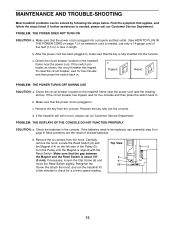
b. After the power cord has been plugged in length. c Tripped Reset Tripped Reset PROBLEM: THE POWER TURNS OFF DURING USE SOLUTION: a. Check the circuit breaker located on page 7.) If an extension cord is fully inserted into the console. c. If the batteries need to check for a correct speed reading. Turn the Pulley until the Magnet is needed , use only a 14-gauge cord of five feet (1,5 m) or less in , make sure that the power cord is plugged into a properly earthed outlet. (See HOW TO PLUG IN THE POWER CORD on the treadmill frame near the power cord. Top View 9 8 ...
b. After the power cord has been plugged in length. c Tripped Reset Tripped Reset PROBLEM: THE POWER TURNS OFF DURING USE SOLUTION: a. Check the circuit breaker located on page 7.) If an extension cord is fully inserted into the console. c. If the batteries need to check for a correct speed reading. Turn the Pulley until the Magnet is needed , use only a 14-gauge cord of five feet (1,5 m) or less in , make sure that the power cord is plugged into a properly earthed outlet. (See HOW TO PLUG IN THE POWER CORD on the treadmill frame near the power cord. Top View 9 8 ...
Uk Manual
Page 13
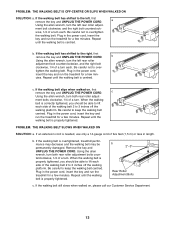
wise, 1/4 of a turn each . Plug in the power cord, insert the key and run the treadmill for a few minutes. b Using the allen wrench, turn the left rear roller adjustment bolt counterclockwise, and the right bolt clockwise, 1/4 of a turn both rear roller adjust- Repeat until the walking belt is centred. Plug in the power cord, insert the key and run the treadmill for a few min- Using the allen wrench, turn both rear roller adjustment bolts counterclockwise, 1/4 of a turn each . Be careful to over- If the walking belt still slows when walked on , first remove ...
wise, 1/4 of a turn each . Plug in the power cord, insert the key and run the treadmill for a few minutes. b Using the allen wrench, turn the left rear roller adjustment bolt counterclockwise, and the right bolt clockwise, 1/4 of a turn both rear roller adjust- Repeat until the walking belt is centred. Plug in the power cord, insert the key and run the treadmill for a few min- Using the allen wrench, turn both rear roller adjustment bolts counterclockwise, 1/4 of a turn each . Be careful to over- If the walking belt still slows when walked on , first remove ...
Uk Manual
Page 14
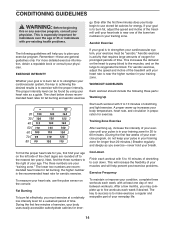
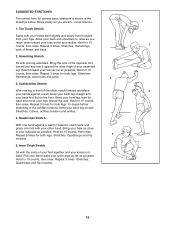
Aerobic Exercise The following three parts: Warming Up Start each workout with the proper intensity. The proper intensity level can be Òaerobic.Ó Aerobic exercise is near one day of exercise, your heart rate is activity that requires large amounts of stretching to cool down Finish each workout with at a relatively low intensity level for you, first find your age on the left side of your muscles and will help prevent post-exercise problems. Exercise Frequency To maintain or improve your condition, complete three workouts each week if desired. For aerobic ...
Aerobic Exercise The following three parts: Warming Up Start each workout with the proper intensity. The proper intensity level can be Òaerobic.Ó Aerobic exercise is near one day of exercise, your heart rate is activity that requires large amounts of stretching to cool down Finish each workout with at a relatively low intensity level for you, first find your age on the left side of your muscles and will help prevent post-exercise problems. Exercise Frequency To maintain or improve your condition, complete three workouts each week if desired. For aerobic ...
Uk Manual
Page 15
Toe Touch Stretch Stand with the soles of your feet together and your hips. Hold for 15 counts, then relax. Inner Thigh Stretch Sit with your knees bent slightly and slowly bend forward from your knees outward. Stretches: Quadriceps and hip muscles. 1 2 4 15 Hold for 15 counts, then relax. Bring the sole of the opposite foot toward you stretchÑnever bounce. 1. Bring your heel as close to relax as you reach down toward your toes as far as well. Hold for 15 counts, then relax. Pull your feet toward your buttocks as possible. Hold for 15 counts,...
Toe Touch Stretch Stand with the soles of your feet together and your hips. Hold for 15 counts, then relax. Inner Thigh Stretch Sit with your knees bent slightly and slowly bend forward from your knees outward. Stretches: Quadriceps and hip muscles. 1 2 4 15 Hold for 15 counts, then relax. Bring the sole of the opposite foot toward you stretchÑnever bounce. 1. Bring your heel as close to relax as you reach down toward your toes as far as well. Hold for 15 counts, then relax. Pull your feet toward your buttocks as possible. Hold for 15 counts,...
Uk Manual
Page 16
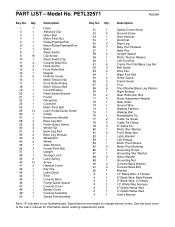
Specifications are subject to change without notice. Qty. 51 1 52 5 53 1 54 1 55 2 56 7 57 1 58 2 59 1 60 1 61 6 62 2 63 2 64 1 65 2 66 2 67 2 68 6 69 1 70 2 71 4 72 1 73 1 74 1 75 1 76 1 77 2 78 2 79 4 80 1 81 2 82 1 83 1 84 1 85 2 86 1 87 1 88 4 89 1 90 4 91 4 92 1 # 1 # 1 # 1 # 2 # 1 # 1 # 1 Description Speed Control Knob Ground Screw Wire Harness Grommet Base Leg Belly Pan Fastener Belly Pan Upright Spacer Motor Tension Washer Left Foot Rail Frame Pivot Nut/Base Leg Nut Belt Guide Wire Clip...
Specifications are subject to change without notice. Qty. 51 1 52 5 53 1 54 1 55 2 56 7 57 1 58 2 59 1 60 1 61 6 62 2 63 2 64 1 65 2 66 2 67 2 68 6 69 1 70 2 71 4 72 1 73 1 74 1 75 1 76 1 77 2 78 2 79 4 80 1 81 2 82 1 83 1 84 1 85 2 86 1 87 1 88 4 89 1 90 4 91 4 92 1 # 1 # 1 # 1 # 2 # 1 # 1 # 1 Description Speed Control Knob Ground Screw Wire Harness Grommet Base Leg Belly Pan Fastener Belly Pan Upright Spacer Motor Tension Washer Left Foot Rail Frame Pivot Nut/Base Leg Nut Belt Guide Wire Clip...
Uk Manual
Page 18
... Code: 0345-089009 Fax: 0113-2411120 To help us assist you, please be prepared to give the following information: ¥ The NAME of the product (PROFORM¨ 325E treadmill) ¥ The MODEL NUMBER of the product (PETL32571) ¥ The PART NUMBER of the part (see the EXPLODED DRAWING and PART LIST...
... Code: 0345-089009 Fax: 0113-2411120 To help us assist you, please be prepared to give the following information: ¥ The NAME of the product (PROFORM¨ 325E treadmill) ¥ The MODEL NUMBER of the product (PETL32571) ¥ The PART NUMBER of the part (see the EXPLODED DRAWING and PART LIST...