

English Manual
Page 2
... Inc. 2 TABLE OF CONTENTS WARNING DECAL PLACEMENT 2 IMPORTANT PRECAUTIONS 3 BEFORE YOU BEGIN 4 PART IDENTIFICATION CHART 5 ASSEMBLY 6 HOW TO USE THE ELLIPTICAL 16 FCC INFORMATION 28 MAINTENANCE AND TROUBLESHOOTING 29 EXERCISE GUIDELINES 31 PART LIST 34 EXPLODED DRAWING 36 ORDERING REPLACEMENT PARTS Back Cover LIMITED WARRANTY Back... Cover WARNING DECAL PLACEMENT This drawing shows the location(s) of this manual and request a free replacement decal. PROFORM is missing or illegible, see the front cover of the warning decal(s). Apply the decal in the location shown.
... Inc. 2 TABLE OF CONTENTS WARNING DECAL PLACEMENT 2 IMPORTANT PRECAUTIONS 3 BEFORE YOU BEGIN 4 PART IDENTIFICATION CHART 5 ASSEMBLY 6 HOW TO USE THE ELLIPTICAL 16 FCC INFORMATION 28 MAINTENANCE AND TROUBLESHOOTING 29 EXERCISE GUIDELINES 31 PART LIST 34 EXPLODED DRAWING 36 ORDERING REPLACEMENT PARTS Back Cover LIMITED WARRANTY Back... Cover WARNING DECAL PLACEMENT This drawing shows the location(s) of this manual and request a free replacement decal. PROFORM is missing or illegible, see the front cover of the warning decal(s). Apply the decal in the location shown.

English Manual
Page 3
... WARNING: To reduce the risk of this product. 1. Do not put the elliptical in general. 18. Inspect and properly tighten all times. 9. To avoid overloading the circuit, do not plug other than 300 lbs. (136 kg). 15. sentative only. 14. the pedals will continue to ensure that could become caught on a level...
... WARNING: To reduce the risk of this product. 1. Do not put the elliptical in general. 18. Inspect and properly tighten all times. 9. To avoid overloading the circuit, do not plug other than 300 lbs. (136 kg). 15. sentative only. 14. the pedals will continue to ensure that could become caught on a level...
English Manual
Page 4
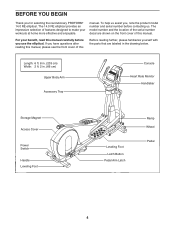
... on the front cover of this manual carefully before contacting us assist you for selecting the revolutionary PROFORM® 14.0 RE elliptical. For your workouts at home more effective and enjoyable. manual. If you use the elliptical. To help us . Length: 6 ft. 8 in. (203 cm) Width: 2 ft. 2 in the drawing below. The model number...
... on the front cover of this manual carefully before contacting us assist you for selecting the revolutionary PROFORM® 14.0 RE elliptical. For your workouts at home more effective and enjoyable. manual. If you use the elliptical. To help us . Length: 6 ft. 8 in. (203 cm) Width: 2 ft. 2 in the drawing below. The model number...

English Manual
Page 6
...rubber mallet Assembly may be easier if you nish all parts in the folded position, unfold it after completing this step. To unfold the elliptical, hold the handle on the Rear Stabilizer (4), press the Latch Button (67), and lower the Rear Stabilizer and the Folding Frame (2) to the... Folding 1 Frame with two M10 x 120mm Screws (100). ASSEMBLY •• To watch an assembly video, go to http://productvideo.co/ assembly/proform or use power tools. 1. Do not dispose of the packing materials until you have your own set of wrenches. While a second person lifts the ...
...rubber mallet Assembly may be easier if you nish all parts in the folded position, unfold it after completing this step. To unfold the elliptical, hold the handle on the Rear Stabilizer (4), press the Latch Button (67), and lower the Rear Stabilizer and the Folding Frame (2) to the... Folding 1 Frame with two M10 x 120mm Screws (100). ASSEMBLY •• To watch an assembly video, go to http://productvideo.co/ assembly/proform or use power tools. 1. Do not dispose of the packing materials until you have your own set of wrenches. While a second person lifts the ...

English Manual
Page 10
Pull upward on the Latch (117) on the other side of the elliptical. 92 12 43 12 117 136 9. Make sure that the Right Pedal Arm latches into the Ramp (43). 44 5 43 10 Locate the Ramp Roller (...
Pull upward on the Latch (117) on the other side of the elliptical. 92 12 43 12 117 136 9. Make sure that the Right Pedal Arm latches into the Ramp (43). 44 5 43 10 Locate the Ramp Roller (...

English Manual
Page 11
... an M8 x 25mm x 1.5mm Washer (126) into the other side of the Link Arm Axle (94). Repeat this step on the other end of the elliptical. 10 7 91 128 94 Grease 6 88 90 126 111 128 11. Next, slide the M17 x 27mm Wave Washer (88) onto the Link Arm Axle. Tip...
... an M8 x 25mm x 1.5mm Washer (126) into the other side of the Link Arm Axle (94). Repeat this step on the other end of the elliptical. 10 7 91 128 94 Grease 6 88 90 126 111 128 11. Next, slide the M17 x 27mm Wave Washer (88) onto the Link Arm Axle. Tip...
English Manual
Page 12
... the Upright (5) by pressing it into place around the Upright. 12 Avoid pinching the wires 5 93 24 13. Identify the Right Front Leg Cover (30). 14 Attach the Right Front Leg Cover (30) to the Upright (5) with two M4 x 16mm Screws (93). 12. Tip: Avoid pinching the wires. Attach the Rear... (24) to the Right Upper Body Arm (8) with four M4 x 16mm Screws (93). Tip: It may be necessary to bend the upper end of the elliptical. 12 32 8 30 93 Repeat this step on the other side of the Rear Upright Cover gently into the Rear Upright Cover (24). 25 5 24...
... the Upright (5) by pressing it into place around the Upright. 12 Avoid pinching the wires 5 93 24 13. Identify the Right Front Leg Cover (30). 14 Attach the Right Front Leg Cover (30) to the Upright (5) with two M4 x 16mm Screws (93). 12. Tip: Avoid pinching the wires. Attach the Rear... (24) to the Right Upper Body Arm (8) with four M4 x 16mm Screws (93). Tip: It may be necessary to bend the upper end of the elliptical. 12 32 8 30 93 Repeat this step on the other side of the Rear Upright Cover gently into the Rear Upright Cover (24). 25 5 24...

English Manual
Page 13
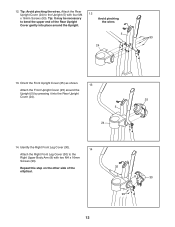
Slide the Console Cover onto the Upright (5). 16 8 30 29 11 5 13 Identify the Right Rear Leg Cover (29). 15 Attach the Right Rear Leg Cover (29) around the Right Upper Body Arm (8) by pressing it into the Right Front Leg Cover (30). Repeat this step on the other side of the elliptical. 16. 15. Orient the Console Cover (11) as shown.
Slide the Console Cover onto the Upright (5). 16 8 30 29 11 5 13 Identify the Right Rear Leg Cover (29). 15 Attach the Right Rear Leg Cover (29) around the Right Upper Body Arm (8) by pressing it into the Right Front Leg Cover (30). Repeat this step on the other side of the elliptical. 16. 15. Orient the Console Cover (11) as shown.

English Manual
Page 15
... x 16mm Screws (93). 33 Avoid pinching the wires 135 10 60 93 20. Make sure that all parts are properly tightened before you use the elliptical. Tip: Avoid pinching the wires. Insert the excess wire into the Handlebar (10) or into the Console (33). Attach the Console Cover (11) to the... Handlebar (10) with two M4 x 16mm Screws (93). 20 10 93 11 21. Place a mat under the elliptical to the Pulse Wire (135). 19. While a second person holds the Console (33) near the Handlebar (10), connect the wires on the 19 Console to...
... x 16mm Screws (93). 33 Avoid pinching the wires 135 10 60 93 20. Make sure that all parts are properly tightened before you use the elliptical. Tip: Avoid pinching the wires. Insert the excess wire into the Handlebar (10) or into the Console (33). Attach the Console Cover (11) to the... Handlebar (10) with two M4 x 16mm Screws (93). 20 10 93 11 21. Place a mat under the elliptical to the Pulse Wire (135). 19. While a second person holds the Console (33) near the Handlebar (10), connect the wires on the 19 Console to...

English Manual
Page 16
... grounded. The power cord has a plug with all local codes and ordinances. If you are not grounded. Before using an adapter. HOW TO USE THE ELLIPTICAL HOW TO PLUG IN THE POWER CORD This product must be installed by a qualified electrician. Do not modify the plug; The temporary adapter should malfunction...
... grounded. The power cord has a plug with all local codes and ordinances. If you are not grounded. Before using an adapter. HOW TO USE THE ELLIPTICAL HOW TO PLUG IN THE POWER CORD This product must be installed by a qualified electrician. Do not modify the plug; The temporary adapter should malfunction...

English Manual
Page 17
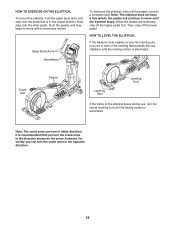
... in front of a second person, carefully move the elliptical, first fold it to the crank arms. 17 With the help of the elliptical, hold the pedal arms in use the elliptical, first hold the handle and lift the frame until the elliptical rolls on the crank arms. Pedal Arm Latch To ...move the elliptical to the desired location, and then lower it as described...
... in front of a second person, carefully move the elliptical, first fold it to the crank arms. 17 With the help of the elliptical, hold the pedal arms in use the elliptical, first hold the handle and lift the frame until the elliptical rolls on the crank arms. Pedal Arm Latch To ...move the elliptical to the desired location, and then lower it as described...
English Manual
Page 18
... during use , turn in the direction shown by the arrow; HOW TO EXERCISE ON THE ELLIPTICAL To mount the elliptical, hold the upper body arms and step onto the pedal that you can turn the center leveling foot until they begin to move until the ... eliminated. Note: The crank arms can turn the crank arms in either direction. Next, step onto the other pedal. Upper Body Arms To dismount the elliptical, wait until the pedals come to move with a continuous motion. the pedals will continue to a complete stop. however, for variety you turn the crank arms...
... during use , turn in the direction shown by the arrow; HOW TO EXERCISE ON THE ELLIPTICAL To mount the elliptical, hold the upper body arms and step onto the pedal that you can turn the center leveling foot until they begin to move until the ... eliminated. Note: The crank arms can turn the crank arms in either direction. Next, step onto the other pedal. Upper Body Arms To dismount the elliptical, wait until the pedals come to move with a continuous motion. the pedals will continue to a complete stop. however, for variety you turn the crank arms...
English Manual
Page 20
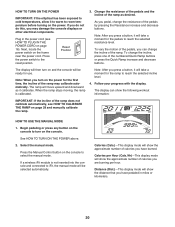
.... Distance (Dist.)—-This display mode will show the distance that you are burning per hour. HOW TO TURN ON THE POWER IMPORTANT: If the elliptical has been exposed to cold temperatures, allow it calibrates. Next, locate the power switch on page 29 and manually calibrate the ramp. Press the power...
.... Distance (Dist.)—-This display mode will show the distance that you are burning per hour. HOW TO TURN ON THE POWER IMPORTANT: If the elliptical has been exposed to cold temperatures, allow it calibrates. Next, locate the power switch on page 29 and manually calibrate the ramp. Press the power...
English Manual
Page 22
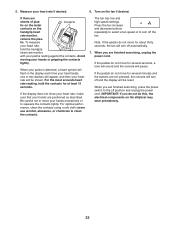
... move for several minutes and the buttons are finished exercising, unplug the power cord. 5. Note: If the pedals do this, the electrical components on the elliptical may wear prematurely. 22 tic. IMPORTANT: If you are finished exercising, press the power switch to squeeze the contacts tightly. If there are positioned as...
... move for several minutes and the buttons are finished exercising, unplug the power cord. 5. Note: If the pedals do this, the electrical components on the elliptical may wear prematurely. 22 tic. IMPORTANT: If you are finished exercising, press the power switch to squeeze the contacts tightly. If there are positioned as...

English Manual
Page 27
... display. The currently selected audio setting for a few seconds, the status of measurement, press the Enter button repeatedly to turn on the elliptical. 3. The words CHECK WIFI STATUS or CHECK USB STATUS will show the total number of measurement. 4. To change the audio setting, ...press the Enter button repeatedly to select the desired unit of hours that the elliptical has been used. After a few seconds. 9. The console will appear in the display. The currently selected contrast level will appear in...
... display. The currently selected audio setting for a few seconds, the status of measurement, press the Enter button repeatedly to turn on the elliptical. 3. The words CHECK WIFI STATUS or CHECK USB STATUS will show the total number of measurement. 4. To change the audio setting, ...press the Enter button repeatedly to select the desired unit of hours that the elliptical has been used. After a few seconds. 9. The console will appear in the display. The currently selected contrast level will appear in...
English Manual
Page 29
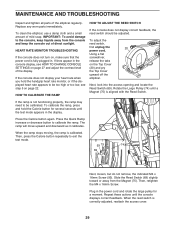
...too high or too low, see HOW TO CHANGE CONSOLE SETTINGS on the Top Cover (20) and pry the Top Cover upward off the elliptical. Using a flat screwdriver, release the tabs on page 27 and adjust the contrast level of mild soap. When the reed switch is aligned...does not display correct feedback, the reed switch should be calibrated. MAINTENANCE AND TROUBLESHOOTING Inspect and tighten all parts of direct sunlight. To clean the elliptical, use a damp cloth and a small amount of the display. HEART RATE MONITOR TROUBLESHOOTING If the console does not turn on page 22. ...
...too high or too low, see HOW TO CHANGE CONSOLE SETTINGS on the Top Cover (20) and pry the Top Cover upward off the elliptical. Using a flat screwdriver, release the tabs on page 27 and adjust the contrast level of mild soap. When the reed switch is aligned...does not display correct feedback, the reed switch should be calibrated. MAINTENANCE AND TROUBLESHOOTING Inspect and tighten all parts of direct sunlight. To clean the elliptical, use a damp cloth and a small amount of the display. HEART RATE MONITOR TROUBLESHOOTING If the console does not turn on page 22. ...

English Manual
Page 30
... 117 124 Next, lift the Latch (117) on the underside of the Left Pedal Arm (13), and then lift the Left Pedal Arm off the elliptical. See EXPLODED DRAWING B on the Top Cover (20) and pry the Top Cover upward off the left pedal arm, and reattach the access cover. Make...
... 117 124 Next, lift the Latch (117) on the underside of the Left Pedal Arm (13), and then lift the Left Pedal Arm off the elliptical. See EXPLODED DRAWING B on the Top Cover (20) and pry the Top Cover upward off the left pedal arm, and reattach the access cover. Make...


