

Uk Manual
Page 2
TABLE OF CONTENTS IMPORTANT PRECAUTIONS 3 BEFORE YOU BEGIN 5 ASSEMBLY 6 HOW TO USE THE CHEST PULSE SENSOR 8 OPERATION AND ADJUSTMENT 9 HOW TO FOLD AND MOVE THE TREADMILL 22 TROUBLESHOOTING 23 CONDITIONING GUIDELINES 26 ORDERING REPLACEMENT PARTS Back Cover Note: An EXPLODED DRAWING and a PART LIST are attached in the centre of ICON Health & Fitness, Inc. 2 PROFORM is a registered trademark of this manual.
TABLE OF CONTENTS IMPORTANT PRECAUTIONS 3 BEFORE YOU BEGIN 5 ASSEMBLY 6 HOW TO USE THE CHEST PULSE SENSOR 8 OPERATION AND ADJUSTMENT 9 HOW TO FOLD AND MOVE THE TREADMILL 22 TROUBLESHOOTING 23 CONDITIONING GUIDELINES 26 ORDERING REPLACEMENT PARTS Back Cover Note: An EXPLODED DRAWING and a PART LIST are attached in the centre of ICON Health & Fitness, Inc. 2 PROFORM is a registered trademark of this manual.

Uk Manual
Page 3
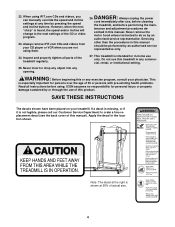
...speed and/or incline may affect the accuracy of 12 and pets away from damage, place a mat under the treadmill. 20. Never allow more than 1.5 m (5 ft.). 12. Do not operate the treadmill if the power cord or plug is damaged, or if the treadmill is not working properly. (See BEFORE YOU BEGIN... on /off switch to raise, lower, or move the treadmill. 19. Keep children under...
...speed and/or incline may affect the accuracy of 12 and pets away from damage, place a mat under the treadmill. 20. Never allow more than 1.5 m (5 ft.). 12. Do not operate the treadmill if the power cord or plug is damaged, or if the treadmill is not working properly. (See BEFORE YOU BEGIN... on /off switch to raise, lower, or move the treadmill. 19. Keep children under...
Uk Manual
Page 4
... procedures in -home use of this manual should be performed by or through the use only. This treadmill is heard, the speed and/or incline will change to the next settings of the treadmill regularly. 25. If a decal is missing, or if it is especially important for personal injury or...or persons with pre-existing health problems. Read all parts of the CD or video program. 23. scribed in this treadmill in the location shown. Do not use , before cleaning the treadmill, and before using them. 24. This is not legible, please call our Customer Service Department to do so by...
... procedures in -home use of this manual should be performed by or through the use only. This treadmill is heard, the speed and/or incline will change to the next settings of the treadmill regularly. 25. If a decal is missing, or if it is especially important for personal injury or...or persons with pre-existing health problems. Read all parts of the CD or video program. 23. scribed in this treadmill in the location shown. Do not use , before cleaning the treadmill, and before using them. 24. This is not legible, please call our Customer Service Department to do so by...
Uk Manual
Page 5
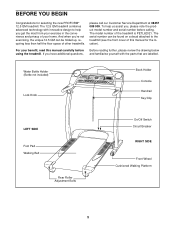
... serial number before using the treadmill. And when you're not exercising, the unique 12.5 QM can be folded up, requiring less than half the floor space of your benefit, read this manual for selecting the new PROFORM® 12.5 QM treadmill. If you have additional questions..., Before reading further, please review the drawing below and familiarise yourself with innovative design to the treadmill (see the front cover of the treadmill is PETL62021. Water Bottle Holder (Bottle...
... serial number before using the treadmill. And when you're not exercising, the unique 12.5 QM can be folded up, requiring less than half the floor space of your benefit, read this manual for selecting the new PROFORM® 12.5 QM treadmill. If you have additional questions..., Before reading further, please review the drawing below and familiarise yourself with innovative design to the treadmill (see the front cover of the treadmill is PETL62021. Water Bottle Holder (Bottle...
Uk Manual
Page 6
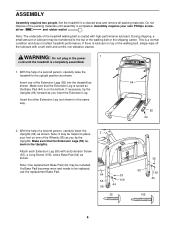
...on the bottom. Insert the other Extension Leg (not shown) in the power 1 cord until assembly is a normal condition and does not affect treadmill performance. WARNING: Do not plug in the same way. 64 55 44 2. With the help of the walking belt, simply wipe off the ... included. driver and rubber mallet . During shipping, a small amount of lubricant may be helpful to the top of a second person, carefully raise the treadmill to the upright position as you insert the Extension Leg. If there is coated with an Extension Screw (35), a Long Screw (109), and a ...
...on the bottom. Insert the other Extension Leg (not shown) in the power 1 cord until assembly is a normal condition and does not affect treadmill performance. WARNING: Do not plug in the same way. 64 55 44 2. With the help of the walking belt, simply wipe off the ... included. driver and rubber mallet . During shipping, a small amount of lubricant may be helpful to the top of a second person, carefully raise the treadmill to the upright position as you insert the Extension Leg. If there is coated with an Extension Screw (35), a Long Screw (109), and a ...
Uk Manual
Page 7
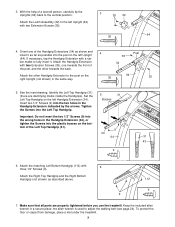
... two 1/2" Screws (9) into the plastic bosses on the left Upright (64) with a rub- To protect the floor or carpet from damage, place a mat under the treadmill. 7 Insert two 1/2" Screws (9) into the two holes in the Handgrip Extension (34), or tighten the Screws into the wrong holes in the Handgrip Extension indicated... front of the Left Top Handgrip (31). 9 34 64 31 43 9 6. Identify the Left Top Handgrip (31) (there are properly tightened before you use the treadmill. 3.
... two 1/2" Screws (9) into the plastic bosses on the left Upright (64) with a rub- To protect the floor or carpet from damage, place a mat under the treadmill. 7 Insert two 1/2" Screws (9) into the two holes in the Handgrip Extension (34), or tighten the Screws into the wrong holes in the Handgrip Extension indicated... front of the Left Top Handgrip (31). 9 34 64 31 43 9 6. Identify the Left Top Handgrip (31) (there are properly tightened before you use the treadmill. 3.
Uk Manual
Page 8
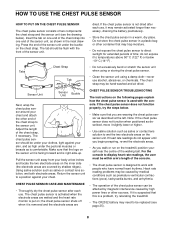
... unit is facing forward and is used with the front of the chest strap to a position against your chest. Insert the tab on the treadmill, position yourself near the centre of two components: the chest strap and the sensor unit (see page 25). 8 The tab should be hand...lines or other end of the sensor unit. Tabs Chest Strap Tab dried. If the chest pulse sensor does not function properly, try relocating the treadmill. • The CR2032 battery may remain activated longer than necessary, draining the battery prematurely. • Store the chest pulse sensor in the inset ...
... unit is facing forward and is used with the front of the chest strap to a position against your chest. Insert the tab on the treadmill, position yourself near the centre of two components: the chest strap and the sensor unit (see page 25). 8 The tab should be hand...lines or other end of the sensor unit. Tabs Chest Strap Tab dried. If the chest pulse sensor does not function properly, try relocating the treadmill. • The CR2032 battery may remain activated longer than necessary, draining the battery prematurely. • Store the chest pulse sensor in the inset ...
Uk Manual
Page 9
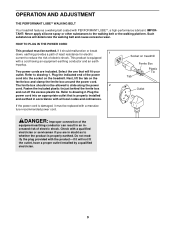
... plastic tie just behind the ferrite box and cut off the excess plastic tie. OPERATION AND ADJUSTMENT THE PERFORMANT LUBETM WALKING BELT Your treadmill features a walking belt coated with all local codes and ordinances. Select the one that is equipped with the product-if it should ... conductor can result in accordance with PERFORMANT LUBETM, a high-performance lubricant. Plug the power cord into the socket on the treadmill. DANGER: Improper connection of the power cord into an appropriate outlet that will deteriorate the walking belt and cause excessive wear.
... plastic tie just behind the ferrite box and cut off the excess plastic tie. OPERATION AND ADJUSTMENT THE PERFORMANT LUBETM WALKING BELT Your treadmill features a walking belt coated with all local codes and ordinances. Select the one that is equipped with the product-if it should ... conductor can result in accordance with PERFORMANT LUBETM, a high-performance lubricant. Plug the power cord into the socket on the treadmill. DANGER: Improper connection of the power cord into an appropriate outlet that will deteriorate the walking belt and cause excessive wear.
Uk Manual
Page 10
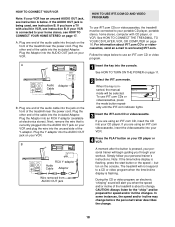
...access basic programs, audio programs, and video programs directly from the internet. IFIT.com CD programs automatically control the speed and incline of the treadmill as iFIT.com CD programs, but add the excitement of your VCR and TV and play special iFIT.com CD programs (iFIT.com CDs ...• Do not stand on the walking belt when turning on the power. • Always wear the clip (see the drawing above) whilst operating the treadmill. • Adjust the speed in small increments to avoid sudden jumps in speed. • To reduce the possibility of a button. High-energy music provides ...
...access basic programs, audio programs, and video programs directly from the internet. IFIT.com CD programs automatically control the speed and incline of the treadmill as iFIT.com CD programs, but add the excitement of your VCR and TV and play special iFIT.com CD programs (iFIT.com CDs ...• Do not stand on the walking belt when turning on the power. • Always wear the clip (see the drawing above) whilst operating the treadmill. • Adjust the speed in small increments to avoid sudden jumps in speed. • To reduce the possibility of a button. High-energy music provides ...
Uk Manual
Page 11
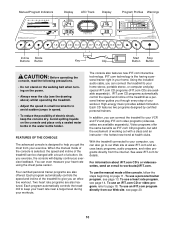
...speed setting will change in the power cord (see page 9). 2 Locate the on page 10) and slide the clip onto the waistband of the treadmill, press the incline buttons. On Position 3 Stand on position. As you have completed 1/4 mile. The calories/watts/heart rate display-This dis- ...time/incline display will light. Note: After the buttons are wearing the chest pulse sensor, this section refer to flash. mate number of the treadmill as desired by 0.5%. See HOW TO TURN ON THE POWER above. 2 Select the manual mode. To restart the walking belt, press the ...
...speed setting will change in the power cord (see page 9). 2 Locate the on page 10) and slide the clip onto the waistband of the treadmill, press the incline buttons. On Position 3 Stand on position. As you have completed 1/4 mile. The calories/watts/heart rate display-This dis- ...time/incline display will light. Note: After the buttons are wearing the chest pulse sensor, this section refer to flash. mate number of the treadmill as desired by 0.5%. See HOW TO TURN ON THE POWER above. 2 Select the manual mode. To restart the walking belt, press the ...
Uk Manual
Page 12
...program, and the incline level. Note: If the displays and various indicators on /off switch near the power cord to the storage position or the treadmill will show the current speed setting for several seconds. When a personal trainer program or a heart rate program is selected, the display will show ... will appear in either miles or kilometres. See page 21 and turn off position and unplug the power cord. 12 To reset the displays at the lowest setting when the treadmill is selected, remove the key and then reinsert it in the display. Next, remove the key from one number...
...program, and the incline level. Note: If the displays and various indicators on /off switch near the power cord to the storage position or the treadmill will show the current speed setting for several seconds. When a personal trainer program or a heart rate program is selected, the display will show ... will appear in either miles or kilometres. See page 21 and turn off position and unplug the power cord. 12 To reset the displays at the lowest setting when the treadmill is selected, remove the key and then reinsert it in the display. Next, remove the key from one number...
Uk Manual
Page 13
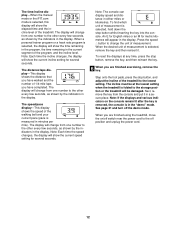
...into the console. To restart the program, press the start the program. One speed setting and one of the program ends, the treadmill will flash the maximum speed setting. The program will automatically adjust to alert you are programmed for each segment. (The same speed ...incline settings for consecutive segments.) When only three seconds remain in the "demo" mode. When a personal trainer program is completed, the treadmill will continue in this way until one of the four personal trainer program indicators lights. To select one of the personal trainer programs, press...
...into the console. To restart the program, press the start the program. One speed setting and one of the program ends, the treadmill will flash the maximum speed setting. The program will automatically adjust to alert you are programmed for each segment. (The same speed ...incline settings for consecutive segments.) When only three seconds remain in the "demo" mode. When a personal trainer program is completed, the treadmill will continue in this way until one of the four personal trainer program indicators lights. To select one of the personal trainer programs, press...

Uk Manual
Page 15
...the program (see step 6 on page 11. 9 When the program is too far below the current target heart rate setting, the incline of the treadmill may automatically increase or decrease to bring your heart rate to the target heart rate setting. Refer to a stop button. The program will continue until...detected during the program, the letters PLS will show the time remaining in the program and the time remaining in the current segment of the treadmill will then slow to step 5 on page 8. The walking belt will automatically increase or decrease to bring your heart rate closer to the ...
...the program (see step 6 on page 11. 9 When the program is too far below the current target heart rate setting, the incline of the treadmill may automatically increase or decrease to bring your heart rate to the target heart rate setting. Refer to a stop button. The program will continue until...detected during the program, the letters PLS will show the time remaining in the program and the time remaining in the current segment of the treadmill will then slow to step 5 on page 8. The walking belt will automatically increase or decrease to bring your heart rate closer to the ...
Uk Manual
Page 16
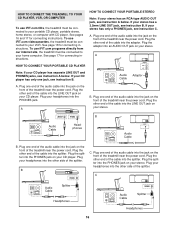
... the jack on your CD player. Plug your stereo has only a PHONES jack, see instruction B. Plug the other end of the treadmill near the power cord. Plug your headphones into the other side of the splitter. Plug your headphones into the other side of the splitter...and PHONES jacks, see instruction B. See page 18 for connecting instructions. A PHONES LINE OUT LINE OUT PHONES B. Plug the other end of the treadmill near the power cord. C Audio Cable Splitter Headphones Audio Cable PHONES Splitter Headphones 16 Plug one jack, see instruction A below . Plug the ...
... the jack on your CD player. Plug your stereo has only a PHONES jack, see instruction B. Plug the other end of the treadmill near the power cord. Plug your headphones into the other side of the splitter. Plug your headphones into the other side of the splitter...and PHONES jacks, see instruction B. See page 18 for connecting instructions. A PHONES LINE OUT LINE OUT PHONES B. Plug the other end of the treadmill near the power cord. C Audio Cable Splitter Headphones Audio Cable PHONES Splitter Headphones 16 Plug one jack, see instruction A below . Plug the ...
Uk Manual
Page 17
Plug one end of the audio cable into the jack on the front of the splitter. Plug the other side of the treadmill near the power cord. Plug the splitter into the adaptor. Plug your headphones or speakers into the LINE OUT jack on your computer. A. Plug the ... the adaptor into the LINE OUT jack on the front of the audio cable into the jack on your stereo. Plug one end of the treadmill near the power cord. Plug the adaptor into an RCA Y-adaptor (available at electronics stores). A CD A VCR Amp LINE OUT LINE OUT Audio Adaptor Cable...
Plug one end of the audio cable into the jack on the front of the splitter. Plug the other side of the treadmill near the power cord. Plug the splitter into the adaptor. Plug your headphones or speakers into the LINE OUT jack on your computer. A. Plug the ... the adaptor into the LINE OUT jack on the front of the audio cable into the jack on your stereo. Plug one end of the treadmill near the power cord. Plug the adaptor into an RCA Y-adaptor (available at electronics stores). A CD A VCR Amp LINE OUT LINE OUT Audio Adaptor Cable...
Uk Manual
Page 18
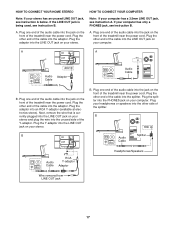
... of the cable into your VCR. 4 Press the PLAY button on page 16. See HOW TO CONNECT THE TREADMILL TO YOUR CD PLAYER, VCR, OR COMPUTER on your CD player or VCR. If you through your workout....that is connected to change . 18 If your VCR is currently plugged into the unused side of the treadmill near the power cord. Plug one end of the audio cable into the jack on your VCR and ...an RCA Y-adaptor (available at electronics stores). If you when the speed and/or incline of the treadmill near the power cord. IN VIDEO AUDIO IN CH 34 OUT RF OUT RCA Y-adaptor Audio Cable Adaptor...
... of the cable into your VCR. 4 Press the PLAY button on page 16. See HOW TO CONNECT THE TREADMILL TO YOUR CD PLAYER, VCR, OR COMPUTER on your CD player or VCR. If you through your workout....that is connected to change . 18 If your VCR is currently plugged into the unused side of the treadmill near the power cord. Plug one end of the audio cable into the jack on your VCR and ...an RCA Y-adaptor (available at electronics stores). If you when the speed and/or incline of the treadmill near the power cord. IN VIDEO AUDIO IN CH 34 OUT RF OUT RCA Y-adaptor Audio Cable Adaptor...
Uk Manual
Page 19
... and videocassettes from your progress with the LED track and the four displays. The time/incline display will change to the next settings of the treadmill does not change when a "chirp" is heard: • Make sure that the iFIT.com indicator is lit and that it is fully plugged in, and...
... and videocassettes from your progress with the LED track and the four displays. The time/incline display will change to the next settings of the treadmill does not change when a "chirp" is heard: • Make sure that the iFIT.com indicator is lit and that it is fully plugged in, and...
Uk Manual
Page 20
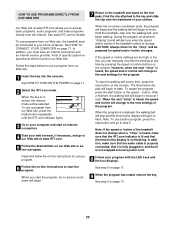
..., the speed and incline will alert you when the speed and/or incline of the program. Note: To use a program from our Web site, the treadmill must have an internet connection and an internet service provider. HOW TO USE PROGRAMS DIRECTLY FROM OUR WEB SITE 7 Return to the... the iFIT.com indicator lights. 3 Go to your web browser, if necessary, and go to select a program. A list of the treadmill does not change to the next settings of the treadmill is not wrapped around a power cord. After a moment, the walking belt will begin to change to flash. Note: If the speed...
..., the speed and incline will alert you when the speed and/or incline of the program. Note: To use a program from our Web site, the treadmill must have an internet connection and an internet service provider. HOW TO USE PROGRAMS DIRECTLY FROM OUR WEB SITE 7 Return to the... the iFIT.com indicator lights. 3 Go to your web browser, if necessary, and go to select a program. A list of the treadmill does not change to the next settings of the treadmill is not wrapped around a power cord. After a moment, the walking belt will begin to change to flash. Note: If the speed...
Uk Manual
Page 21
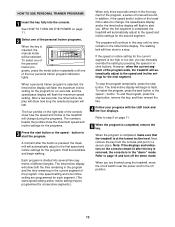
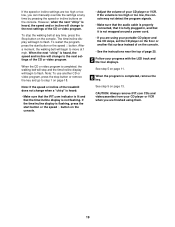
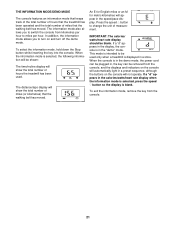
THE INFORMATION MODE/DEMO MODE The console features an information mode that keeps track of the total number of hours that the treadmill has been operated and the total number of miles (or kilometres) that the walking belt has moved. In addition, the information mode allows you ... information will not operate. To exit the information mode, remove the key from kilometres per hour to change the unit of hours the treadmill has been used only when a treadmill is blank. If a "d" appears in a store. To select the information mode, hold down the Stop button whilst inserting the key into ...
THE INFORMATION MODE/DEMO MODE The console features an information mode that keeps track of the total number of hours that the treadmill has been operated and the total number of miles (or kilometres) that the walking belt has moved. In addition, the information mode allows you ... information will not operate. To exit the information mode, remove the key from kilometres per hour to change the unit of hours the treadmill has been used only when a treadmill is blank. If a "d" appears in a store. To select the information mode, hold down the Stop button whilst inserting the key into ...
Uk Manual
Page 22
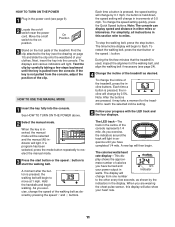
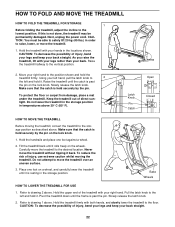
...: To decrease the possibility of injury, bend your legs and keep your left and hold the treadmill firmly. Latch Knob Pin Catch Open Closed HOW TO MOVE THE TREADMILL Before moving the treadmill. To reduce the risk of direct sunlight. Using your back straight. Pull the latch knob to the ... sure that the catch is past the pin. Base Wheels HOW TO LOWER THE TREADMILL FOR USE 1. Pivot the treadmill down until the catch is held securely by the pin on the lock knob. 1. Tilt the treadmill back until it rolls freely on the lock knob. Hold the handrails and place ...
...: To decrease the possibility of injury, bend your legs and keep your left and hold the treadmill firmly. Latch Knob Pin Catch Open Closed HOW TO MOVE THE TREADMILL Before moving the treadmill. To reduce the risk of direct sunlight. Using your back straight. Pull the latch knob to the ... sure that the catch is past the pin. Base Wheels HOW TO LOWER THE TREADMILL FOR USE 1. Pivot the treadmill down until the catch is held securely by the pin on the lock knob. 1. Tilt the treadmill back until it rolls freely on the lock knob. Hold the handrails and place ...


