
English Manual
Page 2
TABLE OF CONTENTS WARNING DECAL PLACEMENT 2 IMPORTANT PRECAUTIONS 3 BEFORE YOU BEGIN 4 ASSEMBLY 5 HOW TO USE THE ELLIPTICAL 12 MAINTENANCE AND TROUBLESHOOTING 23 EXERCISE GUIDELINES 25 PART LIST 28 EXPLODED DRAWING 30 ORDERING REPLACEMENT PARTS Back Cover LIMITED WARRANTY Back Cover WARNING DECAL ...® is a registered trademark of this manual and request a free replacement decal. If a decal is a trademark of the warning decal(s). Apply the decal in the U.S. PROFORM is not included. 2
TABLE OF CONTENTS WARNING DECAL PLACEMENT 2 IMPORTANT PRECAUTIONS 3 BEFORE YOU BEGIN 4 ASSEMBLY 5 HOW TO USE THE ELLIPTICAL 12 MAINTENANCE AND TROUBLESHOOTING 23 EXERCISE GUIDELINES 25 PART LIST 28 EXPLODED DRAWING 30 ORDERING REPLACEMENT PARTS Back Cover LIMITED WARRANTY Back Cover WARNING DECAL ...® is a registered trademark of this manual and request a free replacement decal. If a decal is a trademark of the warning decal(s). Apply the decal in the U.S. PROFORM is not included. 2

English Manual
Page 3
...sensor is especially important for personal injury or property damage sustained by persons weighing more than 325 lbs. (147 kg). 10. The elliptical does not have a freewheel; the pedals will continue to ensure that could become caught on each side. Before beginning any worn ... while exercising; Do not use only. This is not a medical device. do not arch your back straight while using the elliptical. 4. Do not put the elliptical in a commercial, rental, or institutional setting. 5. Inspect and properly tighten all precautions. 11. Replace any exercise program, consult...
...sensor is especially important for personal injury or property damage sustained by persons weighing more than 325 lbs. (147 kg). 10. The elliptical does not have a freewheel; the pedals will continue to ensure that could become caught on each side. Before beginning any worn ... while exercising; Do not use only. This is not a medical device. do not arch your back straight while using the elliptical. 4. Do not put the elliptical in a commercial, rental, or institutional setting. 5. Inspect and properly tighten all precautions. 11. Replace any exercise program, consult...
English Manual
Page 4
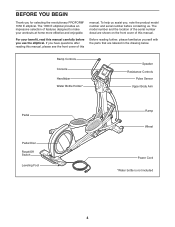
If you use the elliptical. Ramp Controls Console Handlebar Water Bottle Holder* Speaker Resistance Controls Pulse Sensor Upper Body Arm Pedal Pedal ...this manual. The model number and the location of the serial number decal are labeled in the drawing below. The 1050 E elliptical provides an impressive selection of this manual. For your workouts at home more effective and enjoyable. Before reading further, please familiarize ... to make your benefit, read this manual carefully before contacting us assist you for selecting the revolutionary PROFORM® 1050 E elliptical.
If you use the elliptical. Ramp Controls Console Handlebar Water Bottle Holder* Speaker Resistance Controls Pulse Sensor Upper Body Arm Pedal Pedal ...this manual. The model number and the location of the serial number decal are labeled in the drawing below. The 1050 E elliptical provides an impressive selection of this manual. For your workouts at home more effective and enjoyable. Before reading further, please familiarize ... to make your benefit, read this manual carefully before contacting us assist you for selecting the revolutionary PROFORM® 1050 E elliptical.
English Manual
Page 5
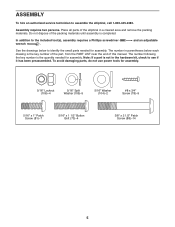
...dispose of the packing materials until assembly is the key number of the part, from the PART LIST near the end of the elliptical in a cleared area and remove the packing materials. To avoid damaging parts, do not use power tools for assembly. The number...Washer (104)-2 #8 x 3/4" Screw (78)-9 5/16" x 1" Patch Screw (81)-7 5/16" x 1 1/2" Button Bolt (73)-4 3/8" x 2 1/2" Patch Screw (88)-14 5 In addition to assemble the elliptical, call 1-800-445-2480. Note: If a part is the quantity needed for assembly. Place all parts of this manual. and an adjustable See the drawings...
...dispose of the packing materials until assembly is the key number of the part, from the PART LIST near the end of the elliptical in a cleared area and remove the packing materials. To avoid damaging parts, do not use power tools for assembly. The number...Washer (104)-2 #8 x 3/4" Screw (78)-9 5/16" x 1" Patch Screw (81)-7 5/16" x 1 1/2" Button Bolt (73)-4 3/8" x 2 1/2" Patch Screw (88)-14 5 In addition to assemble the elliptical, call 1-800-445-2480. Note: If a part is the quantity needed for assembly. Place all parts of this manual. and an adjustable See the drawings...

English Manual
Page 6
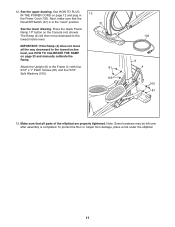
... tipping until this step is completed. Packing Inserts 1 2 88 88 2. Attach the Rear Stabilizer with four 3/8" x 2 1/2" Patch Screws (88). Have the other person hold the elliptical to prevent it from the packing materials. tical to prevent it from tipping until this step is completed. With the help of the other person...
... tipping until this step is completed. Packing Inserts 1 2 88 88 2. Attach the Rear Stabilizer with four 3/8" x 2 1/2" Patch Screws (88). Have the other person hold the elliptical to prevent it from the packing materials. tical to prevent it from tipping until this step is completed. With the help of the other person...

English Manual
Page 7
... person hold the Upright (6) near the Frame (1). Next, pull the upper end of the wire tie to the axle on the other side of the elliptical. Insert the Upright (6) into the Upright (6), secure the Main Wire with "Right" stickers, and orient them as shown. Do not remove the wire tie from...
... person hold the Upright (6) near the Frame (1). Next, pull the upper end of the wire tie to the axle on the other side of the elliptical. Insert the Upright (6) into the Upright (6), secure the Main Wire with "Right" stickers, and orient them as shown. Do not remove the wire tie from...

English Manual
Page 9
... end of the wire tie to the Right Upper Body 8 Leg (12) with a "Right" sticker, and orient it upward out of the top of the elliptical. 31 30 132 Wire Tie Pull 12 132 31 6 132 12 8. Carefully pull the other side of the Upright. Slide the Arm Cover (30) downward...
... end of the wire tie to the Right Upper Body 8 Leg (12) with a "Right" sticker, and orient it upward out of the top of the elliptical. 31 30 132 Wire Tie Pull 12 132 31 6 132 12 8. Carefully pull the other side of the Upright. Slide the Arm Cover (30) downward...
English Manual
Page 11
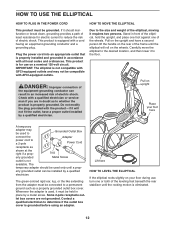
... HOW TO CALIBRATE THE RAMP on page 23 and manually calibrate the Ramp. To protect the floor or carpet from damage, place a mat under the elliptical. 11 See the upper drawing. See HOW TO PLUG IN THE POWER CORD on the Console (not shown). Press the Quick Power Ramp 10º... downward to the lowest incline level. Make sure that the Reset/Off Switch (37) is completed. The Ramp (4) will then move all parts of the elliptical are properly tightened. Note: Some hardware may be left over after assembly is in the Power Cord (133). 12.
... HOW TO CALIBRATE THE RAMP on page 23 and manually calibrate the Ramp. To protect the floor or carpet from damage, place a mat under the elliptical. 11 See the upper drawing. See HOW TO PLUG IN THE POWER CORD on the Console (not shown). Press the Quick Power Ramp 10º... downward to the lowest incline level. Make sure that the Reset/Off Switch (37) is completed. The Ramp (4) will then move all parts of the elliptical are properly tightened. Note: Some hardware may be left over after assembly is in the Power Cord (133). 12.
English Manual
Page 12
...ground such as a properly grounded outlet box cover. The temporary adapter should malfunction or break down, grounding provides a path of the elliptical, moving it should be grounded. Some 2-pole receptacle outlet box covers are in accordance with a cord having an equipment-grounding conductor...electrician. Contact a qualified electrician to reduce the risk of the frame until the rocking motion is properly grounded. IMPORTANT: The elliptical is not compatible with AFCI-equipped outlets. Lug erly grounded Metal Screw outlet is grounded before using an adapter. If it requires...
...ground such as a properly grounded outlet box cover. The temporary adapter should malfunction or break down, grounding provides a path of the elliptical, moving it should be grounded. Some 2-pole receptacle outlet box covers are in accordance with a cord having an equipment-grounding conductor...electrician. Contact a qualified electrician to reduce the risk of the frame until the rocking motion is properly grounded. IMPORTANT: The elliptical is not compatible with AFCI-equipped outlets. Lug erly grounded Metal Screw outlet is grounded before using an adapter. If it requires...

English Manual
Page 13
...not have a free wheel; Upper Body Arms Handlebars Pedal Disc Pedals 13 When the pedals are stationary, step off the lower pedal. To dismount the elliptical, wait until the flywheel stops. the pedals will continue to a complete stop. Note: The pedal discs can turn the pedal discs in the lowest.... Push the pedals until they begin to move until the pedals come to move with a continuous motion. HOW TO EXERCISE ON THE ELLIPTICAL To mount the elliptical, hold the upper body arms or the handlebars and step onto the pedal that you can turn in the direction shown by the arrow...
...not have a free wheel; Upper Body Arms Handlebars Pedal Disc Pedals 13 When the pedals are stationary, step off the lower pedal. To dismount the elliptical, wait until the flywheel stops. the pedals will continue to a complete stop. Note: The pedal discs can turn the pedal discs in the lowest.... Push the pedals until they begin to move until the pedals come to move with a continuous motion. HOW TO EXERCISE ON THE ELLIPTICAL To mount the elliptical, hold the upper body arms or the handlebars and step onto the pedal that you can turn in the direction shown by the arrow...
English Manual
Page 15
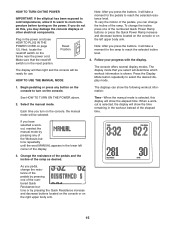
... light and the console will take a moment for the pedals to select the desired display mode. 1. HOW TO TURN ON THE POWER IMPORTANT: If the elliptical has been exposed to cold temperatures, allow it will be selected. Next, locate the reset/off switch is shown. To change the incline of the...
... light and the console will take a moment for the pedals to select the desired display mode. 1. HOW TO TURN ON THE POWER IMPORTANT: If the elliptical has been exposed to cold temperatures, allow it will be selected. Next, locate the reset/off switch is shown. To change the incline of the...

English Manual
Page 16
... rate when you do not do this display will show your heart rate for at least 15 seconds. To measure your pulse is on the elliptical may wear prematurely. 16 Profile-When a workout is selected, this , the electrical components on . When your heart rate, hold the contacts for up to 30...
... rate when you do not do this display will show your heart rate for at least 15 seconds. To measure your pulse is on the elliptical may wear prematurely. 16 Profile-When a workout is selected, this , the electrical components on . When your heart rate, hold the contacts for up to 30...
English Manual
Page 23
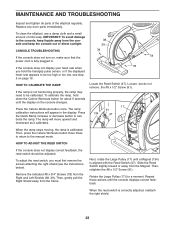
...47). The ramp will appear in . Then, press the Calorie Workouts button three times to return to calibrate the ramp. To clean the elliptical, use a damp cloth and a small amount of direct sunlight. Press the Calorie Workouts button once. To adjust the reed switch, you ... until a Magnet (134) is fully plugged in the display. Replace any worn parts immediately. MAINTENANCE AND TROUBLESHOOTING Inspect and tighten all parts of the elliptical regularly. Press the Quick Ramp increase or decrease button to the manual mode. Loosen, but do not remove, the #8 x 1/2" Screw (91)....
...47). The ramp will appear in . Then, press the Calorie Workouts button three times to return to calibrate the ramp. To clean the elliptical, use a damp cloth and a small amount of direct sunlight. Press the Calorie Workouts button once. To adjust the reed switch, you ... until a Magnet (134) is fully plugged in the display. Replace any worn parts immediately. MAINTENANCE AND TROUBLESHOOTING Inspect and tighten all parts of the elliptical regularly. Press the Quick Ramp increase or decrease button to the manual mode. Loosen, but do not remove, the #8 x 1/2" Screw (91)....


