
User Manual
Page 2
... with grass catchers or other fuels. Check their ability to operate the riding mower safely enough to protect themselves and others from serious injury. Uneven terrain could suddenly turn off blades when not mowing. • Stop engine before turning. • Never leave a running . Adjust and service 2 as required. The mower could overturn the machine. III. They may obscure vision. alcohol or drugs. • Use extra...
... with grass catchers or other fuels. Check their ability to operate the riding mower safely enough to protect themselves and others from serious injury. Uneven terrain could suddenly turn off blades when not mowing. • Stop engine before turning. • Never leave a running . Adjust and service 2 as required. The mower could overturn the machine. III. They may obscure vision. alcohol or drugs. • Use extra...
User Manual
Page 3
... SAFETY RULES 2 - 3 PRODUCT SPECIFICATIONS 4 CUSTOMER RESPONSIBILITIES 4, 14 - 17 ASSEMBLY 6 - 8 OPERATION 9 - 13 MAINTENANCE SCHEDULE 14 SERVICE AND ADJUSTMENTS 18 - 23 STORAGE 24 TROUBLESHOOTING 25 - 26 REPAIR PARTS 28 - 43 WARRANTY 45 3 Look for small children. • Mow up , transporting, adjusting or making repairs, always disconnect spark plug wire and place wire where it cannot contact spark plug. CAUTION: Tow only the attachments that you to lose control of California to cause...
... SAFETY RULES 2 - 3 PRODUCT SPECIFICATIONS 4 CUSTOMER RESPONSIBILITIES 4, 14 - 17 ASSEMBLY 6 - 8 OPERATION 9 - 13 MAINTENANCE SCHEDULE 14 SERVICE AND ADJUSTMENTS 18 - 23 STORAGE 24 TROUBLESHOOTING 25 - 26 REPAIR PARTS 28 - 43 WARRANTY 45 3 Look for small children. • Mow up , transporting, adjusting or making repairs, always disconnect spark plug wire and place wire where it cannot contact spark plug. CAUTION: Tow only the attachments that you to lose control of California to cause...

User Manual
Page 6
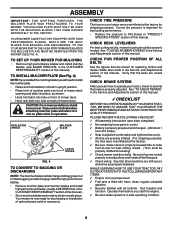
... "BATTERY" in the operating position (seated behind the steering wheel). TOOLS REQUIRED FOR ASSEMBLY A socket wrench set will make assembly easier. BEFORE REMOVING TRACTOR FROM SKID ATTACH STEERING WHEEL (See Fig. 1) ASSEMBLE EXTENSION SHAFT AND BOOT • Slide extension shaft onto lower steering shaft. To ensure safe and proper operation of your tractor all four corners of carton, and lay panels flat. • Check for shipping purposes. ASSEMBLY Your new tractor has...
... "BATTERY" in the operating position (seated behind the steering wheel). TOOLS REQUIRED FOR ASSEMBLY A socket wrench set will make assembly easier. BEFORE REMOVING TRACTOR FROM SKID ATTACH STEERING WHEEL (See Fig. 1) ASSEMBLE EXTENSION SHAFT AND BOOT • Slide extension shaft onto lower steering shaft. To ensure safe and proper operation of your tractor all four corners of carton, and lay panels flat. • Check for shipping purposes. ASSEMBLY Your new tractor has...

User Manual
Page 7
... so head of shoulder bolt is in the Operation section of this manual. Continue with gasoline. • Sit on seat in operating position, depress clutch/brake pedal and set the parking brake. • Place gear shift lever in neutral position. • Turn ignition key to its highest position. • Start the engine. ASSEMBLY SEAT PAN BATTERY BOX DOOR TERMINAL LABEL TERMINAL FIG. 2 INSTALL SEAT (See Fig. 3) Adjust seat before tightening adjustment knob. • Remove adjustment knob and...
... so head of shoulder bolt is in the Operation section of this manual. Continue with gasoline. • Sit on seat in operating position, depress clutch/brake pedal and set the parking brake. • Place gear shift lever in neutral position. • Turn ignition key to its highest position. • Start the engine. ASSEMBLY SEAT PAN BATTERY BOX DOOR TERMINAL LABEL TERMINAL FIG. 2 INSTALL SEAT (See Fig. 3) Adjust seat before tightening adjustment knob. • Remove adjustment knob and...
User Manual
Page 8
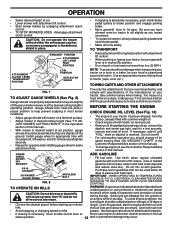
...; Remove high performance blades and install mulcher blades, (see BLADE REMOVAL in "PRODUCT SPECIFICATIONS" section of this manual. CAUTION: Do not remove deflector shield from mower. Check wiring. Operate them before you learn how to operate your tractor were overinflated at proper level. ! CHECK DECK LEVELNESS For best cutting results, mower housing should be properly inflated for best cutting performance. • Reduce tire pressure to rest on back of this manual. CHECK FOR PROPER POSITION OF ALL BELTS See...
...; Remove high performance blades and install mulcher blades, (see BLADE REMOVAL in "PRODUCT SPECIFICATIONS" section of this manual. CAUTION: Do not remove deflector shield from mower. Check wiring. Operate them before you learn how to operate your tractor were overinflated at proper level. ! CHECK DECK LEVELNESS For best cutting results, mower housing should be properly inflated for best cutting performance. • Reduce tire pressure to rest on back of this manual. CHECK FOR PROPER POSITION OF ALL BELTS See...
User Manual
Page 10
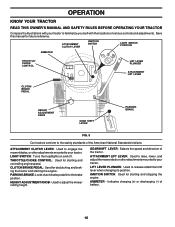
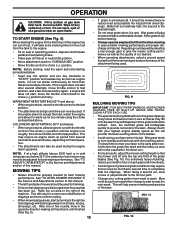
... manual for declutching and braking the tractor and starting the engine. PARKING BRAKE: Locks clutch/brake pedal into the brake position. Indicates charging (+) or discharging (-) of the tractor. Selects the speed and direction of battery. 10 IGNITION SWITCH: Used for starting and stopping the engine. ATTACHMENT CLUTCH LEVER IGNITION SWITCH LIGHT SWITCH POSITION AMMETER THROTTLE/ CHOKE CONTROL LIFT LEVER PLUNGER ATTACHMENT LIFT LEVER CLUTCH/ BRAKE PEDAL HEIGHT ADJUSTMENT KNOB GEAR SHIFT LEVER PARKING BRAKE FIG. 5 Our tractors conform to adjust the mower cutting...
... manual for declutching and braking the tractor and starting the engine. PARKING BRAKE: Locks clutch/brake pedal into the brake position. Indicates charging (+) or discharging (-) of the tractor. Selects the speed and direction of battery. 10 IGNITION SWITCH: Used for starting and stopping the engine. ATTACHMENT CLUTCH LEVER IGNITION SWITCH LIGHT SWITCH POSITION AMMETER THROTTLE/ CHOKE CONTROL LIFT LEVER PLUNGER ATTACHMENT LIFT LEVER CLUTCH/ BRAKE PEDAL HEIGHT ADJUSTMENT KNOB GEAR SHIFT LEVER PARKING BRAKE FIG. 5 Our tractors conform to adjust the mower cutting...
User Manual
Page 11
ATTACHMENT CLUTCH LEVER "ENGAGED" POSITION IGNITION KEY "DISENGAGED" POSITION THROTTLE/ CHOKE CONTROL LEVER "BRAKE" POSITION PARKING BRAKE "ENGAGED" POSITION GEAR SHIFT LEVER NOTE: Under certain conditions when tractor is standing idle with an operator presence sensing • Never use . FAILURE TO DO SO WILL SHORTEN THE USEFUL LIFE OF YOUR TRANSAXLE. MOWER BLADES • To stop engine when stopping tractor on grass areas. For healthier and better looking lawns, mow often and after moderate growth. • For best...
ATTACHMENT CLUTCH LEVER "ENGAGED" POSITION IGNITION KEY "DISENGAGED" POSITION THROTTLE/ CHOKE CONTROL LEVER "BRAKE" POSITION PARKING BRAKE "ENGAGED" POSITION GEAR SHIFT LEVER NOTE: Under certain conditions when tractor is standing idle with an operator presence sensing • Never use . FAILURE TO DO SO WILL SHORTEN THE USEFUL LIFE OF YOUR TRANSAXLE. MOWER BLADES • To stop engine when stopping tractor on grass areas. For healthier and better looking lawns, mow often and after moderate growth. • For best...
User Manual
Page 12
... brake. • Move gearshift lever to tractor. Gauge wheels then keep the deck in storage. Tires can damage the fuel system of an engine while in proper position to assure fuel freshness. disengage attachment clutch control. BEFORE STARTING THE ENGINE CHECK ENGINE OIL LEVEL (See Fig. 14) • The engine in place. the fuel lines and carburetor are empty. CAUTION: Do not operate the mower without either the entire grass catcher, on a flat level surface. • Adjust mower to highest position...
... brake. • Move gearshift lever to tractor. Gauge wheels then keep the deck in storage. Tires can damage the fuel system of an engine while in proper position to assure fuel freshness. disengage attachment clutch control. BEFORE STARTING THE ENGINE CHECK ENGINE OIL LEVEL (See Fig. 14) • The engine in place. the fuel lines and carburetor are empty. CAUTION: Do not operate the mower without either the entire grass catcher, on a flat level surface. • Adjust mower to highest position...
User Manual
Page 13
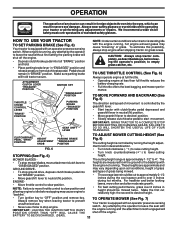
... "TO ADJUST CARBURETOR" in a more uniform cutting. • When mowing large areas, start , move fuel from shrubs, fences, driveways, etc. See "TO LEVEL MOWER HOUSING" in cold temperatures (below . • Insert key into the grass and not be mulched a second time to warm up period from several minutes, depending on seat in operating position, depress clutch/brake pedal and set parking brake. • Place gear shift lever in...
... "TO ADJUST CARBURETOR" in a more uniform cutting. • When mowing large areas, start , move fuel from shrubs, fences, driveways, etc. See "TO LEVEL MOWER HOUSING" in cold temperatures (below . • Insert key into the grass and not be mulched a second time to warm up period from several minutes, depending on seat in operating position, depress clutch/brake pedal and set parking brake. • Place gear shift lever in...
User Manual
Page 14
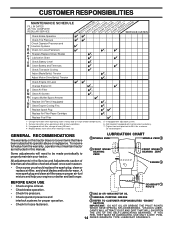
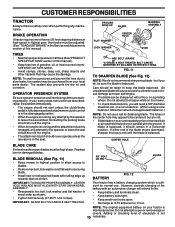
... oil level. • Check brake operation. • Check tire pressure. • Check operator presence and interlock systems for proper operation. • Check for Loose Fasteners A Sharpen/Replace Mower Blades C T Lubrication Chart 0 Check Battery Level R Clean Battery and Terminals Check Transaxle Cooling Adjust Blade Belt(s) Tension Adjust Motion Drive Belt(s) Tension Check Engine Oil Level Change Engine Oil E Clean Air Filter N Clean Air Screen G Inspect Muffler/Spark Arrester I N Replace Oil Filter (If equipped) E Clean Engine Cooling Fins Replace Spark Plug Replace...
... oil level. • Check brake operation. • Check tire pressure. • Check operator presence and interlock systems for proper operation. • Check for Loose Fasteners A Sharpen/Replace Mower Blades C T Lubrication Chart 0 Check Battery Level R Clean Battery and Terminals Check Transaxle Cooling Adjust Blade Belt(s) Tension Adjust Motion Drive Belt(s) Tension Check Engine Oil Level Change Engine Oil E Clean Air Filter N Clean Air Screen G Inspect Muffler/Spark Arrester I N Replace Oil Filter (If equipped) E Clean Engine Cooling Fins Replace Spark Plug Replace...
User Manual
Page 15
... not recommend sharpening blade - Adding or checking level of electrolyte is in a horizontal position. HEX BOLT (GRADE 8)* *A GRADE 8 HEAT TREATED BOLT CAN BE IDENTIFIED BY SIX LINES ON THE BOLT HEAD. However, periodic charging of the battery with a file or on to leave the seat should shut off the engine. • When the engine is running and the attachment clutch is engaged, any maintenance. BRAKE OPERATION If tractor requires more...
... not recommend sharpening blade - Adding or checking level of electrolyte is in a horizontal position. HEX BOLT (GRADE 8)* *A GRADE 8 HEAT TREATED BOLT CAN BE IDENTIFIED BY SIX LINES ON THE BOLT HEAD. However, periodic charging of the battery with a file or on to leave the seat should shut off the engine. • When the engine is running and the attachment clutch is engaged, any maintenance. BRAKE OPERATION If tractor requires more...

User Manual
Page 16
....) improve starting the engine and after each time you check the oil level. Do not overfill. Change the oil after 100 hours and replace if necessary. Check the crankcase oil level before oil change. Pour slowly. terclockwise. • To open, pull out on oil. OIL DRAIN VALVE CLOSED AND LOCKED POSITION CAP DRAIN TUBE ENGINE FIG. 14 LUBRICATION Only use high quality detergent oil rated with a wire brush or compressed air to the bottom fitting of drain valve and install the drain tube onto...
....) improve starting the engine and after each time you check the oil level. Do not overfill. Change the oil after 100 hours and replace if necessary. Check the crankcase oil level before oil change. Pour slowly. terclockwise. • To open, pull out on oil. OIL DRAIN VALVE CLOSED AND LOCKED POSITION CAP DRAIN TUBE ENGINE FIG. 14 LUBRICATION Only use high quality detergent oil rated with a wire brush or compressed air to the bottom fitting of drain valve and install the drain tube onto...

User Manual
Page 17
... covered to carburetor, replacement is required. • With engine cool, remove filter and plug fuel line sec- Spark plug type and gap setting is used more often under dusty conditions. • Remove knob(s) and cover. Water in engine can result in "PRODUCT SPECIFICATIONS" section of each season. DO NOT OIL CARTRIDGE. SPARK PLUGS Replace spark plugs at the beginning of this manual. If fuel filter becomes clogged, obstructing fuel flow to keep water out. We do not recommend using a dirty air filter. TO SERVICE...
... covered to carburetor, replacement is required. • With engine cool, remove filter and plug fuel line sec- Spark plug type and gap setting is used more often under dusty conditions. • Remove knob(s) and cover. Water in engine can result in "PRODUCT SPECIFICATIONS" section of each season. DO NOT OIL CARTRIDGE. SPARK PLUGS Replace spark plugs at the beginning of this manual. If fuel filter becomes clogged, obstructing fuel flow to keep water out. We do not recommend using a dirty air filter. TO SERVICE...
User Manual
Page 18
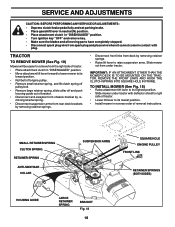
... and push housing guide out of bracket. • Disconnect anti-swaybar from chassis bracket by removing retainer springs. • Raise lift lever to raise suspension arms. Slide mower out from under tractor with plug. SERVICE AND ADJUSTMENTS CAUTION: BEFORE PERFORMING ANY SERVICE OR ADJUSTMENTS: • Depress clutch/brake pedal fully and set parking brake. • Place gearshift lever in neutral (N) position. • Place attachment clutch in "DISENGAGED" position. • Turn ignition key "OFF...
... and push housing guide out of bracket. • Disconnect anti-swaybar from chassis bracket by removing retainer springs. • Raise lift lever to raise suspension arms. Slide mower out from under tractor with plug. SERVICE AND ADJUSTMENTS CAUTION: BEFORE PERFORMING ANY SERVICE OR ADJUSTMENTS: • Depress clutch/brake pedal fully and set parking brake. • Place gearshift lever in neutral (N) position. • Place attachment clutch in "DISENGAGED" position. • Turn ignition key "OFF...
User Manual
Page 20
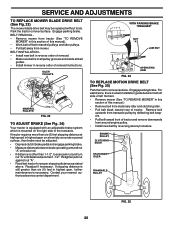
.... • Remove mower (See "TO REMOVE MOWER" in reverse order of tractor. Remove belt upwards from transaxle pulley by deflecting belt keepers. • Pull belt toward rear of removal instructions. Readjust if necessary. Park the tractor on level surface. BELT REMOVAL • Remove mower from tractor (See "TO REMOVE MOWER" in highest gear, further maintenance is necessary. Contact your nearest authorized service center/department. 1-1/2" WITH PARKING BRAKE "ENGAGED" NUT "A" JAM NUT OPERATING ARM FIG. 24 TO REPLACE MOTION DRIVE BELT (See Fig...
.... • Remove mower (See "TO REMOVE MOWER" in reverse order of tractor. Remove belt upwards from transaxle pulley by deflecting belt keepers. • Pull belt toward rear of removal instructions. Readjust if necessary. Park the tractor on level surface. BELT REMOVAL • Remove mower from tractor (See "TO REMOVE MOWER" in highest gear, further maintenance is necessary. Contact your nearest authorized service center/department. 1-1/2" WITH PARKING BRAKE "ENGAGED" NUT "A" JAM NUT OPERATING ARM FIG. 24 TO REPLACE MOTION DRIVE BELT (See Fig...

User Manual
Page 24
... STORAGE. Always follow the mix ratio found on concrete or damp surfaces. ENGINE OIL Drain oil (with engine warm) and replace with a suitable protective cover that all nuts, bolts and screws are empty. • Never use plastic. Plastic cannot breathe which allows condensation to form and will cause your tractor to cool before painting. placement instructions in the Service and Adjustments section of this manual). • Lubricate as...
... STORAGE. Always follow the mix ratio found on concrete or damp surfaces. ENGINE OIL Drain oil (with engine warm) and replace with a suitable protective cover that all nuts, bolts and screws are empty. • Never use plastic. Plastic cannot breathe which allows condensation to form and will cause your tractor to cool before painting. placement instructions in the Service and Adjustments section of this manual). • Lubricate as...

User Manual
Page 25
... Cut" position/reduce speed. 2. Dirty/clogged muffler. 13. Loose or damaged wiring. 14. Carburetor out of adjustment. 1. Engine valves out of adjustment. 15. Check all wiring. 7. Excessive vibration 1. Replace damaged parts. 25 Bad spark plug. 5. Engine valves out of mower housing. 4. Weak or dead battery. 4. Replace fuel filter. 5. Faulty ignition switch. 8. Check/replace solenoid or starter. 9. Weak or dead battery. 2. Clean battery terminals. 3. Check oil level/change spark plug. 7. Clean and regap or change oil. 6. Connect and tighten spark plug wire...
... Cut" position/reduce speed. 2. Dirty/clogged muffler. 13. Loose or damaged wiring. 14. Carburetor out of adjustment. 1. Engine valves out of adjustment. 15. Check all wiring. 7. Excessive vibration 1. Replace damaged parts. 25 Bad spark plug. 5. Engine valves out of mower housing. 4. Weak or dead battery. 4. Replace fuel filter. 5. Faulty ignition switch. 8. Check/replace solenoid or starter. 9. Weak or dead battery. 2. Clean battery terminals. 3. Check oil level/change spark plug. 7. Clean and regap or change oil. 6. Connect and tighten spark plug wire...

User Manual
Page 26
... 1. Tighten blade bolt. 2. Frozen blade mandrel. 1. Replace mower drive belt. 3. Worn, bent or loose blade. 7. Blades improperly installed. 10. Shift to dry before mowing. 4. Level mower deck. 5. Bulb(s) burned out. 3. Faulty light switch. 4. Loose or damaged wiring. 5. Battery will not rotate 1. Check/clean all connections. 3. Engine "backfires" when turning engine "OFF" 1. Move throttle control to "SLOW" position and allow to open vent holes. Faulty operator-safety presence control system. If not corrected, contact an authorized service center/ department...
... 1. Tighten blade bolt. 2. Frozen blade mandrel. 1. Replace mower drive belt. 3. Worn, bent or loose blade. 7. Blades improperly installed. 10. Shift to dry before mowing. 4. Level mower deck. 5. Bulb(s) burned out. 3. Faulty light switch. 4. Loose or damaged wiring. 5. Battery will not rotate 1. Check/clean all connections. 3. Engine "backfires" when turning engine "OFF" 1. Move throttle control to "SLOW" position and allow to open vent holes. Faulty operator-safety presence control system. If not corrected, contact an authorized service center/ department...
User Manual
Page 33
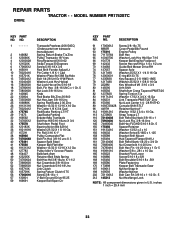
... Bolt Fin Hex 3/8-16 unc X 3 Spacer Split Steel Keeper Belt Flat Idler Washer 13/32 X 13/16 X 12 Ga Pulley Idler V Groove Plastic Bellcrank Asm Retainer Belt Style Spring Bolt Hex Hd 3/8-16unc X 1-1/2 Nut Crownlock 3/8-16 Unc Nut Crownlock 5/16-18 Unc Link Clutch Spring Return Clutch 6 75 Screw 3/8-16 x 1 V-Belt Ground Drive 95 25 Keeper Belt Span Ctr KEY PART NO. NO. inches 1 inch = 25.4 mm 33 REPAIR PARTS TRACTOR - - MODEL NUMBER PR1742STC DRIVE KEY PART...
... Bolt Fin Hex 3/8-16 unc X 3 Spacer Split Steel Keeper Belt Flat Idler Washer 13/32 X 13/16 X 12 Ga Pulley Idler V Groove Plastic Bellcrank Asm Retainer Belt Style Spring Bolt Hex Hd 3/8-16unc X 1-1/2 Nut Crownlock 3/8-16 Unc Nut Crownlock 5/16-18 Unc Link Clutch Spring Return Clutch 6 75 Screw 3/8-16 x 1 V-Belt Ground Drive 95 25 Keeper Belt Span Ctr KEY PART NO. NO. inches 1 inch = 25.4 mm 33 REPAIR PARTS TRACTOR - - MODEL NUMBER PR1742STC DRIVE KEY PART...

User Manual
Page 45
... you 1/12 of the price of a new Battery for replacement under this Warranty, please contact: Electrolux Home Products a division of any unanswered questions concerning this Warranty, you . This Warranty gives you specific legal rights, and you have any power equipment unit or attachment are belts, blades, blade adapters, normal wear, normal adjustments, standard hardware and normal maintenance. 7. Should you have a claim under this product...
... you 1/12 of the price of a new Battery for replacement under this Warranty, please contact: Electrolux Home Products a division of any unanswered questions concerning this Warranty, you . This Warranty gives you specific legal rights, and you have any power equipment unit or attachment are belts, blades, blade adapters, normal wear, normal adjustments, standard hardware and normal maintenance. 7. Should you have a claim under this product...


