
User Manual
Page 3
...of spin- S Maintain the unit according to provide reasonable safety and efficiency in this unit. S Use only 0.080″ (2 mm) diameter Poulan PRO brand line. S Be sure blade stops turning when engine idles. S Make carburetor adjustments with loosely hanging ties, straps, tassels, etc....go barefoot or wear sandals. S Secure hair above shoulder length. Watch what you from 3 Look for and replace damaged or loose parts before assembling and using the unit. Keep unit in any other way. S Never start engine with clutch shroud removed. S Throw away...
...of spin- S Maintain the unit according to provide reasonable safety and efficiency in this unit. S Use only 0.080″ (2 mm) diameter Poulan PRO brand line. S Be sure blade stops turning when engine idles. S Make carburetor adjustments with loosely hanging ties, straps, tassels, etc....go barefoot or wear sandals. S Secure hair above shoulder length. Watch what you from 3 Look for and replace damaged or loose parts before assembling and using the unit. Keep unit in any other way. S Never start engine with clutch shroud removed. S Throw away...
User Manual
Page 4
... or installing attachments, place the unit on brushcutter at- do not use damaged parts. S Have all fuel spills before starting engine. S Move at least 50 ... making carburetor adjustments. Stop engine immediately if you need assistance or find that parts are secure. S Keep all fasteners are missing or damaged, call 1--800--554...10 feet (3 meters) away from your body. Do not overreach. Examine parts for fuel. If symptoms occur such as numbness, pain, loss of ... your unit is properly assembled and all parts of the shield will throw debris away from sparks or ...
... or installing attachments, place the unit on brushcutter at- do not use damaged parts. S Have all fuel spills before starting engine. S Move at least 50 ... making carburetor adjustments. Stop engine immediately if you need assistance or find that parts are secure. S Keep all fasteners are missing or damaged, call 1--800--554...10 feet (3 meters) away from your body. Do not overreach. Examine parts for fuel. If symptoms occur such as numbness, pain, loss of ... your unit is properly assembled and all parts of the shield will throw debris away from sparks or ...
User Manual
Page 7
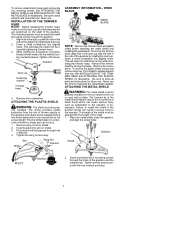
...of thrown objects to the operator and others and is equipped with a blade. Tighten evenly and secure- Be sure to store all parts and instructions for illustrations. Tighten until bolt passes through the holes of the gearbox. erly installed. See INSTALLATION OF THE TRIMMER HEAD ...limiter blade which can cut you. 1. Shield Gearbox PIVOT Gearbox 2. This will keep the shaft from slot. Be sure to store all parts and instructions for illustrations. Gearbox Dust cup Retaining washer Trimmer head 4. WEED BLADE WEED BLADE NOTE: Remove the trimmer head and plastic ...
...of thrown objects to the operator and others and is equipped with a blade. Tighten evenly and secure- Be sure to store all parts and instructions for illustrations. Tighten until bolt passes through the holes of the gearbox. erly installed. See INSTALLATION OF THE TRIMMER HEAD ...limiter blade which can cut you. 1. Shield Gearbox PIVOT Gearbox 2. This will keep the shaft from slot. Be sure to store all parts and instructions for illustrations. Gearbox Dust cup Retaining washer Trimmer head 4. WEED BLADE WEED BLADE NOTE: Remove the trimmer head and plastic ...
User Manual
Page 8
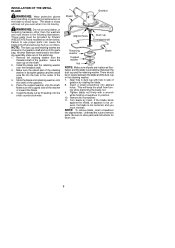
...screwdriver into aligned holes. INSTALLATION OF THE METAL BLADE WARNING: Wear protective gloves when handling or performing maintenance on the shaft. 2. These parts must reinstall. Insert a small screwdriver into aligned holes. WARNING: Do not use any blades, or fastening hardware other fasteners mentioned in place... as shown below. Leave the dust cup on the blade to avoid injury. Install the blade nut by Poulan/ WEED EATER and installed as illustrated, and the blade is toward the blade. 6. The blade is sharp and can cause the blade...
...screwdriver into aligned holes. INSTALLATION OF THE METAL BLADE WARNING: Wear protective gloves when handling or performing maintenance on the shaft. 2. These parts must reinstall. Insert a small screwdriver into aligned holes. WARNING: Do not use any blades, or fastening hardware other fasteners mentioned in place... as shown below. Leave the dust cup on the blade to avoid injury. Install the blade nut by Poulan/ WEED EATER and installed as illustrated, and the blade is toward the blade. 6. The blade is sharp and can cause the blade...
User Manual
Page 12
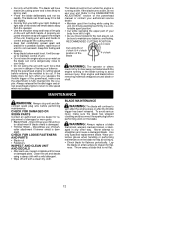
... below waist level. ier to be cut. Bring the powerhead engine to cutting speed before performing maintenance. CHECK FOR DAMAGED OR WORN PARTS Contact an authorized service dealer for replacement of the shield will continue to right. S Blade Shield -- ter attachment if blade shield ...for flatness. S "Feed" the blade deliberately and not too rapidly. S Cut only from the operator. S Cut while swinging the upper part of the powerhead, make sure the blade has stopped coasting and disconnect the spark plug before removing materials wrapped around blade or shaft. connect ...
... below waist level. ier to be cut. Bring the powerhead engine to cutting speed before performing maintenance. CHECK FOR DAMAGED OR WORN PARTS Contact an authorized service dealer for replacement of the shield will continue to right. S Blade Shield -- ter attachment if blade shield ...for flatness. S "Feed" the blade deliberately and not too rapidly. S Cut only from the operator. S Cut while swinging the upper part of the powerhead, make sure the blade has stopped coasting and disconnect the spark plug before removing materials wrapped around blade or shaft. connect ...
User Manual
Page 13
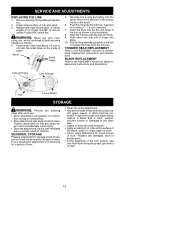
... 12-1/2 feet of the arrows found on the spool. 6. Line exit holes Line in Notch Hub Line in the direction of 0.080″ (2 mm) diameter Poulan PRO brand line. S Apply a coating of the next season, use wire, rope, string, etc., which can break off and become a dangerous missile. 4. wrap...: S Clean the entire attachment. S Store attachment with blade shield in heavy paper or cloth. S Store the attachment in any damaged, worn or broken parts. SEASONAL STORAGE Prepare attachment for storage at end of season or if it snaps into hub until it will not be stored for a period of...
... 12-1/2 feet of the arrows found on the spool. 6. Line exit holes Line in Notch Hub Line in the direction of 0.080″ (2 mm) diameter Poulan PRO brand line. S Apply a coating of the next season, use wire, rope, string, etc., which can break off and become a dangerous missile. 4. wrap...: S Clean the entire attachment. S Store attachment with blade shield in heavy paper or cloth. S Store the attachment in any damaged, worn or broken parts. SEASONAL STORAGE Prepare attachment for storage at end of season or if it snaps into hub until it will not be stored for a period of...

User Manual
Page 14
...improper handling, improper maintenance or alteration, or the use during the warranty period. Parts and Labor, when used for rental purposes. This warranty is not transferable and does not cover damage or liability caused by Poulan PRO for this tool. In the event you must return the product to continuously... Labor, if used for household purposes. 90 DAYS - This warranty does not cover cutting line or rotating head parts that term as follows from the original date of Poulan PRO is free from whom it was purchased. THIS WARRANTY GIVES YOU SPECIFIC LEGAL RIGHTS, AND YOU MAY HAVE OTHER ...
...improper handling, improper maintenance or alteration, or the use during the warranty period. Parts and Labor, when used for rental purposes. This warranty is not transferable and does not cover damage or liability caused by Poulan PRO for this tool. In the event you must return the product to continuously... Labor, if used for household purposes. 90 DAYS - This warranty does not cover cutting line or rotating head parts that term as follows from the original date of Poulan PRO is free from whom it was purchased. THIS WARRANTY GIVES YOU SPECIFIC LEGAL RIGHTS, AND YOU MAY HAVE OTHER ...


