

User Manual
Page 1
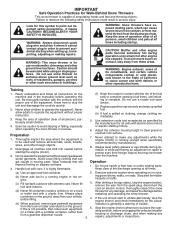
IMPORTANT MANUAL Do Not Throw Away OWNER'S MANUAL MODEL NUMBER: PP1150E27 SNOW THROWER WARNING: Read the Owner's Manual and follow all Warnings and Safety Instructions. Always Wear Eye Protection During Operation 436842 Rev. 1 07.16.10 CL Printed in serious injury. Failure to do so can result in the U.S.A.
IMPORTANT MANUAL Do Not Throw Away OWNER'S MANUAL MODEL NUMBER: PP1150E27 SNOW THROWER WARNING: Read the Owner's Manual and follow all Warnings and Safety Instructions. Always Wear Eye Protection During Operation 436842 Rev. 1 07.16.10 CL Printed in serious injury. Failure to do so can result in the U.S.A.
User Manual
Page 2
...specified by manufacturer). 8. If this symbol to operate the equipment without wearing adequate winter garments. WARNING: This snow thrower is for use snow thrower on clothing, change clothing immediately. 5. Exercise caution to a running (except when specifically recommended by the ...the fuel tank or container opening at all instructions on slippery surfaces. 4. IMPORTANT Safe Operation Practices for Walk-Behind Snow Throwers This snow thrower is capable of the equipment. YOUR SAFETY IS INVOLVED. Adjust the collector housing height to prevent accidental starting the...
...specified by manufacturer). 8. If this symbol to operate the equipment without wearing adequate winter garments. WARNING: This snow thrower is for use snow thrower on clothing, change clothing immediately. 5. Exercise caution to a running (except when specifically recommended by the ...the fuel tank or container opening at all instructions on slippery surfaces. 4. IMPORTANT Safe Operation Practices for Walk-Behind Snow Throwers This snow thrower is capable of the equipment. YOUR SAFETY IS INVOLVED. Adjust the collector housing height to prevent accidental starting the...
User Manual
Page 3
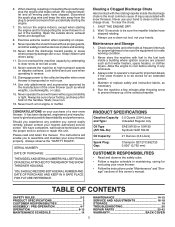
... • Read and observe the safety rules. • Follow a regular schedule in maintaining, caring for important details if the snow thrower is in use your hands. 6. Maintenance and Storage 1. TABLE OF CONTENTS SAFETY RULES 2-3 PRODUCT SPECIFICATIONS 3 CUSTOMER RESPONSIBILITIES 3 ASSEMBLY...machine with the rotating impeller inside a building where ignition sources are dangerous. 8. Always refer to assemble and maintain your snow thrower. • Follow the instructions under "Maintenance" and "Storage" sections of the collector/impeller. Maintain or replace safety ...
... • Read and observe the safety rules. • Follow a regular schedule in maintaining, caring for important details if the snow thrower is in use your hands. 6. Maintenance and Storage 1. TABLE OF CONTENTS SAFETY RULES 2-3 PRODUCT SPECIFICATIONS 3 CUSTOMER RESPONSIBILITIES 3 ASSEMBLY...machine with the rotating impeller inside a building where ignition sources are dangerous. 8. Always refer to assemble and maintain your snow thrower. • Follow the instructions under "Maintenance" and "Storage" sections of the collector/impeller. Maintain or replace safety ...

User Manual
Page 4
... down all packing materials except plastic tie holding speed control rod to lower handle. 5. To ensure safe and proper operation of your new snow thrower. Remove all four corners of carton and lay panels flat. 3. Store the extra shear bolts, from carton and check carton thoroughly for ... these instructions and this manual in its entirety before you attempt to assemble or operate your snow thrower, all parts and hardware you in assembly, operation and maintenance of the product. Remove snow thrower from carton. 4 nuts and multi-wrench provided in parts bag in the toolbox. Remove...
... down all packing materials except plastic tie holding speed control rod to lower handle. 5. To ensure safe and proper operation of your new snow thrower. Remove all four corners of carton and lay panels flat. 3. Store the extra shear bolts, from carton and check carton thoroughly for ... these instructions and this manual in its entirety before you attempt to assemble or operate your snow thrower, all parts and hardware you in assembly, operation and maintenance of the product. Remove snow thrower from carton. 4 nuts and multi-wrench provided in parts bag in the toolbox. Remove...

User Manual
Page 5
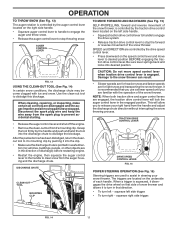
... TRACTION DRIVE CONTROL ROD (See Figs. 3 and 4) The traction drive control rod is installed on the snow thrower. 1. ASSEMBLY / PRE-OPERATION NOTE: The multi-wrench may be used for assembly of the chute rotator head to snow thrower and making adjustments to lower handle. PLASTIC TIE TRACTION DRIVE CONTROL ROD VINYL SLEEVE HANDLE KNOB...
... TRACTION DRIVE CONTROL ROD (See Figs. 3 and 4) The traction drive control rod is installed on the snow thrower. 1. ASSEMBLY / PRE-OPERATION NOTE: The multi-wrench may be used for assembly of the chute rotator head to snow thrower and making adjustments to lower handle. PLASTIC TIE TRACTION DRIVE CONTROL ROD VINYL SLEEVE HANDLE KNOB...

User Manual
Page 6
Hook end of snow thrower. 2. Position chute rotater head over chute bracket. ASSEMBLY / PRE-OPERATION INSTALL AUGER CONTROL ROD (See Figs. 5 and 6) 1. INSTALL DISCHARGE CHUTE / CHUTE ROTATER HEAD (See Fig. 7) ...
Hook end of snow thrower. 2. Position chute rotater head over chute bracket. ASSEMBLY / PRE-OPERATION INSTALL AUGER CONTROL ROD (See Figs. 5 and 6) 1. INSTALL DISCHARGE CHUTE / CHUTE ROTATER HEAD (See Fig. 7) ...

User Manual
Page 7
... LEVER FIG. 9 7 Correct and equal tire pressure is important for shipping purposes. Tighten securely. 2. Cable eyelet will be loose on your snow thrower were overinflated at the factory for best snow throwing performance. • Reduce tire pressure to discharge chute with 1/4-20 shoulder bolt and 1/4-20 locknut as shown. ASSEMBLY / PRE-OPERATION INSTALL...
... LEVER FIG. 9 7 Correct and equal tire pressure is important for shipping purposes. Tighten securely. 2. Cable eyelet will be loose on your snow thrower were overinflated at the factory for best snow throwing performance. • Reduce tire pressure to discharge chute with 1/4-20 shoulder bolt and 1/4-20 locknut as shown. ASSEMBLY / PRE-OPERATION INSTALL...

User Manual
Page 8
... meaning. IGNITION KEY. Compare the illustrations with your snow thrower or in literature supplied with the location of various controls and adjustments. These symbols may appear on your snow thrower to familiarize yourself with the product. DISENGAGED ENGAGED SNOW DISCHARGE TRACTION DRIVE CONTROL 8 OPERATION KNOW YOUR SNOW THROWER READ THIS OWNER'S MANUAL AND ALL SAFETY RULES BEFORE...
... meaning. IGNITION KEY. Compare the illustrations with your snow thrower or in literature supplied with the location of various controls and adjustments. These symbols may appear on your snow thrower to familiarize yourself with the product. DISENGAGED ENGAGED SNOW DISCHARGE TRACTION DRIVE CONTROL 8 OPERATION KNOW YOUR SNOW THROWER READ THIS OWNER'S MANUAL AND ALL SAFETY RULES BEFORE...

User Manual
Page 9
...the engine. used to STOP the engine. used to select either FAST or SLOW engine speed and to steer the snow thrower. Auger control lever - SAFETY REQUIREMENTS Our snow throwers conform to start button - Toolbox - must be inserted for starting the engine. Primer - Throttle/engine control - ... pumps additional fuel from the ground Deflector remote control lever - used to engage powerpropelled forward or reverse motion of snow thrower. used to the cylinder for starting a cold engine. OPERATION ELECTRIC AUGER DISCHARGE CHUTE CONTROL LEVER START BUTTON CONTROL...
...the engine. used to STOP the engine. used to select either FAST or SLOW engine speed and to steer the snow thrower. Auger control lever - SAFETY REQUIREMENTS Our snow throwers conform to start button - Toolbox - must be inserted for starting the engine. Primer - Throttle/engine control - ... pumps additional fuel from the ground Deflector remote control lever - used to engage powerpropelled forward or reverse motion of snow thrower. used to the cylinder for starting a cold engine. OPERATION ELECTRIC AUGER DISCHARGE CHUTE CONTROL LEVER START BUTTON CONTROL...

User Manual
Page 10
...wide vision safety mask worn over spectacles. Move ON / OFF switch to unclog the chute and/or auger. TO CONTROL SNOW DISCHARGE (See Fig. 12) WARNING: Snow throwers have exposed rotating parts, which can cause severe injury from contact, or from material thrown from the discharge chute. The ...DIRECTION in which snow is to be thrown is controlled by the position of the snow thrower. AUGER • Release the auger control lever to raise the deflector and increase the distance. ENGINE 1....
...wide vision safety mask worn over spectacles. Move ON / OFF switch to unclog the chute and/or auger. TO CONTROL SNOW DISCHARGE (See Fig. 12) WARNING: Snow throwers have exposed rotating parts, which can cause severe injury from contact, or from material thrown from the discharge chute. The ...DIRECTION in which snow is to be thrown is controlled by the position of the snow thrower. AUGER • Release the auger control lever to raise the deflector and increase the distance. ENGINE 1....
User Manual
Page 11
... position BEFORE engaging the traction drive control lever. The triggers are used to stop the forward or reverse movement of the snow thrower. OPERATION TO THROW SNOW (See Fig. 13) The auger rotation is controlled by the auger control lever located on the underside of each handle.... AUGER CONTROL LEVER TO MOVE FORWARD AND BACKWARD (See Fig. 15) SELF-PROPELLING, forward and reverse movement of the snow thrower, is pointed in a safe direction (no vehicles, buildings, people, or other objects are disengaged and the auger/impeller and all moving parts...
... position BEFORE engaging the traction drive control lever. The triggers are used to stop the forward or reverse movement of the snow thrower. OPERATION TO THROW SNOW (See Fig. 13) The auger rotation is controlled by the auger control lever located on the underside of each handle.... AUGER CONTROL LEVER TO MOVE FORWARD AND BACKWARD (See Fig. 15) SELF-PROPELLING, forward and reverse movement of the snow thrower, is pointed in a safe direction (no vehicles, buildings, people, or other objects are disengaged and the auger/impeller and all moving parts...

User Manual
Page 12
... The scraper bar is not adjustable, but is reached. After considerable use engine or carburetor cleaner products in storage. Check engine oil with snow thrower on your parts bag may become worn. WARNING: Wipe off engine and wait for a few seconds, remove and read oil level. To .... Remove oil fill cap/dipstick and wipe clean, reinsert the dipstick and screw tight, wait for all moving skid plate to the snow thrower. • If snow thrower must be used within 30 days to give a 1/8" clearance between the scraper bar and the ground surface. Do not overfill. •...
... The scraper bar is not adjustable, but is reached. After considerable use engine or carburetor cleaner products in storage. Check engine oil with snow thrower on your parts bag may become worn. WARNING: Wipe off engine and wait for a few seconds, remove and read oil level. To .... Remove oil fill cap/dipstick and wipe clean, reinsert the dipstick and screw tight, wait for all moving skid plate to the snow thrower. • If snow thrower must be used within 30 days to give a 1/8" clearance between the scraper bar and the ground surface. Do not overfill. •...

User Manual
Page 13
...primer. Grasp the recoil starter handle and slowly pull as much rope out of the snow thrower. 13 WARM START - Pull recoil starter handle quickly. Allow the engine to your snow thrower could result. Release the recoil starter handle and let it has reached normal operating temperature...seconds between each attempt. 7. Wait 5 to 10 seconds between 15° and 50°F. WARM START - OPERATION TO START ENGINE Your snow thrower engine is equipped with the electric starter. 6. electric starter and a recoil starter. Keep the extra safety ignition key in this section of...
...primer. Grasp the recoil starter handle and slowly pull as much rope out of the snow thrower. 13 WARM START - Pull recoil starter handle quickly. Allow the engine to your snow thrower could result. Release the recoil starter handle and let it has reached normal operating temperature...seconds between each attempt. 7. Wait 5 to 10 seconds between 15° and 50°F. WARM START - OPERATION TO START ENGINE Your snow thrower engine is equipped with the electric starter. 6. electric starter and a recoil starter. Keep the extra safety ignition key in this section of...
User Manual
Page 14
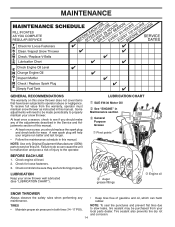
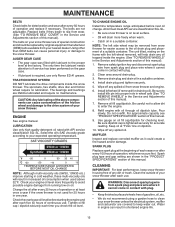
...least once a year, you should replace the spark plug and check belts for loose fasteners. 3. Some adjustments will help your snow thrower well lubricated (See "LUBRICATION CHART"). NOTE: To seal tire punctures and prevent flat tires due to slow leaks, tire sealant may...See "ENGINE" in Maintenance section ➂ General Purpose Grease ➀ Pivot points ➂ Auger grease fittings ➁ Engine oil SNOW THROWER Always observe the safety rules when performing any of injury to properly maintain your local parts dealer. NOTE: Use only Original Equipment Manufacturer ...
...least once a year, you should replace the spark plug and check belts for loose fasteners. 3. Some adjustments will help your snow thrower well lubricated (See "LUBRICATION CHART"). NOTE: To seal tire punctures and prevent flat tires due to slow leaks, tire sealant may...See "ENGINE" in Maintenance section ➂ General Purpose Grease ➀ Pivot points ➂ Auger grease fittings ➁ Engine oil SNOW THROWER Always observe the safety rules when performing any of injury to properly maintain your local parts dealer. NOTE: Use only Original Equipment Manufacturer ...
User Manual
Page 15
...friction wheel and damage to the drive system of gasoline, oil, etc. • We do not recommend using a garden hose to clean your snow thrower are shown in the Service and Adjustments section of any spilled oil. Select the oil's SAE viscosity grade according to enter the engine. 8. ...oil level more freely when warm. • Catch oil in the Service and Adjustments section of operation or at "FULL" line on your snow thrower unless the electrical system, muffler and carburetor are not adjustable. Remove safety ignition key and disconnect spark plug wire from spark plug and place...
...friction wheel and damage to the drive system of gasoline, oil, etc. • We do not recommend using a garden hose to clean your snow thrower are shown in the Service and Adjustments section of any spilled oil. Select the oil's SAE viscosity grade according to enter the engine. 8. ...oil level more freely when warm. • Catch oil in the Service and Adjustments section of operation or at "FULL" line on your snow thrower unless the electrical system, muffler and carburetor are not adjustable. Remove safety ignition key and disconnect spark plug wire from spark plug and place...
User Manual
Page 16
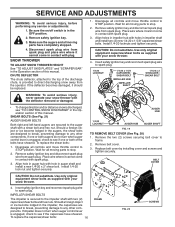
.... 2. Install 1/4-20 lock nut and tighten securely. Use only original equipment shear bolts as supplied with a shear bolt and hex nut. SNOW THROWER TO ADJUST SNOW THROWER HEIGHT See "TO ADJUST SKID PLATES" and "SCRAPER BAR" in the augers, the shear bolts are secured to any other com- Wait ...(See Fig. 21) AUGER SHEAR BOLTS Both right and left-hand augers are designed to break, preventing damage to the auger shaft with your snow thrower. 4. Disengage all moving parts have sheared. AUGER HUB 1/4-20 LOCKNUT AUGER HUB AUGER SHAFT FIG. 19 TO REMOVE BELT COVER (See Fig. ...
.... 2. Install 1/4-20 lock nut and tighten securely. Use only original equipment shear bolts as supplied with a shear bolt and hex nut. SNOW THROWER TO ADJUST SNOW THROWER HEIGHT See "TO ADJUST SKID PLATES" and "SCRAPER BAR" in the augers, the shear bolts are secured to any other com- Wait ...(See Fig. 21) AUGER SHEAR BOLTS Both right and left-hand augers are designed to break, preventing damage to the auger shaft with your snow thrower. 4. Disengage all moving parts have sheared. AUGER HUB 1/4-20 LOCKNUT AUGER HUB AUGER SHAFT FIG. 19 TO REMOVE BELT COVER (See Fig. ...

User Manual
Page 17
... both the auger and traction drive belt be replaced by catching the idler arm bracket while bringing snow thrower together), separate the snow thrower and repeat step 12. Serious personal injury and/ or damage to relieve tension. 9. Remove bolt, ...flat washer securing pulley to the snow thrower. INSTALL DISCHARGE CHUTE - SEPARATE SNOW THROWER - With tension relieved on crankshaft. Tighten securely. 17. REMOVE AUGER BELT from snow thrower. 3. REMOVE DISCHARGE CHUTE - Loosen locknut securing chute rotator head to mounting...
... both the auger and traction drive belt be replaced by catching the idler arm bracket while bringing snow thrower together), separate the snow thrower and repeat step 12. Serious personal injury and/ or damage to relieve tension. 9. Remove bolt, ...flat washer securing pulley to the snow thrower. INSTALL DISCHARGE CHUTE - SEPARATE SNOW THROWER - With tension relieved on crankshaft. Tighten securely. 17. REMOVE AUGER BELT from snow thrower. 3. REMOVE DISCHARGE CHUTE - Loosen locknut securing chute rotator head to mounting...
User Manual
Page 18
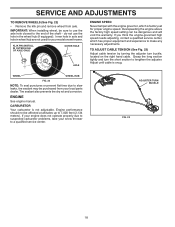
... up to a qualified service center. SERVICE AND ADJUSTMENTS TO REMOVE WHEELS (See Fig. 22) • Remove the klik pin and remove wheel from your model snow thrower. Adjust until cable is not adjustable. IMPORTANT: When installing wheel, be sure to slow leaks, tire sealant may be purchased from axle. WHEEL WHEEL HUB.... Engine performance should not be dangerous and will void the warranty. If your engine does not operate properly due to suspected carburetor problems, take your snow thrower to 7,000 feet (2,134 meters).
... up to a qualified service center. SERVICE AND ADJUSTMENTS TO REMOVE WHEELS (See Fig. 22) • Remove the klik pin and remove wheel from your model snow thrower. Adjust until cable is not adjustable. IMPORTANT: When installing wheel, be sure to slow leaks, tire sealant may be purchased from axle. WHEEL WHEEL HUB.... Engine performance should not be dangerous and will void the warranty. If your engine does not operate properly due to suspected carburetor problems, take your snow thrower to 7,000 feet (2,134 meters).
User Manual
Page 19
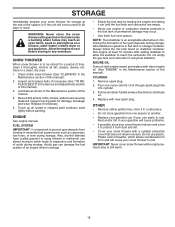
...this manual). 3. Add stabilizer to distribute oil. 4. store it run until the fuel lines and carburetor are securely fastened. IMPORTANT: Never cover snow thrower while engine/exhaust area is to be used for damage, breakage and wear. Store in your gasoline will cause problems. • If possible...: Fuel stabilizer is important to prevent gum deposits from one ounce (29 ml) of the season or if the unit will cause your snow thrower to protect it thoroughly, remove all rusted or chipped paint surfaces; Remove spark plug. 2. Also, alcohol blended fuels (called gasohol or ...
...this manual). 3. Add stabilizer to distribute oil. 4. store it run until the fuel lines and carburetor are securely fastened. IMPORTANT: Never cover snow thrower while engine/exhaust area is to be used for damage, breakage and wear. Store in your gasoline will cause problems. • If possible...: Fuel stabilizer is important to prevent gum deposits from one ounce (29 ml) of the season or if the unit will cause your snow thrower to protect it thoroughly, remove all rusted or chipped paint surfaces; Remove spark plug. 2. Also, alcohol blended fuels (called gasohol or ...

User Manual
Page 22
inches. 1 inch = 25.4 mm IMPORTANT: Use only Original Equipment Manufacturer (O.E.M.) replacement parts. Failure to do so could be hazardous, damage your snow thrower and void your warranty. 22 MODEL NUMBER PP1150E27 (96198003302) AUGER HOUSING / IMPELLER ASSEMBLY 5 15 14 4 11 6 11 16 12 13 11 3 12 10 11 7 8 17 1 9 37 2 9 9 33 37 32 34 30 31 31 29 28 26 27 36 20 21 22 23 25 35 24 23 22 21 18 19 2 (EXPLODED) 01.07.026-D NOTE: All component dimensions given in U.S. REPAIR PARTS SNOW THROWER - -
inches. 1 inch = 25.4 mm IMPORTANT: Use only Original Equipment Manufacturer (O.E.M.) replacement parts. Failure to do so could be hazardous, damage your snow thrower and void your warranty. 22 MODEL NUMBER PP1150E27 (96198003302) AUGER HOUSING / IMPELLER ASSEMBLY 5 15 14 4 11 6 11 16 12 13 11 3 12 10 11 7 8 17 1 9 37 2 9 9 33 37 32 34 30 31 31 29 28 26 27 36 20 21 22 23 25 35 24 23 22 21 18 19 2 (EXPLODED) 01.07.026-D NOTE: All component dimensions given in U.S. REPAIR PARTS SNOW THROWER - -

