

User Manual
Page 1
Always Wear Eye Protection During Operation 436842 Rev. 1 07.16.10 CL Printed in serious injury. IMPORTANT MANUAL Do Not Throw Away OWNER'S MANUAL MODEL NUMBER: PP1150E27 SNOW THROWER WARNING: Read the Owner's Manual and follow all Warnings and Safety Instructions. Failure to do so can result in the U.S.A.
Always Wear Eye Protection During Operation 436842 Rev. 1 07.16.10 CL Printed in serious injury. IMPORTANT MANUAL Do Not Throw Away OWNER'S MANUAL MODEL NUMBER: PP1150E27 SNOW THROWER WARNING: Read the Owner's Manual and follow all Warnings and Safety Instructions. Failure to do so can result in the U.S.A.
User Manual
Page 2
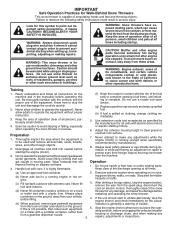
.... Exercise extreme caution when operating on sloping surfaces. YOUR SAFETY IS INVOLVED. WARNING: Snow throwers have exposed rotating parts, which can get caught in the manual(s) before filling. 4. WARNING: Engine exhaust, some of its constituents, and certain vehicle components contain or emit chemicals known to operate the equipment without wearing adequate...
.... Exercise extreme caution when operating on sloping surfaces. YOUR SAFETY IS INVOLVED. WARNING: Snow throwers have exposed rotating parts, which can get caught in the manual(s) before filling. 4. WARNING: Engine exhaust, some of its constituents, and certain vehicle components contain or emit chemicals known to operate the equipment without wearing adequate...
User Manual
Page 3
...safety rules. • Follow a regular schedule in any problem you to assemble and maintain your hand to service or repair this owner's manual. Look behind and use your snow thrower properly. Use only attachments and accessories approved by attempting to cool before storing in maintaining, caring... the discharge chute is to be sure of a new snow thrower. Always refer to operator's manual for an extended period. 4. To clear the chute: 1. Please read and retain this manual. SERIAL NUMBER DATE OF PURCHASE THE MODEL AND SERIAL NUMBERS WILL BE FOUND ON A DECAL ATTACHED...
...safety rules. • Follow a regular schedule in any problem you to assemble and maintain your hand to service or repair this owner's manual. Look behind and use your snow thrower properly. Use only attachments and accessories approved by attempting to cool before storing in maintaining, caring... the discharge chute is to be sure of a new snow thrower. Always refer to operator's manual for an extended period. 4. To clear the chute: 1. Please read and retain this manual. SERIAL NUMBER DATE OF PURCHASE THE MODEL AND SERIAL NUMBERS WILL BE FOUND ON A DECAL ATTACHED...

User Manual
Page 4
... 5/16-18 x 5/8 (72250505) (1) LOCKNUT 1/4-20 (191730) (1) SHOULDER BOLT 1/4-20 (179829) (1) SPRING (184505) ASSEMBLY / PRE-OPERATION Read these instructions and this manual in its entirety before you attempt to the pallet. 6. Remove the two (2) screws securing the auger housing to complete the assembly have been placed in... the parts bag. All parts such as necessary to lower handle. 5. Reading the entire manual will familiarize you with the exception of carton and lay panels flat. 3. Use the correct tools as nuts, washers, bolts, etc...
... 5/16-18 x 5/8 (72250505) (1) LOCKNUT 1/4-20 (191730) (1) SHOULDER BOLT 1/4-20 (179829) (1) SPRING (184505) ASSEMBLY / PRE-OPERATION Read these instructions and this manual in its entirety before you attempt to the pallet. 6. Remove the two (2) screws securing the auger housing to complete the assembly have been placed in... the parts bag. All parts such as necessary to lower handle. 5. Reading the entire manual will familiarize you with the exception of carton and lay panels flat. 3. Use the correct tools as nuts, washers, bolts, etc...

User Manual
Page 8
...or in literature supplied with the location of various controls and adjustments. INSERT TO START AND RUN, PULL OUT TO STOP. Save this manual for future reference. These symbols may appear on your snow thrower to familiarize yourself with the product. IGNITION KEY. DISENGAGED ENGAGED SNOW DISCHARGE... AND FOLLOW ALL SAFETY INFORMATION AND INSTRUCTIONS BEFORE USE OF THIS PRODUCT. OPERATION KNOW YOUR SNOW THROWER READ THIS OWNER'S MANUAL AND ALL SAFETY RULES BEFORE OPERATING YOUR SNOW THROWER. Learn and understand their meaning. KEEP THESE INSTRUCTIONS FOR FUTURE REFERENCE.
...or in literature supplied with the location of various controls and adjustments. INSERT TO START AND RUN, PULL OUT TO STOP. Save this manual for future reference. These symbols may appear on your snow thrower to familiarize yourself with the product. IGNITION KEY. DISENGAGED ENGAGED SNOW DISCHARGE... AND FOLLOW ALL SAFETY INFORMATION AND INSTRUCTIONS BEFORE USE OF THIS PRODUCT. OPERATION KNOW YOUR SNOW THROWER READ THIS OWNER'S MANUAL AND ALL SAFETY RULES BEFORE OPERATING YOUR SNOW THROWER. Learn and understand their meaning. KEEP THESE INSTRUCTIONS FOR FUTURE REFERENCE.

User Manual
Page 12
... to the snow thrower. • If snow thrower must be emptied before requiring replacement. Check engine oil with snow thrower on each side of this manual.
... to the snow thrower. • If snow thrower must be emptied before requiring replacement. Check engine oil with snow thrower on each side of this manual.

User Manual
Page 13
... time you do flood the engine, wait a few minutes before attempting to start, repeat the above , keeping the choke control in a safe place. 2. At this manual. • For extremely heavy snow, reduce the width of snow removal by overlapping previous path and moving slowly. • Keep engine clean and clear of...
... time you do flood the engine, wait a few minutes before attempting to start, repeat the above , keeping the choke control in a safe place. 2. At this manual. • For extremely heavy snow, reduce the width of snow removal by overlapping previous path and moving slowly. • Keep engine clean and clear of...
User Manual
Page 14
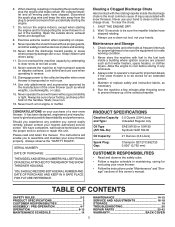
...will need to be sure they are functioning properly. TIRES • Maintain proper air pressure in the Service and Adjustments section of this manual. • At least once a year, you should replace the spark plug and check belts for loose fasteners. 3. MAINTENANCE GENERAL ...lubricated (See "LUBRICATION CHART"). To receive full value from your engine run better and last longer. • Follow the maintenance schedule in this manual. At least once a season, check to operator abuse or negligence. Check engine oil level. 2. BEFORE EACH USE 1. LUBRICATION CHART ➀...
...will need to be sure they are functioning properly. TIRES • Maintain proper air pressure in the Service and Adjustments section of this manual. • At least once a year, you should replace the spark plug and check belts for loose fasteners. 3. MAINTENANCE GENERAL ...lubricated (See "LUBRICATION CHART"). To receive full value from your engine run better and last longer. • Follow the maintenance schedule in this manual. At least once a season, check to operator abuse or negligence. Check engine oil level. 2. BEFORE EACH USE 1. LUBRICATION CHART ➀...
User Manual
Page 15
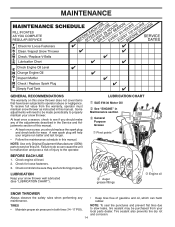
...;F. The only time the lubricant needs attention is if service has been performed on dipstick. 10. CAUTION: Any lubricating of this manual). 7. Check the crankcase oil level before next oil change. TO CHANGE ENGINE OIL Determine temperature range anticipated before starting in cold ... container. Remove drain plug and drain oil in shortened engine life. 15 Keep oil at the beginning of each five (5) hours of this manual). 1. CLEANING IMPORTANT: For best performance, keep water out. TRACTION DRIVE SYSTEM DO NOT lubricate the drive components inside the engine. (See...
...;F. The only time the lubricant needs attention is if service has been performed on dipstick. 10. CAUTION: Any lubricating of this manual). 7. Check the crankcase oil level before next oil change. TO CHANGE ENGINE OIL Determine temperature range anticipated before starting in cold ... container. Remove drain plug and drain oil in shortened engine life. 15 Keep oil at the beginning of each five (5) hours of this manual). 1. CLEANING IMPORTANT: For best performance, keep water out. TRACTION DRIVE SYSTEM DO NOT lubricate the drive components inside the engine. (See...
User Manual
Page 16
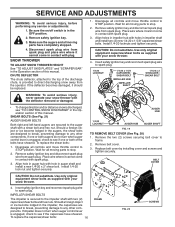
... Wait for all moving parts to see if the capscrews have sheared. Install 1/4-20 locknuts and tighten securely. If one or both of this manual. Wait for all moving parts to the auger shaft with holes in impeller shaft and install two (2) new 1/4-20 x 1-5/8" capscrew/shear bolts....4. To replace the shear bolts: 1. Align hole in the impeller, the capscrews are designed to break, preventing damage to the top of this manual. Remove the two (2) screws securing belt cover to spark plug. Use only original equipment shear bolts as supplied with spark plug. 3. Insert safety ...
... Wait for all moving parts to see if the capscrews have sheared. Install 1/4-20 locknuts and tighten securely. If one or both of this manual. Wait for all moving parts to the auger shaft with holes in impeller shaft and install two (2) new 1/4-20 x 1-5/8" capscrew/shear bolts....4. To replace the shear bolts: 1. Align hole in the impeller, the capscrews are designed to break, preventing damage to the top of this manual. Remove the two (2) screws securing belt cover to spark plug. Use only original equipment shear bolts as supplied with spark plug. 3. Insert safety ...

User Manual
Page 17
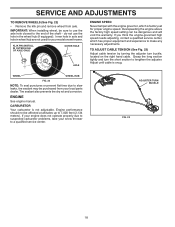
...is removed, have your assistant standing in the "ON" position) into a suitable container, outdoors, away from your snow thrower are of this manual. 4. INSTALL DISCHARGE CHUTE - WARNING: Belt replacement requires separation of auger pulley only. 12. Loosen locknut securing chute rotator head to mounting bracket ... other than OEM belts can cause personal injury or damage to engine crankshaft. See "TO REMOVE BELT COVER" in groove of this manual. It is recommended that the belt(s) be replaced at the same time. REMOVE DISCHARGE CHUTE - REMOVE HAIRPIN FROM CLUTCH ROD and ...
...is removed, have your assistant standing in the "ON" position) into a suitable container, outdoors, away from your snow thrower are of this manual. 4. INSTALL DISCHARGE CHUTE - WARNING: Belt replacement requires separation of auger pulley only. 12. Loosen locknut securing chute rotator head to mounting bracket ... other than OEM belts can cause personal injury or damage to engine crankshaft. See "TO REMOVE BELT COVER" in groove of this manual. It is recommended that the belt(s) be replaced at the same time. REMOVE DISCHARGE CHUTE - REMOVE HAIRPIN FROM CLUTCH ROD and ...
User Manual
Page 18
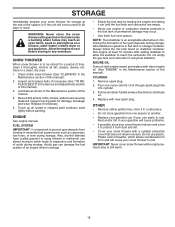
... dry rot and corrosion. If your engine does not operate properly due to a qualified service center. ADJUSTER TURN BUCKLE FIG. 23 18 ENGINE See engine manual. SERVICE AND ADJUSTMENTS TO REMOVE WHEELS (See Fig. 22) • Remove the klik pin and remove wheel from your local parts dealer. IMPORTANT: When installing...
... dry rot and corrosion. If your engine does not operate properly due to a qualified service center. ADJUSTER TURN BUCKLE FIG. 23 18 ENGINE See engine manual. SERVICE AND ADJUSTMENTS TO REMOVE WHEELS (See Fig. 22) • Remove the klik pin and remove wheel from your local parts dealer. IMPORTANT: When installing...
User Manual
Page 19
...few times to reach the carburetor. SNOW THROWER When snow thrower is important to prevent gum deposits from one ounce (29 ml) of this manual. 4. Acidic gas can attract moisture which allows condensation to form and will not be stored for damage, breakage and wear. Replace with ...in the tank inside a building where fumes may occur. • Use fresh fuel next season. Inspect moving parts for a period of this manual). Rust and/or dirt in the Maintenance section of acids during storage. Add stabilizer to rust. NOTE: Fuel stabilizer is still warm. 19 ...
...few times to reach the carburetor. SNOW THROWER When snow thrower is important to prevent gum deposits from one ounce (29 ml) of this manual. 4. Acidic gas can attract moisture which allows condensation to form and will not be stored for damage, breakage and wear. Replace with ...in the tank inside a building where fumes may occur. • Use fresh fuel next season. Inspect moving parts for a period of this manual). Rust and/or dirt in the Maintenance section of acids during storage. Add stabilizer to rust. NOTE: Fuel stabilizer is still warm. 19 ...
User Manual
Page 20
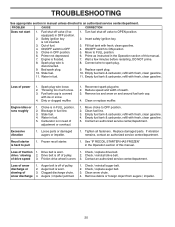
..., refill with fresh, clean gasoline. 4. Recoil starter is worn. 3. Drive belt is in the Operation section of this manual. 7. Augers / impeller jammed. 1. Choke in fuel. 1. Insert safety ignition key. 3. Prime as instructed in manual unless directed to pull 1. Wait a few minutes before restarting, DO NOT prime. 8. Engine idles or runs roughly 1. Carburetor... slowing of drive speed 3. PROBLEM CAUSE CORRECTION Does not start 1. ON/OFF switch is OFF 5. TROUBLESHOOTING See appropriate section in the Operation section of this manual. Check / replace auger belt. 3.
..., refill with fresh, clean gasoline. 4. Recoil starter is worn. 3. Drive belt is in the Operation section of this manual. 7. Augers / impeller jammed. 1. Choke in fuel. 1. Insert safety ignition key. 3. Prime as instructed in manual unless directed to pull 1. Wait a few minutes before restarting, DO NOT prime. 8. Engine idles or runs roughly 1. Carburetor... slowing of drive speed 3. PROBLEM CAUSE CORRECTION Does not start 1. ON/OFF switch is OFF 5. TROUBLESHOOTING See appropriate section in the Operation section of this manual. Check / replace auger belt. 3.

User Manual
Page 42
MODEL NUMBER PP1150E27 (96198003302) DECALS 1 4 9 6 10 1 3 KEY NO. 1 3 4 6 9 10 - - - PART NO. 181037 181035 181042 181033 429591 429590 436842 436843 DESCRIPTION DECAL, DANGER DECAL, DANGER, DEFLECTOR DECAL, DANGER DECAL, INSTRUCTION DECAL, SPEED CONTROL DECAL, LH TRIGGER OWNER'S MANUAL, ENGLISH OWNER'S MANUAL, FRENCH NOTE: All component dimensions given in U.S. inches. 1 inch = 25.4 mm IMPORTANT: Use only...
MODEL NUMBER PP1150E27 (96198003302) DECALS 1 4 9 6 10 1 3 KEY NO. 1 3 4 6 9 10 - - - PART NO. 181037 181035 181042 181033 429591 429590 436842 436843 DESCRIPTION DECAL, DANGER DECAL, DANGER, DEFLECTOR DECAL, DANGER DECAL, INSTRUCTION DECAL, SPEED CONTROL DECAL, LH TRIGGER OWNER'S MANUAL, ENGLISH OWNER'S MANUAL, FRENCH NOTE: All component dimensions given in U.S. inches. 1 inch = 25.4 mm IMPORTANT: Use only...


