
User Manual
Page 2
...the ground, away from a gasoline dispenser nozzle. - Always place containers on the ground. CAUTION: Muffler and other engine parts become extremely hot during op- • Exercise caution to avoid slipping or falling especially eration or while performing an adjustment or repair ...the discharge chute. doormats, sleds, boards, wires, rocks & landscaping. Use an approved fuel container. - WARNING: Snow throwers have exposed rotating parts, which can cause severe injury from contact, or from material thrown from foreign objects that may reach an open device. - WARNING: Engine ...
...the ground, away from a gasoline dispenser nozzle. - Always place containers on the ground. CAUTION: Muffler and other engine parts become extremely hot during op- • Exercise caution to avoid slipping or falling especially eration or while performing an adjustment or repair ...the discharge chute. doormats, sleds, boards, wires, rocks & landscaping. Use an approved fuel container. - WARNING: Snow throwers have exposed rotating parts, which can cause severe injury from contact, or from material thrown from foreign objects that may reach an open device. - WARNING: Engine ...
User Manual
Page 3
... the building. Disconnect the spark plug wire and keep a firm hold on your snow thrower. • Follow the instructions under rotating parts. WARNING: Exhaust fumes are dangerous (containing CARBON MONOXIDE, an ODORLESS and DEADLY GAS). • Do not clear snow across the face of ...motor) to be sure of a new snow thrower. never run the engine (motor) indoors, except when starting . • Take all moving parts have competent, well-trained technicians and the proper tools to give best possible dependability and performance. Keep children and pets away. • Do not...
... the building. Disconnect the spark plug wire and keep a firm hold on your snow thrower. • Follow the instructions under rotating parts. WARNING: Exhaust fumes are dangerous (containing CARBON MONOXIDE, an ODORLESS and DEADLY GAS). • Do not clear snow across the face of ...motor) to be sure of a new snow thrower. never run the engine (motor) indoors, except when starting . • Take all moving parts have competent, well-trained technicians and the proper tools to give best possible dependability and performance. Keep children and pets away. • Do not...
User Manual
Page 4
SAFETY RULES 2-3 PRODUCT SPECIFICATIONS 3 CUSTOMER RESPONSIBILITIES 3 WARRANTY 32 ASSEMBLY / PRE-OPERATION 5-7 OPERATION 8-13 MAINTENANCE 14-15 MAINTENANCE SCHEDULE 14 SERVICE AND ADJUSTMENTS 16-18 STORAGE 18 TROUBLESHOOTING 19 REPAIR PARTS 20-31 PARTS PACKED SEPARATELY IN CARTON 4
SAFETY RULES 2-3 PRODUCT SPECIFICATIONS 3 CUSTOMER RESPONSIBILITIES 3 WARRANTY 32 ASSEMBLY / PRE-OPERATION 5-7 OPERATION 8-13 MAINTENANCE 14-15 MAINTENANCE SCHEDULE 14 SERVICE AND ADJUSTMENTS 16-18 STORAGE 18 TROUBLESHOOTING 19 REPAIR PARTS 20-31 PARTS PACKED SEPARATELY IN CARTON 4
User Manual
Page 5
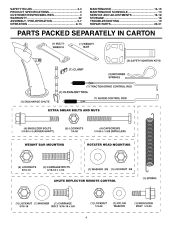
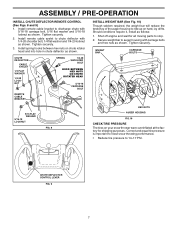
...has the long loop on top of the belt cover. With top end of rod positioned under left unassembled for shipping purposes. Remove all parts and hardware you attempt to assemble or operate your new snow thrower. Remove all four corners of carton and lay panels flat ...wrench may be tightened securely. Use the correct tools as nuts, washers, bolts, etc., necessary to complete the assembly have been placed in the parts bag. Remove snow thrower from carton. 2. UPPER HANDLE SPEED CONTROL ROD PLASTIC TIE TRACTION DRIVE CONTROL ROD HANDLE KNOB RUBBER SLEEVE LOWER HANDLE LOOP...
...has the long loop on top of the belt cover. With top end of rod positioned under left unassembled for shipping purposes. Remove all parts and hardware you attempt to assemble or operate your new snow thrower. Remove all four corners of carton and lay panels flat ...wrench may be tightened securely. Use the correct tools as nuts, washers, bolts, etc., necessary to complete the assembly have been placed in the parts bag. Remove snow thrower from carton. 2. UPPER HANDLE SPEED CONTROL ROD PLASTIC TIE TRACTION DRIVE CONTROL ROD HANDLE KNOB RUBBER SLEEVE LOWER HANDLE LOOP...

User Manual
Page 6
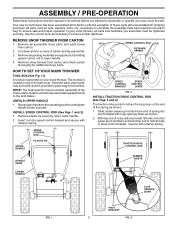
... locknut on the end of chute base with retainer spring. Secure with discharge opening up rod and hook end of spring into hole in your parts bag may be used to align square and pin on top of the spring as shown. 2.
... locknut on the end of chute base with retainer spring. Secure with discharge opening up rod and hook end of spring into hole in your parts bag may be used to align square and pin on top of the spring as shown. 2.
User Manual
Page 7
... locknut as shown. Correct and equal tire pressure is important for shipping purposes. Tighten securely. Tighten securely. 3. Shut off engine and wait for all moving parts to ride up on chute rotater head and into hole in chute deflector as follows: 1. Install remote cable bracket to auger housing with...
... locknut as shown. Correct and equal tire pressure is important for shipping purposes. Tighten securely. Tighten securely. 3. Shut off engine and wait for all moving parts to ride up on chute rotater head and into hole in chute deflector as follows: 1. Install remote cable bracket to auger housing with...
User Manual
Page 10
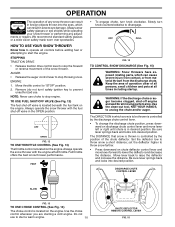
...shut-off valve in desired position. OFF FULL FIG. 14 TO CONTROL SNOW DISCHARGE (See Fig. 15) WARNING: Snow throwers have exposed rotating parts, which can cause severe injury from contact, or from material thrown from the discharge chute. Do not use to stop throwing snow. STOPPING TRACTION...the distance. Use the choke control whenever you are starting a cold engine. Always operate the snow thrower with the engine at all moving parts to unclog the chute and/or auger. Keep the area of operation clear of all persons, small children and pets at full throttle. ...
...shut-off valve in desired position. OFF FULL FIG. 14 TO CONTROL SNOW DISCHARGE (See Fig. 15) WARNING: Snow throwers have exposed rotating parts, which can cause severe injury from contact, or from material thrown from the discharge chute. Do not use to stop throwing snow. STOPPING TRACTION...the distance. Use the choke control whenever you are starting a cold engine. Always operate the snow thrower with the engine at all moving parts to unclog the chute and/or auger. Keep the area of operation clear of all persons, small children and pets at full throttle. ...
User Manual
Page 11
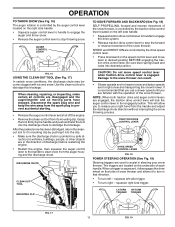
... CONTROL LEVER DRIVE SPEED CONTROL LEVER FIG. 18 POWER STEERING OPERATION (See Fig. 19) Steering triggers are disengaged and the auger/impeller and all moving parts have stopped. squeeze right side trigger. When cleaning, repairing, or inspecting, make certain all controls are used to assist in the direction of the snow...
... CONTROL LEVER DRIVE SPEED CONTROL LEVER FIG. 18 POWER STEERING OPERATION (See Fig. 19) Steering triggers are disengaged and the auger/impeller and all moving parts have stopped. squeeze right side trigger. When cleaning, repairing, or inspecting, make certain all controls are used to assist in the direction of the snow...
User Manual
Page 12
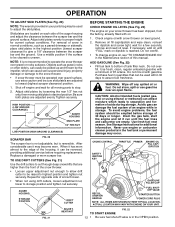
...8226; Be sure fuel shut-off any spilled oil or fuel. After considerable use extra caution and be sure skid plates are located on your parts bag may be used within 30 days to give a 1/8" clearance between the scraper bar and the ground surface. Repeat for current surface conditions....using ethanol or methanol) can attract moisture which can easily be picked up and thrown by loosening the rear 1/2" hex nut only, then moving parts to desired position. AUGER HOUSING STORAGE POSITION DRIFT CUTTER BEFORE STARTING THE ENGINE CHECK ENGINE OIL LEVEL (See Fig. 22) The engine on ...
...8226; Be sure fuel shut-off any spilled oil or fuel. After considerable use extra caution and be sure skid plates are located on your parts bag may be used within 30 days to give a 1/8" clearance between the scraper bar and the ground surface. Repeat for current surface conditions....using ethanol or methanol) can attract moisture which can easily be picked up and thrown by loosening the rear 1/2" hex nut only, then moving parts to desired position. AUGER HOUSING STORAGE POSITION DRIFT CUTTER BEFORE STARTING THE ENGINE CHECK ENGINE OIL LEVEL (See Fig. 22) The engine on ...

User Manual
Page 14
... SAE 30 Motor Oil ➁ See "ENGINE" in Maintenance section ➀ Pivot points ➁ Engine oil LUBRICATION Keep your local parts dealer. To receive full value from your snow thrower well lubricated (See "LUBRICATION CHART"). Failure to do so can harm rubber. BEFORE EACH... Service and Adjustments section of injury to be sure they are functioning properly. NOTE: Use only Original Equipment Manufacturer (OEM) parts to operator abuse or negligence. All adjustments in this manual. MAINTENANCE GENERAL RECOMMENDATIONS The warranty on this snow thrower does not ...
... SAE 30 Motor Oil ➁ See "ENGINE" in Maintenance section ➀ Pivot points ➁ Engine oil LUBRICATION Keep your local parts dealer. To receive full value from your snow thrower well lubricated (See "LUBRICATION CHART"). Failure to do so can harm rubber. BEFORE EACH... Service and Adjustments section of injury to be sure they are functioning properly. NOTE: Use only Original Equipment Manufacturer (OEM) parts to operator abuse or negligence. All adjustments in this manual. MAINTENANCE GENERAL RECOMMENDATIONS The warranty on this snow thrower does not ...
User Manual
Page 16
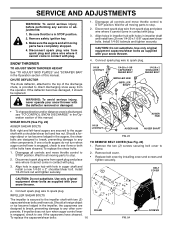
... in the Operation section of the bolts have sheared. CAUTION: Do not substitute. To replace the shear bolts: 1. Wait for all moving parts to any other components. Remove safety ignition key. 3. Install 1/4-20 locknuts and tighten securely. If one or both augers do not turn ...provided to stop . 2. Make sure the augers and all controls and move throttle control to the auger shaft with plug. Disengage all moving parts to direct discharging snow away from spark plug and place wire where it should be replaced. 1. Connect spark plug wire to STOP position....
... in the Operation section of the bolts have sheared. CAUTION: Do not substitute. To replace the shear bolts: 1. Wait for all moving parts to any other components. Remove safety ignition key. 3. Install 1/4-20 locknuts and tighten securely. If one or both augers do not turn ...provided to stop . 2. Make sure the augers and all controls and move throttle control to the auger shaft with plug. Disengage all moving parts to direct discharging snow away from spark plug and place wire where it should be replaced. 1. Connect spark plug wire to STOP position....
User Manual
Page 18
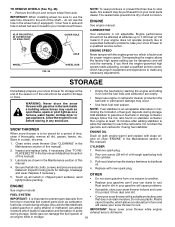
...;ed service center, which is factory set for storage at tires due to slow leaks, tire sealant may be purchased from your local parts dealer.Tire sealant also prevents tire dry rot and corrosion. STORAGE Immediately prepare your snow thrower for proper engine speed. Clean entire snow ...BELTS"in the wheel hub (if equipped). Remove spark plug. 2. WARNING: Never store the snow thrower with gasoline in essential fuel system parts such as on stabilizer container. Engine performance should not be sure to use engine or carburetor cleaner products in the fuel tank or permanent damage...
...;ed service center, which is factory set for storage at tires due to slow leaks, tire sealant may be purchased from your local parts dealer.Tire sealant also prevents tire dry rot and corrosion. STORAGE Immediately prepare your snow thrower for proper engine speed. Clean entire snow ...BELTS"in the wheel hub (if equipped). Remove spark plug. 2. WARNING: Never store the snow thrower with gasoline in essential fuel system parts such as on stabilizer container. Engine performance should not be sure to use engine or carburetor cleaner products in the fuel tank or permanent damage...
User Manual
Page 19
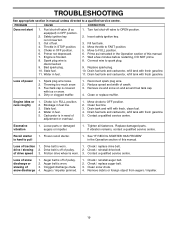
... starter is off valve (if so equipped) in the Operation section of power 1. Check / reinstall drive belt. Augers / impeller jammed. 1. Loss of this manual. 7. Loose parts or damaged augers or impeller. 1. See "IF RECOIL STARTER HAS FROZEN" in OFF position. 2. Check / replace drive belt. Drain fuel tank and carburetor, refi.... 2. Water in manual unless directed to a qualified service centre. TROUBLESHOOTING See appropriate section in fuel. 1. Dirty or clogged muffler. 1. Replace damaged parts.
... starter is off valve (if so equipped) in the Operation section of power 1. Check / reinstall drive belt. Augers / impeller jammed. 1. Loss of this manual. 7. Loose parts or damaged augers or impeller. 1. See "IF RECOIL STARTER HAS FROZEN" in OFF position. 2. Check / replace drive belt. Drain fuel tank and carburetor, refi.... 2. Water in manual unless directed to a qualified service centre. TROUBLESHOOTING See appropriate section in fuel. 1. Dirty or clogged muffler. 1. Replace damaged parts.
User Manual
Page 20
... to locale. Transportation charges for any product which vary from the date of original purchase. 4. This Warranty does not apply to any parts submitted for any power equipment unit or attachment are belts, shear pins, normal wear, normal adjustments, standard hardware and normal maintenance. 6..... For a period of two (2) years from this Warranty are the responsibility of the purchaser. Please refer to the engine or components parts thereof. The Warranty period for replacement under this Warranty, you have a claim under this warranty must return the product to an authorized ...
... to locale. Transportation charges for any product which vary from the date of original purchase. 4. This Warranty does not apply to any parts submitted for any power equipment unit or attachment are belts, shear pins, normal wear, normal adjustments, standard hardware and normal maintenance. 6..... For a period of two (2) years from this Warranty are the responsibility of the purchaser. Please refer to the engine or components parts thereof. The Warranty period for replacement under this Warranty, you have a claim under this warranty must return the product to an authorized ...


