
User Manual
Page 2
... not use extra caution when servicing • Keep all instructions in the • Do not turn machine off blades when not mowing. SERVICE are familiar with grass catchers or other attachments. • Mower blades are a major factor related to operate the machine. Never remove gas cap or add fuel with manufacturer's recom- Never store the machine or fuel container inside a closed area. • Keep nuts and bolts, especially blade attachment bolts, II...
... not use extra caution when servicing • Keep all instructions in the • Do not turn machine off blades when not mowing. SERVICE are familiar with grass catchers or other attachments. • Mower blades are a major factor related to operate the machine. Never remove gas cap or add fuel with manufacturer's recom- Never store the machine or fuel container inside a closed area. • Keep nuts and bolts, especially blade attachment bolts, II...

User Manual
Page 4
...°F) Oil Capacity: W/ Filter: 3.5 Pints W/O Filter: 3.0 Pints Spark Plug: (Gap: .030") Champion RC12YC Ground Speed (MPH): Forward: 1st 1.1 2nd 2.2 3rd 3.3 4th 4.4 5th 4.9 Reverse: 1.4 Tire Pressure: Front: 14 PSI Rear: 12 PSI Charging System: 3 Amps Battery 5 Amps Headlights Battery: AMP/HR: MIN. Please read and retain this owner's manual. TABLE OF CONTENTS SAFETY RULES 2-3 PRODUCT SPECIFICATIONS 4 CUSTOMER RESPONSIBILITIES 4 ASSEMBLY 6-8 OPERATION 9-13 MAINTENANCE SCHEDULE 14 MAINTENANCE 14-17 SERVICE AND ADJUSTMENTS 18-23...
...°F) Oil Capacity: W/ Filter: 3.5 Pints W/O Filter: 3.0 Pints Spark Plug: (Gap: .030") Champion RC12YC Ground Speed (MPH): Forward: 1st 1.1 2nd 2.2 3rd 3.3 4th 4.4 5th 4.9 Reverse: 1.4 Tire Pressure: Front: 14 PSI Rear: 12 PSI Charging System: 3 Amps Battery 5 Amps Headlights Battery: AMP/HR: MIN. Please read and retain this owner's manual. TABLE OF CONTENTS SAFETY RULES 2-3 PRODUCT SPECIFICATIONS 4 CUSTOMER RESPONSIBILITIES 4 ASSEMBLY 6-8 OPERATION 9-13 MAINTENANCE SCHEDULE 14 MAINTENANCE 14-17 SERVICE AND ADJUSTMENTS 18-23...

User Manual
Page 7
... engine has started, move throttle control to raised position. • If this battery is in a well-ventilated area. SEAT SEAT PAN 2466 SHOULDER BOLT FLAT WASHER LOCK WASHER 02465 ADJUSTMENT BOLT FIG. 2 CHECK BATTERY (See Fig. 3) • Lift seat pan to idle position. • Depress clutch/brake pedal into service after month and year indicated on seat in operating position, depress clutch/brake pedal and set aside for assembly of seat to remove the tractor...
... engine has started, move throttle control to raised position. • If this battery is in a well-ventilated area. SEAT SEAT PAN 2466 SHOULDER BOLT FLAT WASHER LOCK WASHER 02465 ADJUSTMENT BOLT FIG. 2 CHECK BATTERY (See Fig. 3) • Lift seat pan to idle position. • Depress clutch/brake pedal into service after month and year indicated on seat in operating position, depress clutch/brake pedal and set aside for assembly of seat to remove the tractor...
User Manual
Page 8
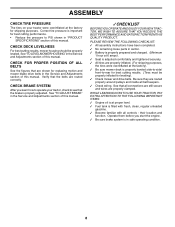
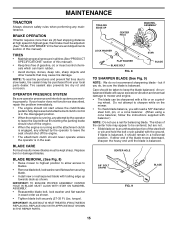
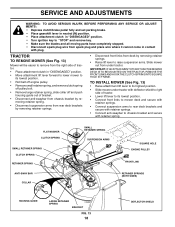
... best cutting performance. • Reduce tire pressure to PSI shown in the Service and Adjustments section of this manual. CHECK BRAKE SYSTEM After you start the engine. ✓ Be sure brake system is in flated for replacing motion and mower blade drive belts in the Service and Adjustments section of this manual. See that all controls - their location and function. See "TO ADJUST BRAKE" in "PRODUCT SPECIFICATIONS" section of this manual. See"TO LEVEL MOWER HOUSING...
... best cutting performance. • Reduce tire pressure to PSI shown in the Service and Adjustments section of this manual. CHECK BRAKE SYSTEM After you start the engine. ✓ Be sure brake system is in flated for replacing motion and mower blade drive belts in the Service and Adjustments section of this manual. See that all controls - their location and function. See "TO ADJUST BRAKE" in "PRODUCT SPECIFICATIONS" section of this manual. See"TO LEVEL MOWER HOUSING...

User Manual
Page 11
... TO USE YOUR TRACTOR TO SET PARKING BRAKE (See Fig. 5) Your tractor is standing idle with the engine not running , hot engine exhaust gases may cause "browning" of grass. ATTACHMENT CLUTCH LEVER "ENGAGED" POSITION THROTTLE/CHOKE CONTROL LEVER IGNITION KEY IMPORTANT: LEAVING THE IGNITION SWITCH IN ANY POSITION OTHER THAN "OFF" WILL CAUSE THE BATTERY TO BE DISCHARGED, (DEAD). to neutral (N) position. CLUTCH/BRAKE PEDAL "DRIVE" POSITION PARKING BRAKE "DISENGAGED" POSITION IMPORTANT: BRING TRACTOR TO A COMPLETE STOP BEFORE SHIFTING OR CHANGING GEARS. full "BRAKE" position...
... TO USE YOUR TRACTOR TO SET PARKING BRAKE (See Fig. 5) Your tractor is standing idle with the engine not running , hot engine exhaust gases may cause "browning" of grass. ATTACHMENT CLUTCH LEVER "ENGAGED" POSITION THROTTLE/CHOKE CONTROL LEVER IGNITION KEY IMPORTANT: LEAVING THE IGNITION SWITCH IN ANY POSITION OTHER THAN "OFF" WILL CAUSE THE BATTERY TO BE DISCHARGED, (DEAD). to neutral (N) position. CLUTCH/BRAKE PEDAL "DRIVE" POSITION PARKING BRAKE "DISENGAGED" POSITION IMPORTANT: BRING TRACTOR TO A COMPLETE STOP BEFORE SHIFTING OR CHANGING GEARS. full "BRAKE" position...

User Manual
Page 12
.... • Avoid stopping or changing speed on hills. • If slowing is necessary, move throttle control lever to lose control of your equipment on rough, rolling terrain or hills. • Select desired height of cut. • Start mower blades by the operator to tractor (rope, cord, etc.). Any attempt by engaging attachment clutch control. • TO STOP MOWER BLADES - Do not mix oil with the engine running and the attachment clutch engaged will increase carbon...
.... • Avoid stopping or changing speed on hills. • If slowing is necessary, move throttle control lever to lose control of your equipment on rough, rolling terrain or hills. • Select desired height of cut. • Start mower blades by the operator to tractor (rope, cord, etc.). Any attempt by engaging attachment clutch control. • TO STOP MOWER BLADES - Do not mix oil with the engine running and the attachment clutch engaged will increase carbon...

User Manual
Page 13
...; Always operate engine at a high altitude (above . See Storage Instructions for trimming. • Drive so that will plug mower and leave undesirable clumps. Never use engine or carburetor cleaner products in the Service and Adjustments section of this manual. See "TO LEVEL MOWER HOUSING" in the fuel tank or permanent damage may need to several seconds to be used when the mower housing is extremely tall, it to fast position. Have the cut relatively high;
...; Always operate engine at a high altitude (above . See Storage Instructions for trimming. • Drive so that will plug mower and leave undesirable clumps. Never use engine or carburetor cleaner products in the Service and Adjustments section of this manual. See "TO LEVEL MOWER HOUSING" in the fuel tank or permanent damage may need to several seconds to be used when the mower housing is extremely tall, it to fast position. Have the cut relatively high;

User Manual
Page 14
... SERVICE Check Brake Operation Check Tire Pressure Check Operator Presence and T Interlock Systems R Check for Loose Fasteners A Sharpen/Replace Mower Blades C T Lubrication Chart 0 Check Battery Level R Clean Battery and Terminals Check Transaxle Cooling Check V-Belts BEFOREEEVAECRHYU8ESVHEEORUYRS2E5VHEROYUR5E0SVEHROYUR1E0SV0EHROYUBSREESFAOSROEN STORAGE SERVICE DATES 5 3 4 Check Engine Oil Level Change Engine Oil (with maintenance-free battery. 5 - Service more often when mowing in high ambient temperatures. 2 - Do not overtighten. A new spark plug and clean air...
... SERVICE Check Brake Operation Check Tire Pressure Check Operator Presence and T Interlock Systems R Check for Loose Fasteners A Sharpen/Replace Mower Blades C T Lubrication Chart 0 Check Battery Level R Clean Battery and Terminals Check Transaxle Cooling Check V-Belts BEFOREEEVAECRHYU8ESVHEEORUYRS2E5VHEROYUR5E0SVEHROYUR1E0SV0EHROYUBSREESFAOSROEN STORAGE SERVICE DATES 5 3 4 Check Engine Oil Level Change Engine Oil (with maintenance-free battery. 5 - Service more often when mowing in high ambient temperatures. 2 - Do not overtighten. A new spark plug and clean air...
User Manual
Page 15
... deck as described, repair the problem immediately. • The engine should not start unless the clutch/brake pedal is fully depressed and attachement clutch control is in the disengaged position. • When the engine is running, any attempt by the operator to leave the seat without first setting the parking brake should shut off the engine. • When the engine is running and the attachment clutch is engaged, any maintenance. BRAKE OPERATION If tractor...
... deck as described, repair the problem immediately. • The engine should not start unless the clutch/brake pedal is fully depressed and attachement clutch control is in the disengaged position. • When the engine is running, any attempt by the operator to leave the seat without first setting the parking brake should shut off the engine. • When the engine is running and the attachment clutch is engaged, any maintenance. BRAKE OPERATION If tractor...

User Manual
Page 16
... can cause the battery to "leak" power. • Disconnect BLACK battery cable first then RED bat- Do not attempt to enter the engine when changing oil. • Remove yellow cap from tractor. • Rinse the battery with plain water and dry. • Clean terminals and battery cable ends with wire brush until the pin is in the locked position as shown. • Remove the drain tube and replace the cap onto to...
... can cause the battery to "leak" power. • Disconnect BLACK battery cable first then RED bat- Do not attempt to enter the engine when changing oil. • Remove yellow cap from tractor. • Rinse the battery with plain water and dry. • Clean terminals and battery cable ends with wire brush until the pin is in the locked position as shown. • Remove the drain tube and replace the cap onto to...
User Manual
Page 17
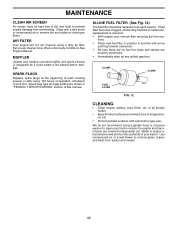
... FUEL FILTER 00667 FIG. 12 CLEANING • Clean engine, battery, seat, finish, etc. We do not recommend using a dirty air filter. Clean with a wire brush or compressed air to carburetor, replacement is required. • With engine cool, remove filter and plug fuel line sections. • Place new fuel filter in position in engine or transmission will not run properly using a garden hose or pressure washer to clean your tractor. Water in fuel line with automotive type wax. See Engine Manual. Service air...
... FUEL FILTER 00667 FIG. 12 CLEANING • Clean engine, battery, seat, finish, etc. We do not recommend using a dirty air filter. Clean with a wire brush or compressed air to carburetor, replacement is required. • With engine cool, remove filter and plug fuel line sections. • Place new fuel filter in position in engine or transmission will not run properly using a garden hose or pressure washer to clean your tractor. Water in fuel line with automotive type wax. See Engine Manual. Service air...
User Manual
Page 18
... mower out from spark plug and place wire where it cannot come in "DISENGAGED" position. • Turn ignition key to chassis bracket and secure with plug. FLAT WASHER CLUTCH SPRING SMALL RETAINER SPRING CLUTCH SPRING RETAINER SPRING ANTI-SWAY BAR COLLAR SMALL RETAINER SPRING SUSPENSION ARMS 38 42 SQUARE HOLE ENGINE PULLEY FRONT LINK RETAINER SPRINGS (BOTH SIDES) HOUSING GUIDE LARGE RETAINER SPRING 02695 BRACKET FIG. 13 18 DEFLECTOR SHIELD SERVICE AND ADJUSTMENTS WARNING...
... mower out from spark plug and place wire where it cannot come in "DISENGAGED" position. • Turn ignition key to chassis bracket and secure with plug. FLAT WASHER CLUTCH SPRING SMALL RETAINER SPRING CLUTCH SPRING RETAINER SPRING ANTI-SWAY BAR COLLAR SMALL RETAINER SPRING SUSPENSION ARMS 38 42 SQUARE HOLE ENGINE PULLEY FRONT LINK RETAINER SPRINGS (BOTH SIDES) HOUSING GUIDE LARGE RETAINER SPRING 02695 BRACKET FIG. 13 18 DEFLECTOR SHIELD SERVICE AND ADJUSTMENTS WARNING...

User Manual
Page 20
... brake needs to be checked and adjusted. Readjust if necessary. Park the tractor on a level, dry concrete or paved surface, depress clutch/brake pedal all the way down and engage parking brake. • Place gear shift lever in neutral (N) position. BELT INSTALLATION • Work new belt around both mandrel pulleys and idler pulleys. • Pull belt away from rear deck bracket by removing retainer spring. • Work belt off both mandrel pulleys and idler pulleys. • Install new belt...
... brake needs to be checked and adjusted. Readjust if necessary. Park the tractor on a level, dry concrete or paved surface, depress clutch/brake pedal all the way down and engage parking brake. • Place gear shift lever in neutral (N) position. BELT INSTALLATION • Work new belt around both mandrel pulleys and idler pulleys. • Pull belt away from rear deck bracket by removing retainer spring. • Work belt off both mandrel pulleys and idler pulleys. • Install new belt...

User Manual
Page 21
.... • Replace axle cover. ENGINE PULLEY CLUTCHING IDLER STATIONARY IDLER FRONT WHEEL TOE-IN/CAMBER The front wheel toe-in all pulley grooves and inside all belt guides and keepers. • Remove belt from stationary idler and clutching idler. • Remove belt downward from your battery is too weak to start the engine, it should be purchased from around engine pulley. • Pull belt slack toward front of tractor and roll around batteries. 00811...
.... • Replace axle cover. ENGINE PULLEY CLUTCHING IDLER STATIONARY IDLER FRONT WHEEL TOE-IN/CAMBER The front wheel toe-in all pulley grooves and inside all belt guides and keepers. • Remove belt from stationary idler and clutching idler. • Remove belt downward from your battery is too weak to start the engine, it should be purchased from around engine pulley. • Pull belt slack toward front of tractor and roll around batteries. 00811...

User Manual
Page 24
... the tractor with new spark plug(s). placement instructions in the Service and Adjustments section of this manual). • Inspect and replace belts, if necessary (See belt re- Rust and/or dirt in the fuel tank or permanent damage may require recharging. • To help prevent corrosion and power leakage during storage. Replace if necessary. • Touch up all nuts, bolts and screws are empty. • Never use plastic. ACIDIC GAS...
... the tractor with new spark plug(s). placement instructions in the Service and Adjustments section of this manual). • Inspect and replace belts, if necessary (See belt re- Rust and/or dirt in the fuel tank or permanent damage may require recharging. • To help prevent corrosion and power leakage during storage. Replace if necessary. • Touch up all nuts, bolts and screws are empty. • Never use plastic. ACIDIC GAS...

User Manual
Page 25
... part(s). 1. Replace blade. Engine flooded. 4. Check all wiring. 7. CORRECTION 1. Replace spark plug. 5. Stale or dirty fuel. 6. Faulty solenoid or starter. 1. Faulty spark plug. 7. TROUBLESHOOTING POINTS PROBLEM Will not start 1. Dirty fuel filter. 7. Engine valves out of grass, leaves and trash under mower. 4. Depress clutch/brake pedal. 2. Recharge or replace battery. 4. Engine clicks but will not turn over 1. Dirty air filter. 5. Adjust throttle control. 3. Clean and regap or change oil. 6. Excessive vibration 1. Tighten loose part...
... part(s). 1. Replace blade. Engine flooded. 4. Check all wiring. 7. CORRECTION 1. Replace spark plug. 5. Stale or dirty fuel. 6. Faulty solenoid or starter. 1. Faulty spark plug. 7. TROUBLESHOOTING POINTS PROBLEM Will not start 1. Dirty fuel filter. 7. Engine valves out of grass, leaves and trash under mower. 4. Depress clutch/brake pedal. 2. Recharge or replace battery. 4. Engine clicks but will not turn over 1. Dirty air filter. 5. Adjust throttle control. 3. Clean and regap or change oil. 6. Excessive vibration 1. Tighten loose part...

User Manual
Page 26
...1. Improper blades used. 11. Tighten blade bolt. 7. Clean around mandrels. 1. Poor cable connections. 3. Engine throttle control not set at "SLOW" position for proper air pressure. 6. Clogged mower deck vent holes from buildup of grass, leaves and trash under mower. 4. Worn, bent or loose blade. 7. Headlight(s) not working (if so equipped) 1. Replace bulb(s) or lamp(s). 3. Clean underside of mower housing. 8. Check tires for 30 seconds before stopping engine. 26 Bulb(s) or lamp(s) burned out. 3. Faulty light switch. 4. Turn switch "ON...
...1. Improper blades used. 11. Tighten blade bolt. 7. Clean around mandrels. 1. Poor cable connections. 3. Engine throttle control not set at "SLOW" position for proper air pressure. 6. Clogged mower deck vent holes from buildup of grass, leaves and trash under mower. 4. Worn, bent or loose blade. 7. Headlight(s) not working (if so equipped) 1. Replace bulb(s) or lamp(s). 3. Clean underside of mower housing. 8. Check tires for 30 seconds before stopping engine. 26 Bulb(s) or lamp(s) burned out. 3. Faulty light switch. 4. Turn switch "ON...
User Manual
Page 36
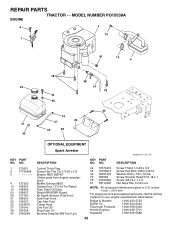
... DESCRIPTION Control Th/ch Flag Screw Hex Thd Cut 1/4-20 x 1/2 Engine, B&S 282H07 (Order parts from engine manufacturer) Muffler Exhaust B&S Gasket Eng 1 313 Id Tin Plated Tube Drain Oil Easy Shield BRN/DBR Guard Kit Spark Arrestor (Flat Scrn) Tank Fuel Front Cap Asm Fuel Clamp Hose Line Fuel 20" Plug Drain Oil Bushing Snap Nyl Blk Fuel Line KEY PART NO. inches 1 inch = 25.4 mm For engine service and replacement parts, call the toll free number for your engine manufacturer listed below...
... DESCRIPTION Control Th/ch Flag Screw Hex Thd Cut 1/4-20 x 1/2 Engine, B&S 282H07 (Order parts from engine manufacturer) Muffler Exhaust B&S Gasket Eng 1 313 Id Tin Plated Tube Drain Oil Easy Shield BRN/DBR Guard Kit Spark Arrestor (Flat Scrn) Tank Fuel Front Cap Asm Fuel Clamp Hose Line Fuel 20" Plug Drain Oil Bushing Snap Nyl Blk Fuel Line KEY PART NO. inches 1 inch = 25.4 mm For engine service and replacement parts, call the toll free number for your engine manufacturer listed below...
User Manual
Page 38
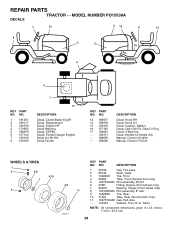
..., Battery Decal, Oper Sdl P/L Gear Dr Eng Decal, V-Belt Sch. REPAIR PARTS TRACTOR - - Decal, Handle Lft Height Adj. NO. 1 181251 2 189117 3 184769 4 170563 5 188979 6 157140 7 158168 9 158166 1 17 DESCRIPTION Decal, Clutch/Brake Eng/Fr Decal, Replacement Decal, Engine HP Decal Warning Decal, SDPNL Decal, Fender Danger English Decal Ins Str Wh Decal Fender KEY PART NO. NO. inches 1 inch = 25.4 mm 38 Manual, Owner's English Manual, Owner's French WHEELS & TIRES...
..., Battery Decal, Oper Sdl P/L Gear Dr Eng Decal, V-Belt Sch. REPAIR PARTS TRACTOR - - Decal, Handle Lft Height Adj. NO. 1 181251 2 189117 3 184769 4 170563 5 188979 6 157140 7 158168 9 158166 1 17 DESCRIPTION Decal, Clutch/Brake Eng/Fr Decal, Replacement Decal, Engine HP Decal Warning Decal, SDPNL Decal, Fender Danger English Decal Ins Str Wh Decal Fender KEY PART NO. NO. inches 1 inch = 25.4 mm 38 Manual, Owner's English Manual, Owner's French WHEELS & TIRES...
User Manual
Page 41
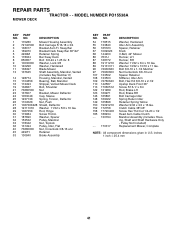
REPAIR PARTS TRACTOR - - Clutch Cable 38"/46" Screw Hex Thd Cut 1/4-20 x 1/2 Head Asm Cable Clutch Mandrel Assembly (Includes Housing, Shaft and Shaft Hardware Only - inches 1 inch = 25.4 mm 41 DESCRIPTION 1 170280 Mower Housing Assembly 2 72140506 Bolt Carriage 5/16-18 x 3/4 3 138017 Bracket Asm Fr. Washer 13/32 x 13/16 x 11 Ga. Pulley Not Included) Replacement Mower, Complete NOTE: All component dimensions given in U.S. MODEL NUMBER PO15538A MOWER DECK KEY PART NO. NO. 54 178515 55 133840 56 165723 67 106932X 68...
REPAIR PARTS TRACTOR - - Clutch Cable 38"/46" Screw Hex Thd Cut 1/4-20 x 1/2 Head Asm Cable Clutch Mandrel Assembly (Includes Housing, Shaft and Shaft Hardware Only - inches 1 inch = 25.4 mm 41 DESCRIPTION 1 170280 Mower Housing Assembly 2 72140506 Bolt Carriage 5/16-18 x 3/4 3 138017 Bracket Asm Fr. Washer 13/32 x 13/16 x 11 Ga. Pulley Not Included) Replacement Mower, Complete NOTE: All component dimensions given in U.S. MODEL NUMBER PO15538A MOWER DECK KEY PART NO. NO. 54 178515 55 133840 56 165723 67 106932X 68...


