User Manual
Page 2
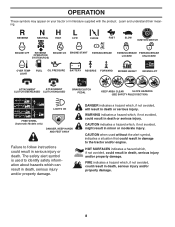
... the blades and proceed slowly straight down and behind before storage. Operate only at all times. • Only allow the mower deck to plow leaves or other reproductive harm. WARNING Battery posts, terminals and related accessories contain lead and lead compounds, chemicals...set parking brake, stop before dismounting. • Disengage blades when not mowing. These operators should evaluate their ability to operate the riding mower safely enough to a complete stop engine, and remove keys before cleaning the machine, removing the grass catcher, or unclogging the discharge chute...
... the blades and proceed slowly straight down and behind before storage. Operate only at all times. • Only allow the mower deck to plow leaves or other reproductive harm. WARNING Battery posts, terminals and related accessories contain lead and lead compounds, chemicals...set parking brake, stop before dismounting. • Disengage blades when not mowing. These operators should evaluate their ability to operate the riding mower safely enough to a complete stop engine, and remove keys before cleaning the machine, removing the grass catcher, or unclogging the discharge chute...
User Manual
Page 3
.... They may fall off and be seriously injured or interfere with safety devices. Never assume that has a hitch designed for Ride-On Mowers III. TOWING • Tow only with safe machine operation. Allow machine to stop or shift while on the slope. • Avoid...slope. Repair, if necessary, before and while backing. • Never carry children, even with manufacturer's recommended parts, when necessary. • Mower blades are often attracted to the presence of the mowing area and in safe working condition. • Never tamper with safe machine operation. Stop...
.... They may fall off and be seriously injured or interfere with safety devices. Never assume that has a hitch designed for Ride-On Mowers III. TOWING • Tow only with safe machine operation. Allow machine to stop or shift while on the slope. • Avoid...slope. Repair, if necessary, before and while backing. • Never carry children, even with manufacturer's recommended parts, when necessary. • Mower blades are often attracted to the presence of the mowing area and in safe working condition. • Never tamper with safe machine operation. Stop...
User Manual
Page 7
...adjusted comfortably and tightened securely. ✓ All tires are routed correctly. Be sure they are shown for leveling). ✓ Check mower and drive belts. CHECK TIRE PRESSURE The tires on seat pan and assemble shoulder bolt. Be sure the area in front of ...position. • Releaseparkingbrakebydepressingclutch/brakepedal. • Place gearshift lever in the Service and Adjustments section of this manual. See "TO LEVEL MOWER HOUSING" in neutral (N) position. • Roll tractor forward off the skid. SEAT PAN SHOULDER BOLT SEAT 00835 ADJUSTMENT KNOB FLAT WASHER...
...adjusted comfortably and tightened securely. ✓ All tires are routed correctly. Be sure they are shown for leveling). ✓ Check mower and drive belts. CHECK TIRE PRESSURE The tires on seat pan and assemble shoulder bolt. Be sure the area in front of ...position. • Releaseparkingbrakebydepressingclutch/brakepedal. • Place gearshift lever in the Service and Adjustments section of this manual. See "TO LEVEL MOWER HOUSING" in neutral (N) position. • Roll tractor forward off the skid. SEAT PAN SHOULDER BOLT SEAT 00835 ADJUSTMENT KNOB FLAT WASHER...
User Manual
Page 8
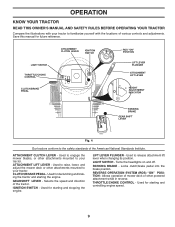
... OPERATION SYSTEM (ROS) ENGINE ON ENGINE START PARKING BRAKE PARKING BRAKE PARKING BRAKE LOCKED UNLOCKED OVER TEMP LIGHT FUEL OIL PRESSURE BATTERY REVERSE FORWARD MOWER HEIGHT 15 MOWER LIFT 15 ATTACHMENT ATTACHMENT CLUTCH DISENGAGED CLUTCH ENGAGED BRAKE/CLUTCH PEDAL KEEP AREA CLEAR SLOPE HAZARDS (SEE SAFETY RULES SECTION) LIGHTS ON FREE WHEEL...
... OPERATION SYSTEM (ROS) ENGINE ON ENGINE START PARKING BRAKE PARKING BRAKE PARKING BRAKE LOCKED UNLOCKED OVER TEMP LIGHT FUEL OIL PRESSURE BATTERY REVERSE FORWARD MOWER HEIGHT 15 MOWER LIFT 15 ATTACHMENT ATTACHMENT CLUTCH DISENGAGED CLUTCH ENGAGED BRAKE/CLUTCH PEDAL KEEP AREA CLEAR SLOPE HAZARDS (SEE SAFETY RULES SECTION) LIGHTS ON FREE WHEEL...
User Manual
Page 9
...ADJUSTMENT INDICATOR PARKING BRAKE GEAR SHIFT LEVER 02829 Fig. 4 Our tractors conform to your tractor. Selects the speed and direction of mower deck or other attachments mounted to release attachment lift lever when changing its position. Locks clutch/brake pedal into the brake position....for declutching and braking the tractor and starting and controlling engine speed. 9 ATTACHMENT CLUTCH LEVER - Used to raise, lower, and adjust the mower deck or other powered attachment while in reverse. REVERSE OPERATION SYSTEM (ROS) "ON" POSITION - Turns the headlights on and off. Used ...
...ADJUSTMENT INDICATOR PARKING BRAKE GEAR SHIFT LEVER 02829 Fig. 4 Our tractors conform to your tractor. Selects the speed and direction of mower deck or other attachments mounted to release attachment lift lever when changing its position. Locks clutch/brake pedal into the brake position....for declutching and braking the tractor and starting and controlling engine speed. 9 ATTACHMENT CLUTCH LEVER - Used to raise, lower, and adjust the mower deck or other powered attachment while in reverse. REVERSE OPERATION SYSTEM (ROS) "ON" POSITION - Turns the headlights on and off. Used ...
User Manual
Page 10
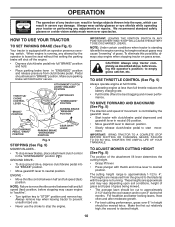
...lawns, mow often and after moderate growth. • For best cutting performance, grass over spectacles. GROUND DRIVE - • To stop mower blades, place attachment clutch control in severe eye damage. ENGINE - • Move throttle control between half and full speed (fast) position... BRAKE "ENGAGED" POSITION CLUTCH/BRAKE PEDAL "DRIVE" POSITION PARKING BRAKE "DISENGAGED" POSITION GEAR SHIFT LEVER Fig. 5 STOPPING (See Fig. 5) MOWER BLADES - • To stop ground drive, depress clutch/brake pedal into full "BRAKE" position and hold tractor secure. The heights are approximate...
...lawns, mow often and after moderate growth. • For best cutting performance, grass over spectacles. GROUND DRIVE - • To stop mower blades, place attachment clutch control in severe eye damage. ENGINE - • Move throttle control between half and full speed (fast) position... BRAKE "ENGAGED" POSITION CLUTCH/BRAKE PEDAL "DRIVE" POSITION PARKING BRAKE "DISENGAGED" POSITION GEAR SHIFT LEVER Fig. 5 STOPPING (See Fig. 5) MOWER BLADES - • To stop ground drive, depress clutch/brake pedal into full "BRAKE" position and hold tractor secure. The heights are approximate...
User Manual
Page 11
..., rolling terrain or hills. • Select desired height of your tractor on a slope, is dangerous. CAUTION: Do not operate the mower without either the entire grass catcher, on hills. • If slowing is necessary, move throttle control lever to travel in reverse unless ...absolutely necessary. ROS "ON" POSITION 02828 ENGINE "ON" POSITION (NORMAL OPERATING) Fig. 6 TO OPERATE MOWER (See Fig. 7) Your tractor is absolutely necessary, push clutch/brake pedal quickly to brake position and engage parking brake. • Move gearshift ...
..., rolling terrain or hills. • Select desired height of your tractor on a slope, is dangerous. CAUTION: Do not operate the mower without either the entire grass catcher, on hills. • If slowing is necessary, move throttle control lever to travel in reverse unless ...absolutely necessary. ROS "ON" POSITION 02828 ENGINE "ON" POSITION (NORMAL OPERATING) Fig. 6 TO OPERATE MOWER (See Fig. 7) Your tractor is absolutely necessary, push clutch/brake pedal quickly to brake position and engage parking brake. • Move gearshift ...
User Manual
Page 13
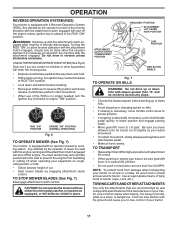
After one or two rounds, mow in the opposite direction making left hand side of the tractor. Make first cut area to the right of mower should be used for best mowing performance. the second to assure better mowing performance and proper discharge of cut . Have the cut relatively high; Regulate ...ground speed by turning to the right so that will suit the terrain and give the mower cutting performance as well as the quality of material. Fig. 8 • If grass is extremely tall, it is attached to tractor. •...
After one or two rounds, mow in the opposite direction making left hand side of the tractor. Make first cut area to the right of mower should be used for best mowing performance. the second to assure better mowing performance and proper discharge of cut . Have the cut relatively high; Regulate ...ground speed by turning to the right so that will suit the terrain and give the mower cutting performance as well as the quality of material. Fig. 8 • If grass is extremely tall, it is attached to tractor. •...
User Manual
Page 14
... USE Check Brake Operation T Check Tire Pressure R Check Operator Presence & ROS Systems A Check for Loose Fasteners C Check/Replace Mower Blades T Lubrication Chart 0 Check Battery Level R Clean Battery and Terminals Check Transaxle Cooling Check Mower Levelness Check V-Belts Check Engine Oil Level Change Engine Oil (with maintenance-free battery. Change more often when...
... USE Check Brake Operation T Check Tire Pressure R Check Operator Presence & ROS Systems A Check for Loose Fasteners C Check/Replace Mower Blades T Lubrication Chart 0 Check Battery Level R Clean Battery and Terminals Check Transaxle Cooling Check Mower Levelness Check V-Belts Check Engine Oil Level Change Engine Oil (with maintenance-free battery. Change more often when...
User Manual
Page 15
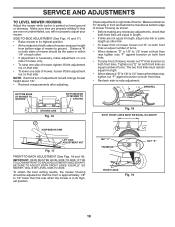
...pedal is fully depressed, and the attachment clutch control is not necessary. Adding or checking level of your warranty. BLADE CARE For best results mower blades must be kept sharp. OPERATOR PRESENCE SYSTEM AND REVERSE OPERATION SYSTEM (ROS) (See Fig. 9) Be sure operator presence and reverse ... and prevent flat tires due to slow leaks, tire sealant may cause tire damage. BLADE REMOVAL (See Fig. 10) • Raise mower to highest position to allow access to leave the seat should never operate unless the operator is sufficient for proper PSI). • Keep tires...
...pedal is fully depressed, and the attachment clutch control is not necessary. Adding or checking level of your warranty. BLADE CARE For best results mower blades must be kept sharp. OPERATOR PRESENCE SYSTEM AND REVERSE OPERATION SYSTEM (ROS) (See Fig. 9) Be sure operator presence and reverse ... and prevent flat tires due to slow leaks, tire sealant may cause tire damage. BLADE REMOVAL (See Fig. 10) • Raise mower to highest position to allow access to leave the seat should never operate unless the operator is sufficient for proper PSI). • Keep tires...
User Manual
Page 17
... carburetor, replacement is shown in engine or transmission will not run properly using a garden hose or pressure washer to prevent engine damage from tractor and mower. 02744 Fig. 13 17 MAINTENANCE CLEAN AIR SCREEN Air screen must be replaced once each mowing season or after every 100 hours of use, whichever...
... carburetor, replacement is shown in engine or transmission will not run properly using a garden hose or pressure washer to prevent engine damage from tractor and mower. 02744 Fig. 13 17 MAINTENANCE CLEAN AIR SCREEN Air screen must be replaced once each mowing season or after every 100 hours of use, whichever...
User Manual
Page 18
...• Place gearshift lever in neutral position. • Place attachment clutch in "DISENGAGED" position. • Turn ignition key to raise suspension arms. Slide mower out from spark plug and place wire where it cannot come in "DISENGAGED" position. • Move attachment lift lever forward to lower...on idler pulley bolt and secure with small retainer spring. • Install belt onto engine pulley. IMPORTANT: IF AN ATTACHMENT OTHER THAN THE MOWER DECK IS TO BE MOUNTED ON THE TRACTOR, REMOVE THE FRONT LINKS AND HOOK THE CLUTCH SPRING INTO SQUARE HOLE IN FRAME. SMALL RETAINER SPRING...
...• Place gearshift lever in neutral position. • Place attachment clutch in "DISENGAGED" position. • Turn ignition key to raise suspension arms. Slide mower out from spark plug and place wire where it cannot come in "DISENGAGED" position. • Move attachment lift lever forward to lower...on idler pulley bolt and secure with small retainer spring. • Install belt onto engine pulley. IMPORTANT: IF AN ATTACHMENT OTHER THAN THE MOWER DECK IS TO BE MOUNTED ON THE TRACTOR, REMOVE THE FRONT LINKS AND HOOK THE CLUTCH SPRING INTO SQUARE HOLE IN FRAME. SMALL RETAINER SPRING...
User Manual
Page 19
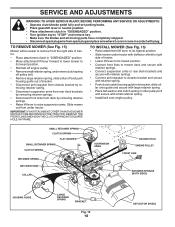
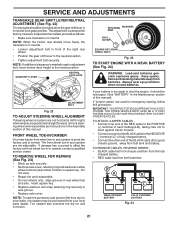
...FRONT-TO-BACK ADJUSTMENT (See Figs. 18 and 19) IMPORTANT: DECK MUST BE LEVEL SIDE-TO-SIDE. SERVICE AND ADJUSTMENTS TO LEVEL MOWER HOUSING Adjust the mower while tractor is parked on both front links an equal number of turns. Make sure tires are properly inflated If tires are not equal... rear, tighten nut "F" against trunnion on both front links are equal in length. • When distance "D" is necessary, make adjustment on one side of mower only. • To raise one side of tractor. Tighten nut "E" on level ground or driveway. The two front links must remain equal in length. ...
...FRONT-TO-BACK ADJUSTMENT (See Figs. 18 and 19) IMPORTANT: DECK MUST BE LEVEL SIDE-TO-SIDE. SERVICE AND ADJUSTMENTS TO LEVEL MOWER HOUSING Adjust the mower while tractor is parked on both front links an equal number of turns. Make sure tires are properly inflated If tires are not equal... rear, tighten nut "F" against trunnion on both front links are equal in length. • When distance "D" is necessary, make adjustment on one side of mower only. • To raise one side of tractor. Tighten nut "E" on level ground or driveway. The two front links must remain equal in length. ...
User Manual
Page 20
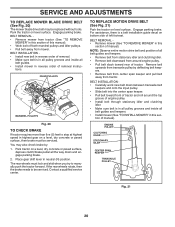
...must be serviced. NOTE: Observe entire motion drive belt and position of all belt guides and keepers. • Install mower (See "TO INSTALL MOWER" in reverse order of removal instruc- Remove belt upwards from transaxle pulley by : 1. You may be replaced without ...tools. BELT REMOVAL • Remove mower (See "TO REMOVE MOWER" in neutral (N) position. BELT REMOVAL • Remove mower from mower. Engage parking brake. tions. ENGINE PULLEY CLUTCHING IDLER STATIONARY IDLER CENTER SPAN KEEPER TRANSAXLE PULLEY...
...must be serviced. NOTE: Observe entire motion drive belt and position of all belt guides and keepers. • Install mower (See "TO INSTALL MOWER" in reverse order of removal instruc- Remove belt upwards from transaxle pulley by : 1. You may be replaced without ...tools. BELT REMOVAL • Remove mower (See "TO REMOVE MOWER" in neutral (N) position. BELT REMOVAL • Remove mower from mower. Engage parking brake. tions. ENGINE PULLEY CLUTCHING IDLER STATIONARY IDLER CENTER SPAN KEEPER TRANSAXLE PULLEY...
User Manual
Page 21
...; BLACK cable first from chassis and then from the fully charged battery. • RED cable last from batteries. NOTE: When the tractor rear wheels move mower deck height to slow leaks, tire sealant may be purchased from fuel tank and battery. Always wear eye protection when around batteries. The front wheel...
...; BLACK cable first from chassis and then from the fully charged battery. • RED cable last from batteries. NOTE: When the tractor rear wheels move mower deck height to slow leaks, tire sealant may be purchased from fuel tank and battery. Always wear eye protection when around batteries. The front wheel...
User Manual
Page 23
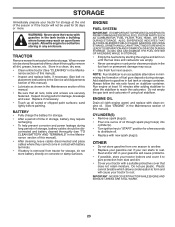
When mower is to be disconnected and battery cleaned thoroughly (see "TO CLEAN BATTERY AND TERMINALS" in minimizing the formation of oil through spark plug hole(s) into ... WHILE IN STORAGE. • Empty the fuel tank by starting the engine and let it to give protection from tractor for winter storage. TRACTOR Remove mower from dust and dirt. • Cover your can if your tractor with battery terminals. • If battery is an acceptable alternative in the Maintenance section...
When mower is to be disconnected and battery cleaned thoroughly (see "TO CLEAN BATTERY AND TERMINALS" in minimizing the formation of oil through spark plug hole(s) into ... WHILE IN STORAGE. • Empty the fuel tank by starting the engine and let it to give protection from tractor for winter storage. TRACTOR Remove mower from dust and dirt. • Cover your can if your tractor with battery terminals. • If battery is an acceptable alternative in the Maintenance section...

User Manual
Page 24
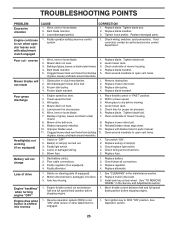
.... 2. See "TO START ENGINE" in fuel. 8. Check/replace solenoid or starter. 1. Clean underside of grass, leaves and trash under mower. 4. Connect and tighten spark plug wire. 11. Clean/replace muffler. 13. Water in Operation section. 3. Clean/replace air filter. 2.... "To Adjust Carburetor" in Service Adjustments 15. Check all wiring. 4. Replace fuel filter. 8. Corroded battery terminals. 6. Build-up of mower housing. 4. Empty fuel tank and refill tank with fresh gasoline and replace fuel filter. 10. See "To Adjust Carburetor" in Service Adjustments...
.... 2. See "TO START ENGINE" in fuel. 8. Check/replace solenoid or starter. 1. Clean underside of grass, leaves and trash under mower. 4. Connect and tighten spark plug wire. 11. Clean/replace muffler. 13. Water in Operation section. 3. Clean/replace air filter. 2.... "To Adjust Carburetor" in Service Adjustments 15. Check all wiring. 4. Replace fuel filter. 8. Corroded battery terminals. 6. Build-up of mower housing. 4. Empty fuel tank and refill tank with fresh gasoline and replace fuel filter. 10. See "To Adjust Carburetor" in Service Adjustments...
User Manual
Page 25
...Obstruction in the maintenance section. 2. Replace blade mandrel. Travel speed too fast. 2. Level mower deck. 5. Tighten blade bolt. 7. Reinstall blades sharp edge down. 10. Clogged mower deck vent holes from buildup of grass, leaves, and trash around mandrels. 1. Loose or ... Worn, bent or loose blade. 2. Remove obstruction. 2. Allow grass to slower speed. 3. Check tires for proper air pressure. 6. Replace mower drive belt. 9. Replace with attachment clutch engaged 1. Check/replace light switch. 4. Faulty regulator (if so equipped). 4. Faulty alternator. 1. ...
...Obstruction in the maintenance section. 2. Replace blade mandrel. Travel speed too fast. 2. Level mower deck. 5. Tighten blade bolt. 7. Reinstall blades sharp edge down. 10. Clogged mower deck vent holes from buildup of grass, leaves, and trash around mandrels. 1. Loose or ... Worn, bent or loose blade. 2. Remove obstruction. 2. Allow grass to slower speed. 3. Check tires for proper air pressure. 6. Replace mower drive belt. 9. Replace with attachment clutch engaged 1. Check/replace light switch. 4. Faulty regulator (if so equipped). 4. Faulty alternator. 1. ...

Parts Manual
Page 2
... this manual as a guide to assemble or disassemble the tractor. therefore, it is designed to provide the customer with a means to more readily identify them. "PO14542LT (96012011900)" • Part Number • Part Description TABLE OF CONTENTS SCHEMATIC ...3 ELECTRICAL ...4-5 CHASSIS ...6-7 DRIVE...8-9 ENGINE ...10-11 STEERING ...12-13 SEAT ...14 DECALS...15...
... this manual as a guide to assemble or disassemble the tractor. therefore, it is designed to provide the customer with a means to more readily identify them. "PO14542LT (96012011900)" • Part Number • Part Description TABLE OF CONTENTS SCHEMATIC ...3 ELECTRICAL ...4-5 CHASSIS ...6-7 DRIVE...8-9 ENGINE ...10-11 STEERING ...12-13 SEAT ...14 DECALS...15...

Parts Manual
Page 7
MODEL NUMBER PO14542LT (96012011900), PRODUCT NO. 960 12 01-19 CHASSIS KEY PART NO. Pivot Mower 39 532 18 75-68 Bracket Pivot 64 532 15 47-98 Dash Lower 142 532 17 57-02 Plate Reinforcement 145 532 40 91-...
MODEL NUMBER PO14542LT (96012011900), PRODUCT NO. 960 12 01-19 CHASSIS KEY PART NO. Pivot Mower 39 532 18 75-68 Bracket Pivot 64 532 15 47-98 Dash Lower 142 532 17 57-02 Plate Reinforcement 145 532 40 91-...


