User Manual
Page 7
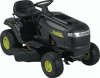
.... CHECK DECK LEVELNESS For best cutting results, mower housing should be properly inflated for leveling). ✓ Check mower and drive belts. Be sure they are routed properly around pulleys and inside all connections are still secure and wires are shown for replacing motion ...at proper level. ✓ Fuel tank is filled with fresh, clean, regular unleaded gasoline. ✓ Become familiar with the instructions that the belts are properly inflated. (For shipping purposes, the tires were overinflated at the factory for shipping purposes. See that are properly clamped. WARNING: ...
.... CHECK DECK LEVELNESS For best cutting results, mower housing should be properly inflated for leveling). ✓ Check mower and drive belts. Be sure they are routed properly around pulleys and inside all connections are still secure and wires are shown for replacing motion ...at proper level. ✓ Fuel tank is filled with fresh, clean, regular unleaded gasoline. ✓ Become familiar with the instructions that the belts are properly inflated. (For shipping purposes, the tires were overinflated at the factory for shipping purposes. See that are properly clamped. WARNING: ...
User Manual
Page 14
... Adjustments section of this manual. • At least once a year you should replace the spark plug, clean or replace air filter, and check blades and belts for wear. IF YOU FEEL THEY MUST BE LUBRICATED, USE ONLY A DRY, POWDERED GRAPHITE TYPE 14 LUBRICANT SPARINGLY. Replace blades more often when operating in... Systems A Check for Loose Fasteners C Check/Replace Mower Blades T Lubrication Chart 0 Check Battery Level R Clean Battery and Terminals Check Transaxle Cooling Check Mower Levelness Check V-Belts Check Engine Oil Level Change Engine Oil (with maintenance-free battery.
... Adjustments section of this manual. • At least once a year you should replace the spark plug, clean or replace air filter, and check blades and belts for wear. IF YOU FEEL THEY MUST BE LUBRICATED, USE ONLY A DRY, POWDERED GRAPHITE TYPE 14 LUBRICANT SPARINGLY. Replace blades more often when operating in... Systems A Check for Loose Fasteners C Check/Replace Mower Blades T Lubrication Chart 0 Check Battery Level R Clean Battery and Terminals Check Transaxle Cooling Check Mower Levelness Check V-Belts Check Engine Oil Level Change Engine Oil (with maintenance-free battery.
User Manual
Page 16
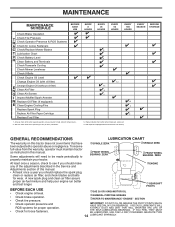
Check the crankcase oil level before oil change. MAINTENANCE V-BELTS Check V-belts for checking level. Replace belts if they will drain more freely when warm. • Catch oil in a suitable container. • Remove oil fill cap/dipstick. TRANSAXLE MAINTENANCE Keep transaxle free ... at "FULL" line on oil. Do not attempt to catch oil directly under oil drain hole (drain hole may be hot. Do not overfill. The belts are not adjustable. ENGINE LUBRICATION Only use high pressure water or steam to your engine oil level more than 13 Ft-Lb's) • Refill engine...
Check the crankcase oil level before oil change. MAINTENANCE V-BELTS Check V-belts for checking level. Replace belts if they will drain more freely when warm. • Catch oil in a suitable container. • Remove oil fill cap/dipstick. TRANSAXLE MAINTENANCE Keep transaxle free ... at "FULL" line on oil. Do not attempt to catch oil directly under oil drain hole (drain hole may be hot. Do not overfill. The belts are not adjustable. ENGINE LUBRICATION Only use high pressure water or steam to your engine oil level more than 13 Ft-Lb's) • Refill engine...
User Manual
Page 18
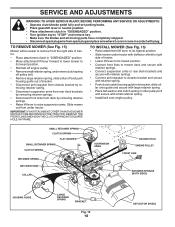
...8226; Place attachment clutch in contact with deflector shield to right side of tractor. • Lower lift lever to its lowest position. • Roll belt off engine pulley. • Remove small retainer spring, and remove clutch spring off pulley bolt. • Remove large retainer spring, slide collar off ... large retainer spring. • Place flat washer and clutch spring on idler pulley bolt and secure with small retainer spring. • Install belt onto engine pulley. IMPORTANT: IF AN ATTACHMENT OTHER THAN THE MOWER DECK IS TO BE MOUNTED ON THE TRACTOR, REMOVE THE FRONT LINKS AND...
...8226; Place attachment clutch in contact with deflector shield to right side of tractor. • Lower lift lever to its lowest position. • Roll belt off engine pulley. • Remove small retainer spring, and remove clutch spring off pulley bolt. • Remove large retainer spring, slide collar off ... large retainer spring. • Place flat washer and clutch spring on idler pulley bolt and secure with small retainer spring. • Install belt onto engine pulley. IMPORTANT: IF AN ATTACHMENT OTHER THAN THE MOWER DECK IS TO BE MOUNTED ON THE TRACTOR, REMOVE THE FRONT LINKS AND...
User Manual
Page 20
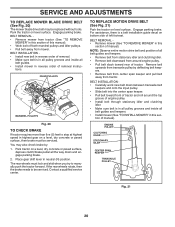
... replaced without tools. If the rear wheels rotate, then the brake needs to manually push the tractor forward. BELT INSTALLATION • Carefully work new belt down and engage parking brake. 2. BELT REMOVAL • Remove mower from tractor (See "TO REMOVE MOWER" in this sec- tions. The rear ...wheels must be serviced. Contact a qualified service center. BELT REMOVAL • Remove mower (See "TO REMOVE MOWER" in this section of removal instruc- IDLER PULLEYS MANDREL PULLEYS Fig. 20 TO CHECK ...
... replaced without tools. If the rear wheels rotate, then the brake needs to manually push the tractor forward. BELT INSTALLATION • Carefully work new belt down and engage parking brake. 2. BELT REMOVAL • Remove mower from tractor (See "TO REMOVE MOWER" in this sec- tions. The rear ...wheels must be serviced. Contact a qualified service center. BELT REMOVAL • Remove mower (See "TO REMOVE MOWER" in this section of removal instruc- IDLER PULLEYS MANDREL PULLEYS Fig. 20 TO CHECK ...
User Manual
Page 23
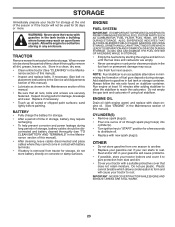
WARNING: Never store the tractor with battery terminals. • If battery is removed from one ounce of this manual). • Inspect and replace belts, if necessary (See belt re- Store in a clean, dry area. • Clean entire tractor (See "CLEANING" in the tank inside a building where fumes may reach an open flame or...
WARNING: Never store the tractor with battery terminals. • If battery is removed from one ounce of this manual). • Inspect and replace belts, if necessary (See belt re- Store in a clean, dry area. • Clean entire tractor (See "CLEANING" in the tank inside a building where fumes may reach an open flame or...
User Manual
Page 25
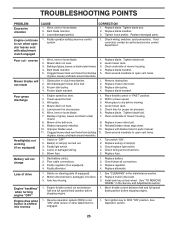
...Clogged mower deck vent holes from buildup of grass, leaves, and trash around mandrels. 1. Loose or damaged wiring. 5. Motion drive belt worn, damaged, or broken. 3. TROUBLESHOOTING POINTS PROBLEM Excessive vibration CAUSE 1. Tighten blade bolt. 2. Replace blade mandrel. 3. Replace ...damaged parts. If not corrected, contact an authorized service center/ department. Mower drive belt worn. 8. Reinstall blades sharp edge down. 10. Clean around mandrels to dry before stopping engine. 1. Faulty alternator. 1. Axle...
...Clogged mower deck vent holes from buildup of grass, leaves, and trash around mandrels. 1. Loose or damaged wiring. 5. Motion drive belt worn, damaged, or broken. 3. TROUBLESHOOTING POINTS PROBLEM Excessive vibration CAUSE 1. Tighten blade bolt. 2. Replace blade mandrel. 3. Replace ...damaged parts. If not corrected, contact an authorized service center/ department. Mower drive belt worn. 8. Reinstall blades sharp edge down. 10. Clean around mandrels to dry before stopping engine. 1. Faulty alternator. 1. Axle...
User Manual
Page 28
... within the meaning of that this Warranty, you . Transportation charges for parts or labor incurred in replacing parts, any power equipment unit or attachment are belts, blades, blade adapters, normal wear, normal adjustments, standard hardware and normal maintenance. 7. After ninety (90) days, we will replace, without charge for the movement of...
... within the meaning of that this Warranty, you . Transportation charges for parts or labor incurred in replacing parts, any power equipment unit or attachment are belts, blades, blade adapters, normal wear, normal adjustments, standard hardware and normal maintenance. 7. After ninety (90) days, we will replace, without charge for the movement of...

Parts Manual
Page 9
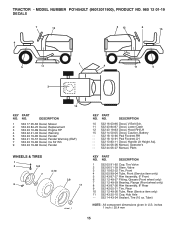
... 817 06 06-20 Screw 3/8-16 x 1-1/4 57 532 13 82-55 V-Belt Ground Drive 62 532 12 48-72 Cover Pedal Blk Round KEY PART NO. MODEL NUMBER PO14542LT (96012011900), PRODUCT NO. 960 12 01-19 DRIVE KEY PART NO. DESCRIPTION ... Flat 39 872 11 06-22 Bolt RDHD 3/8-16 unc x 2-3/4 Gr. 5 41 532 17 55-56 Keeper Belt Flat Idler 47 532 12 77-83 Pulley Idler V Groove Plastic 48 532 15 44-07 Bellcrank Asm 49 532 12 ...-92 Bolt Shoulder 5/16-18 x .561 169 532 16 55-80 Plate Fastening 170 532 18 74-14 Keeper Belt Transaxle Gear 197 532 16 96-13 Nyliner Snap-In 198 532 16 95-93 Washer Nyliner 202 872 11 06...
... 817 06 06-20 Screw 3/8-16 x 1-1/4 57 532 13 82-55 V-Belt Ground Drive 62 532 12 48-72 Cover Pedal Blk Round KEY PART NO. MODEL NUMBER PO14542LT (96012011900), PRODUCT NO. 960 12 01-19 DRIVE KEY PART NO. DESCRIPTION ... Flat 39 872 11 06-22 Bolt RDHD 3/8-16 unc x 2-3/4 Gr. 5 41 532 17 55-56 Keeper Belt Flat Idler 47 532 12 77-83 Pulley Idler V Groove Plastic 48 532 15 44-07 Bellcrank Asm 49 532 12 ...-92 Bolt Shoulder 5/16-18 x .561 169 532 16 55-80 Plate Fastening 170 532 18 74-14 Keeper Belt Transaxle Gear 197 532 16 96-13 Nyliner Snap-In 198 532 16 95-93 Washer Nyliner 202 872 11 06...
Parts Manual
Page 15
..., Ins Str Wh 9 532 43 19-86 Decal, Fender WHEELS & TIRES 1 2 5,8 4,10 7 6 3,9 11 wheel_1 KEY PART NO. NO. DESCRIPTION 10 532 16 03-96 Decal, V-Belt Sch. 11 532 43 84-87 Decal, Lower Dash 12 532 43 19-83 Decal, Hood RH/LH 15 532 14 50-05 Decal, Caution... 83-11 Decal, Handle Lft Height Adj. - - 532 44 06-26 Manual, Operator's - - 532 44 06-27 Manual, Parts KEY PART NO. TRACTOR - MODEL NUMBER PO14542LT (96012011900), PRODUCT NO. 960 12 01-19 DECALS 7 12 2 12 6 15 9 5 11 1 4 11 5 3 10 KEY PART NO. inches 1 inch = 25.4 mm 15...
..., Ins Str Wh 9 532 43 19-86 Decal, Fender WHEELS & TIRES 1 2 5,8 4,10 7 6 3,9 11 wheel_1 KEY PART NO. NO. DESCRIPTION 10 532 16 03-96 Decal, V-Belt Sch. 11 532 43 84-87 Decal, Lower Dash 12 532 43 19-83 Decal, Hood RH/LH 15 532 14 50-05 Decal, Caution... 83-11 Decal, Handle Lft Height Adj. - - 532 44 06-26 Manual, Operator's - - 532 44 06-27 Manual, Parts KEY PART NO. TRACTOR - MODEL NUMBER PO14542LT (96012011900), PRODUCT NO. 960 12 01-19 DECALS 7 12 2 12 6 15 9 5 11 1 4 11 5 3 10 KEY PART NO. inches 1 inch = 25.4 mm 15...
Parts Manual
Page 17
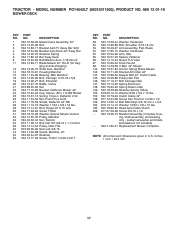
... NO. NO. inches 1 inch = 25.4 mm 17 ging and discharging) 13 532 19 28-72 Shaft Asm. MODEL NUMBER PO14542LT (96012011900), PRODUCT NO. 960 12 01-19 MOWER DECK KEY PART NO. DESCRIPTION 48 532 13 39-44 Washer, Hardened 52 532... 59 532 14 10-43 Guard TUV Idler 67 532 10 69-32 Knob Round 68 532 14 49-59 V-Belt, 42" Mower 142 532 19 57-84 Anchor Spring Brake Mower 143 532 15 71-09 Bracket Arm Idler 42..." 144 532 15 86-34 Keeper Belt 42" Clutch Cable 145 532 16 58-88 Pulley Idler Flat 146 532 17 19-77 Bolt Carriage Idler 147 ...
... NO. NO. inches 1 inch = 25.4 mm 17 ging and discharging) 13 532 19 28-72 Shaft Asm. MODEL NUMBER PO14542LT (96012011900), PRODUCT NO. 960 12 01-19 MOWER DECK KEY PART NO. DESCRIPTION 48 532 13 39-44 Washer, Hardened 52 532... 59 532 14 10-43 Guard TUV Idler 67 532 10 69-32 Knob Round 68 532 14 49-59 V-Belt, 42" Mower 142 532 19 57-84 Anchor Spring Brake Mower 143 532 15 71-09 Bracket Arm Idler 42..." 144 532 15 86-34 Keeper Belt 42" Clutch Cable 145 532 16 58-88 Pulley Idler Flat 146 532 17 19-77 Bolt Carriage Idler 147 ...
Parts Manual
Page 20
..., adjusted, operated, and maintained in accordance with a Battery, we find to 90 days from defects in replacing parts, any power equipment unit or attachment are belts, blades, blade adapters, normal wear, normal adjustments, standard hardware and normal maintenance. 7. Transportation charges for parts or labor incurred in materials and workmanship. This Warranty...
..., adjusted, operated, and maintained in accordance with a Battery, we find to 90 days from defects in replacing parts, any power equipment unit or attachment are belts, blades, blade adapters, normal wear, normal adjustments, standard hardware and normal maintenance. 7. Transportation charges for parts or labor incurred in materials and workmanship. This Warranty...

