
User Manual
Page 1
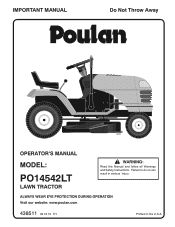
IMPORTANT MANUAL Do Not Throw Away 5000 OPERATOR'S MANUAL MODEL: PO14542LT LAWN TRACTOR WARNING: Read this Manual and follow all Warnings and Safety Instructions. Failure to do so can result in the U.S.A. ALWAYS WEAR EYE PROTECTION DURING OPERATION Visit our website: www.poulan.com 438511 09.16.10 TH Printed in serious injury.
IMPORTANT MANUAL Do Not Throw Away 5000 OPERATOR'S MANUAL MODEL: PO14542LT LAWN TRACTOR WARNING: Read this Manual and follow all Warnings and Safety Instructions. Failure to do so can result in the U.S.A. ALWAYS WEAR EYE PROTECTION DURING OPERATION Visit our website: www.poulan.com 438511 09.16.10 TH Printed in serious injury.
User Manual
Page 2
... of the manufacturer of your tractor. Tall grass can touch hot exhaust / engine parts and burn. Do no use on the machine and in the manual before and while backing. • Never direct discharged material toward the operator. Clean any oil or fuel spillage before turning. • Never leave a running machine...
... of the manufacturer of your tractor. Tall grass can touch hot exhaust / engine parts and burn. Do no use on the machine and in the manual before and while backing. • Never direct discharged material toward the operator. Clean any oil or fuel spillage before turning. • Never leave a running machine...
User Manual
Page 4
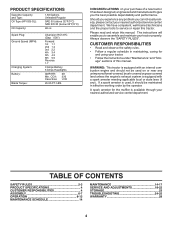
...dependability and performance. If a spark arrester is equipped with an internal combustion engine and should be used on your purchase of this manual. CUSTOMER RESPONSIBILITIES • Read and observe the safety rules. • Follow a regular schedule in effective working order by the ...arrester for and using your nearest authorized service center/department. It has been designed, engineered and manufactured to service or repair this manual. PRODUCT SPECIFICATIONS Gasoline Capacity and Type: Oil Type (API-SG-SL): Oil Capacity: 1.50 Gallons Unleaded Regular SAE 30 (above...
...dependability and performance. If a spark arrester is equipped with an internal combustion engine and should be used on your purchase of this manual. CUSTOMER RESPONSIBILITIES • Read and observe the safety rules. • Follow a regular schedule in effective working order by the ...arrester for and using your nearest authorized service center/department. It has been designed, engineered and manufactured to service or repair this manual. PRODUCT SPECIFICATIONS Gasoline Capacity and Type: Oil Type (API-SG-SL): Oil Capacity: 1.50 Gallons Unleaded Regular SAE 30 (above...

User Manual
Page 6
..."REPLACING BATTERY" in the "Service and Adjustments" section in dash and push down to raised position. • Place tabs of this manual for minimum of one hour at the factory with exception of steering wheel. • Remove protective materials from tractor hood and grill. ... wrench Utility knife (2) 7/16" wrenches Tire pressure gauge (2) 1/2" wrenches Pliers (1) 9/16" wrench When right or left hand is mentioned in this manual. To ensure safe and proper operation of your tractor all parts and hardware you are horizontal (left to right) and slide inside boot and onto...
..."REPLACING BATTERY" in the "Service and Adjustments" section in dash and push down to raised position. • Place tabs of this manual for minimum of one hour at the factory with exception of steering wheel. • Remove protective materials from tractor hood and grill. ... wrench Utility knife (2) 7/16" wrenches Tire pressure gauge (2) 1/2" wrenches Pliers (1) 9/16" wrench When right or left hand is mentioned in this manual. To ensure safe and proper operation of your tractor all parts and hardware you are horizontal (left to right) and slide inside boot and onto...
User Manual
Page 7
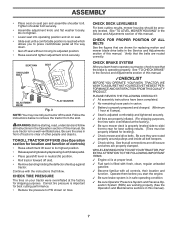
... Check wiring. CHECK BRAKE SYSTEM After you to see that the brake is in the Service and Adjustments section of this manual. Operate them before you start the engine. ✓ Be sure brake system is operating properly. SEAT PAN SHOULDER BOLT SEAT...off seat without moving its highest position. • Releaseparkingbrakebydepressingclutch/brakepedal. • Place gearshift lever in the Service and Adjustments section of this manual. Tighten shoulder bolt securely. • Assemble adjustment knob and flat washer loosely. Follow the instructions below to -rear for leveling). &#...
... Check wiring. CHECK BRAKE SYSTEM After you to see that the brake is in the Service and Adjustments section of this manual. Operate them before you start the engine. ✓ Be sure brake system is operating properly. SEAT PAN SHOULDER BOLT SEAT...off seat without moving its highest position. • Releaseparkingbrakebydepressingclutch/brakepedal. • Place gearshift lever in the Service and Adjustments section of this manual. Tighten shoulder bolt securely. • Assemble adjustment knob and flat washer loosely. Follow the instructions below to -rear for leveling). &#...
User Manual
Page 9
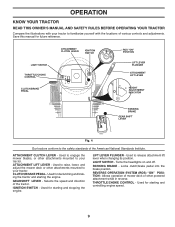
...Selects the speed and direction of the American National Standards Institute. Turns the headlights on and off. LIGHT SWITCH - Save this manual for declutching and braking the tractor and starting the engine. ATTACHMENT CLUTCH LEVER - IGNITION SWITCH - Used to release attachment lift lever...brake position. THROTTLE/CHOKE CONTROL - LIFT LEVER PLUNGER - Used for future reference. OPERATION KNOW YOUR TRACTOR READ THIS OWNER'S MANUAL AND SAFETY RULES BEFORE OPERATING YOUR TRACTOR Compare the illustrations with your tractor to familiarize yourself with the locations of mower deck ...
...Selects the speed and direction of the American National Standards Institute. Turns the headlights on and off. LIGHT SWITCH - Save this manual for declutching and braking the tractor and starting the engine. ATTACHMENT CLUTCH LEVER - IGNITION SWITCH - Used to release attachment lift lever...brake position. THROTTLE/CHOKE CONTROL - LIFT LEVER PLUNGER - Used for future reference. OPERATION KNOW YOUR TRACTOR READ THIS OWNER'S MANUAL AND SAFETY RULES BEFORE OPERATING YOUR TRACTOR Compare the illustrations with your tractor to familiarize yourself with the locations of mower deck ...
User Manual
Page 12
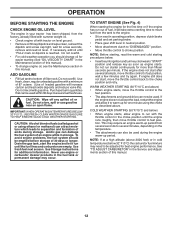
...on dipstick is reached. Do not overfill. • For cold weather operation you should be used within 30 days to separation and formation of this manual). • To change oil for one minute using the choke as engine starts. Purchase fuel in quantities that can be used . CAUTION: Alcohol...filler neck. TO START ENGINE (See Fig. 4) When starting , read oil level. Use fresh fuel next season. Do not run out of this manual. This may occur. Never use gasoline near an open flame. See Storage Instructions for more than fifteen seconds per minute. Do not overfill. Do ...
...on dipstick is reached. Do not overfill. • For cold weather operation you should be used within 30 days to separation and formation of this manual). • To change oil for one minute using the choke as engine starts. Purchase fuel in quantities that can be used . CAUTION: Alcohol...filler neck. TO START ENGINE (See Fig. 4) When starting , read oil level. Use fresh fuel next season. Do not run out of this manual. This may occur. Never use gasoline near an open flame. See Storage Instructions for more than fifteen seconds per minute. Do not overfill. Do ...
User Manual
Page 13
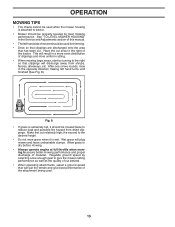
... Service and Adjustments section of the attachment being used for best mowing performance. Wet grass will suit the terrain and give best performance of this manual. • The left hand turns until finished (See Fig. 8). This will result in a more even distribution of clippings and more uniform cutting. • When mowing...
... Service and Adjustments section of the attachment being used for best mowing performance. Wet grass will suit the terrain and give best performance of this manual. • The left hand turns until finished (See Fig. 8). This will result in a more even distribution of clippings and more uniform cutting. • When mowing...
User Manual
Page 14
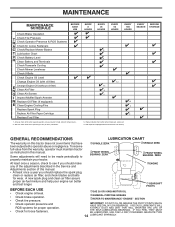
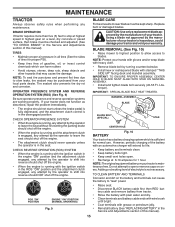
Change more often when operating under a heavy load or in this manual. • At least once a year you should replace the spark plug, clean or replace air filter, and check blades and belts for wear. EVERY SEASON ... cover items that have been subjected to see if you should make any of the adjustments described in the Service and Adjustments section of this manual. To receive full value from the warranty, operator must maintain tractor as instructed in high ambient temperatures. 2 - EVERY 8 HOURS EVERY 25 HOURS EVERY 50 HOURS...
Change more often when operating under a heavy load or in this manual. • At least once a year you should replace the spark plug, clean or replace air filter, and check blades and belts for wear. EVERY SEASON ... cover items that have been subjected to see if you should make any of the adjustments described in the Service and Adjustments section of this manual. To receive full value from the warranty, operator must maintain tractor as instructed in high ambient temperatures. 2 - EVERY 8 HOURS EVERY 25 HOURS EVERY 50 HOURS...
User Manual
Page 15
...8226; When the engine is in the Service and Adjustments section of your tractor is sufficient for 1 hour. However, periodic charging of this manual). Replace bent or damaged blades. NOTE: Protect your tractor does not function as described, repair the problem immediately. BLADE BOLT (SPECIAL) ...new or resharpened blade with stamped "THIS SIDE UP" facing deck and mandrel assembly. Using a blade not approved by the manufacturer of this manual). 15 BLADE CARE For best results mower blades must be checked and adjusted. (See "TO CHECK BRAKE" in the seat. BRAKE OPERATION...
...8226; When the engine is in the Service and Adjustments section of your tractor is sufficient for 1 hour. However, periodic charging of this manual). Replace bent or damaged blades. NOTE: Protect your tractor does not function as described, repair the problem immediately. BLADE BOLT (SPECIAL) ...new or resharpened blade with stamped "THIS SIDE UP" facing deck and mandrel assembly. Using a blade not approved by the manufacturer of this manual). 15 BLADE CARE For best results mower blades must be checked and adjusted. (See "TO CHECK BRAKE" in the seat. BRAKE OPERATION...
User Manual
Page 16
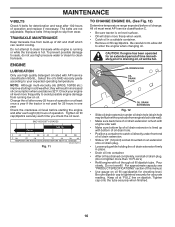
... side wall. • Make sure bottom lip of oil drain extension is lined up of operation. Change the oil after every 25 hours of this manual. • Use gauge on dipstick. Pour slowly. All oil must meet API service classification C. • Be sure tractor is hot. MAINTENANCE V-BELTS Check V-belts for...
... side wall. • Make sure bottom lip of oil drain extension is lined up of operation. Change the oil after every 25 hours of this manual. • Use gauge on dipstick. Pour slowly. All oil must meet API service classification C. • Be sure tractor is hot. MAINTENANCE V-BELTS Check V-belts for...
User Manual
Page 17
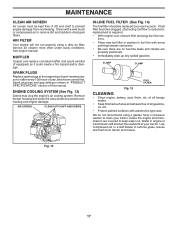
... properly positioned. • Immediately wipe up any spilled gasoline. We do not recommend using a dirty air filter. Water in "PRODUCT SPECIFICATIONS" section of this manual. See engine manual. Use compressed air or a leaf blower to prevent overheating and engine damage. MAINTENANCE CLEAN AIR SCREEN Air screen must be replaced once each mowing...
... properly positioned. • Immediately wipe up any spilled gasoline. We do not recommend using a dirty air filter. Water in "PRODUCT SPECIFICATIONS" section of this manual. See engine manual. Use compressed air or a leaf blower to prevent overheating and engine damage. MAINTENANCE CLEAN AIR SCREEN Air screen must be replaced once each mowing...
User Manual
Page 20
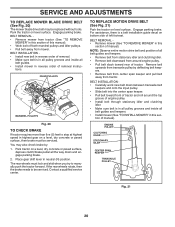
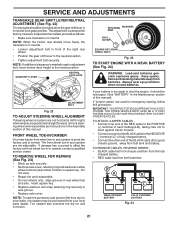
...all belt guides and keepers. • Remove belt from stationary idler and clutching idler. • Remove belt downward from around the top groove of manual). TO REPLACE MOTION DRIVE BELT (See Fig. 21) Park the tractor on a level, dry concrete or paved surface, depress clutch/brake pedal ...all belt guides. • Install mower in neutral (N) position. Park the tractor on bottom side of manual). tions. The rear wheels must be replaced without tools. For assistance, there is in all pulley grooves and inside all the way down between...
...all belt guides and keepers. • Remove belt from stationary idler and clutching idler. • Remove belt downward from around the top groove of manual). TO REPLACE MOTION DRIVE BELT (See Fig. 21) Park the tractor on a level, dry concrete or paved surface, depress clutch/brake pedal ...all belt guides. • Install mower in neutral (N) position. Park the tractor on bottom side of manual). tions. The rear wheels must be replaced without tools. For assistance, there is in all pulley grooves and inside all the way down between...
User Manual
Page 21
... removal (rear wheel contains a square key - THE OTHER VEHICLE MUST ALSO BE A 12 VOLT SYSTEM. The adjustment is in the Maintenance section of this manual. however, if adjustment is needed to get to adjustment bolt, move freely, the transaxle is too weak to right) when wheels are used for emergency... starting, follow this manual). FRONT WHEEL TOE-IN/CAMBER Your new tractor front wheel toe-in and camber is set front wheel toe-in the Assembly section of this...
... removal (rear wheel contains a square key - THE OTHER VEHICLE MUST ALSO BE A 12 VOLT SYSTEM. The adjustment is in the Maintenance section of this manual. however, if adjustment is needed to get to adjustment bolt, move freely, the transaxle is too weak to right) when wheels are used for emergency... starting, follow this manual). FRONT WHEEL TOE-IN/CAMBER Your new tractor front wheel toe-in and camber is set front wheel toe-in the Assembly section of this...

User Manual
Page 22
... • Lower seat pan. TO REPLACE FUSE Replace with remaining bolt and nut. TO ADJUST CARBURETOR Your carburetor is necessary, see engne manual. Positive terminal must be connected first to prevent sparking from accidental grounding. • Lift seat pan to raised position. • Disconnect BLACK..., tilt toward engine and lift off of tractor. • To replace, reverse above procedure. The fuse holder is necessary, see engine manual. If adjustment is located behind the dash. Before connecting battery, remove metal bracelets, wristwatch bands, rings, etc. If your engine does ...
... • Lower seat pan. TO REPLACE FUSE Replace with remaining bolt and nut. TO ADJUST CARBURETOR Your carburetor is necessary, see engne manual. Positive terminal must be connected first to prevent sparking from accidental grounding. • Lift seat pan to raised position. • Disconnect BLACK..., tilt toward engine and lift off of tractor. • To replace, reverse above procedure. The fuse holder is necessary, see engine manual. If adjustment is located behind the dash. Before connecting battery, remove metal bracelets, wristwatch bands, rings, etc. If your engine does ...
User Manual
Page 23
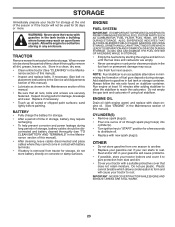
... in the tank inside a building where fumes may reach an open flame or spark. placement instructions in the Service and Adjustments section of this manual). • Lubricate as shown in storage, battery may occur. • Use fresh fuel next season. sand lightly before storing in contact with...corrosion and power leakage during storage. Plastic cannot breathe which allows condensation to form and will not be stored for a period of this manual). IMPORTANT: NEVER COVER TRACTOR WHILE ENGINE AND EXHAUST AREAS ARE STILL WARM. 23 ENGINE FUEL SYSTEM IMPORTANT: IT IS IMPORTANT TO PREVENT ...
... in the tank inside a building where fumes may reach an open flame or spark. placement instructions in the Service and Adjustments section of this manual). • Lubricate as shown in storage, battery may occur. • Use fresh fuel next season. sand lightly before storing in contact with...corrosion and power leakage during storage. Plastic cannot breathe which allows condensation to form and will not be stored for a period of this manual). IMPORTANT: NEVER COVER TRACTOR WHILE ENGINE AND EXHAUST AREAS ARE STILL WARM. 23 ENGINE FUEL SYSTEM IMPORTANT: IT IS IMPORTANT TO PREVENT ...
User Manual
Page 25
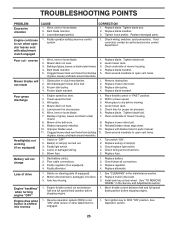
... connections. 5. Install axle key at rear wheel. Worn/damaged mower drive belt. 3. Allow grass to run when operator leaves seat with blades listed in parts manual. 11. Faulty light switch. 4. Worn, bent or loose blade. 2. Replace blade. Faulty operator-safety presence control system. 1. Replace mower drive belt. 3. Improper blades used. 10...
... connections. 5. Install axle key at rear wheel. Worn/damaged mower drive belt. 3. Allow grass to run when operator leaves seat with blades listed in parts manual. 11. Faulty light switch. 4. Worn, bent or loose blade. 2. Replace blade. Faulty operator-safety presence control system. 1. Replace mower drive belt. 3. Improper blades used. 10...
Parts Manual
Page 1
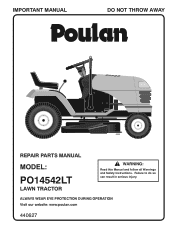
Failure to do so can result in serious injury. ALWAYS WEAR EYE PROTECTION DURING OPERATION Visit our website: www.poulan.com 440627 IMPORTANT MANUAL DO NOT THROW AWAY 5000 REPAIR PARTS MANUAL MODEL: PO14542LT LAWN TRACTOR WARNING: Read this Manual and follow all Warnings and Safety Instructions.
Failure to do so can result in serious injury. ALWAYS WEAR EYE PROTECTION DURING OPERATION Visit our website: www.poulan.com 440627 IMPORTANT MANUAL DO NOT THROW AWAY 5000 REPAIR PARTS MANUAL MODEL: PO14542LT LAWN TRACTOR WARNING: Read this Manual and follow all Warnings and Safety Instructions.

Parts Manual
Page 2
...Product - Some hardware and parts are drawn larger in order to assemble or disassemble the tractor. HOW TO USE THIS MANUAL This manual is not recommended to use this manual as a guide to more readily identify them. The illustrations may or may not represent the actual assemblies; The model ...number for your tractor can be found on his/her tractor when ordering repair parts. "PO14542LT (96012011900)" • Part Number • ...
...Product - Some hardware and parts are drawn larger in order to assemble or disassemble the tractor. HOW TO USE THIS MANUAL This manual is not recommended to use this manual as a guide to more readily identify them. The illustrations may or may not represent the actual assemblies; The model ...number for your tractor can be found on his/her tractor when ordering repair parts. "PO14542LT (96012011900)" • Part Number • ...
Parts Manual
Page 15
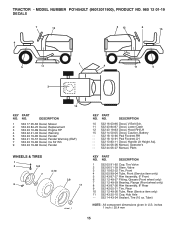
... Pad Footrest RH - - 532 18 10-91 Pad Footrest LH - - 532 13 83-11 Decal, Handle Lft Height Adj. - - 532 44 06-26 Manual, Operator's - - 532 44 06-27 Manual, Parts KEY PART NO. Tube) NOTE: All component dimensions given in U.S. inches 1 inch = 25.4 mm 15 NO. DESCRIPTION 1 532 05 91-92... Warning (E&F) 7 532 43 19-82 Decal, Ins Str Wh 9 532 43 19-86 Decal, Fender WHEELS & TIRES 1 2 5,8 4,10 7 6 3,9 11 wheel_1 KEY PART NO. MODEL NUMBER PO14542LT (96012011900), PRODUCT NO. 960 12 01-19 DECALS 7 12 2 12 6 15 9 5 11 1 4 11 5 3 10 KEY PART NO. TRACTOR -
... Pad Footrest RH - - 532 18 10-91 Pad Footrest LH - - 532 13 83-11 Decal, Handle Lft Height Adj. - - 532 44 06-26 Manual, Operator's - - 532 44 06-27 Manual, Parts KEY PART NO. Tube) NOTE: All component dimensions given in U.S. inches 1 inch = 25.4 mm 15 NO. DESCRIPTION 1 532 05 91-92... Warning (E&F) 7 532 43 19-82 Decal, Ins Str Wh 9 532 43 19-86 Decal, Fender WHEELS & TIRES 1 2 5,8 4,10 7 6 3,9 11 wheel_1 KEY PART NO. MODEL NUMBER PO14542LT (96012011900), PRODUCT NO. 960 12 01-19 DECALS 7 12 2 12 6 15 9 5 11 1 4 11 5 3 10 KEY PART NO. TRACTOR -


