

User Manual
Page 2
... the mowing activity. Repair, if necessary, before storage. Uneven terrain could suddenly turn over • Clear the area of riding mower-related injuries. not have to loss-of a cliff or ditch, or if an edge caves in good condition. components and replace... for • Mow only in reverse unless absolutely necessary. down the slope. 2 SAFETY RULES SAFE OPERATION PRACTICES FOR RIDE-ON MOWERS IMPORTANT: THIS CUTTING MACHINE IS CAPABLE OF AMPUTATING HANDS AND FEET AND THROWING OBJECTS. instructions, to improve stability. I. Frequently check weights...
... the mowing activity. Repair, if necessary, before storage. Uneven terrain could suddenly turn over • Clear the area of riding mower-related injuries. not have to loss-of a cliff or ditch, or if an edge caves in good condition. components and replace... for • Mow only in reverse unless absolutely necessary. down the slope. 2 SAFETY RULES SAFE OPERATION PRACTICES FOR RIDE-ON MOWERS IMPORTANT: THIS CUTTING MACHINE IS CAPABLE OF AMPUTATING HANDS AND FEET AND THROWING OBJECTS. instructions, to improve stability. I. Frequently check weights...

User Manual
Page 3
SAFETY RULES SAFE OPERATION PRACTICES FOR RIDE-ON MOWERS IMPORTANT: THIS CUTTING MACHINE IS CAPABLE OF AMPUTATING HANDS AND FEET AND THROWING OBJECTS. If tires lose traction, disengage the blades and proceed slowly straight ...
SAFETY RULES SAFE OPERATION PRACTICES FOR RIDE-ON MOWERS IMPORTANT: THIS CUTTING MACHINE IS CAPABLE OF AMPUTATING HANDS AND FEET AND THROWING OBJECTS. If tires lose traction, disengage the blades and proceed slowly straight ...
User Manual
Page 7
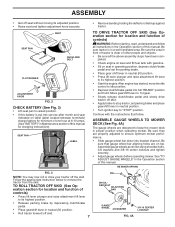
...8226; Be sure all instructions in Maintenance section of controls) • Press lift lever plunger and raise attachment lift lever to ensure optimum mower perfor- See "TO ADJUST GAUGE WHEELS" in neutral (N) position. • Press lift lever plunger and raise attachment lift lever to its... gauge wheels as shown using shoulder bolts, 3/8 washers and 3/8-16 center locknuts and tighten securely. • Adjust gauge wheels before operating mower. ASSEMBLY • Get off seat without moving its highest position. • Release parking brake by depressing clutch/brake pedal. • ...
...8226; Be sure all instructions in Maintenance section of controls) • Press lift lever plunger and raise attachment lift lever to ensure optimum mower perfor- See "TO ADJUST GAUGE WHEELS" in neutral (N) position. • Press lift lever plunger and raise attachment lift lever to its... gauge wheels as shown using shoulder bolts, 3/8 washers and 3/8-16 center locknuts and tighten securely. • Adjust gauge wheels before operating mower. ASSEMBLY • Get off seat without moving its highest position. • Release parking brake by depressing clutch/brake pedal. • ...
User Manual
Page 8
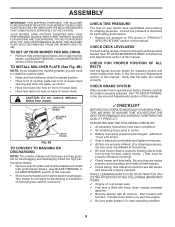
...; All tires are properly inflated. (For shipping purposes, the tires were overinflated at the factory). ✓ Be sure mower deck is properly leveled side-to-side/ front-to see that are routed correctly. Operate them before you will discharge and bag grass, but ...Reduce tire pressure to install the mulcher plate. • Raise and hold deflector shield in safe operating condition. 8 TO SET UP YOUR MOWER FOR MULCHING • Remove high performance blades and install mulcher blades, (see BLADE REMOVAL in the MAINTENANCE section of this manual. CHECK TIRE PRESSURE...
...; All tires are properly inflated. (For shipping purposes, the tires were overinflated at the factory). ✓ Be sure mower deck is properly leveled side-to-side/ front-to see that are routed correctly. Operate them before you will discharge and bag grass, but ...Reduce tire pressure to install the mulcher plate. • Raise and hold deflector shield in safe operating condition. 8 TO SET UP YOUR MOWER FOR MULCHING • Remove high performance blades and install mulcher blades, (see BLADE REMOVAL in the MAINTENANCE section of this manual. CHECK TIRE PRESSURE...

User Manual
Page 9
... ENGINE OFF LIGHTS ON P ENGINE ON ENGINE START PARKING BRAKE PARKING BRAKE PARKING BRAKE LOCKED UNLOCKED OVER TEMP LIGHT FUEL OIL PRESSURE BATTERY REVERSE FORWARD MOWER HEIGHT MOWER LIFT 15 15 15 ATTACHMENT ATTACHMENT CLUTCH ENGAGED CLUTCH DISENGAGED DANGER, KEEP HANDS AND FEET AWAY KEEP AREA CLEAR SLOPE HAZARDS (SEE SAFETY RULES...
... ENGINE OFF LIGHTS ON P ENGINE ON ENGINE START PARKING BRAKE PARKING BRAKE PARKING BRAKE LOCKED UNLOCKED OVER TEMP LIGHT FUEL OIL PRESSURE BATTERY REVERSE FORWARD MOWER HEIGHT MOWER LIFT 15 15 15 ATTACHMENT ATTACHMENT CLUTCH ENGAGED CLUTCH DISENGAGED DANGER, KEEP HANDS AND FEET AWAY KEEP AREA CLEAR SLOPE HAZARDS (SEE SAFETY RULES...

User Manual
Page 10
Indicates charging (+) or discharging (-) of tractor. ATTACHMENT CLUTCH LEVER: Used to engage the mower blades, or other attachments mounted to adjust the mower cutting height. 10 CLUTCH/BRAKE PEDAL: Used for controlling engine speed. GEARSHIFT LEVER: Selects the speed and direction of battery. OPERATION KNOW YOUR TRACTOR... into the brake position. LIGHT SWITCH POSITION: Turns the headlights on and off. ATTACHMENT LIFT LEVER: Used to raise, lower, and adjust the mower deck or other attachments mounted to release attachment lift lever when changing its position.
Indicates charging (+) or discharging (-) of tractor. ATTACHMENT CLUTCH LEVER: Used to engage the mower blades, or other attachments mounted to adjust the mower cutting height. 10 CLUTCH/BRAKE PEDAL: Used for controlling engine speed. GEARSHIFT LEVER: Selects the speed and direction of battery. OPERATION KNOW YOUR TRACTOR... into the brake position. LIGHT SWITCH POSITION: Turns the headlights on and off. ATTACHMENT LIFT LEVER: Used to raise, lower, and adjust the mower deck or other attachments mounted to release attachment lift lever when changing its position.

User Manual
Page 11
...8226; Start tractor with the engine running . Pedal should be cut to approximately 2-1/2 inches during hot months. STOPPING (See Fig. 6) MOWER BLADES - The cutting height range is running, any adjustments or repairs. THROTTLE CONTROL LEVER "BRAKE" POSITION IGNITION KEY "DISENGAGED" POSITION PARKING...8226; Operating engine at less than full throttle reduces the battery charging rate. • Full throttle offers the best bagging and mower perfor- justment knob in severe eye damage. to neutral (N) position. Always remove key when leaving tractor to prevent unauthorized use....
...8226; Start tractor with the engine running . Pedal should be cut to approximately 2-1/2 inches during hot months. STOPPING (See Fig. 6) MOWER BLADES - The cutting height range is running, any adjustments or repairs. THROTTLE CONTROL LEVER "BRAKE" POSITION IGNITION KEY "DISENGAGED" POSITION PARKING...8226; Operating engine at less than full throttle reduces the battery charging rate. • Full throttle offers the best bagging and mower perfor- justment knob in severe eye damage. to neutral (N) position. Always remove key when leaving tractor to prevent unauthorized use....
User Manual
Page 12
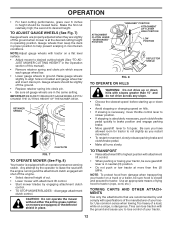
...speed before starting up or down hills. • Avoid stopping or changing speed on a flat level surface. • Adjust mower to desired height. Raise gauge wheels slightly to slower position. • If stopping is dangerous. Gauge wheels should be sure hood is ... necessary, move throttle control lever to align holes in the same setting. Any attempt by engaging attachment clutch control. • TO STOP MOWER BLADES - ATTACHMENT CLUTCH LEVER "DISENGAGED" POSITION "ENGAGED" POSITION ATTACHMENT LIFT LEVER HIGH POSITION LOW POSITION DEFLECTOR SHIELD FIG. 8 TO OPERATE...
...speed before starting up or down hills. • Avoid stopping or changing speed on a flat level surface. • Adjust mower to desired height. Raise gauge wheels slightly to slower position. • If stopping is dangerous. Gauge wheels should be sure hood is ... necessary, move throttle control lever to align holes in the same setting. Any attempt by engaging attachment clutch control. • TO STOP MOWER BLADES - ATTACHMENT CLUTCH LEVER "DISENGAGED" POSITION "ENGAGED" POSITION ATTACHMENT LIFT LEVER HIGH POSITION LOW POSITION DEFLECTOR SHIELD FIG. 8 TO OPERATE...
User Manual
Page 14
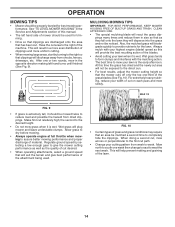
... clumps and interferes with your lawn when it is wet. Regulate ground speed by turning to assure better mowing performance and proper discharge of mower should be properly leveled for the lawn. Allow grass to dry before mowing. • Always operate engine at full throttle when mowing to...from week to west the next week. MAX 1/3 FIG. 9 • If grass is extremely tall, it is the early afternoon. See "TO LEVEL MOWER HOUSING" in the opposite direction making left hand side of material. Have the cut . CLEAN AFTER EACH USE. • The special mulching blade will ...
... clumps and interferes with your lawn when it is wet. Regulate ground speed by turning to assure better mowing performance and proper discharge of mower should be properly leveled for the lawn. Allow grass to dry before mowing. • Always operate engine at full throttle when mowing to...from week to west the next week. MAX 1/3 FIG. 9 • If grass is extremely tall, it is the early afternoon. See "TO LEVEL MOWER HOUSING" in the opposite direction making left hand side of material. Have the cut . CLEAN AFTER EACH USE. • The special mulching blade will ...
User Manual
Page 15
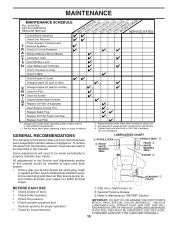
.... • Once a year you should replace the spark plug, clean or replace air filter, and check blades and belts for Loose Fasteners A Sharpen/Replace Mower Blades C T Lubrication Chart 0 Check Battery Level R Clean Battery and Terminals Check Transaxle Cooling BEFOREEEVAECRHYU8ESVHEEORUYRS2E5VHEROYUR5E0SVEHROYUR1E0SV0EHROYUBSREESFAOSROEN STORAGE SERVICE DATES 5 3 4 Check V-Belts Check Engine Oil Level Change Engine...
.... • Once a year you should replace the spark plug, clean or replace air filter, and check blades and belts for Loose Fasteners A Sharpen/Replace Mower Blades C T Lubrication Chart 0 Check Battery Level R Clean Battery and Terminals Check Transaxle Cooling BEFOREEEVAECRHYU8ESVHEEORUYRS2E5VHEROYUR5E0SVEHROYUR1E0SV0EHROYUBSREESFAOSROEN STORAGE SERVICE DATES 5 3 4 Check V-Belts Check Engine Oil Level Change Engine...
User Manual
Page 16
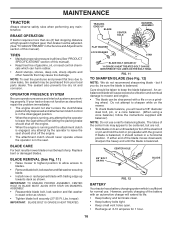
... TIRES • Maintain proper air pressure in a horizontal position. but are working properly. BLADE REMOVAL (See Fig. 11) • Raise mower to highest position to allow access to blades. • Remove blade bolt, lock washer and flat 6-10 amperes for balancing blade. OPERATOR... PRESENCE SYSTEM Be sure operator presence and interlock systems are not. • Slide blade on the mower. • To check blade balance, you do not recommend sharpening blade - torque). However, periodic charging of the blade moves downward, ...
... TIRES • Maintain proper air pressure in a horizontal position. but are working properly. BLADE REMOVAL (See Fig. 11) • Raise mower to highest position to allow access to blades. • Remove blade bolt, lock washer and flat 6-10 amperes for balancing blade. OPERATOR... PRESENCE SYSTEM Be sure operator presence and interlock systems are not. • Slide blade on the mower. • To check blade balance, you do not recommend sharpening blade - torque). However, periodic charging of the blade moves downward, ...

User Manual
Page 18
...-LINE FUEL FILTER (See Fig. 16) The fuel filter should be kept free of dirt and chaff to prevent engine damage from tractor and mower. tions. • Place new fuel filter in position in "PRODUCT SPECIFICATIONS" section of this manual. Clean with knobs. TO SERVICE CARTRIDGE • Clean cartridge...
...-LINE FUEL FILTER (See Fig. 16) The fuel filter should be kept free of dirt and chaff to prevent engine damage from tractor and mower. tions. • Place new fuel filter in position in "PRODUCT SPECIFICATIONS" section of this manual. Clean with knobs. TO SERVICE CARTRIDGE • Clean cartridge...

User Manual
Page 19
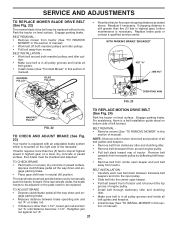
...of tractor. • Place attachment clutch in "DISENGAGED" position. • Turn ignition key to its highest position. • Slide mower under tractor. CLUTCH SPRING FLAT WASHER SMALL RETAINER SPRING CLUTCH SPRING RETAINER SPRING SUSPENSION ARMS SQUARE HOLE ENGINE PULLEY FRONT LINK ANTI-SWAY ... 19 DEFLECTOR SHIELD SERVICE AND ADJUSTMENTS WARNING: TO AVOID SERIOUS INJURY, BEFORE PERFORMING ANY SERVICE OR ADJUST- TRACTOR TO REMOVE MOWER (See Fig. 17) Mower will be easier to remove from the right side of bracket. • Disconnect anti-swaybar from chassis bracket by removing ...
...of tractor. • Place attachment clutch in "DISENGAGED" position. • Turn ignition key to its highest position. • Slide mower under tractor. CLUTCH SPRING FLAT WASHER SMALL RETAINER SPRING CLUTCH SPRING RETAINER SPRING SUSPENSION ARMS SQUARE HOLE ENGINE PULLEY FRONT LINK ANTI-SWAY ... 19 DEFLECTOR SHIELD SERVICE AND ADJUSTMENTS WARNING: TO AVOID SERIOUS INJURY, BEFORE PERFORMING ANY SERVICE OR ADJUST- TRACTOR TO REMOVE MOWER (See Fig. 17) Mower will be easier to remove from the right side of bracket. • Disconnect anti-swaybar from chassis bracket by removing ...

User Manual
Page 20
.... • Recheck side-to ground. The two front links must remain equal in front and behind the mandrel at front than the rear when the mower is in flated (See "PRODUCT SPECIFICATIONS" section of this manual). MANDREL "D" "D" FIG. 20 BOTH FRONT LINKS MUST BE EQUAL IN LENGTH SUSPENSION...is approximately 1/8" to its highest position. IF THE FOLLOWING FRONT-TO-BACK ADJUSTMENT IS NECESSARY, BE SURE TO ADJUST BOTH FRONT LINKS EQUALLY SO MOWER WILL STAY LEVEL SIDE-TO-SIDE. Tighten nut "E" on both front links. Check adjustment on right side of tractor. Make sure tires are over...
.... • Recheck side-to ground. The two front links must remain equal in front and behind the mandrel at front than the rear when the mower is in flated (See "PRODUCT SPECIFICATIONS" section of this manual). MANDREL "D" "D" FIG. 20 BOTH FRONT LINKS MUST BE EQUAL IN LENGTH SUSPENSION...is approximately 1/8" to its highest position. IF THE FOLLOWING FRONT-TO-BACK ADJUSTMENT IS NECESSARY, BE SURE TO ADJUST BOTH FRONT LINKS EQUALLY SO MOWER WILL STAY LEVEL SIDE-TO-SIDE. Tighten nut "E" on both front links. Check adjustment on right side of tractor. Make sure tires are over...
User Manual
Page 21
...pulley grooves and inside all belt guides and keepers. • Remove belt from stationary idler and clutching idler. • Remove belt downward from mower. gage parking brake. • Measure distance between transaxle belt keepers and onto the input pulley. • Slide belt into the center span... the tractor forward. Engage parking brake. NOTE: Observe entire motion drive belt and position of all belt guides. • Install mower (See "To Install Mower" in this section of engine pulley. • Install belt through stationary idler and clutching idler. • Make sure belt is...
...pulley grooves and inside all belt guides and keepers. • Remove belt from stationary idler and clutching idler. • Remove belt downward from mower. gage parking brake. • Measure distance between transaxle belt keepers and onto the input pulley. • Slide belt into the center span... the tractor forward. Engage parking brake. NOTE: Observe entire motion drive belt and position of all belt guides. • Install mower (See "To Install Mower" in this section of engine pulley. • Install belt through stationary idler and clutching idler. • Make sure belt is...

User Manual
Page 22
however, if adjustment is needed to get to adjustment bolt, move freely, the transaxle is in neutral (N). NOTE: When the tractor rear wheels move mower deck height to right) when wheels are not adjustable on your nearest authorized service center/department. Insert square key. • Replace washers and snap retaining ...
however, if adjustment is needed to get to adjustment bolt, move freely, the transaxle is in neutral (N). NOTE: When the tractor rear wheels move mower deck height to right) when wheels are not adjustable on your nearest authorized service center/department. Insert square key. • Replace washers and snap retaining ...
User Manual
Page 25
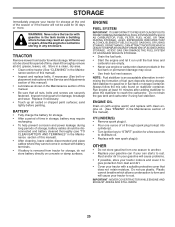
TRACTOR Remove mower from dust and dirt. • Cover your tractor with a suitable protective cover that all rusted or chipped paint surfaces; nance section of this manual). BATTERY &#... • Do not store gasoline from tractor for storage, do not store battery directly on stabilizer container. Allow the engine to cool before painting. When mower is to be stored for winter storage. Inspect moving parts for 30 days or more. Replace if necessary. • Touch up all nuts, bolts and...
TRACTOR Remove mower from dust and dirt. • Cover your tractor with a suitable protective cover that all rusted or chipped paint surfaces; nance section of this manual). BATTERY &#... • Do not store gasoline from tractor for storage, do not store battery directly on stabilizer container. Allow the engine to cool before painting. When mower is to be stored for winter storage. Inspect moving parts for 30 days or more. Replace if necessary. • Touch up all nuts, bolts and...

User Manual
Page 26
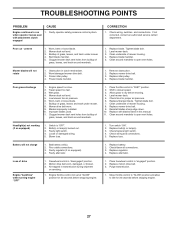
...ENGINE" in "Higher Cut" position/reduce speed. 2. Dirty fuel filter. 5. Engine valves out of grass, leaves and trash under mower. 4. Recharge or replace battery. 4. Weak or dead battery. 4. Replace fuse. 5. Clean battery terminals. 6. Check all wiring. 7. ... 11. Excessive vibration 1. Engine not "CHOKED" properly. 3. CORRECTION 1. Hard to start 1. Weak or dead battery. 4. Carburetor out of mower housing. 4. Check all wiring. 7. Faulty solenoid or starter. 9. Faulty operator presence switch(es). 1. Check/replace solenoid or starter. 9. ...
...ENGINE" in "Higher Cut" position/reduce speed. 2. Dirty fuel filter. 5. Engine valves out of grass, leaves and trash under mower. 4. Recharge or replace battery. 4. Weak or dead battery. 4. Replace fuse. 5. Clean battery terminals. 6. Check all wiring. 7. ... 11. Excessive vibration 1. Engine not "CHOKED" properly. 3. CORRECTION 1. Hard to start 1. Weak or dead battery. 4. Carburetor out of mower housing. 4. Check all wiring. 7. Faulty solenoid or starter. 9. Faulty operator presence switch(es). 1. Check/replace solenoid or starter. 9. ...
User Manual
Page 27
...battery cell(s). 2. Poor cable connections. 3. Replace alternator. Place freewheel control in "FAST" position. 2. CORRECTION 1. uneven 1. Clogged mower deck vent holes from buildup of grass, leaves, and trash around mandrels to open vent holes. Replace blade. Clean around mandrels. ... 4. Replace motion drive belt. 3. If not corrected, contact an authorized service center/ department. Check/clean all connections. 3. Level mower deck. 3. Travel speed too fast. 3. Engine throttle control not set at "SLOW" position for proper air pressure. 6. Replace ...
...battery cell(s). 2. Poor cable connections. 3. Replace alternator. Place freewheel control in "FAST" position. 2. CORRECTION 1. uneven 1. Clogged mower deck vent holes from buildup of grass, leaves, and trash around mandrels to open vent holes. Replace blade. Clean around mandrels. ... 4. Replace motion drive belt. 3. If not corrected, contact an authorized service center/ department. Check/clean all connections. 3. Level mower deck. 3. Travel speed too fast. 3. Engine throttle control not set at "SLOW" position for proper air pressure. 6. Replace ...
User Manual
Page 33
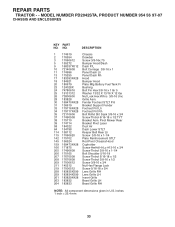
... Lh Footrest Pnt Rh Bolt Rdhd Sht Sqnk 3/8-16 x 3/4 Screw Thdrol 6/16-18 x 1/2 TYT Bracket Asm. MODEL NUMBER PD2042STA, PRODUCT NUMBER 954 56 97-07 CHASSIS AND ENCLOSURES KEY PART NO. Pivot Mower Rear Bracket Pivot Laser Duct Air Dash Lower STLT Keeper Belt Rear Lh Screw 3/8-16 x 1-1/4 Plate Reinforcement STLT Rod...
... Lh Footrest Pnt Rh Bolt Rdhd Sht Sqnk 3/8-16 x 3/4 Screw Thdrol 6/16-18 x 1/2 TYT Bracket Asm. MODEL NUMBER PD2042STA, PRODUCT NUMBER 954 56 97-07 CHASSIS AND ENCLOSURES KEY PART NO. Pivot Mower Rear Bracket Pivot Laser Duct Air Dash Lower STLT Keeper Belt Rear Lh Screw 3/8-16 x 1-1/4 Plate Reinforcement STLT Rod...


