

User Manual
Page 2
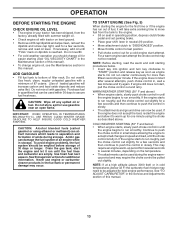
... not turn over • Clear the area of objects such as required. Slopes are familiar with the engine running . • Use slow speed. Check their ability to operate the riding mower safely enough to cool before operating or storing the machine. require extra caution. Repair, if necessary, before refueling. Tall grass can touch hot exhaust / engine parts and burn. Choose a low gear so that operators...
... not turn over • Clear the area of objects such as required. Slopes are familiar with the engine running . • Use slow speed. Check their ability to operate the riding mower safely enough to cool before operating or storing the machine. require extra caution. Repair, if necessary, before refueling. Tall grass can touch hot exhaust / engine parts and burn. Choose a low gear so that operators...
User Manual
Page 4
...;F) OIL CAPACITY: W/FILTER 4.0 PINTS W/O FILTER 3.75 PINTS SPARK PLUG: (GAP: .040") CHAMPION QC12YC GROUND SPEED (MPH): Forward: Reverse: 1st 1.2 2nd 1.5 3rd 2.4 4th 3.5 5th 4.8 6th 5.3 1.5 TIRE PRESSURE: FRONT: REAR: 14 PSI 10 PSI CHARGING SYSTEM: 3 AMPS BATTERY 5 AMPS HEADLIGHTS BATTERY: AMP/HR: MIN. TABLE OF CONTENTS SAFETY RULES 2-3 PRODUCT SPECIFICATIONS 4 CUSTOMER RESPONSIBILITIES 4 ASSEMBLY 6-8 OPERATION 9-14 MAINTENANCE SCHEDULE 15 MAINTENANCE 15-18 SERVICE AND ADJUSTMENTS 19-24 STORAGE 25 TROUBLESHOOTING 26-27 REPAIR PARTS...
...;F) OIL CAPACITY: W/FILTER 4.0 PINTS W/O FILTER 3.75 PINTS SPARK PLUG: (GAP: .040") CHAMPION QC12YC GROUND SPEED (MPH): Forward: Reverse: 1st 1.2 2nd 1.5 3rd 2.4 4th 3.5 5th 4.8 6th 5.3 1.5 TIRE PRESSURE: FRONT: REAR: 14 PSI 10 PSI CHARGING SYSTEM: 3 AMPS BATTERY 5 AMPS HEADLIGHTS BATTERY: AMP/HR: MIN. TABLE OF CONTENTS SAFETY RULES 2-3 PRODUCT SPECIFICATIONS 4 CUSTOMER RESPONSIBILITIES 4 ASSEMBLY 6-8 OPERATION 9-14 MAINTENANCE SCHEDULE 15 MAINTENANCE 15-18 SERVICE AND ADJUSTMENTS 19-24 STORAGE 25 TROUBLESHOOTING 26-27 REPAIR PARTS...
User Manual
Page 7
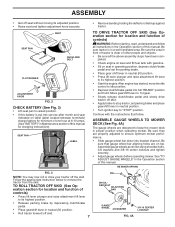
...; Check engine oil level and fill fuel tank with the instructions that gauge wheel bar aligning holes are on seat in operating position, depress clutch/brake pedal and set parking brake and place gearshift lever in proper position when operating mower. mance. • Slide gauge wheel bar down into full "BRAKE" position and hold. Be sure they are designed to keep the mower deck in neutral position. • Turn ignition key to remove the tractor from the skid. Assemble gauge wheels as shown using shoulder bolts...
...; Check engine oil level and fill fuel tank with the instructions that gauge wheel bar aligning holes are on seat in operating position, depress clutch/brake pedal and set parking brake and place gearshift lever in proper position when operating mower. mance. • Slide gauge wheel bar down into full "BRAKE" position and hold. Be sure they are designed to keep the mower deck in neutral position. • Turn ignition key to remove the tractor from the skid. Assemble gauge wheels as shown using shoulder bolts...
User Manual
Page 8
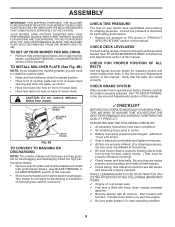
... purposes. CHECK TIRE PRESSURE The tires on back of this manual. CHECK BRAKE SYSTEM After you start the engine. ✓ Be sure brake system is filled with fresh, clean, regular unleaded gasoline. ✓ Become familiar with all belt keepers. ✓ Check wiring. CHECK DECK LEVELNESS For best cutting results, mower housing should be properly inflated for replacing motion and mower blade drive belts in "PRODUCT SPECIFICATIONS" section of optional grass catcher accessory. DEFLECTOR...
... purposes. CHECK TIRE PRESSURE The tires on back of this manual. CHECK BRAKE SYSTEM After you start the engine. ✓ Be sure brake system is filled with fresh, clean, regular unleaded gasoline. ✓ Become familiar with all belt keepers. ✓ Check wiring. CHECK DECK LEVELNESS For best cutting results, mower housing should be properly inflated for replacing motion and mower blade drive belts in "PRODUCT SPECIFICATIONS" section of optional grass catcher accessory. DEFLECTOR...

User Manual
Page 10
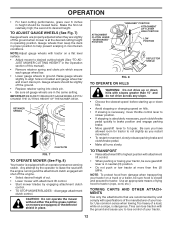
... starting a cold engine. CHOKE CONTROL - THROTTLE CONTROL: Used for future reference. HEIGHT ADJUSTMENT KNOB - ATTACHMENT CLUTCH LEVER: Used to engage the mower blades, or other attachments mounted to familiarize yourself with the locations of the American National Standards Institute. CHOKE CONTROL THROTTLE CONTROL CLUTCH/ BRAKE PEDAL HEIGHT ADJUSTMENT KNOB AMMETER ATTACHMENT CLUTCH LEVER IGNITION SWITCH LIGHT SWITCH POSITION LIFT LEVER PLUNGER ATTACHMENT LIFT LEVER PARKING BRAKE GEARSHIFT LEVER FIG. 5 Our tractors conform to your tractor. GEARSHIFT LEVER: Selects the speed...
... starting a cold engine. CHOKE CONTROL - THROTTLE CONTROL: Used for future reference. HEIGHT ADJUSTMENT KNOB - ATTACHMENT CLUTCH LEVER: Used to engage the mower blades, or other attachments mounted to familiarize yourself with the locations of the American National Standards Institute. CHOKE CONTROL THROTTLE CONTROL CLUTCH/ BRAKE PEDAL HEIGHT ADJUSTMENT KNOB AMMETER ATTACHMENT CLUTCH LEVER IGNITION SWITCH LIGHT SWITCH POSITION LIFT LEVER PLUNGER ATTACHMENT LIFT LEVER PARKING BRAKE GEARSHIFT LEVER FIG. 5 Our tractors conform to your tractor. GEARSHIFT LEVER: Selects the speed...

User Manual
Page 11
... switch. FAILURE TO DO SO WILL SHORTEN THE USEFUL LIFE OF YOUR • To stop engine when stopping tractor on grass areas. The heights are measured from clutch/brake pedal. To eliminate this possibility, always stop mower blades,move throttle control to slow position and allowing engine to start movement. mance. Do not use choke to stop engine. • Turn knob clockwise ( ) to raise cutting height. • Turn knob counterclockwise ( ) to start a warm engine...
... switch. FAILURE TO DO SO WILL SHORTEN THE USEFUL LIFE OF YOUR • To stop engine when stopping tractor on grass areas. The heights are measured from clutch/brake pedal. To eliminate this possibility, always stop mower blades,move throttle control to slow position and allowing engine to start movement. mance. Do not use choke to stop engine. • Turn knob clockwise ( ) to raise cutting height. • Turn knob counterclockwise ( ) to start a warm engine...
User Manual
Page 12
... same setting. JUST MOWER CUTTING HEIGHT" in the Operation section of tying hood to tractor (rope, cord, etc.). TO TRANSPORT • Raise attachment lift to highest position with tractor on a flat level surface. • Adjust mower to align holes in bracket and gauge wheel bar and insert clevis pin. Use an appropriate means of this manual). • Remove retainer spring and clevis pin which secure each gauge wheel bar. • Lower gauge wheels to 1st gear. Too...
... same setting. JUST MOWER CUTTING HEIGHT" in the Operation section of tying hood to tractor (rope, cord, etc.). TO TRANSPORT • Raise attachment lift to highest position with tractor on a flat level surface. • Adjust mower to align holes in bracket and gauge wheel bar and insert clevis pin. Use an appropriate means of this manual). • Remove retainer spring and clevis pin which secure each gauge wheel bar. • Lower gauge wheels to 1st gear. Too...
User Manual
Page 13
... formation of filler neck. OPERATION BEFORE STARTING THE ENGINE CHECK ENGINE OIL LEVEL • The engine in your tractor has been shipped, from the factory, already filled with summer weight oil. • Check engine oil with tractor on seat in operating position, depress clutch/brake pedal and set parking brake. • Place gear shift lever in neutral (N) position. • Move attachment clutch to "DISENGAGED" position. • Move throttle control to fast position • Pull choke control out for a few seconds...
... formation of filler neck. OPERATION BEFORE STARTING THE ENGINE CHECK ENGINE OIL LEVEL • The engine in your tractor has been shipped, from the factory, already filled with summer weight oil. • Check engine oil with tractor on seat in operating position, depress clutch/brake pedal and set parking brake. • Place gear shift lever in neutral (N) position. • Move attachment clutch to "DISENGAGED" position. • Move throttle control to fast position • Pull choke control out for a few seconds...
User Manual
Page 15
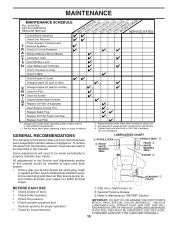
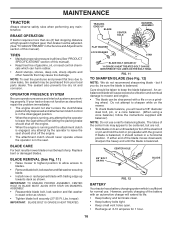
... Check Tire Pressure Check Operator Presence and T Interlock Systems R Check for Loose Fasteners A Sharpen/Replace Mower Blades C T Lubrication Chart 0 Check Battery Level R Clean Battery and Terminals Check Transaxle Cooling BEFOREEEVAECRHYU8ESVHEEORUYRS2E5VHEROYUR5E0SVEHROYUR1E0SV0EHROYUBSREESFAOSROEN STORAGE SERVICE DATES 5 3 4 Check V-Belts Check Engine Oil Level Change Engine Oil (with maintenance-free battery. 5 - Not required if equipped with oil filter) E Change Engine Oil (without oil filter) N Clean Air Filter G Clean Air Screen I N Inspect Muffler/Spark...
... Check Tire Pressure Check Operator Presence and T Interlock Systems R Check for Loose Fasteners A Sharpen/Replace Mower Blades C T Lubrication Chart 0 Check Battery Level R Clean Battery and Terminals Check Transaxle Cooling BEFOREEEVAECRHYU8ESVHEEORUYRS2E5VHEROYUR5E0SVEHROYUR1E0SV0EHROYUBSREESFAOSROEN STORAGE SERVICE DATES 5 3 4 Check V-Belts Check Engine Oil Level Change Engine Oil (with maintenance-free battery. 5 - Not required if equipped with oil filter) E Change Engine Oil (without oil filter) N Clean Air Filter G Clean Air Screen I N Inspect Muffler/Spark...
User Manual
Page 16
... blade on the mower. • To check blade balance, you do not recommend sharpening blade - TIRES • Maintain proper air pressure in all tires (See"PRODUCT SPECIFICATIONS" section of the steel bolt or pin and hold the bolt or pin parallel with trailing edge up towards deck as described, repair the problem immediately. • The engine should not start unless the clutch/brake pedal is fully depressed and attachement clutch control is...
... blade on the mower. • To check blade balance, you do not recommend sharpening blade - TIRES • Maintain proper air pressure in all tires (See"PRODUCT SPECIFICATIONS" section of the steel bolt or pin and hold the bolt or pin parallel with trailing edge up towards deck as described, repair the problem immediately. • The engine should not start unless the clutch/brake pedal is fully depressed and attachement clutch control is...

User Manual
Page 17
... replace if necessary. Check your engine oil level more freely when warm. • Catch oil in the SERVICE AND ADJUSTMENTS section of this manual. • Use gauge on oil fill cap/dipstick for 50 hours in the locked position as shown. • Remove the drain tube and replace the cap onto to slip from end of the drain valve. • Refill engine with grease or petroleum jelly. • Reinstall battery (See "REPLACING BATTERY...
... replace if necessary. Check your engine oil level more freely when warm. • Catch oil in the SERVICE AND ADJUSTMENTS section of this manual. • Use gauge on oil fill cap/dipstick for 50 hours in the locked position as shown. • Remove the drain tube and replace the cap onto to slip from end of the drain valve. • Refill engine with grease or petroleum jelly. • Reinstall battery (See "REPLACING BATTERY...

User Manual
Page 18
... of the engine are properly positioned. • Immediately wipe up any spilled gasoline. Spark plug type and gap setting are reinstalled. Make sure the cooling shrouds are shown in fuel line with automotive type wax. DO NOT USE PRESSURIZED AIR TO CLEAN OR DRY CARTRIDGE. tions. • Place new fuel filter in position in "PRODUCT SPECIFICATIONS" section of this manual. DO NOT OIL CARTRIDGE. Clean with a wire brush or compressed air to remove grass, leaves...
... of the engine are properly positioned. • Immediately wipe up any spilled gasoline. Spark plug type and gap setting are reinstalled. Make sure the cooling shrouds are shown in fuel line with automotive type wax. DO NOT USE PRESSURIZED AIR TO CLEAN OR DRY CARTRIDGE. tions. • Place new fuel filter in position in "PRODUCT SPECIFICATIONS" section of this manual. DO NOT OIL CARTRIDGE. Clean with a wire brush or compressed air to remove grass, leaves...

User Manual
Page 19
... by removing retainer springs. • Raise lift lever to raise suspension arms. Slide mower out from spark plug and place wire where it cannot come in "DISENGAGED" position. • Turn ignition key to chassis bracket and secure with retainer spring. • Push clutch cable housing guide into bracket, slide collar onto guide and secure with large retainer spring. • Place flat washer and clutch spring on idler pulley bolt and...
... by removing retainer springs. • Raise lift lever to raise suspension arms. Slide mower out from spark plug and place wire where it cannot come in "DISENGAGED" position. • Turn ignition key to chassis bracket and secure with retainer spring. • Push clutch cable housing guide into bracket, slide collar onto guide and secure with large retainer spring. • Place flat washer and clutch spring on idler pulley bolt and...
User Manual
Page 21
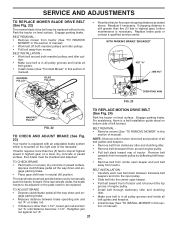
... brake needs to be adjusted or the pads need to be replaced without tools. SERVICE AND ADJUSTMENTS TO REPLACE MOWER BLADE DRIVE BELT (See Fig. 22) The mower blade drive belt may be replaced. Engage parking brake. Remove belt upwards from transaxle pulley by deflecting belt keepers. • Remove belt from center span keeper and pull belt away from mower. WITH PARKING BRAKE "ENGAGED" 1-1/2" NUT "A" JAM NUT OPERATING ARM FIG. 23 TO REPLACE MOTION DRIVE BELT (See Fig. 24) MANDREL PULLEY Park the tractor on level...
... brake needs to be adjusted or the pads need to be replaced without tools. SERVICE AND ADJUSTMENTS TO REPLACE MOWER BLADE DRIVE BELT (See Fig. 22) The mower blade drive belt may be replaced. Engage parking brake. Remove belt upwards from transaxle pulley by deflecting belt keepers. • Remove belt from center span keeper and pull belt away from mower. WITH PARKING BRAKE "ENGAGED" 1-1/2" NUT "A" JAM NUT OPERATING ARM FIG. 23 TO REPLACE MOTION DRIVE BELT (See Fig. 24) MANDREL PULLEY Park the tractor on level...
User Manual
Page 24
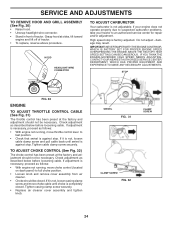
... engine does not operate properly due to suspected carburetor problems, take your tractor to fast position. • Check that swivel is necessary, proceed as described below before loosening cable. High speed stop . IMPORTANT: NEVERTAMPER WITHTHE ENGINE GOVERNOR, WHICH IS FACTORY SET FOR PROPER ENGINE SPEED. If adjustment is against stop. Tighten casing clamp screw securely. • Replace air cleaner cover assembly and tighten knob. HOOD HEADLIGHT WIRE CONNECTOR TO ADJUST CARBURETOR Your carburetor is factory adjusted...
... engine does not operate properly due to suspected carburetor problems, take your tractor to fast position. • Check that swivel is necessary, proceed as described below before loosening cable. High speed stop . IMPORTANT: NEVERTAMPER WITHTHE ENGINE GOVERNOR, WHICH IS FACTORY SET FOR PROPER ENGINE SPEED. If adjustment is against stop. Tighten casing clamp screw securely. • Replace air cleaner cover assembly and tighten knob. HOOD HEADLIGHT WIRE CONNECTOR TO ADJUST CARBURETOR Your carburetor is factory adjusted...
User Manual
Page 25
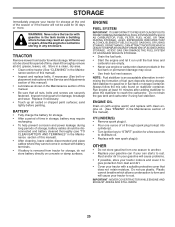
..., battery cables should be used for 30 days or more. ACIDIC GAS CAN DAMAGE THE FUEL SYSTEM OF AN ENGINE WHILE IN STORAGE. • Drain the fuel tank. • Start the engine and let it thoroughly, remove all dirt, grease, leaves, etc. When mower is removed from dust and dirt. • Cover your tractor with new spark plug(s). Replace if necessary. • Touch up all nuts, bolts and screws are empty. • Never use plastic...
..., battery cables should be used for 30 days or more. ACIDIC GAS CAN DAMAGE THE FUEL SYSTEM OF AN ENGINE WHILE IN STORAGE. • Drain the fuel tank. • Start the engine and let it thoroughly, remove all dirt, grease, leaves, etc. When mower is removed from dust and dirt. • Cover your tractor with new spark plug(s). Replace if necessary. • Touch up all nuts, bolts and screws are empty. • Never use plastic...
User Manual
Page 26
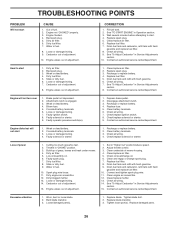
... plug wire. 11. Replace blade. Tighten loose part(s). Replace damaged parts. 26 Out of adjustment. 8. Drain fuel tank and carburetor, refill tank with fresh gasoline. 9. Engine valves out of adjustment. 15. Engine will not start . 4. Weak or dead battery. 4. Clean battery terminals. 6. Corroded battery terminals. 3. Faulty solenoid or starter. 1. Dirty air filter. 5. Carburetor out of adjustment. 1. Clean underside of grass, leaves and trash under mower. 4. Check oil level/change spark plug. 7. See "To Adjust Carburetor" in "CHOKE" position...
... plug wire. 11. Replace blade. Tighten loose part(s). Replace damaged parts. 26 Out of adjustment. 8. Drain fuel tank and carburetor, refill tank with fresh gasoline. 9. Engine valves out of adjustment. 15. Engine will not start . 4. Weak or dead battery. 4. Clean battery terminals. 6. Corroded battery terminals. 3. Faulty solenoid or starter. 1. Dirty air filter. 5. Carburetor out of adjustment. 1. Clean underside of grass, leaves and trash under mower. 4. Check oil level/change spark plug. 7. See "To Adjust Carburetor" in "CHOKE" position...
User Manual
Page 27
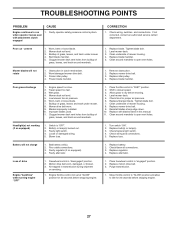
... 1. Turn switch "ON". 2. Check/replace light switch. 4. Battery will not rotate 1. Freewheel control in transmission during shipment or servicing. 1. Motion drive belt worn, damaged, or broken. 3. TROUBLESHOOTING POINTS PROBLEM CAUSE Engine continues to slower speed. 3. uneven 1. Level mower deck. 3. Worn/damaged mower drive belt. 3. Engine speed too slow. 2. Improper blades used. 11. Clean underside of mower housing. 4. Replace with attachment clutch engaged 1. Purge transmission. 1. Frozen idler pulley. 4. Remove obstruction. 2. Travel speed...
... 1. Turn switch "ON". 2. Check/replace light switch. 4. Battery will not rotate 1. Freewheel control in transmission during shipment or servicing. 1. Motion drive belt worn, damaged, or broken. 3. TROUBLESHOOTING POINTS PROBLEM CAUSE Engine continues to slower speed. 3. uneven 1. Level mower deck. 3. Worn/damaged mower drive belt. 3. Engine speed too slow. 2. Improper blades used. 11. Clean underside of mower housing. 4. Replace with attachment clutch engaged 1. Purge transmission. 1. Frozen idler pulley. 4. Remove obstruction. 2. Travel speed...
User Manual
Page 40
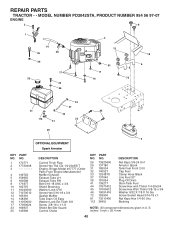
... 183906 81 73510400 112 3645J DESCRIPTION Nut Keps 3/8-24 Unf Arrestor Spark Tank Fuel Front 2 00 Cap Fuel Clamp Hose Black Line Fuel 20" Plug Oil Drain Stem Tank Fuel Screw Hex wsh Thdrol 1/4-20x3/4 Screw Hex Wsh Thdrol 3/8-16 x 3/4 Washer 9/32 X 7/8 X 16 Ga Screw Socket Head 5/16-18 x 1 Nut Keps Hex 1/4-20 Unc Bushing NOTE: All component dimensions given in U. inches 1 inch = 25.4 mm 40 REPAIR PARTS TRACTOR - - NO. 1 170771 2 17720408 3 -------- 4 149723 5 159955 6 160589...
... 183906 81 73510400 112 3645J DESCRIPTION Nut Keps 3/8-24 Unf Arrestor Spark Tank Fuel Front 2 00 Cap Fuel Clamp Hose Black Line Fuel 20" Plug Oil Drain Stem Tank Fuel Screw Hex wsh Thdrol 1/4-20x3/4 Screw Hex Wsh Thdrol 3/8-16 x 3/4 Washer 9/32 X 7/8 X 16 Ga Screw Socket Head 5/16-18 x 1 Nut Keps Hex 1/4-20 Unc Bushing NOTE: All component dimensions given in U. inches 1 inch = 25.4 mm 40 REPAIR PARTS TRACTOR - - NO. 1 170771 2 17720408 3 -------- 4 149723 5 159955 6 160589...
User Manual
Page 43
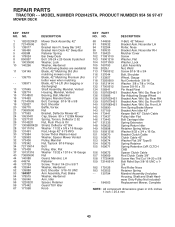
..." Keeper Belt 42" Clutch Cable Pulley Idler Flat Bolt Carriage Idler Spring Extension Spring Return Idler Retainer Spring Yellow Washer 9/32 x 3/4 x 16 Ga. Noseroller RH Mulcher Cover Screw Washer, Flat Washer, Lock Latch Assembly Nut, Weld Screw 5/16-18 x 3/4 Bolt, Shoulder Wheel, Gauge Nut Centerlock 3/8-16 Washer 3/8 x 7/8 x 14 Ga. inches 1 inch = 25.4 mm 43 Noseroller LH Roller, Nose Bracket Asm. Rear RH Bracket Asm. Ga. Ga. Whl. REPAIR PARTS TRACTOR - - Rear LH Bar Adjusting Gauge Wheel Bracket Asm. Whl. MODEL NUMBER PD2042STA, PRODUCT NUMBER 954...
..." Keeper Belt 42" Clutch Cable Pulley Idler Flat Bolt Carriage Idler Spring Extension Spring Return Idler Retainer Spring Yellow Washer 9/32 x 3/4 x 16 Ga. Noseroller RH Mulcher Cover Screw Washer, Flat Washer, Lock Latch Assembly Nut, Weld Screw 5/16-18 x 3/4 Bolt, Shoulder Wheel, Gauge Nut Centerlock 3/8-16 Washer 3/8 x 7/8 x 14 Ga. inches 1 inch = 25.4 mm 43 Noseroller LH Roller, Nose Bracket Asm. Rear RH Bracket Asm. Ga. Ga. Whl. REPAIR PARTS TRACTOR - - Rear LH Bar Adjusting Gauge Wheel Bracket Asm. Whl. MODEL NUMBER PD2042STA, PRODUCT NUMBER 954...


