
User Manual
Page 2
...Do not mow in speed or direction, ing. Clean any oil or fuel spillage before storage. GENERAL OPERATION • Read, understand, and follow all parts to come to protect themselves and others from serious injury. • Follow the manufacturer's recommendation for Ride-On Mowers DANGER: THIS CUTTING MACHINE IS ...Be sure the area is over if a wheel is clear of riding mower-related injuries. you cannot back up which can touch hot exhaust / engine parts and burn. ing. • Do not try to stabilize the machine by the blades. • Keep all movement on all times. • ...
...Do not mow in speed or direction, ing. Clean any oil or fuel spillage before storage. GENERAL OPERATION • Read, understand, and follow all parts to come to protect themselves and others from serious injury. • Follow the manufacturer's recommendation for Ride-On Mowers DANGER: THIS CUTTING MACHINE IS ...Be sure the area is over if a wheel is clear of riding mower-related injuries. you cannot back up which can touch hot exhaust / engine parts and burn. ing. • Do not try to stabilize the machine by the blades. • Keep all movement on all times. • ...
User Manual
Page 3
...; Check brake operation frequently. Always look down slowly. • Do not turn on slopes. • Never allow children or others in contact with manufacturer's recommended parts, when necessary. • Mower blades are often attracted to cool before restarting. • Never make any fuel-soaked debris. They may block your vehicle when...
...; Check brake operation frequently. Always look down slowly. • Do not turn on slopes. • Never allow children or others in contact with manufacturer's recommended parts, when necessary. • Mower blades are often attracted to cool before restarting. • Never make any fuel-soaked debris. They may block your vehicle when...
User Manual
Page 5
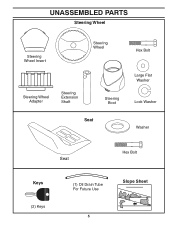
UNASSEMBLED PARTS Steering Wheel Steering Wheel Insert Steering Wheel Steering Wheel Adapter Steering Extension Shaft Steering Boot Seat Hex Bolt Large Flat Washer Lock Washer Washer Seat Hex Bolt Keys (2) Keys (1) Oil Drain Tube For Future Use Slope Sheet 5
UNASSEMBLED PARTS Steering Wheel Steering Wheel Insert Steering Wheel Steering Wheel Adapter Steering Extension Shaft Steering Boot Seat Hex Bolt Large Flat Washer Lock Washer Washer Seat Hex Bolt Keys (2) Keys (1) Oil Drain Tube For Future Use Slope Sheet 5
User Manual
Page 6
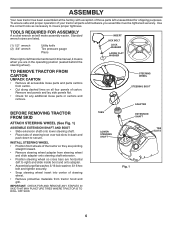
...MAY PUNCTURE TIRES WHERE TRACTOR IS TO ROLL OFF SKID. INSTALL STEERING WHEEL • Position front wheels of your tractor all accessible loose parts and parts cartons from tractor hood and grill. To ensure safe and proper operation of the tractor so they are pointing straight forward. •...ATTACH STEERING WHEEL (See Fig. 1) ASSEMBLE EXTENSION SHAFT AND BOOT • Slide extension shaft onto lower steering shaft. • Place tabs of those parts left to right) and slide inside boot and onto adapter. • Assemble large flat washer, 5/16 lock washer, 5/16 hex bolt and tighten ...
...MAY PUNCTURE TIRES WHERE TRACTOR IS TO ROLL OFF SKID. INSTALL STEERING WHEEL • Position front wheels of your tractor all accessible loose parts and parts cartons from tractor hood and grill. To ensure safe and proper operation of the tractor so they are pointing straight forward. •...ATTACH STEERING WHEEL (See Fig. 1) ASSEMBLE EXTENSION SHAFT AND BOOT • Slide extension shaft onto lower steering shaft. • Place tabs of those parts left to right) and slide inside boot and onto adapter. • Assemble large flat washer, 5/16 lock washer, 5/16 hex bolt and tighten ...

User Manual
Page 8
... tank is filled with fresh, clean, regular unleaded gasoline. ✓ Become familiar with all the above assembly steps have been completed. ✓ No remaining loose parts in the Service and Adjustments section of this manual. ✓CHECKLIST BEFORE YOU OPERATE YOUR NEW TRACTOR, WE WISH TO ASSURE THAT YOU RECEIVE THE...
... tank is filled with fresh, clean, regular unleaded gasoline. ✓ Become familiar with all the above assembly steps have been completed. ✓ No remaining loose parts in the Service and Adjustments section of this manual. ✓CHECKLIST BEFORE YOU OPERATE YOUR NEW TRACTOR, WE WISH TO ASSURE THAT YOU RECEIVE THE...
User Manual
Page 16
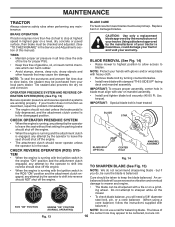
... blade bolt by the manufacturer of your tractor is running with a file or on the mower. IMPORTANT: Special blade bolt is balanced. If your local parts dealer. Lbs. CHECK REVERSE OPERATION (ROS) SYS- ROS "ON" POSITION 02828 ENGINE "ON" POSITION (NORMAL OPERATING) Fig. 13 • To check blade balance, you do...
... blade bolt by the manufacturer of your tractor is running with a file or on the mower. IMPORTANT: Special blade bolt is balanced. If your local parts dealer. Lbs. CHECK REVERSE OPERATION (ROS) SYS- ROS "ON" POSITION 02828 ENGINE "ON" POSITION (NORMAL OPERATING) Fig. 13 • To check blade balance, you do...
User Manual
Page 19
... (N) position. • Place attachment clutch in "DISENGAGED" position. • Turn ignition key to "STOP" and remove key. • Make sure the blades and all moving parts have completely stopped. • Disconnect spark plug wire from spark plug and place wire where it 's lowest position. remove retainer springs and washers. • Go...
... (N) position. • Place attachment clutch in "DISENGAGED" position. • Turn ignition key to "STOP" and remove key. • Make sure the blades and all moving parts have completely stopped. • Disconnect spark plug wire from spark plug and place wire where it 's lowest position. remove retainer springs and washers. • Go...
User Manual
Page 23
...) The transaxle should be in neutral when the gear shift lever is too weak to slow leaks, tire sealant may be purchased from your local parts dealer. TO REMOVE WHEEL FOR REPAIRS (See Fig. 32) • Block up axle securely. • Remove axle cover, retaining ring and washers to allow wheel...
...) The transaxle should be in neutral when the gear shift lever is too weak to slow leaks, tire sealant may be purchased from your local parts dealer. TO REMOVE WHEEL FOR REPAIRS (See Fig. 32) • Block up axle securely. • Remove axle cover, retaining ring and washers to allow wheel...

User Manual
Page 24
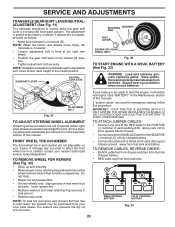
... wiring diagram in the backside of the grill. • Replace bulb in holder and push bulb holder securely back into the hole in the Repair Parts section. If adjustment is located behind the dash. SERVICE AND ADJUSTMENTS REPLACING BATTERY (See Figs. 34) WARNING: Do not short battery terminals by allowing a wrench...
... wiring diagram in the backside of the grill. • Replace bulb in holder and push bulb holder securely back into the hole in the Repair Parts section. If adjustment is located behind the dash. SERVICE AND ADJUSTMENTS REPLACING BATTERY (See Figs. 34) WARNING: Do not short battery terminals by allowing a wrench...
User Manual
Page 25
... where they cannot come in contact with battery terminals. • If battery is an acceptable alternative in fuel tank or storage container. Inspect moving parts for damage, breakage and wear. Replace if necessary. • Touch up all nuts, bolts and screws are empty. • Never use plastic...tractor (See "CLEANING" in any enclosure. ENGINE FUEL SYSTEM IMPORTANT: IT IS IMPORTANT TO PREVENT GUM DEPOSITS FROM FORMING IN ESSENTIAL FUEL SYSTEM PARTS SUCH AS CARBURETOR, FUEL FILTER, FUEL HOSE, OR TANK DURING STORAGE. Add stabilizer to rust. Do not empty the gas tank and carburetor ...
... where they cannot come in contact with battery terminals. • If battery is an acceptable alternative in fuel tank or storage container. Inspect moving parts for damage, breakage and wear. Replace if necessary. • Touch up all nuts, bolts and screws are empty. • Never use plastic...tractor (See "CLEANING" in any enclosure. ENGINE FUEL SYSTEM IMPORTANT: IT IS IMPORTANT TO PREVENT GUM DEPOSITS FROM FORMING IN ESSENTIAL FUEL SYSTEM PARTS SUCH AS CARBURETOR, FUEL FILTER, FUEL HOSE, OR TANK DURING STORAGE. Add stabilizer to rust. Do not empty the gas tank and carburetor ...
User Manual
Page 26
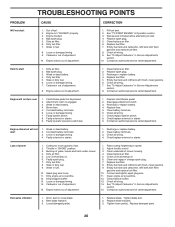
...level/change spark plug. 7. Empty fuel tank and carburetor, refill tank with fresh gasoline and replace fuel filter. 8. Loose/damaged part(s). 1. Replace damaged parts. 26 Engine not "CHOKED" properly. 3. Engine valves out of mower housing. 4. See "To Adjust Carburetor" in Operation section... Connect and tighten spark plug wire. 11. Clean engine air screen/fins. 12. See "To Adjust Carburetor" in fuel. 8. Tighten loose part(s). Engine flooded. 4. Wait several minutes before attempting to start . 4. Replace spark plug. 5. Dirty air filter. 2. Recharge or replace battery...
...level/change spark plug. 7. Empty fuel tank and carburetor, refill tank with fresh gasoline and replace fuel filter. 8. Loose/damaged part(s). 1. Replace damaged parts. 26 Engine not "CHOKED" properly. 3. Engine valves out of mower housing. 4. See "To Adjust Carburetor" in Operation section... Connect and tighten spark plug wire. 11. Clean engine air screen/fins. 12. See "To Adjust Carburetor" in fuel. 8. Tighten loose part(s). Engine flooded. 4. Wait several minutes before attempting to start . 4. Replace spark plug. 5. Dirty air filter. 2. Recharge or replace battery...
User Manual
Page 30
...name and address of the authorized dealer from date of original purchase. 5. The Warranty period for any products used for the movement of any part which has been subjected to alteration, misuse, abuse, improper assembly or installation, delivery damage, or to you 1/12 of the price of... the purchaser. LIMITED WARRANTY The Manufacturer warrants to materials or workmanship. Transportation charges for any parts submitted for replacement under this Warranty, you have other rights which we will repair or replace, at our option, without charge to you ...
...name and address of the authorized dealer from date of original purchase. 5. The Warranty period for any products used for the movement of any part which has been subjected to alteration, misuse, abuse, improper assembly or installation, delivery damage, or to you 1/12 of the price of... the purchaser. LIMITED WARRANTY The Manufacturer warrants to materials or workmanship. Transportation charges for any parts submitted for replacement under this Warranty, you have other rights which we will repair or replace, at our option, without charge to you ...


