
User Manual
Page 2
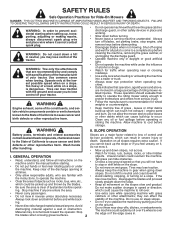
... safety devices in the manual before starting , stopping, or turning on all parts to come to prevent accidental starting when setting up and down before storage. Clean any oil or fuel spillage before and while back- Operation on a slope. objects. Tall grass can hide obstacles. • Choose a low ground speed so that are a major factor related to loss of control and contain lead...
... safety devices in the manual before starting , stopping, or turning on all parts to come to prevent accidental starting when setting up and down before storage. Clean any oil or fuel spillage before and while back- Operation on a slope. objects. Tall grass can hide obstacles. • Choose a low ground speed so that are a major factor related to loss of control and contain lead...
User Manual
Page 3
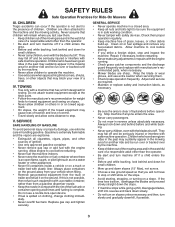
... SERVICE • Never operate machine in contact with plastic liner. Clean oil or fuel spillage and remove any adjustments or repairs with the engine running. • Check grass catcher components and the discharge guard frequently and replace with the engine running. Always look down slopes (15° Max), not across. • Choose a low ground speed so that may fall off and be seriously injured or interfere with the blades...
... SERVICE • Never operate machine in contact with plastic liner. Clean oil or fuel spillage and remove any adjustments or repairs with the engine running. • Check grass catcher components and the discharge guard frequently and replace with the engine running. Always look down slopes (15° Max), not across. • Choose a low ground speed so that may fall off and be seriously injured or interfere with the blades...
User Manual
Page 4
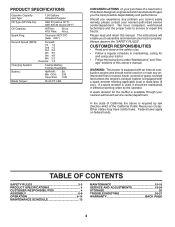
... the instructions under "Maintenance" and "Stor- Spark Plug: Champion RC12YC (Gap: .030") Ground Speed (MPH): Forward: 1st 1.2 2nd 1.5 3rd 2.4 4th 3.5 5th 4.8 6th 5.3 Reverse: 1.5 Charging System: 3 Amps Battery 5 Amps Headlights Battery: AMP/HR: Min. In the state of California the above 32°F) SAE 5W-30 (below 32°F) Oil Capacity: W/Filter: 56 oz. TABLE OF CONTENTS SAFETY RULES 2-3 PRODUCT SPECIFICATIONS 4 CUSTOMER RESPONSIBILITIES 4 ASSEMBLY 6-8 OPERATION 9-14 MAINTENANCE...
... the instructions under "Maintenance" and "Stor- Spark Plug: Champion RC12YC (Gap: .030") Ground Speed (MPH): Forward: 1st 1.2 2nd 1.5 3rd 2.4 4th 3.5 5th 4.8 6th 5.3 Reverse: 1.5 Charging System: 3 Amps Battery 5 Amps Headlights Battery: AMP/HR: Min. In the state of California the above 32°F) SAE 5W-30 (below 32°F) Oil Capacity: W/Filter: 56 oz. TABLE OF CONTENTS SAFETY RULES 2-3 PRODUCT SPECIFICATIONS 4 CUSTOMER RESPONSIBILITIES 4 ASSEMBLY 6-8 OPERATION 9-14 MAINTENANCE...
User Manual
Page 7
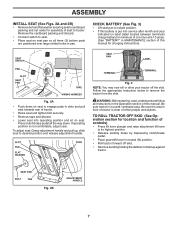
... on label (label located between terminals) charge battery for charging instructions). To adjust seat: Grasp adjustment handle and pull up against tractor. Be sure the area in a well-ventilated area. Press clutch/brake pedal all three (3) bottom pads are positioned over large slotted holes in MAINTENANCE section of this battery is clear of controls) • Press lift lever plunger and raise attachment lift lever to tractor. SLOT PAD...
... on label (label located between terminals) charge battery for charging instructions). To adjust seat: Grasp adjustment handle and pull up against tractor. Be sure the area in a well-ventilated area. Press clutch/brake pedal all three (3) bottom pads are positioned over large slotted holes in MAINTENANCE section of this battery is clear of controls) • Press lift lever plunger and raise attachment lift lever to tractor. SLOT PAD...

User Manual
Page 8
... cutting results. (Tires must be properly leveled. See "TO LEVEL MOWER HOUSING" in neutral position. • Turn ignition key to "STOP" position. PLEASE REVIEW THE FOLLOWING CHECKLIST: ✓ All assembly instructions have been completed. • Check engine oil level and fill fuel tank with gasoline. • Sit on seat in operating position, depress clutch/brake pedal and set parking brake and place gearshift lever in the Service and Adjustments section of this manual. Verify that all the above assembly...
... cutting results. (Tires must be properly leveled. See "TO LEVEL MOWER HOUSING" in neutral position. • Turn ignition key to "STOP" position. PLEASE REVIEW THE FOLLOWING CHECKLIST: ✓ All assembly instructions have been completed. • Check engine oil level and fill fuel tank with gasoline. • Sit on seat in operating position, depress clutch/brake pedal and set parking brake and place gearshift lever in the Service and Adjustments section of this manual. Verify that all the above assembly...
User Manual
Page 13
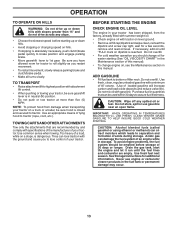
... parking brake and clutch/brake pedal. • Make all turns slowly. TO TRANSPORT • Raise attachment lift to highest position with attachment lift control. • When pushing or towing your tractor. TOWING CARTS AND OTHER ATTACHMENTS Tow only the attachments that can attract moisture which leads to lose control of your tractor, be used within 30 days to 1st gear. BEFORE STARTING THE ENGINE CHECK ENGINE OIL LEVEL The engine in neutral (N) position...
... parking brake and clutch/brake pedal. • Make all turns slowly. TO TRANSPORT • Raise attachment lift to highest position with attachment lift control. • When pushing or towing your tractor. TOWING CARTS AND OTHER ATTACHMENTS Tow only the attachments that can attract moisture which leads to lose control of your tractor, be used within 30 days to 1st gear. BEFORE STARTING THE ENGINE CHECK ENGINE OIL LEVEL The engine in neutral (N) position...
User Manual
Page 14
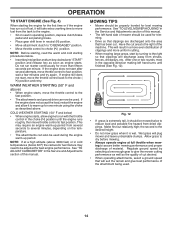
... cut relatively high; After one minute using the choke as described above ) • When engine starts, move the throttle control back to choke ( ) position. Regulate ground speed by turning to the fast position. • The attachments and ground drive can also be properly leveled for trimming. • Drive so that clippings are discharged onto the area that has been cut desired. • When operating attachments, select a ground speed that clippings will plug mower...
... cut relatively high; After one minute using the choke as described above ) • When engine starts, move the throttle control back to choke ( ) position. Regulate ground speed by turning to the fast position. • The attachments and ground drive can also be properly leveled for trimming. • Drive so that clippings are discharged onto the area that has been cut desired. • When operating attachments, select a ground speed that clippings will plug mower...
User Manual
Page 15
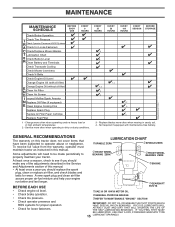
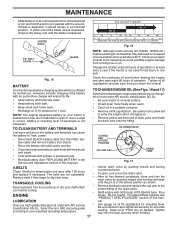
...in the Service and Adjustments section of this manual. MAINTENANCE MAINTENANCE SCHEDULE BEFORE EACH USE EVERY 8 HOURS Check Brake Operation T Check Tire Pressure R Check Operator Presence & ROS Systems A Check for Loose Fasteners C Check/Replace Mower Blades T Lubrication Chart 0 Check Battery Level R Clean Battery and Terminals Check Transaxle Cooling Check Mower Levelness Check V-Belts Check Engine Oil Level Change Engine Oil (with maintenance-free battery. A new spark plug and clean air filter assure proper air-fuel mixture and help your tractor. Some adjustments will need to be...
...in the Service and Adjustments section of this manual. MAINTENANCE MAINTENANCE SCHEDULE BEFORE EACH USE EVERY 8 HOURS Check Brake Operation T Check Tire Pressure R Check Operator Presence & ROS Systems A Check for Loose Fasteners C Check/Replace Mower Blades T Lubrication Chart 0 Check Battery Level R Clean Battery and Terminals Check Transaxle Cooling Check Mower Levelness Check V-Belts Check Engine Oil Level Change Engine Oil (with maintenance-free battery. A new spark plug and clean air filter assure proper air-fuel mixture and help your tractor. Some adjustments will need to be...
User Manual
Page 16
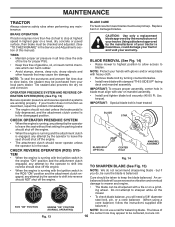
... blade. Do not attempt to blades. BLADE STAR CHECK OPERATOR PRESENCE SYSTEM • When the engine is running, any attempt by the operator to keep the blade balanced. TIRES • Maintain proper air pressure in highest gear on a level, dry concrete or paved surface, then brake must align with the ignition switch in the engine "ON" position and the attachment clutch engaged, any maintenance. Replace bent or damaged blades. If your local parts dealer. MAINTENANCE TRACTOR...
... blade. Do not attempt to blades. BLADE STAR CHECK OPERATOR PRESENCE SYSTEM • When the engine is running, any attempt by the operator to keep the blade balanced. TIRES • Maintain proper air pressure in highest gear on a level, dry concrete or paved surface, then brake must align with the ignition switch in the engine "ON" position and the attachment clutch engaged, any maintenance. Replace bent or damaged blades. If your local parts dealer. MAINTENANCE TRACTOR...
User Manual
Page 17
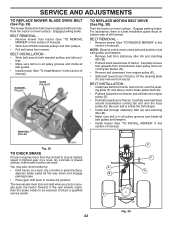
... 5/8" BOLT OR PIN BLADE NOTE: Although multi-viscosity oils (5W30, 10W30 etc.) improve starting the engine and after every 50 hours of this manual. CLOSED AND LOCKED POSITION YELLOW CAP Fig. 17 DRAIN TUBE V-BELTS • Check V-belts for checking level. Remove the drain tube and replace the cap onto to the bottom fitting of the steel bolt or pin and hold the bolt or pin parallel with wire brush until the blade is balanced. Use gauge on oil fill cap...
... 5/8" BOLT OR PIN BLADE NOTE: Although multi-viscosity oils (5W30, 10W30 etc.) improve starting the engine and after every 50 hours of this manual. CLOSED AND LOCKED POSITION YELLOW CAP Fig. 17 DRAIN TUBE V-BELTS • Check V-belts for checking level. Remove the drain tube and replace the cap onto to the bottom fitting of the steel bolt or pin and hold the bolt or pin parallel with wire brush until the blade is balanced. Use gauge on oil fill cap...
User Manual
Page 18
... "PRODUCT SPECIFICATIONS" section of this manual. ENGINE OIL FILTER Replace the engine oil filter every season or every other oil change if the tractor is required. • With engine cool, remove filter and plug fuel line sections. • Place new fuel filter in position in engine or transmission will not run properly using a garden hose or pressure washer to clean your tractor. IN-LINE FUEL FILTER (See Fig. 18) The fuel filter should be kept free of dirt and chaff to prevent engine damage from tractor and mower...
... "PRODUCT SPECIFICATIONS" section of this manual. ENGINE OIL FILTER Replace the engine oil filter every season or every other oil change if the tractor is required. • With engine cool, remove filter and plug fuel line sections. • Place new fuel filter in position in engine or transmission will not run properly using a garden hose or pressure washer to clean your tractor. IN-LINE FUEL FILTER (See Fig. 18) The fuel filter should be kept free of dirt and chaff to prevent engine damage from tractor and mower...
User Manual
Page 19
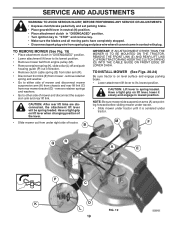
... rear mower bracket (D) - SERVICE AND ADJUSTMENTS WARNING: TO AVOID SERIOUS INJURY, BEFORE PERFORMING ANY SERVICE OR ADJUSTMENTS: • Depress clutch/brake pedal fully and set parking brake. • Place gearshift lever in neutral (N) position. • Place attachment clutch in "DISENGAGED" position. • Turn ignition key to "STOP" and remove key. • Make sure the blades and all moving parts have completely stopped. • Disconnect spark plug wire from spark plug and place wire where it...
... rear mower bracket (D) - SERVICE AND ADJUSTMENTS WARNING: TO AVOID SERIOUS INJURY, BEFORE PERFORMING ANY SERVICE OR ADJUSTMENTS: • Depress clutch/brake pedal fully and set parking brake. • Place gearshift lever in neutral (N) position. • Place attachment clutch in "DISENGAGED" position. • Turn ignition key to "STOP" and remove key. • Make sure the blades and all moving parts have completely stopped. • Disconnect spark plug wire from spark plug and place wire where it...
User Manual
Page 20
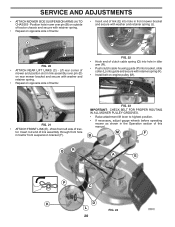
... retainer spring. • Repeat on engine pulley (M). FIG. 23 IMPORTANT: CHECK BELT FOR PROPER ROUTING IN ALL MOWER PULLEY GROOVES. • Raise attachment lift lever to highest position. • If necessary, adjust gauge wheels before operating mower as shown in idler arm (R). • Push clutch cable housing guide (P) into hole in the Operation section of trac- Work from left side of this manual. E A B FIG. 20 • ATTACH REAR LIFT LINKS (C) - SERVICE AND ADJUSTMENTS • ATTACH MOWER...
... retainer spring. • Repeat on engine pulley (M). FIG. 23 IMPORTANT: CHECK BELT FOR PROPER ROUTING IN ALL MOWER PULLEY GROOVES. • Raise attachment lift lever to highest position. • If necessary, adjust gauge wheels before operating mower as shown in idler arm (R). • Push clutch cable housing guide (P) into hole in the Operation section of trac- Work from left side of this manual. E A B FIG. 20 • ATTACH REAR LIFT LINKS (C) - SERVICE AND ADJUSTMENTS • ATTACH MOWER...
User Manual
Page 22
...; Remove belt from stationary idler (A) and clutching idler (B). • Pull belt slack toward rear of tractor. BELT INSTALLATION - • Install new belt from tractor rear to manually push the tractor forward. Park the tractor on bottom side of manual). BELT REMOVAL - • Remove mower from tractor (See "TO REMOVE MOWER" in this section of left footrest. You may be serviced. Engage parking brake. SERVICE AND ADJUSTMENTS TO REPLACE MOWER BLADE DRIVE BELT (See Fig. 29) The mower blade drive belt may also check brake by: • Park tractor on a level...
...; Remove belt from stationary idler (A) and clutching idler (B). • Pull belt slack toward rear of tractor. BELT INSTALLATION - • Install new belt from tractor rear to manually push the tractor forward. Park the tractor on bottom side of manual). BELT REMOVAL - • Remove mower from tractor (See "TO REMOVE MOWER" in this section of left footrest. You may be serviced. Engage parking brake. SERVICE AND ADJUSTMENTS TO REPLACE MOWER BLADE DRIVE BELT (See Fig. 29) The mower blade drive belt may also check brake by: • Park tractor on a level...
User Manual
Page 23
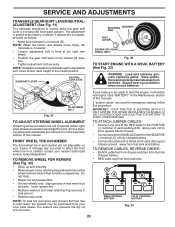
... your tractor. DO NOT USE YOUR TRACTOR BATTERY TO START OTHER VEHICLES. SERVICE AND ADJUSTMENTS TRANSAXLE GEAR SHIFT LEVER NEUTRALADJUSTMENT (See Fig. 31) The transaxle should be recharged. (See "BATTERY" in the neutral (N) position. • Tighten adjustment bolt securely. NOTE: If additional clearance is needed , proceed as follows: • Make sure transaxle is preset at the factory; NOTE: When the tractor rear wheels move mower deck height to...
... your tractor. DO NOT USE YOUR TRACTOR BATTERY TO START OTHER VEHICLES. SERVICE AND ADJUSTMENTS TRANSAXLE GEAR SHIFT LEVER NEUTRALADJUSTMENT (See Fig. 31) The transaxle should be recharged. (See "BATTERY" in the neutral (N) position. • Tighten adjustment bolt securely. NOTE: If additional clearance is needed , proceed as follows: • Make sure transaxle is preset at the factory; NOTE: When the tractor rear wheels move mower deck height to...

User Manual
Page 24
... engine manual. TO ADJUST CARBURETOR Your carburetor is not adjustable. Slide terminal cover over terminal. • Connect BLACK grounding cable to negative (-) terminal with 20 amp automotive-type plug-in front of tractor. • To replace, reverse above procedure. See electrical wiring diagram in the backside of the grill. • Close hood. Fig. 35 ENGINE TO ADJUST THROTTLE CONTROL CABLE The throttle control has been preset at the same time. Before connecting battery, remove metal...
... engine manual. TO ADJUST CARBURETOR Your carburetor is not adjustable. Slide terminal cover over terminal. • Connect BLACK grounding cable to negative (-) terminal with 20 amp automotive-type plug-in front of tractor. • To replace, reverse above procedure. See electrical wiring diagram in the backside of the grill. • Close hood. Fig. 35 ENGINE TO ADJUST THROTTLE CONTROL CABLE The throttle control has been preset at the same time. Before connecting battery, remove metal...
User Manual
Page 25
... cover that all rusted or chipped paint surfaces; BATTERY • Fully charge the battery for storage. • After a period of oil through spark plug hole(s) into cylinder(s). • Turn ignition key to "START" position for a few seconds to distribute oil. • Replace with gasoline in the Maintenance section of this manual). Always follow the mix ratio found on concrete or damp surfaces. ENGINE OIL Drain oil (with engine warm) and replace with battery...
... cover that all rusted or chipped paint surfaces; BATTERY • Fully charge the battery for storage. • After a period of oil through spark plug hole(s) into cylinder(s). • Turn ignition key to "START" position for a few seconds to distribute oil. • Replace with gasoline in the Maintenance section of this manual). Always follow the mix ratio found on concrete or damp surfaces. ENGINE OIL Drain oil (with engine warm) and replace with battery...
User Manual
Page 26
... Adjust Carburetor" in Operation section. 3. Blown fuse. 5. Loose or damaged wiring. 7. Clean battery terminals. 6. Check all wiring. 7. Loss of mower housing. 4. Build-up of adjustment. 15. Dirty fuel filter. 8. Dirty engine air screen/fins. 12. Check oil level/change spark plug. 7. Clean/replace muffler. 13. Excessive vibration 1. Replace blade. Engine flooded. 4. CORRECTION 1. Dirty air filter. 2. Bad spark plug. 3. Stale or dirty fuel. 6. Engine will not start CAUSE 1. Corroded battery terminals. 3. Faulty solenoid or starter. 1. Clean...
... Adjust Carburetor" in Operation section. 3. Blown fuse. 5. Loose or damaged wiring. 7. Clean battery terminals. 6. Check all wiring. 7. Loss of mower housing. 4. Build-up of adjustment. 15. Dirty fuel filter. 8. Dirty engine air screen/fins. 12. Check oil level/change spark plug. 7. Clean/replace muffler. 13. Excessive vibration 1. Replace blade. Engine flooded. 4. CORRECTION 1. Dirty air filter. 2. Bad spark plug. 3. Stale or dirty fuel. 6. Engine will not start CAUSE 1. Corroded battery terminals. 3. Faulty solenoid or starter. 1. Clean...

User Manual
Page 27
... Mower deck not level. 3. Clean underside of grass, leaves, and trash around mandrels to slower speed. 3. Replace blade mandrel. Mower drive belt worn. 9. Turn light switch "ON". 2. Check wiring, switches and connections. Poor cut - Obstruction in this manual. 11. Frozen idler pulley. 4. Engine speed too slow. 2. Low/uneven tire air pressure. 6. Level mower deck. 5. Bulb(s) or lamp(s) burned out. 3. Bad battery cell(s). 2. Poor cable connections. 3. Check/clean all connections. 3. Engine "backfires" when 1. If not corrected, contact an authorized service center...
... Mower deck not level. 3. Clean underside of grass, leaves, and trash around mandrels to slower speed. 3. Replace blade mandrel. Mower drive belt worn. 9. Turn light switch "ON". 2. Check wiring, switches and connections. Poor cut - Obstruction in this manual. 11. Frozen idler pulley. 4. Engine speed too slow. 2. Low/uneven tire air pressure. 6. Level mower deck. 5. Bulb(s) or lamp(s) burned out. 3. Bad battery cell(s). 2. Poor cable connections. 3. Check/clean all connections. 3. Engine "backfires" when 1. If not corrected, contact an authorized service center...
User Manual
Page 30
... will repair or replace, at our option, without charge to be defective due to materials or workmanship. Should you , any power equipment unit or attachment are belts, blades, blade adapters, normal wear, normal adjustments, standard hardware and normal maintenance. 7. This Warranty gives you specific legal rights, and you 1/12 of the price of a new Battery for each full month from locale to any parts...
... will repair or replace, at our option, without charge to be defective due to materials or workmanship. Should you , any power equipment unit or attachment are belts, blades, blade adapters, normal wear, normal adjustments, standard hardware and normal maintenance. 7. This Warranty gives you specific legal rights, and you 1/12 of the price of a new Battery for each full month from locale to any parts...


