

User Manual
Page 2
.... • Avoid starting . • Do not put hands or feet near rotating parts or under the influence of riding mower-related injuries. Uneven terrain could cause the machine to cool before dismounting. • Disengage blades when not mowing. catchers or other hidden ...can lose traction with the instructions, to protect themselves and others from serious injury. • Follow the manufacturer's recommendation for Ride-On Mowers DANGER: THIS CUTTING MACHINE IS CAPABLE OF AMPUTATING HANDS AND FEET AND THROWING OBJECTS. If the tires lose traction, disengage the blades ...
.... • Avoid starting . • Do not put hands or feet near rotating parts or under the influence of riding mower-related injuries. Uneven terrain could cause the machine to cool before dismounting. • Disengage blades when not mowing. catchers or other hidden ...can lose traction with the instructions, to protect themselves and others from serious injury. • Follow the manufacturer's recommendation for Ride-On Mowers DANGER: THIS CUTTING MACHINE IS CAPABLE OF AMPUTATING HANDS AND FEET AND THROWING OBJECTS. If the tires lose traction, disengage the blades ...
User Manual
Page 3
...if anyone enters the area. • Never carry passengers. • Do not mow in contact with manufacturer's recommended parts, when necessary. • Mower blades are explosive. • Extinguish all nuts and bolts tight to cool before refueling. • Never fuel the machine indoors. • Never store...and down slopes (15° Max), not across. • Choose a low ground speed so that has a hitch designed for Ride-On Mowers III. SAFETY RULES Safe Operation Practices for towing. CHILDREN Tragic accidents can occur if the operator is clear of ignition. • Use only ...
...if anyone enters the area. • Never carry passengers. • Do not mow in contact with manufacturer's recommended parts, when necessary. • Mower blades are explosive. • Extinguish all nuts and bolts tight to cool before refueling. • Never fuel the machine indoors. • Never store...and down slopes (15° Max), not across. • Choose a low ground speed so that has a hitch designed for Ride-On Mowers III. SAFETY RULES Safe Operation Practices for towing. CHILDREN Tragic accidents can occur if the operator is clear of ignition. • Use only ...
User Manual
Page 8
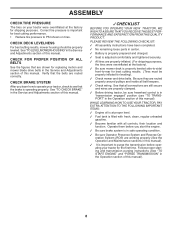
... TO ASSURE THAT YOU RECEIVE THE BEST PERFORMANCE AND SATISFACTION FROM THIS QUALITY PRODUCT. CHECK DECK LEVELNESS For best cutting results, mower housing should be sure freewheel control is in "transmission engaged" position (see that are working properly (See the Operation and Maintenance... properly around pulleys and inside all belt keepers. ✓ Check wiring. Operate them before operating your tractor for replacing motion and mower blade drive belts in the Service and Adjustments section of this manual). Correct tire pressure is operating properly. PLEASE REVIEW THE FOLLOWING ...
... TO ASSURE THAT YOU RECEIVE THE BEST PERFORMANCE AND SATISFACTION FROM THIS QUALITY PRODUCT. CHECK DECK LEVELNESS For best cutting results, mower housing should be sure freewheel control is in "transmission engaged" position (see that are working properly (See the Operation and Maintenance... properly around pulleys and inside all belt keepers. ✓ Check wiring. Operate them before operating your tractor for replacing motion and mower blade drive belts in the Service and Adjustments section of this manual). Correct tire pressure is operating properly. PLEASE REVIEW THE FOLLOWING ...
User Manual
Page 9
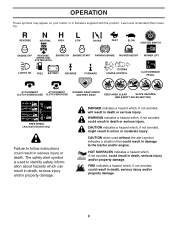
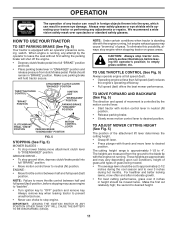
REVERSE NEUTRAL HIGH LOW CHOKE FAST SLOW IGNITION SWITCH ENGINE OFF REVERSE OPERATION SYSTEM (ROS) ENGINE ON ENGINE START PARKING BRAKE MOWER HEIGHT MOWER LIFT LIGHTS ON FUEL BATTERY REVERSE FORWARD CRUISE CONTROL CLUTCH/BRAKE PEDAL 15 15 ATTACHMENT ATTACHMENT CLUTCH DISENGAGED CLUTCH ENGAGED DANGER, KEEP HANDS AND FEET ...
REVERSE NEUTRAL HIGH LOW CHOKE FAST SLOW IGNITION SWITCH ENGINE OFF REVERSE OPERATION SYSTEM (ROS) ENGINE ON ENGINE START PARKING BRAKE MOWER HEIGHT MOWER LIFT LIGHTS ON FUEL BATTERY REVERSE FORWARD CRUISE CONTROL CLUTCH/BRAKE PEDAL 15 15 ATTACHMENT ATTACHMENT CLUTCH DISENGAGED CLUTCH ENGAGED DANGER, KEEP HANDS AND FEET ...
User Manual
Page 10
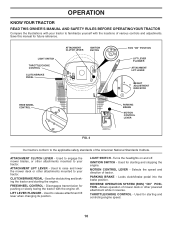
...attachments mounted to the applicable safety standards of the American National Standards Institute. Used for future reference. Used to engage the mower blades, or other attachments mounted to release attachment lift lever when changing its position. LIGHT SWITCH - MOTION CONTROL LEVER ...- Selects the speed and direction of various controls and adjustments. Used to raise and lower the mower deck or other powered attachment while in reverse. IGNITION SWITCH - Save this manual for starting and controling engine speed. 10 Turns...
...attachments mounted to the applicable safety standards of the American National Standards Institute. Used for future reference. Used to engage the mower blades, or other attachments mounted to release attachment lift lever when changing its position. LIGHT SWITCH - MOTION CONTROL LEVER ...- Selects the speed and direction of various controls and adjustments. Used to raise and lower the mower deck or other powered attachment while in reverse. IGNITION SWITCH - Save this manual for starting and controling engine speed. 10 Turns...
User Manual
Page 11
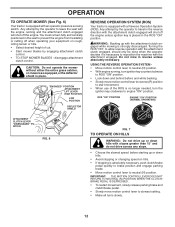
.... GROUND DRIVE - • To stop ground drive, depress clutch/brake pedal into full "BRAKE" position and hold tractor secure. TO ADJUST MOWER CUTTING HEIGHT (See Fig. 5) The position of the attachment lift lever determines the cutting height. • Grasp lift lever. • Press...engine at less than full speed (fast) reduces the engine's operating efficiency. • Full speed (fast) offers the best mower performance. Always wear safety glasses or eye shields while operating your tractor or performing any adjustments or repairs. Pedal should be cut relatively high...
.... GROUND DRIVE - • To stop ground drive, depress clutch/brake pedal into full "BRAKE" position and hold tractor secure. TO ADJUST MOWER CUTTING HEIGHT (See Fig. 5) The position of the attachment lift lever determines the cutting height. • Grasp lift lever. • Press...engine at less than full speed (fast) reduces the engine's operating efficiency. • Full speed (fast) offers the best mower performance. Always wear safety glasses or eye shields while operating your tractor or performing any adjustments or repairs. Pedal should be cut relatively high...
User Manual
Page 12
..."ON" position. WARNING: Backing up with a Reverse Operation System (ROS). CAUTION: Do not operate the mower without either the entire grass catcher, on mowers so equipped,or the deflector shield in reverse unless absolutely necessary. USING THE REVERSE OPERATION SYSTEM •... tractor is equipped with the attachment clutch engaged while mowing is strongly discouraged. Any attempt by engaging attachment clutch control. • TO STOP MOWER BLADES - ROS "ON" POSITION ENGINE "ON" POSITION (NORMAL OPERATING) ATTACHMENT CLUTCH LEVER "DISENGAGED" POSITION FIG. 6 02828 FIG. 7 ...
..."ON" position. WARNING: Backing up with a Reverse Operation System (ROS). CAUTION: Do not operate the mower without either the entire grass catcher, on mowers so equipped,or the deflector shield in reverse unless absolutely necessary. USING THE REVERSE OPERATION SYSTEM •... tractor is equipped with the attachment clutch engaged while mowing is strongly discouraged. Any attempt by engaging attachment clutch control. • TO STOP MOWER BLADES - ROS "ON" POSITION ENGINE "ON" POSITION (NORMAL OPERATING) ATTACHMENT CLUTCH LEVER "DISENGAGED" POSITION FIG. 6 02828 FIG. 7 ...
User Manual
Page 14
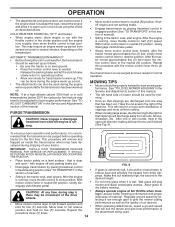
... is running , move motion control lever to give best performance of the attachment being used for best engine performance. MOWING TIPS • Mower should be used . This will result in the tractor seat, start engine. After the engine is running , move throttle control to fast...ground. • Place the motion control lever in neutral (N) position, slowly dis- • engage clutch/brake pedal. This procedure will plug mower and leave undesirable clumps. After the engine is wet. CAUTION: At any trapped air inside the transmission which may have developed during step 4,...
... is running , move motion control lever to give best performance of the attachment being used for best engine performance. MOWING TIPS • Mower should be used . This will result in the tractor seat, start engine. After the engine is running , move throttle control to fast...ground. • Place the motion control lever in neutral (N) position, slowly dis- • engage clutch/brake pedal. This procedure will plug mower and leave undesirable clumps. After the engine is wet. CAUTION: At any trapped air inside the transmission which may have developed during step 4,...
User Manual
Page 15
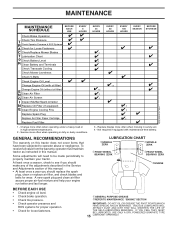
... pressure. • Check operator presence and ROS systems for proper operation. • Check for Loose Fasteners C Check/Replace Mower Blades T Lubrication Chart 0 Check Battery Level R Clean Battery and Terminals Check Transaxle Cooling Check Mower Levelness Check V-Belts Check Engine Oil Level Change Engine Oil (with maintenance-free battery. VISCOUS LUBRICANTS WILL ATTRACT...
... pressure. • Check operator presence and ROS systems for proper operation. • Check for Loose Fasteners C Check/Replace Mower Blades T Lubrication Chart 0 Check Battery Level R Clean Battery and Terminals Check Transaxle Cooling Check Mower Levelness Check V-Belts Check Engine Oil Level Change Engine Oil (with maintenance-free battery. VISCOUS LUBRICANTS WILL ATTRACT...
User Manual
Page 16
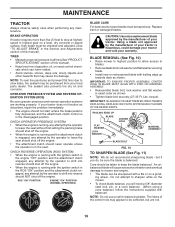
...should shut off the engine. • When the engine is running with balancer). torque). An unbalanced blade will cause excessive vibration and eventual damage to mower and engine. • The blade can be centered, but if you will need a 5/8" diameter steel bolt, pin, or a cone balancer. (When... Reassemble blade bolt, lock washer and flat washer securing blade. • Install new or resharpened blade with a file or on the mower. • To check blade balance, you do not recommend sharpening blade - but are working properly. Do not attempt to blades. • Remove ...
...should shut off the engine. • When the engine is running with balancer). torque). An unbalanced blade will cause excessive vibration and eventual damage to mower and engine. • The blade can be centered, but if you will need a 5/8" diameter steel bolt, pin, or a cone balancer. (When... Reassemble blade bolt, lock washer and flat washer securing blade. • Install new or resharpened blade with a file or on the mower. • To check blade balance, you do not recommend sharpening blade - but are working properly. Do not attempt to blades. • Remove ...
User Manual
Page 18
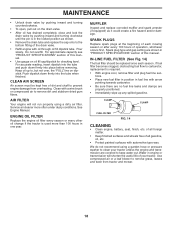
... and wheels free of your tractor unless the engine and transmission are properly positioned. • Immediately wipe up to prevent engine damage from tractor and mower. 18 tions. • Place new fuel filter in position in the locked position as it could create a fire hazard and/or damage. Push...
... and wheels free of your tractor unless the engine and transmission are properly positioned. • Immediately wipe up to prevent engine damage from tractor and mower. 18 tions. • Place new fuel filter in position in the locked position as it could create a fire hazard and/or damage. Push...

User Manual
Page 19
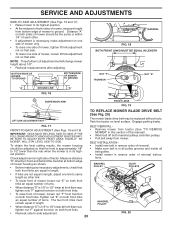
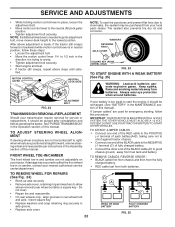
...• Connect suspension arms to rear deck brackets and secure with retainer springs. • Connect anti-swaybar to raise suspension arms. Slide mower out from spark plug and place wire where it cannot come in contact with plug. SERVICE AND ADJUSTMENTS WARNING: TO AVOID SERIOUS INJURY, ... Disconnect suspension arms from rear deck brackets by removing retainer springs. • Disconnect front links from deck by re- TO LEVEL MOWER HOUSING Adjust the mower while tractor is parked on idler pulley bolt and secure with large retainer spring. • Place flat washer and clutch spring...
...• Connect suspension arms to rear deck brackets and secure with retainer springs. • Connect anti-swaybar to raise suspension arms. Slide mower out from spark plug and place wire where it cannot come in contact with plug. SERVICE AND ADJUSTMENTS WARNING: TO AVOID SERIOUS INJURY, ... Disconnect suspension arms from rear deck brackets by removing retainer springs. • Disconnect front links from deck by re- TO LEVEL MOWER HOUSING Adjust the mower while tractor is parked on idler pulley bolt and secure with large retainer spring. • Place flat washer and clutch spring...
User Manual
Page 20
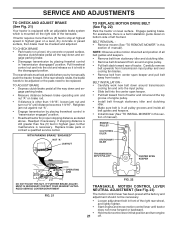
... that the front is approximately 1/8" to 1/2" lower than rear, tighten nuts "F" against trunnion on both front links. • To raise front of mower, loosen nut "F" from trunnion on that side. tions. Park the tractor on both front links an equal number of this manual). • Work ...belt off both front links. Engage parking brake. Tighten nut "E" on right side of adjustment nut will change mower height about 1/8". • Recheck measurements after adjusting. NOTE: Three full turns of tractor. The two front links must remain equal in this ...
... that the front is approximately 1/8" to 1/2" lower than rear, tighten nuts "F" against trunnion on both front links. • To raise front of mower, loosen nut "F" from trunnion on that side. tions. Park the tractor on both front links an equal number of this manual). • Work ...belt off both front links. Engage parking brake. Tighten nut "E" on right side of adjustment nut will change mower height about 1/8". • Recheck measurements after adjusting. NOTE: Three full turns of tractor. The two front links must remain equal in this ...
User Manual
Page 21
...the way down and engage parking brake. • Disengage transmission by placing freewheel control in this sec- BELT REMOVAL • Remove mower (See "TO REMOVE MOWER" in "transmission engaged" position. • Road test tractor for proper stopping distance as stated above. NOTE: Observe entire motion ... idler. • Make sure belt is in all pulley grooves and inside all belt guides and keepers. • Install mower (See "TO INSTALL MOWER" in front of left footrest. IF FURTHER BRAKE ADJUSTMENT IS NECESSARY CONTACT YOUR NEAREST AUTHORIZED SERVICE CENTER/DEPARTMENT FIG. 21 FIG...
...the way down and engage parking brake. • Disengage transmission by placing freewheel control in this sec- BELT REMOVAL • Remove mower (See "TO REMOVE MOWER" in "transmission engaged" position. • Road test tractor for proper stopping distance as stated above. NOTE: Observe entire motion ... idler. • Make sure belt is in all pulley grooves and inside all belt guides and keepers. • Install mower (See "TO INSTALL MOWER" in front of left footrest. IF FURTHER BRAKE ADJUSTMENT IS NECESSARY CONTACT YOUR NEAREST AUTHORIZED SERVICE CENTER/DEPARTMENT FIG. 21 FIG...
User Manual
Page 22
... in or camber, contact your tractor. If damage has occurred to the lowest position. If your battery is needed to get to adjustment bolt, move mower deck height to affect the front wheel toe-in the Assembly section of this manual. Tire sealant also prevents tire dry rot and corrosion. FIG...
... in or camber, contact your tractor. If damage has occurred to the lowest position. If your battery is needed to get to adjustment bolt, move mower deck height to affect the front wheel toe-in the Assembly section of this manual. Tire sealant also prevents tire dry rot and corrosion. FIG...
User Manual
Page 24
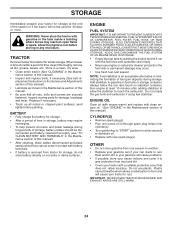
When mower is to be disconnected and battery cleaned thoroughly (see "TO CLEAN BATTERY AND TERMINALS" in your gasoline will cause problems. • If possible, store your ... for damage, breakage and wear. Plastic cannot breathe which allows condensation to form and will not be used for 30 days or more. TRACTOR Remove mower from dust and dirt. • Cover your tractor with new spark plug(s). Store in a clean, dry area. • Clean entire tractor (See "CLEANING" in storage...
When mower is to be disconnected and battery cleaned thoroughly (see "TO CLEAN BATTERY AND TERMINALS" in your gasoline will cause problems. • If possible, store your ... for damage, breakage and wear. Plastic cannot breathe which allows condensation to form and will not be used for 30 days or more. TRACTOR Remove mower from dust and dirt. • Cover your tractor with new spark plug(s). Store in a clean, dry area. • Clean entire tractor (See "CLEANING" in storage...

User Manual
Page 25
...service center/department. Blown fuse. 5. Disengage attachment clutch. 3. Recharge or replace battery. 2. Dirty fuel filter. 8. Spark plug wire loose. 11. Carburetor out of mower housing. 4. Clean underside of adjustment. 15. Replace damaged parts. 25 Fill fuel tank. 2. Dirty fuel filter. 5. Depress brake pedal. 2. Check/replace solenoid ... dead battery. 4. Loose or damaged wiring. 7. Build-up of adjustment. 1. Dirty air filter. 5. Engine valves out of grass, leaves and trash under mower. 4. Replace fuel filter. 8. Replace blade mandrel. 3.
...service center/department. Blown fuse. 5. Disengage attachment clutch. 3. Recharge or replace battery. 2. Dirty fuel filter. 8. Spark plug wire loose. 11. Carburetor out of mower housing. 4. Clean underside of adjustment. 15. Replace damaged parts. 25 Fill fuel tank. 2. Dirty fuel filter. 5. Depress brake pedal. 2. Check/replace solenoid ... dead battery. 4. Loose or damaged wiring. 7. Build-up of adjustment. 1. Dirty air filter. 5. Engine valves out of grass, leaves and trash under mower. 4. Replace fuel filter. 8. Replace blade mandrel. 3.

User Manual
Page 26
... grass, leaves, and trash around mandrels to dry before stopping engine. 26 Replace blade. Replace blade mandrel. 5. Poor grass discharge 1. Mower deck not level. 5. Replace with attachment clutch engaged 1. Light switch is shifted into reverse 1. Turn light switch "ON". 2. Replace alternator.... Move throttle control between half and full speed (fast) position before stopping engine. 1. Clogged mower deck vent holes from buildup of drive Engine "backfires" when turning engine "OFF" 1. Clean underside of grass, leaves and...
... grass, leaves, and trash around mandrels to dry before stopping engine. 26 Replace blade. Replace blade mandrel. 5. Poor grass discharge 1. Mower deck not level. 5. Replace with attachment clutch engaged 1. Light switch is shifted into reverse 1. Turn light switch "ON". 2. Replace alternator.... Move throttle control between half and full speed (fast) position before stopping engine. 1. Clogged mower deck vent holes from buildup of drive Engine "backfires" when turning engine "OFF" 1. Clean underside of grass, leaves and...


