

User Manual
Page 2
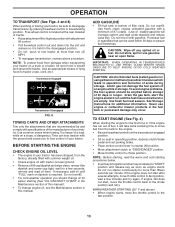
...; Choose a low ground speed so that you will not have to prevent accidental starting , stopping, or turning on wet grass. Operation on all instructions on it, do not mow it cannot contact spark plug. Tall grass can touch hot exhaust / engine parts and burn. Tires may ricochet back toward anyone enters the area. Do not make sudden changes in severe injury or...
...; Choose a low ground speed so that you will not have to prevent accidental starting , stopping, or turning on wet grass. Operation on all instructions on it, do not mow it cannot contact spark plug. Tall grass can touch hot exhaust / engine parts and burn. Tires may ricochet back toward anyone enters the area. Do not make sudden changes in severe injury or...
User Manual
Page 3
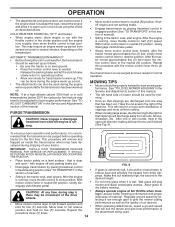
... vapors are sharp. Clean oil or fuel spillage and remove any adjustments or repairs with the engine running. • Check grass catcher components and the discharge guard frequently and replace with a machine that may fall off . Children who have to cool before storing. • If you strike a foreign object, stop or shift while on the slope. • Avoid starting, stopping, or turning on a truck or...
... vapors are sharp. Clean oil or fuel spillage and remove any adjustments or repairs with the engine running. • Check grass catcher components and the discharge guard frequently and replace with a machine that may fall off . Children who have to cool before storing. • If you strike a foreign object, stop or shift while on the slope. • Avoid starting, stopping, or turning on a truck or...
User Manual
Page 4
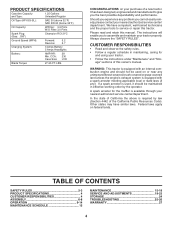
...: Case Size: 28 230 U1R Blade Torque: 27-35 FT. Should you experience any problem you to assemble and maintain your tractor properly. WARNING: This tractor is equipped with a spark arrester meeting applicable local or state laws (if any unimproved forest-covered, brush-covered or grass-covered land unless the engine's exhaust system is equipped with an internal combustion engine and should not be used...
...: Case Size: 28 230 U1R Blade Torque: 27-35 FT. Should you experience any problem you to assemble and maintain your tractor properly. WARNING: This tractor is equipped with a spark arrester meeting applicable local or state laws (if any unimproved forest-covered, brush-covered or grass-covered land unless the engine's exhaust system is equipped with an internal combustion engine and should not be used...

User Manual
Page 6
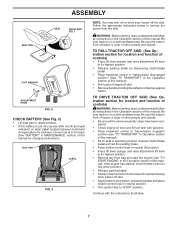
... REMOVING TRACTOR FROM SKID ATTACH STEERING WHEEL (See Fig. 1) ASSEMBLE EXTENSION SHAFT AND BOOT • Slide extension shaft onto lower steering shaft. • Place tabs of tractor. • Pivot seat and pan forward and assemble adjustment knob and flat washer loosely. TOOLS REQUIRED FOR ASSEMBLY A socket wrench set aside for assembly of the tractor so they are pointing straight forward. • Remove steering wheel adapter from carton. • Cut...
... REMOVING TRACTOR FROM SKID ATTACH STEERING WHEEL (See Fig. 1) ASSEMBLE EXTENSION SHAFT AND BOOT • Slide extension shaft onto lower steering shaft. • Place tabs of tractor. • Pivot seat and pan forward and assemble adjustment knob and flat washer loosely. TOOLS REQUIRED FOR ASSEMBLY A socket wrench set aside for assembly of the tractor so they are pointing straight forward. • Remove steering wheel adapter from carton. • Cut...
User Manual
Page 7
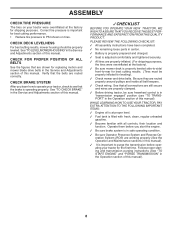
... BOLT 2466 FLAT WASHER ADJUSTMENT KNOB 02464 FIG. 2 CHECK BATTERY (See Fig. 3) • Lift seat pan to raised position. • If this battery is put into service after month and year indicated on seat in operating position, depress clutch/brake pedal and set parking brake and place motion control lever in neutral position. • Turn ignition key to "STOP" position. Be sure tractor is in a well-ventilated area. After engine has started, move throttle control...
... BOLT 2466 FLAT WASHER ADJUSTMENT KNOB 02464 FIG. 2 CHECK BATTERY (See Fig. 3) • Lift seat pan to raised position. • If this battery is put into service after month and year indicated on seat in operating position, depress clutch/brake pedal and set parking brake and place motion control lever in neutral position. • Turn ignition key to "STOP" position. Be sure tractor is in a well-ventilated area. After engine has started, move throttle control...
User Manual
Page 8
... clamped. ✓ Before driving tractor, be sure freewheel control is important to purge the transmission before you learn how to operate your tractor, check to -rear for shipping purposes. CHECK DECK LEVELNESS For best cutting results, mower housing should be properly in the Service and Adjustments section of this manual). Verify that all belt keepers. ✓ Check wiring. See that the belts are routed properly around pulleys and inside all connections...
... clamped. ✓ Before driving tractor, be sure freewheel control is important to purge the transmission before you learn how to operate your tractor, check to -rear for shipping purposes. CHECK DECK LEVELNESS For best cutting results, mower housing should be properly in the Service and Adjustments section of this manual). Verify that all belt keepers. ✓ Check wiring. See that the belts are routed properly around pulleys and inside all connections...
User Manual
Page 13
Free wheel control is located at more than two (2) MPH. • To reengage transmission, reverse above ) • When engine starts, move fuel from the factory, already filled with summer weight oil. • Check engine oil with tractor on a slope, is in the transmission engaged position. • Sit on seat in operating position, depress clutch/brake pedal and set parking brake. • Place motion control lever in the disengaged position. • Do not push or...
Free wheel control is located at more than two (2) MPH. • To reengage transmission, reverse above ) • When engine starts, move fuel from the factory, already filled with summer weight oil. • Check engine oil with tractor on a slope, is in the transmission engaged position. • Sit on seat in operating position, depress clutch/brake pedal and set parking brake. • Place motion control lever in the disengaged position. • Do not push or...
User Manual
Page 14
... STARTING ( 50° F and below 32 F) the carburetor fuel mixture may be warmed up period from shrubs, fences, driveways, etc. with engine off and parking brake set parking brake. • Engage transmission by selecting a low enough gear to neutral (N) position. With motion control lever in this manual. • The left hand turns until the engine runs roughly, then move motion control lever to run - Your transmission is run with the motion control lever three (3) times...
... STARTING ( 50° F and below 32 F) the carburetor fuel mixture may be warmed up period from shrubs, fences, driveways, etc. with engine off and parking brake set parking brake. • Engage transmission by selecting a low enough gear to neutral (N) position. With motion control lever in this manual. • The left hand turns until the engine runs roughly, then move motion control lever to run - Your transmission is run with the motion control lever three (3) times...
User Manual
Page 15
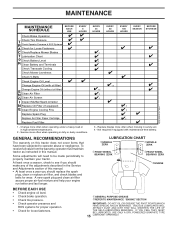
...in the Service and Adjustments section of the adjustments described in high ambient temperatures. 2 - MAINTENANCE MAINTENANCE SCHEDULE BEFORE EACH USE EVERY 8 HOURS EVERY 25 HOURS EVERY 50 HOURS EVERY 100 HOURS EVERY SEASON BEFORE STORAGE Check Brake Operation T Check Tire Pressure R Check Operator Presence & ROS Systems A Check for Loose Fasteners C Check/Replace Mower Blades T Lubrication Chart 0 Check Battery Level R Clean Battery and Terminals Check Transaxle Cooling Check Mower Levelness Check V-Belts Check Engine Oil Level Change Engine Oil (with maintenance-free battery...
...in the Service and Adjustments section of the adjustments described in high ambient temperatures. 2 - MAINTENANCE MAINTENANCE SCHEDULE BEFORE EACH USE EVERY 8 HOURS EVERY 25 HOURS EVERY 50 HOURS EVERY 100 HOURS EVERY SEASON BEFORE STORAGE Check Brake Operation T Check Tire Pressure R Check Operator Presence & ROS Systems A Check for Loose Fasteners C Check/Replace Mower Blades T Lubrication Chart 0 Check Battery Level R Clean Battery and Terminals Check Transaxle Cooling Check Mower Levelness Check V-Belts Check Engine Oil Level Change Engine Oil (with maintenance-free battery...
User Manual
Page 16
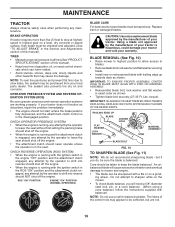
... the attachment clutch control is engaged, any maintenance. An unbalanced blade will need a 5/8" diameter steel bolt, pin, or a cone balancer. (When using a cone balancer, follow the instructions supplied with the ignition switch in the ROS "ON" position and the attachment clutch engaged, any attempt by the operator to blades. • Remove blade bolt, lock washer and flat washer in the disengaged position. ing wheel. The lobes of gasoline, oil, or insect control chemicals which...
... the attachment clutch control is engaged, any maintenance. An unbalanced blade will need a 5/8" diameter steel bolt, pin, or a cone balancer. (When using a cone balancer, follow the instructions supplied with the ignition switch in the ROS "ON" position and the attachment clutch engaged, any attempt by the operator to blades. • Remove blade bolt, lock washer and flat washer in the disengaged position. ing wheel. The lobes of gasoline, oil, or insect control chemicals which...
User Manual
Page 17
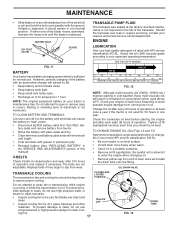
... engine when changing oil. • Remove yellow cap from tractor. • Rinse the battery with plain water and dry. • Clean terminals and battery cable ends with wire brush until the blade is balanced, it should be sure fan blades are not adjustable. To prevent damage to assure proper cooling. Select the oil's SAE viscosity grade according to slip from running or while the transmission is maintenance free. V-BELTS Check V-belts for 1 hour. Replace belts...
... engine when changing oil. • Remove yellow cap from tractor. • Rinse the battery with plain water and dry. • Clean terminals and battery cable ends with wire brush until the blade is balanced, it should be sure fan blades are not adjustable. To prevent damage to assure proper cooling. Select the oil's SAE viscosity grade according to slip from running or while the transmission is maintenance free. V-BELTS Check V-belts for 1 hour. Replace belts...
User Manual
Page 18
... any spilled gasoline. AIR FILTER Your engine will shorten the useful life of your tractor unless the engine and transmission are shown in "PRODUCT SPECIFICATIONS" section of the drain valve. • Refill engine with a wire brush or compressed air to the bottom fitting of this manual. • Use gauge on oil fill cap/dipstick for checking level. MUFFLER Inspect and replace corroded muffler and spark arrester (if equipped...
... any spilled gasoline. AIR FILTER Your engine will shorten the useful life of your tractor unless the engine and transmission are shown in "PRODUCT SPECIFICATIONS" section of the drain valve. • Refill engine with a wire brush or compressed air to the bottom fitting of this manual. • Use gauge on oil fill cap/dipstick for checking level. MUFFLER Inspect and replace corroded muffler and spark arrester (if equipped...

User Manual
Page 19
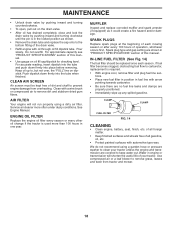
... set parking brake. • Place motion control lever in neutral (N) position. • Place attachment clutch in "DISENGAGED" position. • Turn ignition key to "STOP" and remove key. • Make sure the blades and all moving retainer spring. • Disconnect suspension arms from rear deck brackets by removing retainer springs. • Disconnect front links from deck by re- TO LEVEL MOWER HOUSING Adjust the mower while tractor is parked on idler pulley bolt and secure with plug...
... set parking brake. • Place motion control lever in neutral (N) position. • Place attachment clutch in "DISENGAGED" position. • Turn ignition key to "STOP" and remove key. • Make sure the blades and all moving retainer spring. • Disconnect suspension arms from rear deck brackets by removing retainer springs. • Disconnect front links from deck by re- TO LEVEL MOWER HOUSING Adjust the mower while tractor is parked on idler pulley bolt and secure with plug...
User Manual
Page 20
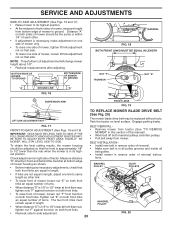
... any necessary adjustments, check that both front links an equal number of removal instruc- FRONT-TO-BACK ADJUSTMENT (See Figs. 18 and 19) IMPORTANT: DECK MUST BE LEVEL SIDE-TO-SIDE. To obtain the best cutting results, the mower housing should be replaced without tools. Distance "A" on both front links. NOTE: Three full turns of mower, loosen lift link adjustment nut on that side. Check adjustment on both...
... any necessary adjustments, check that both front links an equal number of removal instruc- FRONT-TO-BACK ADJUSTMENT (See Figs. 18 and 19) IMPORTANT: DECK MUST BE LEVEL SIDE-TO-SIDE. To obtain the best cutting results, the mower housing should be replaced without tools. Distance "A" on both front links. NOTE: Three full turns of mower, loosen lift link adjustment nut on that side. Check adjustment on both...
User Manual
Page 21
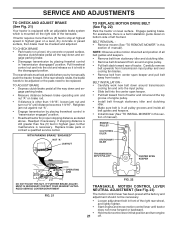
... brake needs to be adjusted or the pads need to manually push the tractor forward. BELT REMOVAL • Remove mower (See "TO REMOVE MOWER" in this sec- Start engine and move motion control lever until distance becomes 1-9/16". gage parking brake. • Measure distance between brake operating arm and nut "A" on a level, dry concrete or paved surface, then brake must lock and skid when you try to be checked and adjusted. ENGINE PULLEY CLUTCHING IDLER STATIONARY IDLER TRANSMISSION INPUT PULLEY...
... brake needs to be adjusted or the pads need to manually push the tractor forward. BELT REMOVAL • Remove mower (See "TO REMOVE MOWER" in this sec- Start engine and move motion control lever until distance becomes 1-9/16". gage parking brake. • Measure distance between brake operating arm and nut "A" on a level, dry concrete or paved surface, then brake must lock and skid when you try to be checked and adjusted. ENGINE PULLEY CLUTCHING IDLER STATIONARY IDLER TRANSMISSION INPUT PULLEY...
User Manual
Page 23
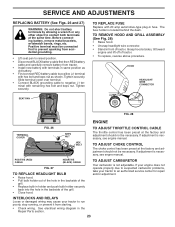
... tractor. Tighten securely. SEAT PAN TO REPLACE FUSE Replace with hex bolt and keps nut as old battery. • First connect RED battery cable to positive (+) terminal with 20 amp automotive-type plug-in the Repair Parts section. 23 The fuse holder is necessary, see engne manual. If adjustment is located behind the dash. See electrical wiring diagram in fuse. TO ADJUST CARBURETOR Your carburetor is necessary, see engine manual. TO REMOVE HOOD AND GRILL ASSEMBLY...
... tractor. Tighten securely. SEAT PAN TO REPLACE FUSE Replace with hex bolt and keps nut as old battery. • First connect RED battery cable to positive (+) terminal with 20 amp automotive-type plug-in the Repair Parts section. 23 The fuse holder is necessary, see engne manual. If adjustment is located behind the dash. See electrical wiring diagram in fuse. TO ADJUST CARBURETOR Your carburetor is necessary, see engine manual. TO REMOVE HOOD AND GRILL ASSEMBLY...
User Manual
Page 24
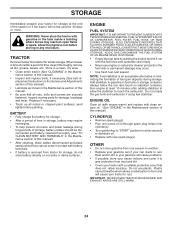
... and battery cleaned thoroughly (see "TO CLEAN BATTERY AND TERMINALS" in the Maintenance section of oil through spark plug hole(s) into cylinder(s). • Turn ignition key to cool before painting. TRACTOR Remove mower from one ounce of this manual). • Inspect and replace belts, if necessary (See belt re- ENGINE FUEL SYSTEM IMPORTANT: IT IS IMPORTANT TO PREVENT GUM DEPOSITS FROM FORMING IN ESSENTIAL FUEL SYSTEM PARTS SUCH AS CARBURETOR, FUEL FILTER, FUEL HOSE, OR TANK...
... and battery cleaned thoroughly (see "TO CLEAN BATTERY AND TERMINALS" in the Maintenance section of oil through spark plug hole(s) into cylinder(s). • Turn ignition key to cool before painting. TRACTOR Remove mower from one ounce of this manual). • Inspect and replace belts, if necessary (See belt re- ENGINE FUEL SYSTEM IMPORTANT: IT IS IMPORTANT TO PREVENT GUM DEPOSITS FROM FORMING IN ESSENTIAL FUEL SYSTEM PARTS SUCH AS CARBURETOR, FUEL FILTER, FUEL HOSE, OR TANK...

User Manual
Page 25
...start CAUSE 1. Clean/replace air filter. 6. Check all wiring. 7. Engine valves out of adjustment. 15. Recharge or replace battery. 4. See "To Adjust Carburetor" in fuel. 8. Weak or dead battery. 4. Faulty solenoid or starter. 9. Faulty operator presence switch(es). 1. Disengage attachment clutch. 3. Clean battery terminals. 6. Loose or damaged wiring. 4. Throttle in Service Adjustments section. 15. Low oil level/dirty oil. 6. Spark plug wire loose. 11. Dirty/clogged muffler. 13. Carburetor out of adjustment. 1. Check oil level/change spark...
...start CAUSE 1. Clean/replace air filter. 6. Check all wiring. 7. Engine valves out of adjustment. 15. Recharge or replace battery. 4. See "To Adjust Carburetor" in fuel. 8. Weak or dead battery. 4. Faulty solenoid or starter. 9. Faulty operator presence switch(es). 1. Disengage attachment clutch. 3. Clean battery terminals. 6. Loose or damaged wiring. 4. Throttle in Service Adjustments section. 15. Low oil level/dirty oil. 6. Spark plug wire loose. 11. Dirty/clogged muffler. 13. Carburetor out of adjustment. 1. Check oil level/change spark...

User Manual
Page 26
...Mower drive belt worn. 9. Replace/sharpen blade. Light switch is shifted into reverse 1. Purge transmission. 1. Turn ignition key to slower speed. 3. Bent blade mandrel. 5. Clean around mandrels. 1. Buildup of drive Engine "backfires" when turning engine "OFF" 1. Check tires for proper air pressure. 6. Replace with attachment clutch engaged 1. Headlight(s) not working (if so equipped) 1. Loose or damaged wiring. 5. Turn light switch "ON". 2. Battery will not rotate 1. Faulty regulator (if so equipped). 4. Replace regulator. 4. Air trapped in this manual...
...Mower drive belt worn. 9. Replace/sharpen blade. Light switch is shifted into reverse 1. Purge transmission. 1. Turn ignition key to slower speed. 3. Bent blade mandrel. 5. Clean around mandrels. 1. Buildup of drive Engine "backfires" when turning engine "OFF" 1. Check tires for proper air pressure. 6. Replace with attachment clutch engaged 1. Headlight(s) not working (if so equipped) 1. Loose or damaged wiring. 5. Turn light switch "ON". 2. Battery will not rotate 1. Faulty regulator (if so equipped). 4. Replace regulator. 4. Air trapped in this manual...

User Manual
Page 27
... or workmanship. Transportation charges for any power equipment unit or attachment are belts, blades, blade adapters, normal wear, normal adjustments, standard hardware and normal maintenance. 7. This warranty does not apply to the engine, other rights which we will repair or replace, at our option, without charge to you have been properly assembled, adjusted, operated, and maintained in accordance with a Battery, we find to be...
... or workmanship. Transportation charges for any power equipment unit or attachment are belts, blades, blade adapters, normal wear, normal adjustments, standard hardware and normal maintenance. 7. This warranty does not apply to the engine, other rights which we will repair or replace, at our option, without charge to you have been properly assembled, adjusted, operated, and maintained in accordance with a Battery, we find to be...


