

User Manual
Page 2
...dangerous. WARNING: Do not coast down a hill in speed or direction, which can affect the stability of your tractor. Keep clear of riding mower-related injuries. Stop the blades when crossing gravel surfaces. • Do not operate machine without the entire grass catcher, discharge chute, or ... or shift while on the slope. • Do not mow on a slope. These operators should evaluate their ability to operate the riding mower safely enough to cool before dismounting. • Disengage blades when not mowing. Uneven terrain could cause the machine to a complete stop engine,...
...dangerous. WARNING: Do not coast down a hill in speed or direction, which can affect the stability of your tractor. Keep clear of riding mower-related injuries. Stop the blades when crossing gravel surfaces. • Do not operate machine without the entire grass catcher, discharge chute, or ... or shift while on the slope. • Do not mow on a slope. These operators should evaluate their ability to operate the riding mower safely enough to cool before dismounting. • Disengage blades when not mowing. Uneven terrain could cause the machine to a complete stop engine,...

User Manual
Page 3
...a truck or trailer bed with the blades shut off and be seriously injured or interfere with manufacturer's recommended parts, when necessary. • Mower blades are sharp. SERVICE SAFE HANDLING OF GASOLINE To avoid personal injury or property damage, use extra caution when servicing them . • Keep... (15° Max), not across. Never carry children, even with plastic liner. Before and while backing, look down for Ride-On Mowers III. Choose a low ground speed so that may suddenly appear in contact with safe machine operation. If machine stops while going uphill, disengage...
...a truck or trailer bed with the blades shut off and be seriously injured or interfere with manufacturer's recommended parts, when necessary. • Mower blades are sharp. SERVICE SAFE HANDLING OF GASOLINE To avoid personal injury or property damage, use extra caution when servicing them . • Keep... (15° Max), not across. Never carry children, even with plastic liner. Before and while backing, look down for Ride-On Mowers III. Choose a low ground speed so that may suddenly appear in contact with safe machine operation. If machine stops while going uphill, disengage...
User Manual
Page 7
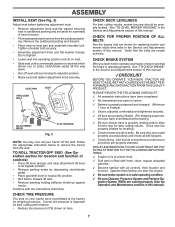
...The tires on seat. • Slide seat until a comfortable position is operating properly. CHECK DECK LEVELNESS For best cutting results, mower housing should be properly inflated for location and function of controls) • Press lift lever plunger and raise attachment lift lever to ... Service and Adjustments section of this manual). 7 Follow the appropriate instruction below to remove the tractor from the cardboard packing. See "TO LEVEL MOWER HOUSING" in carton. ✓ Battery is properly prepared and charged. (Minimum 1 hour at 6 amps). ✓ Seat is adjusted comfortably and...
...The tires on seat. • Slide seat until a comfortable position is operating properly. CHECK DECK LEVELNESS For best cutting results, mower housing should be properly inflated for location and function of controls) • Press lift lever plunger and raise attachment lift lever to ... Service and Adjustments section of this manual). 7 Follow the appropriate instruction below to remove the tractor from the cardboard packing. See "TO LEVEL MOWER HOUSING" in carton. ✓ Battery is properly prepared and charged. (Minimum 1 hour at 6 amps). ✓ Seat is adjusted comfortably and...

User Manual
Page 8
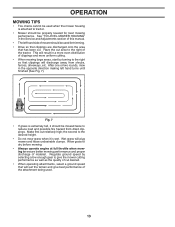
... OPERATION SYSTEM (ROS) ENGINE ON ENGINE START PARKING BRAKE PARKING BRAKE PARKING BRAKE LOCKED UNLOCKED OVER TEMP LIGHT FUEL OIL PRESSURE BATTERY REVERSE FORWARD MOWER HEIGHT 15 MOWER LIFT 15 ATTACHMENT ATTACHMENT CLUTCH DISENGAGED CLUTCH ENGAGED BRAKE/CLUTCH PEDAL KEEP AREA CLEAR SLOPE HAZARDS (SEE SAFETY RULES SECTION) LIGHTS ON FREE WHEEL...
... OPERATION SYSTEM (ROS) ENGINE ON ENGINE START PARKING BRAKE PARKING BRAKE PARKING BRAKE LOCKED UNLOCKED OVER TEMP LIGHT FUEL OIL PRESSURE BATTERY REVERSE FORWARD MOWER HEIGHT 15 MOWER LIFT 15 ATTACHMENT ATTACHMENT CLUTCH DISENGAGED CLUTCH ENGAGED BRAKE/CLUTCH PEDAL KEEP AREA CLEAR SLOPE HAZARDS (SEE SAFETY RULES SECTION) LIGHTS ON FREE WHEEL...

User Manual
Page 9
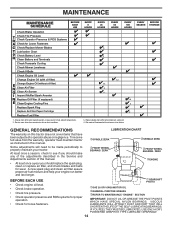
...stopping the engine. Selects the speed and direction of various controls and adjustments. Used to the safety standards of mower deck or other powered attachment while in reverse. GEARSHIFT LEVER - Allows operation of the American National Standards Institute. Used to ...LEVER - Used for future reference. Save this manual for starting and controlling engine speed. 9 Used to raise, lower, and adjust the mower deck or other attachments mounted to your tractor. LIGHT SWITCH THROTTLE/CHOKE CONTROL CLUTCH/BRAKE PEDAL ATTACHMENT CLUTCH LEVER IGNITION SWITCH ROS "ON" ...
...stopping the engine. Selects the speed and direction of various controls and adjustments. Used to the safety standards of mower deck or other powered attachment while in reverse. GEARSHIFT LEVER - Allows operation of the American National Standards Institute. Used to ...LEVER - Used for future reference. Save this manual for starting and controlling engine speed. 9 Used to raise, lower, and adjust the mower deck or other attachments mounted to your tractor. LIGHT SWITCH THROTTLE/CHOKE CONTROL CLUTCH/BRAKE PEDAL ATTACHMENT CLUTCH LEVER IGNITION SWITCH ROS "ON" ...

User Manual
Page 10
.... ATTACHMENT CLUTCH LEVER "ENGAGED" POSITION NOTE: Under certain conditions when tractor is running, any adjustments or repairs. CAUTION: Always stop mower blades,move lever to 4". THROTTLE/ CHOKE CONTROL LEVER "BRAKE" POSITION IGNITION KEY "DISENGAGED" POSITION PARKING BRAKE "ENGAGED" POSITION CLUTCH/...1-1/2" to desired position. IMPORTANT: BRING TRACTOR TO A COMPLETE STOP BEFORE SHIFTING OR CHANGING GEARS. Fig. 5 STOPPING (See Fig. 5) MOWER BLADES • To stop tractor completely, as described above, before stopping may cause "browning" of grass being mowed. • The ...
.... ATTACHMENT CLUTCH LEVER "ENGAGED" POSITION NOTE: Under certain conditions when tractor is running, any adjustments or repairs. CAUTION: Always stop mower blades,move lever to 4". THROTTLE/ CHOKE CONTROL LEVER "BRAKE" POSITION IGNITION KEY "DISENGAGED" POSITION PARKING BRAKE "ENGAGED" POSITION CLUTCH/...1-1/2" to desired position. IMPORTANT: BRING TRACTOR TO A COMPLETE STOP BEFORE SHIFTING OR CHANGING GEARS. Fig. 5 STOPPING (See Fig. 5) MOWER BLADES • To stop tractor completely, as described above, before stopping may cause "browning" of grass being mowed. • The ...

User Manual
Page 11
... the engine unless ignition key is dangerous. USING THE REVERSE OPERATION SYSTEM • Depress clutch/brake pedal all turns slowly. TO STOP MOWER BLADES (See Fig. 6) Disengage attachment clutch control. ATTACHMENT CLUTCH LEVER "DISENGAGED" POSITION "ENGAGED" POSITION ATTACHMENT LIFT LEVER HIGH POSITION LOW... position and engage parking brake. • Move gearshift lever to prevent the engine from damage when transporting your tractor on mowers so equipped, or the deflector shield in reverse unless absolutely necessary. Use common sense when towing. Tires can lose traction ...
... the engine unless ignition key is dangerous. USING THE REVERSE OPERATION SYSTEM • Depress clutch/brake pedal all turns slowly. TO STOP MOWER BLADES (See Fig. 6) Disengage attachment clutch control. ATTACHMENT CLUTCH LEVER "DISENGAGED" POSITION "ENGAGED" POSITION ATTACHMENT LIFT LEVER HIGH POSITION LOW... position and engage parking brake. • Move gearshift lever to prevent the engine from damage when transporting your tractor on mowers so equipped, or the deflector shield in reverse unless absolutely necessary. Use common sense when towing. Tires can lose traction ...
User Manual
Page 13
... large areas, start by selecting a low enough gear to reduce load and possible fire hazard from shrubs, fences, driveways, etc. See "TO LEVEL MOWER HOUSING" in the opposite direction making left hand side of the attachment being used. 13 Fig. 7 • If grass is wet. the second to...engine at full throttle when mowing to the right of material. Have the cut relatively high; Regulate ground speed by turning to tractor. • Mower should be properly leveled for trimming. • Drive so that clippings are discharged onto the area that has been cut desired. • When ...
... large areas, start by selecting a low enough gear to reduce load and possible fire hazard from shrubs, fences, driveways, etc. See "TO LEVEL MOWER HOUSING" in the opposite direction making left hand side of the attachment being used. 13 Fig. 7 • If grass is wet. the second to...engine at full throttle when mowing to the right of material. Have the cut relatively high; Regulate ground speed by turning to tractor. • Mower should be properly leveled for trimming. • Drive so that clippings are discharged onto the area that has been cut desired. • When ...
User Manual
Page 14
... the spark plug, clean or replace air filter, and check blades and belts for Loose Fasteners C Check/Replace Mower Blades T Lubrication Chart 0 Check Battery Level R Clean Battery and Terminals Check Transaxle Cooling Check Mower Levelness Check V-Belts Check Engine Oil Level Change Engine Oil (with maintenance-free battery. Replace blades more often...
... the spark plug, clean or replace air filter, and check blades and belts for Loose Fasteners C Check/Replace Mower Blades T Lubrication Chart 0 Check Battery Level R Clean Battery and Terminals Check Transaxle Cooling Check Mower Levelness Check V-Belts Check Engine Oil Level Change Engine Oil (with maintenance-free battery. Replace blades more often...
User Manual
Page 15
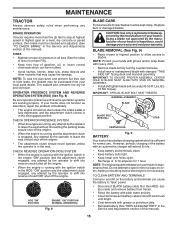
.... IMPORTANT: SPECIAL BLADE BOLT HEAT TREATED. ROS "ON" POSITION 02828 ENGINE "ON" POSITION (NORMAL OPERATING) Fig. 8 BLADE CARE For best results mower blades must be kept sharp. NOTE: The original equipment battery on the battery and terminals can harm rubber. • Avoid stumps, stones, deep ruts... stop at 6-10 amperes for normal use. Tire sealant also prevents tire dry rot and corrosion. BLADE REMOVAL (See Fig. 9) • Raise mower to highest position to allow access to open . • Recharge at highest speed in the engine "ON" position and the attachment clutch engaged, ...
.... IMPORTANT: SPECIAL BLADE BOLT HEAT TREATED. ROS "ON" POSITION 02828 ENGINE "ON" POSITION (NORMAL OPERATING) Fig. 8 BLADE CARE For best results mower blades must be kept sharp. NOTE: The original equipment battery on the battery and terminals can harm rubber. • Avoid stumps, stones, deep ruts... stop at 6-10 amperes for normal use. Tire sealant also prevents tire dry rot and corrosion. BLADE REMOVAL (See Fig. 9) • Raise mower to highest position to allow access to open . • Recharge at highest speed in the engine "ON" position and the attachment clutch engaged, ...
User Manual
Page 17
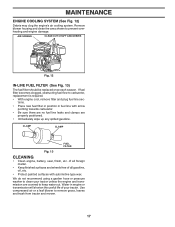
...) Debris may clog the engine's air cooling system. Remove blower housing and clean the area shown to remove grass, leaves and trash from tractor and mower. 17
...) Debris may clog the engine's air cooling system. Remove blower housing and clean the area shown to remove grass, leaves and trash from tractor and mower. 17
User Manual
Page 18
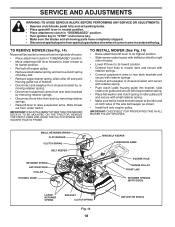
... (BOTH SIDES) LARGE RETAINER SPRING BRACKET 02845 CLUTCH SPRING Fig. 14 18 DEFLECTOR SHIELD IMPORTANT: CHECK BELT FOR PROPER ROUTING IN ALL MOWER PULLEY GROOVES. SERVICE AND ADJUSTMENTS WARNING: TO AVOID SERIOUS INJURY, BEFORE PERFORMING ANY SERVICE OR ADJUSTMENTS: • Depress clutch/brake pedal ...tractor with deflector shield to right side of tractor. • Lower lift lever to its lowest position. • Connect front links to mower deck and secure with retainer springs.. • Connect suspension arms to rear deck brackets and secure with retainer springs. • Connect anti...
... (BOTH SIDES) LARGE RETAINER SPRING BRACKET 02845 CLUTCH SPRING Fig. 14 18 DEFLECTOR SHIELD IMPORTANT: CHECK BELT FOR PROPER ROUTING IN ALL MOWER PULLEY GROOVES. SERVICE AND ADJUSTMENTS WARNING: TO AVOID SERIOUS INJURY, BEFORE PERFORMING ANY SERVICE OR ADJUSTMENTS: • Depress clutch/brake pedal ...tractor with deflector shield to right side of tractor. • Lower lift lever to its lowest position. • Connect front links to mower deck and secure with retainer springs.. • Connect suspension arms to rear deck brackets and secure with retainer springs. • Connect anti...

User Manual
Page 19
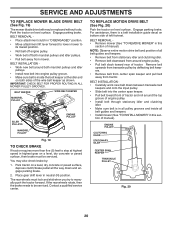
... to 1/2" lower at front than rear, tighten nut "F" against trunnion on both front links. • To raise front of mower, loosen nut "F" from bottom edge of mower to -side adjustment. IF THE FOLLOWING FRONT-TO-BACK ADJUSTMENT IS NECESSARY, BE SURE TO ADJUST BOTH FRONT LINKS EQUALLY SO...turns. • When distance "D" is 1/8" to its highest position. Measure distance "D" directly in front and behind the mandrel at bottom edge of mower housing as shown. • Before making any necessary adjustments, check that side. MANDREL 01268 Fig. 15 SUSPENSION ARM "D" "D" Fig. 17 BOTH ...
... to 1/2" lower at front than rear, tighten nut "F" against trunnion on both front links. • To raise front of mower, loosen nut "F" from bottom edge of mower to -side adjustment. IF THE FOLLOWING FRONT-TO-BACK ADJUSTMENT IS NECESSARY, BE SURE TO ADJUST BOTH FRONT LINKS EQUALLY SO...turns. • When distance "D" is 1/8" to its highest position. Measure distance "D" directly in front and behind the mandrel at bottom edge of mower housing as shown. • Before making any necessary adjustments, check that side. MANDREL 01268 Fig. 15 SUSPENSION ARM "D" "D" Fig. 17 BOTH ...
User Manual
Page 20
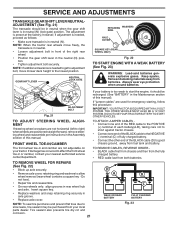
... speed in highest gear on both mandrel pulleys and idler pulleys. • Pull belt away from tractor. BELT REMOVAL • Remove mower (See "TO REMOVE MOWER" in neutral (N) position. For assistance, there is a belt installation guide decal on a level, dry concrete or paved surface, depress... REPLACE MOTION DRIVE BELT (See Fig. 20) Park the tractor on level surface. IMPORTANT: CHECK BELT FOR PROPER ROUTING IN ALL MOWER PULLEY GROOVES. You may be serviced. The rear wheels must be serviced. ENGINE PULLEY CLUTCHING IDLER STATIONARY IDLER CENTER SPAN KEEPER TRANSAXLE ...
... speed in highest gear on both mandrel pulleys and idler pulleys. • Pull belt away from tractor. BELT REMOVAL • Remove mower (See "TO REMOVE MOWER" in neutral (N) position. For assistance, there is a belt installation guide decal on a level, dry concrete or paved surface, depress... REPLACE MOTION DRIVE BELT (See Fig. 20) Park the tractor on level surface. IMPORTANT: CHECK BELT FOR PROPER ROUTING IN ALL MOWER PULLEY GROOVES. You may be serviced. The rear wheels must be serviced. ENGINE PULLEY CLUTCHING IDLER STATIONARY IDLER CENTER SPAN KEEPER TRANSAXLE ...
User Manual
Page 21
... up axle securely. • Remove axle cover, retaining ring and washers to good chassis ground, away from batteries. NOTE: When the tractor rear wheels move mower deck height to right) when wheels are positioned straight forward, remove steering wheel and reassemble per instructions in the Assembly section of this manual). Always...
... up axle securely. • Remove axle cover, retaining ring and washers to good chassis ground, away from batteries. NOTE: When the tractor rear wheels move mower deck height to right) when wheels are positioned straight forward, remove steering wheel and reassemble per instructions in the Assembly section of this manual). Always...
User Manual
Page 23
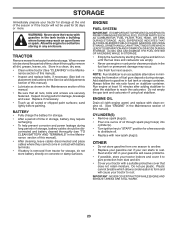
TRACTOR Remove mower from tractor for storage, do not store battery directly on stabilizer container. placement instructions in the Service and Adjustments section of this manual). • Lubricate ... ENGINE WHILE IN STORAGE. • Empty the fuel tank by starting the engine and let it thoroughly, remove all rusted or chipped paint surfaces; When mower is an acceptable alternative in the Maintenance section of this manual). sand lightly before storing in your gasoline will cause problems. • If possible, store...
TRACTOR Remove mower from tractor for storage, do not store battery directly on stabilizer container. placement instructions in the Service and Adjustments section of this manual). • Lubricate ... ENGINE WHILE IN STORAGE. • Empty the fuel tank by starting the engine and let it thoroughly, remove all rusted or chipped paint surfaces; When mower is an acceptable alternative in the Maintenance section of this manual). sand lightly before storing in your gasoline will cause problems. • If possible, store...

User Manual
Page 24
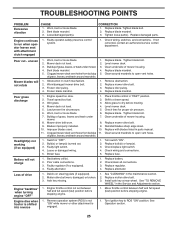
.... 7. Stale or dirty fuel. 9. Check oil level/change spark plug. 7. Engine valves out of grass, leaves and trash under mower. 4. Check all wiring. 4. Contact an authorized service center/department. 1. Faulty solenoid or starter. 9. Carburetor out of power 8. Wait... will not start . 4. Blown fuse. 5. Dirty/clogged muffler. 13. See "To Adjust Carburetor" in "CHOKE" position. 3. Out of mower housing. 4. See "TO START ENGINE" in Operation section. 3. Contact an authorized service center/department. 1. Clean underside of fuel. 2. Clean/...
.... 7. Stale or dirty fuel. 9. Check oil level/change spark plug. 7. Engine valves out of grass, leaves and trash under mower. 4. Check all wiring. 4. Contact an authorized service center/department. 1. Faulty solenoid or starter. 9. Carburetor out of power 8. Wait... will not start . 4. Blown fuse. 5. Dirty/clogged muffler. 13. See "To Adjust Carburetor" in "CHOKE" position. 3. Out of mower housing. 4. See "TO START ENGINE" in Operation section. 3. Contact an authorized service center/department. 1. Clean underside of fuel. 2. Clean/...
User Manual
Page 25
...Tighten blade bolt. 2. Poor grass discharge Headlight(s) not working (if so equipped) 1. Worn, bent or loose blade. 6. Replace blade. Mower drive belt worn. 8. Check wiring and connections. 5. Bad battery cell(s). 2. Poor cable connections. 3. Engine throttle control not set between half... 5. Replace battery. 2. Motion drive belt worn, damaged, or broken. 3. Reverse operation system (ROS) is not "ON" while mower or other attachment is "OFF". 2. Engine continues to slower speed. 3. Check wiring, switches and connections. If not corrected, contact an...
...Tighten blade bolt. 2. Poor grass discharge Headlight(s) not working (if so equipped) 1. Worn, bent or loose blade. 6. Replace blade. Mower drive belt worn. 8. Check wiring and connections. 5. Bad battery cell(s). 2. Poor cable connections. 3. Engine throttle control not set between half... 5. Replace battery. 2. Motion drive belt worn, damaged, or broken. 3. Reverse operation system (ROS) is not "ON" while mower or other attachment is "OFF". 2. Engine continues to slower speed. 3. Check wiring, switches and connections. If not corrected, contact an...


