

User Manual
Page 2
...; Operate machine only in place and working. • Slow down slopes, not across. • Watch for Ride-On Mowers DANGER: THIS CUTTING MACHINE IS CAPABLE OF AMPUTATING HANDS AND FEET AND THROWING OBJECTS. Tires may ricochet back toward anyone. Do not make sudden changes in the manual before starting when setting up, transporting, adjusting or making repairs, always disconnect spark plug wire...
...; Operate machine only in place and working. • Slow down slopes, not across. • Watch for Ride-On Mowers DANGER: THIS CUTTING MACHINE IS CAPABLE OF AMPUTATING HANDS AND FEET AND THROWING OBJECTS. Tires may ricochet back toward anyone. Do not make sudden changes in the manual before starting when setting up, transporting, adjusting or making repairs, always disconnect spark plug wire...

User Manual
Page 3
.... • Mower blades are often attracted to the presence of ignition. • • Use only approved gasoline container. • • Never remove gas cap or add fuel with the engine running . • Check grass catcher components and the discharge chute frequently and replace with safe machine operation. Tragic accidents can occur if the operator is not alert to the machine and the mowing activity. Do not turn on...
.... • Mower blades are often attracted to the presence of ignition. • • Use only approved gasoline container. • • Never remove gas cap or add fuel with the engine running . • Check grass catcher components and the discharge chute frequently and replace with safe machine operation. Tragic accidents can occur if the operator is not alert to the machine and the mowing activity. Do not turn on...
User Manual
Page 4
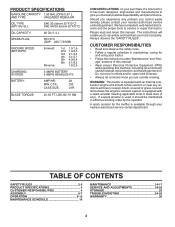
... OF CONTENTS SAFETY RULES 2-3 PRODUCT SPECIFICATIONS 4 CUSTOMER RESPONSIBILITIES 4 ASSEMBLY 6-7 OPERATION 8-13 MAINTENANCE SCHEDULE 14 MAINTENANCE 14-17 SERVICE AND ADJUSTMENTS 18-22 STORAGE 23 TROUBLESHOOTING 24-25 WARRANTY 26 4 PRODUCT SPECIFICATIONS GASOLINE CAPACITY 1.50 GALLONS/5,67 L AND TYPE: UNLEADED REGULAR OIL TYPE (API: SG-SL): SAE 30 (above 32°F/0°C) SAE 5W30 (below 32°F/0°C) OIL CAPACITY: 48 Oz./1,4 L SPARK PLUG: RC12YC (GAP: .030"/.76 MM) GROUND...
... OF CONTENTS SAFETY RULES 2-3 PRODUCT SPECIFICATIONS 4 CUSTOMER RESPONSIBILITIES 4 ASSEMBLY 6-7 OPERATION 8-13 MAINTENANCE SCHEDULE 14 MAINTENANCE 14-17 SERVICE AND ADJUSTMENTS 18-22 STORAGE 23 TROUBLESHOOTING 24-25 WARRANTY 26 4 PRODUCT SPECIFICATIONS GASOLINE CAPACITY 1.50 GALLONS/5,67 L AND TYPE: UNLEADED REGULAR OIL TYPE (API: SG-SL): SAE 30 (above 32°F/0°C) SAE 5W30 (below 32°F/0°C) OIL CAPACITY: 48 Oz./1,4 L SPARK PLUG: RC12YC (GAP: .030"/.76 MM) GROUND...
User Manual
Page 6
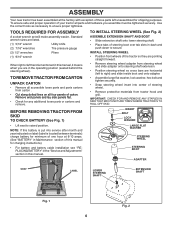
... steering shaft extension. • Position steering wheel so cross bars are listed. (1) 5/16" wrench Utility knife (2) 7/16" wrenches Tire pressure gauge (2) 1/2" wrenches Pliers (1) 9/16" wrench When right or left hand is located between terminals) charge battery for any additional loose parts or cartons and remove. Standard wrench sizes are horizontal (left unassembled for charging instructions). • For battery and battery cable installation see "REPLACING BATTERY" in the "Service and Adjustments" section...
... steering shaft extension. • Position steering wheel so cross bars are listed. (1) 5/16" wrench Utility knife (2) 7/16" wrenches Tire pressure gauge (2) 1/2" wrenches Pliers (1) 9/16" wrench When right or left hand is located between terminals) charge battery for any additional loose parts or cartons and remove. Standard wrench sizes are horizontal (left unassembled for charging instructions). • For battery and battery cable installation see "REPLACING BATTERY" in the "Service and Adjustments" section...
User Manual
Page 7
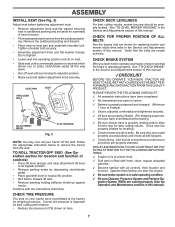
... drive belts. Continue with all belt keepers. ✓ Check wiring. CHECK DECK LEVELNESS For best cutting results, mower housing should be properly inflated for replacing motion and mower blade drive belts in safe operating condition. ✓ Be sure Operator Presence System and Reverse Operation System (ROS) are routed properly around pulleys and inside all controls, their location and function. CHECK BRAKE SYSTEM After you to remove the tractor from the cardboard packing. Tighten shoulder bolt securely. • Assemble adjustment knob...
... drive belts. Continue with all belt keepers. ✓ Check wiring. CHECK DECK LEVELNESS For best cutting results, mower housing should be properly inflated for replacing motion and mower blade drive belts in safe operating condition. ✓ Be sure Operator Presence System and Reverse Operation System (ROS) are routed properly around pulleys and inside all controls, their location and function. CHECK BRAKE SYSTEM After you to remove the tractor from the cardboard packing. Tighten shoulder bolt securely. • Assemble adjustment knob...

User Manual
Page 9
... BRAKE - LIGHT SWITCH - THROTTLE/CHOKE CONTROL - Used for starting the engine. Used to familiarize yourself with your tractor. Turns the headlights on and off. Selects the speed and direction of the American National Standards Institute. Locks clutch/brake pedal into the brake position. Save this manual for starting and controlling engine speed. 9 Used to raise, lower, and adjust the mower deck or other attachments mounted to your tractor to release attachment lift lever when changing its position. CLUTCH/BRAKE PEDAL - LIFT LEVER PLUNGER - GEARSHIFT LEVER - Used...
... BRAKE - LIGHT SWITCH - THROTTLE/CHOKE CONTROL - Used for starting the engine. Used to familiarize yourself with your tractor. Turns the headlights on and off. Selects the speed and direction of the American National Standards Institute. Locks clutch/brake pedal into the brake position. Save this manual for starting and controlling engine speed. 9 Used to raise, lower, and adjust the mower deck or other attachments mounted to your tractor to release attachment lift lever when changing its position. CLUTCH/BRAKE PEDAL - LIFT LEVER PLUNGER - GEARSHIFT LEVER - Used...

User Manual
Page 10
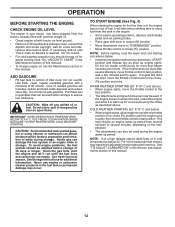
.... TO USE THROTTLE CONTROL (See Fig. 5) Always operate engine at full throttle. • Operating engine at less than full throttle reduces the battery charging rate. • Full throttle offers the best bagging and mower perfor- IMPORTANT: BRING TRACTOR TO A COMPLETE STOP BEFORE SHIFTING OR CHANGING GEARS. GROUND DRIVE • To stop engine when stopping tractor on grass areas. TO ADJUST MOWER CUTTING HEIGHT (See Fig. 5) The position of the attachment lift lever determines the cutting height...
.... TO USE THROTTLE CONTROL (See Fig. 5) Always operate engine at full throttle. • Operating engine at less than full throttle reduces the battery charging rate. • Full throttle offers the best bagging and mower perfor- IMPORTANT: BRING TRACTOR TO A COMPLETE STOP BEFORE SHIFTING OR CHANGING GEARS. GROUND DRIVE • To stop engine when stopping tractor on grass areas. TO ADJUST MOWER CUTTING HEIGHT (See Fig. 5) The position of the attachment lift lever determines the cutting height...
User Manual
Page 12
... octane. (Use of this manual. Drain the gas tank, start the engine and let it run out of 30 days or longer. Do not run with tractor on seat in operating position, depress clutch/brake pedal and set parking brake. • Place gear shift lever in neutral (N) position. • Move attachment clutch to "DISENGAGED" position. • Move throttle control to choke ( ) position. If the engine does not accept the load, restart the engine and allow engine to run starter continuously for...
... octane. (Use of this manual. Drain the gas tank, start the engine and let it run out of 30 days or longer. Do not run with tractor on seat in operating position, depress clutch/brake pedal and set parking brake. • Place gear shift lever in neutral (N) position. • Move attachment clutch to "DISENGAGED" position. • Move throttle control to choke ( ) position. If the engine does not accept the load, restart the engine and allow engine to run starter continuously for...
User Manual
Page 14
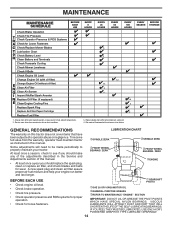
... • At least once a year you should replace the spark plug, clean or replace air filter, and check blades and belts for wear. MAINTENANCE MAINTENANCE SCHEDULE BEFORE EACH USE Check Brake Operation T Check Tire Pressure R Check Operator Presence & ROS Systems A Check for Loose Fasteners C Check/Replace Mower Blades T Lubrication Chart 0 Check Battery Level R Clean Battery and Terminals Check Transaxle Cooling Check Mower Levelness Check V-Belts Check Engine Oil Level Change Engine Oil (with maintenance-free battery. At least once a season, check to see if you should make any of...
... • At least once a year you should replace the spark plug, clean or replace air filter, and check blades and belts for wear. MAINTENANCE MAINTENANCE SCHEDULE BEFORE EACH USE Check Brake Operation T Check Tire Pressure R Check Operator Presence & ROS Systems A Check for Loose Fasteners C Check/Replace Mower Blades T Lubrication Chart 0 Check Battery Level R Clean Battery and Terminals Check Transaxle Cooling Check Mower Levelness Check V-Belts Check Engine Oil Level Change Engine Oil (with maintenance-free battery. At least once a season, check to see if you should make any of...
User Manual
Page 15
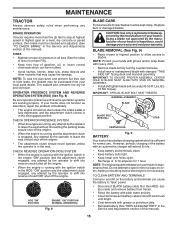
... battery cable and remove battery from your tractor is sufficient for normal use. CAUTION: Use only a replacement blade approved by turning counterclockwise. • Install new or resharpened blade with the ignition switch in all tires (See the sides of tires for 1 hour. BRAKE OPERATION If tractor requires more than five (5) feet to stop at 6-10 amperes for proper PSI). • Keep tires free of this manual). 15 NOTE: Protect your warranty. MAINTENANCE TRACTOR...
... battery cable and remove battery from your tractor is sufficient for normal use. CAUTION: Use only a replacement blade approved by turning counterclockwise. • Install new or resharpened blade with the ignition switch in all tires (See the sides of tires for 1 hour. BRAKE OPERATION If tractor requires more than five (5) feet to stop at 6-10 amperes for proper PSI). • Keep tires free of this manual). 15 NOTE: Protect your warranty. MAINTENANCE TRACTOR...
User Manual
Page 16
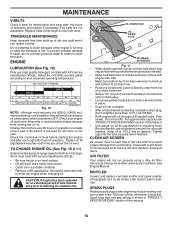
... not run properly using a dirty air filter. ENGINE LUBRICATION (See Fig. 10) Only use high pressure water or steam to remove dirt and stubborn dried gum fibers. Change the oil after each time you check the oil level. Check the crankcase oil level before oil change. Lbs./18 Nm) • Refill engine with a wire brush or compressed air to clean transaxle. Tighten cap onto the tube securely when finished. Clean with oil through oil fill dipstick tube. See Engine Manual. Spark plug type and gap setting...
... not run properly using a dirty air filter. ENGINE LUBRICATION (See Fig. 10) Only use high pressure water or steam to remove dirt and stubborn dried gum fibers. Change the oil after each time you check the oil level. Check the crankcase oil level before oil change. Lbs./18 Nm) • Refill engine with a wire brush or compressed air to clean transaxle. Tighten cap onto the tube securely when finished. Clean with oil through oil fill dipstick tube. See Engine Manual. Spark plug type and gap setting...
User Manual
Page 17
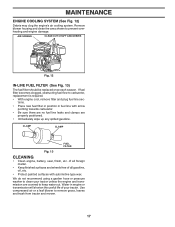
... may clog the engine's air cooling system. CLAMP CLAMP FUEL FILTER Fig. 13 CLEANING • Clean engine, battery, seat, finish, etc. Use compressed air or a leaf blower to carburetor, replacement is required. • With engine cool, remove filter and plug fuel line sections. • Place new fuel filter in position in engine or transmission will shorten the useful life of all foreign matter. • Keep finished surfaces and wheels free of your tractor unless the engine and transmission are properly positioned. • Immediately...
... may clog the engine's air cooling system. CLAMP CLAMP FUEL FILTER Fig. 13 CLEANING • Clean engine, battery, seat, finish, etc. Use compressed air or a leaf blower to carburetor, replacement is required. • With engine cool, remove filter and plug fuel line sections. • Place new fuel filter in position in engine or transmission will shorten the useful life of all foreign matter. • Keep finished surfaces and wheels free of your tractor unless the engine and transmission are properly positioned. • Immediately...
User Manual
Page 18
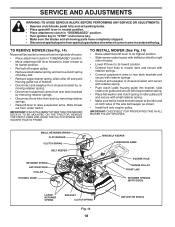
... CLUTCH SPRING BELT KEEPER RETAINER SPRING ANTI-SWAY BAR COLLAR HOUSING GUIDE WIRE BELT KEEPER SUSPENSION ARMS SQUARE HOLE ENGINE PULLEY FRONT LINK RETAINER SPRINGS (BOTH SIDES) LARGE RETAINER SPRING BRACKET 02845 CLUTCH SPRING Fig. 14 18 DEFLECTOR SHIELD SERVICE AND ADJUSTMENTS WARNING: TO AVOID SERIOUS INJURY, BEFORE PERFORMING ANY SERVICE OR ADJUSTMENTS: • Depress clutch/brake pedal fully and set parking brake. • Place gearshift lever in neutral position. • Place attachment clutch in "DISENGAGED" position. • Turn ignition...
... CLUTCH SPRING BELT KEEPER RETAINER SPRING ANTI-SWAY BAR COLLAR HOUSING GUIDE WIRE BELT KEEPER SUSPENSION ARMS SQUARE HOLE ENGINE PULLEY FRONT LINK RETAINER SPRINGS (BOTH SIDES) LARGE RETAINER SPRING BRACKET 02845 CLUTCH SPRING Fig. 14 18 DEFLECTOR SHIELD SERVICE AND ADJUSTMENTS WARNING: TO AVOID SERIOUS INJURY, BEFORE PERFORMING ANY SERVICE OR ADJUSTMENTS: • Depress clutch/brake pedal fully and set parking brake. • Place gearshift lever in neutral position. • Place attachment clutch in "DISENGAGED" position. • Turn ignition...
User Manual
Page 20
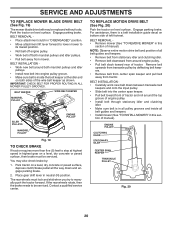
... the wire belt keeper as shown. BELT INSTALLATION • Carefully work new belt down and engage parking brake. 2. Park tractor on level surface. BELT REMOVAL • Remove mower (See "TO REMOVE MOWER" in this section of tractor and roll around both mandrel pulleys and idler pulleys. • Pull belt away from mower. BELT REMOVAL • Place attachment clutch in neutral (N) position. Contact a qualified service center. SERVICE AND ADJUSTMENTS TO REPLACE MOWER BLADE DRIVE BELT (See Fig. 19) The mower blade drive belt may also check brake by deflecting belt keepers...
... the wire belt keeper as shown. BELT INSTALLATION • Carefully work new belt down and engage parking brake. 2. Park tractor on level surface. BELT REMOVAL • Remove mower (See "TO REMOVE MOWER" in this section of tractor and roll around both mandrel pulleys and idler pulleys. • Pull belt away from mower. BELT REMOVAL • Place attachment clutch in neutral (N) position. Contact a qualified service center. SERVICE AND ADJUSTMENTS TO REPLACE MOWER BLADE DRIVE BELT (See Fig. 19) The mower blade drive belt may also check brake by deflecting belt keepers...
User Manual
Page 21
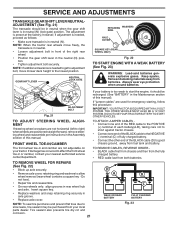
... the tractor rear wheels move mower deck height to right) when wheels are positioned straight forward, remove steering wheel and reassemble per instructions in the Assembly section of this manual. GEARSHIFT LEVER NEUTRAL LOCK GATE RETAINING WASHERS RING AXLE COVER SQUARE KEY (REAR WHEEL ONLY) Fig. 22 TO START ENGINE WITH A WEAK BATTERY (See Fig. 23) WARNING: Lead-acid batteries generate explosive gases. FRONT WHEEL TOE-IN/CAMBER TO ATTACH JUMPER CABLES...
... the tractor rear wheels move mower deck height to right) when wheels are positioned straight forward, remove steering wheel and reassemble per instructions in the Assembly section of this manual. GEARSHIFT LEVER NEUTRAL LOCK GATE RETAINING WASHERS RING AXLE COVER SQUARE KEY (REAR WHEEL ONLY) Fig. 22 TO START ENGINE WITH A WEAK BATTERY (See Fig. 23) WARNING: Lead-acid batteries generate explosive gases. FRONT WHEEL TOE-IN/CAMBER TO ATTACH JUMPER CABLES...
User Manual
Page 22
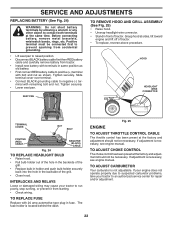
... starting. • Check wiring. SEAT PAN TO REMOVE HOOD AND GRILL ASSEMBLY (See Fig. 25) • Raise hood. • Unsnap headlight wire connector. • Stand in same position as old battery. • First connect RED battery cable to positive (+) terminal with remaining bolt and nut. HOOD HEADLIGHT WIRE CONNECTOR 02495 TERMINAL COVER 02602 NUT BOLT POSITIVE (RED) CABLE 02603 NEGATIVE (BLACK) CABLE Fig. 24 TO REPLACE HEADLIGHT BULB • Raise hood. • Pull bulb...
... starting. • Check wiring. SEAT PAN TO REMOVE HOOD AND GRILL ASSEMBLY (See Fig. 25) • Raise hood. • Unsnap headlight wire connector. • Stand in same position as old battery. • First connect RED battery cable to positive (+) terminal with remaining bolt and nut. HOOD HEADLIGHT WIRE CONNECTOR 02495 TERMINAL COVER 02602 NUT BOLT POSITIVE (RED) CABLE 02603 NEGATIVE (BLACK) CABLE Fig. 24 TO REPLACE HEADLIGHT BULB • Raise hood. • Pull bulb...
User Manual
Page 23
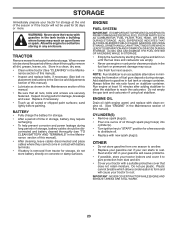
... oil. • Replace with clean engine oil. (See "ENGINE" in the Maintenance section of oil through spark plug hole(s) into cylinder(s). • Turn ignition key to "START" position for a few seconds to cool before painting. placement instructions in the Service and Adjustments section of this manual). • Lubricate as shown in the Maintenance section of storage, battery cables should be used for 30 days or more. Do not empty the gas tank and carburetor if using fuel...
... oil. • Replace with clean engine oil. (See "ENGINE" in the Maintenance section of oil through spark plug hole(s) into cylinder(s). • Turn ignition key to "START" position for a few seconds to cool before painting. placement instructions in the Service and Adjustments section of this manual). • Lubricate as shown in the Maintenance section of storage, battery cables should be used for 30 days or more. Do not empty the gas tank and carburetor if using fuel...

User Manual
Page 24
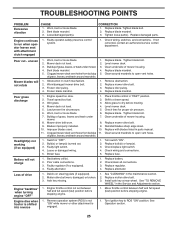
... Depress clutch/brake pedal. 2. Replace fuse. 5. Check/replace ignition switch. 8. Check/replace solenoid or starter. 9. Recharge or replace battery. 2. Clean battery terminals. 3. Check all wiring. 9. Check/replace solenoid or starter. 1. Clean underside of adjustment. 15. Clean/replace air filter. 5. Check oil level/change spark plug. 7. Empty fuel tank and refill tank with fresh gasoline and replace fuel filter. 8. Clean engine air screen/fins. 12. Check all wiring. 14. See "To Adjust Carburetor" in Service Adjustments 15. Contact an authorized service...
... Depress clutch/brake pedal. 2. Replace fuse. 5. Check/replace ignition switch. 8. Check/replace solenoid or starter. 9. Recharge or replace battery. 2. Clean battery terminals. 3. Check all wiring. 9. Check/replace solenoid or starter. 1. Clean underside of adjustment. 15. Clean/replace air filter. 5. Check oil level/change spark plug. 7. Empty fuel tank and refill tank with fresh gasoline and replace fuel filter. 8. Clean engine air screen/fins. 12. Check all wiring. 14. See "To Adjust Carburetor" in Service Adjustments 15. Contact an authorized service...
User Manual
Page 25
...Turn ignition key to dry before stopping engine. 1. Replace blade. Tighten loose part(s). Worn, bent or loose blade. 2. Worn/damaged mower drive belt. 3. Frozen blade mandrel. 1. Tighten blade bolt. 2. Place throttle control in clutch mechanism. 2. Worn, bent or loose blade. 6. of grass, leaves and trash under mower. 7. Check/replace light switch. 4. Loss of grass, leaves, and trash around mandrels to run when operator leaves seat with blades listed in parts manual. 11. See "CLEANING" in the Service and Adjustments section. 1. See "TO REMOVE WHEEL...
...Turn ignition key to dry before stopping engine. 1. Replace blade. Tighten loose part(s). Worn, bent or loose blade. 2. Worn/damaged mower drive belt. 3. Frozen blade mandrel. 1. Tighten blade bolt. 2. Place throttle control in clutch mechanism. 2. Worn, bent or loose blade. 6. of grass, leaves and trash under mower. 7. Check/replace light switch. 4. Loss of grass, leaves, and trash around mandrels to run when operator leaves seat with blades listed in parts manual. 11. See "CLEANING" in the Service and Adjustments section. 1. See "TO REMOVE WHEEL...

User Manual
Page 26
... is subject to the engine, transaxle/transmission components, battery (except as noted below) or components parts thereof. Should you may have any products used for each full month from the date of how long an implied Warranty may last, so the above limitations or exclusions may not apply to you have been properly assembled, adjusted, operated, and maintained in...
... is subject to the engine, transaxle/transmission components, battery (except as noted below) or components parts thereof. Should you may have any products used for each full month from the date of how long an implied Warranty may last, so the above limitations or exclusions may not apply to you have been properly assembled, adjusted, operated, and maintained in...


