User Manual
Page 3
...that come with accessories such as batteries, chargers, AC adapters, memory cards, cables, pouches, and language support. EN-2 Contact your camera. „ The manufacturer assumes no liability for any errors or discrepancies in this manual are for precise product definition and! This is... are U.S. included accessories. „ The illustrations in this manual. Products very often vary between retailers especially with your camera may be trademarks or registered trademarks of your dealer for the purposes of explanation and may be different from the actual design...
...that come with accessories such as batteries, chargers, AC adapters, memory cards, cables, pouches, and language support. EN-2 Contact your camera. „ The manufacturer assumes no liability for any errors or discrepancies in this manual are for precise product definition and! This is... are U.S. included accessories. „ The illustrations in this manual. Products very often vary between retailers especially with your camera may be trademarks or registered trademarks of your dealer for the purposes of explanation and may be different from the actual design...

User Manual
Page 4
...by young children. Keep the battery out of the reach of children. EN-3 Please consult our friendly customer service. Continued use the camera in you have any questions. This may cause personal injury. Do not use may result in areas near water. Continued use the... camera while you are walking, driving or riding a motorcycle. Do not place the camera on unstable surfaces. Do not use may cause personal injury. Do not disassemble, change or repair the...
...by young children. Keep the battery out of the reach of children. EN-3 Please consult our friendly customer service. Continued use the camera in you have any questions. This may cause personal injury. Do not use may result in areas near water. Continued use the... camera while you are walking, driving or riding a motorcycle. Do not place the camera on unstable surfaces. Do not use may cause personal injury. Do not disassemble, change or repair the...

User Manual
Page 5
... in contact with your eyes, flush with its polarities inverted may cause heat to impact. Do not drop, strike or use . Do not wrap the camera or place it in a well-ventilated area. Failure to do this is a precision instrument. Do not use ; This may cause personal injury. This...to anyone's eyes. Touching a warm battery may cause fire or electric shock. This may damage cords and cables, resulting in personal injury. Use the camera in cloth or blankets. this may cause damage to leak. The battery may damage the glass on the screen or cause the internal fluid to...
... in contact with your eyes, flush with its polarities inverted may cause heat to impact. Do not drop, strike or use . Do not wrap the camera or place it in a well-ventilated area. Failure to do this is a precision instrument. Do not use ; This may cause personal injury. This...to anyone's eyes. Touching a warm battery may cause fire or electric shock. This may damage cords and cables, resulting in personal injury. Use the camera in cloth or blankets. this may cause damage to leak. The battery may damage the glass on the screen or cause the internal fluid to...

User Manual
Page 6
... the specified battery or its performance and lifetime, we recommend that can be captured. Look for the insert with this icon: Or visit www.polaroid.com. This is normal and not a malfunction. „ If the battery is an exception), it may affect the number of images that ...described below: „ Use only the specified battery (3.7V). „ Avoid extremely cold environments as low temperatures can shorten the battery life and reduce camera performance. „ When you are using a new rechargeable battery or a rechargeable battery that has not been used for an extended period of time (a...
... the specified battery or its performance and lifetime, we recommend that can be captured. Look for the insert with this icon: Or visit www.polaroid.com. This is normal and not a malfunction. „ If the battery is an exception), it may affect the number of images that ...described below: „ Use only the specified battery (3.7V). „ Avoid extremely cold environments as low temperatures can shorten the battery life and reduce camera performance. „ When you are using a new rechargeable battery or a rechargeable battery that has not been used for an extended period of time (a...
User Manual
Page 7
CONTENTS 7 INTRODUCTION 7 Overview 7 Package Contents 8 GETTING TO KNOW YOUR CAMERA 8 Front View 9 Rear View 10 LCD Monitor Display 12 GETTING STARTED 12 Preparation 13 Charging the Battery 14 Initial Settings 16 CAPTURE MODE 16 Capturing ...
CONTENTS 7 INTRODUCTION 7 Overview 7 Package Contents 8 GETTING TO KNOW YOUR CAMERA 8 Front View 9 Rear View 10 LCD Monitor Display 12 GETTING STARTED 12 Preparation 13 Charging the Battery 14 Initial Settings 16 CAPTURE MODE 16 Capturing ...
User Manual
Page 8
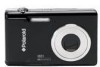
... fast and easy with a resolution of -the-art smart camera. Package Contents Carefully unpack your purchase of a Polaroid SD card - purchased separately - EN-7 INTRODUCTION Overview Congratulations on your camera and ensure that you have the following items: Common Product Components: „ Digital Camera „ User's manual „ Software CD-ROM „ USB cable „ AV...
... fast and easy with a resolution of -the-art smart camera. Package Contents Carefully unpack your purchase of a Polaroid SD card - purchased separately - EN-7 INTRODUCTION Overview Congratulations on your camera and ensure that you have the following items: Common Product Components: „ Digital Camera „ User's manual „ Software CD-ROM „ USB cable „ AV...
User Manual
Page 13
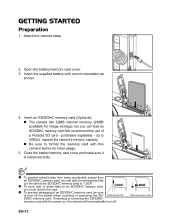
up to 4GB) to expand the camera's memory capacity. „ Be sure to "LOCK". „ To save, edit, or erase data on an SD/SDHC memory card, you can load an SD/SDHC memory card (We recommend the use of a Polaroid SD card - If inserting or removing the SD/SDHC... format the memory card with correct orientation as shown. 4. Insert the supplied battery with this camera before its initial usage. 5. Attach the camera strap. 2. Insert an SD/SDHC memory card (Optional). „ The camera has 32MB internal memory (28MB available for image storage), but you can slide the write protect...
up to 4GB) to expand the camera's memory capacity. „ Be sure to "LOCK". „ To save, edit, or erase data on an SD/SDHC memory card, you can load an SD/SDHC memory card (We recommend the use of a Polaroid SD card - If inserting or removing the SD/SDHC... format the memory card with correct orientation as shown. 4. Insert the supplied battery with this camera before its initial usage. 5. Attach the camera strap. 2. Insert an SD/SDHC memory card (Optional). „ The camera has 32MB internal memory (28MB available for image storage), but you can slide the write protect...

User Manual
Page 14
... status LED on the charger is red when charging has started and is green 2 when charging is normal and not a malfunction. „ When using the camera in cold areas, keep the camera and battery warm by holding them inside your outer clothes. EN-13
... status LED on the charger is red when charging has started and is green 2 when charging is normal and not a malfunction. „ When using the camera in cold areas, keep the camera and battery warm by holding them inside your outer clothes. EN-13

User Manual
Page 15
Toggle the button to set when: „ The camera is turned on for an extended period of time. Press the button. 3. Select [Date/Time] with the f button. 4. EN-14 To exit from the [Setup] ... adjust the value for the date and time with the c / d buttons. „ The time is not displayed on after leaving the camera without the battery for the first time. „ The camera is turned on the LCD monitor, follow these steps to [ ] or [ ]. 2. When the date and time information is displayed in...
Toggle the button to set when: „ The camera is turned on for an extended period of time. Press the button. 3. Select [Date/Time] with the f button. 4. EN-14 To exit from the [Setup] ... adjust the value for the date and time with the c / d buttons. „ The time is not displayed on after leaving the camera without the battery for the first time. „ The camera is turned on the LCD monitor, follow these steps to [ ] or [ ]. 2. When the date and time information is displayed in...

User Manual
Page 17
...b exposure, and pressing the shutter button down fully captures the images. „ The focus area frame turns green when the camera is ready for shooting. CAPTURE MODE Capturing Images Your camera is changed to [ ], the lens barrel will extend forward and it again to help you compose images, playback recorded images/... zoom in focus and the exposure is calculated. „ When the focus or exposure is turned on the subject. In both modes, if the camera mode is equipped with a 3.0" full color TFT LCD monitor to re-focus on in [ ] or [ ] mode, the lens will retract into the...
...b exposure, and pressing the shutter button down fully captures the images. „ The focus area frame turns green when the camera is ready for shooting. CAPTURE MODE Capturing Images Your camera is changed to [ ], the lens barrel will extend forward and it again to help you compose images, playback recorded images/... zoom in focus and the exposure is calculated. „ When the focus or exposure is turned on the subject. In both modes, if the camera mode is equipped with a 3.0" full color TFT LCD monitor to re-focus on in [ ] or [ ] mode, the lens will retract into the...
User Manual
Page 18
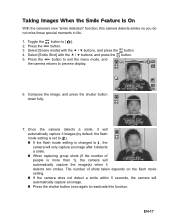
.../ 03 / 01 00 : 00 f 0010 Waiting for Smile Shutter:Exit 7. Press the button to exit the menu mode, and the camera returns to [ ]. 2. button. Once the camera detects a smile, it will automatically capture 3 images (by default, the flash mode setting is set to ). „ If the flash... When capturing group shots (if the number of shots taken depends on the flash mode setting. „ If the camera does not detect a smile within 5 seconds, the camera will Shutter:Exit automatically capture the image(s) when it detects two smiles. Taking Images When the Smile Feature Is On With...
.../ 03 / 01 00 : 00 f 0010 Waiting for Smile Shutter:Exit 7. Press the button to exit the menu mode, and the camera returns to [ ]. 2. button. Once the camera detects a smile, it will automatically capture 3 images (by default, the flash mode setting is set to ). „ If the flash... When capturing group shots (if the number of shots taken depends on the flash mode setting. „ If the camera does not detect a smile within 5 seconds, the camera will Shutter:Exit automatically capture the image(s) when it detects two smiles. Taking Images When the Smile Feature Is On With...

User Manual
Page 20
...the image. 7. Select [Blink Detect] with the c / d buttons, and press the button. 5. If camera detects that the subject has blinked, a warning message will be shown on the screen. The camera starts analyzing the captured image. Select [On] with the c / d buttons, and press the button. ...Feature People must periodically blink to keep their subjects. Blinking is involuntary and fast. However, with the new "blink detection" function, the camera can detect a blinking pattern while capturing an image. 1. Most people taking pictures do not notice when the blink occurs in their eyes...
...the image. 7. Select [Blink Detect] with the c / d buttons, and press the button. 5. If camera detects that the subject has blinked, a warning message will be shown on the screen. The camera starts analyzing the captured image. Select [On] with the c / d buttons, and press the button. ...Feature People must periodically blink to keep their subjects. Blinking is involuntary and fast. However, with the new "blink detection" function, the camera can detect a blinking pattern while capturing an image. 1. Most people taking pictures do not notice when the blink occurs in their eyes...

User Manual
Page 22
... of the f / e buttons during video recording. and compatible with the e / f buttons. 3. Playing Back Video Clips You can also play back recorded video clips on the camera. Press the button. „ A press of the media player, refer to its respective help documentation. To cancel pause, press the button again. „ Video clips...
... of the f / e buttons during video recording. and compatible with the e / f buttons. 3. Playing Back Video Clips You can also play back recorded video clips on the camera. Press the button. „ A press of the media player, refer to its respective help documentation. To cancel pause, press the button again. „ Video clips...

User Manual
Page 26
Select [Cancel Protect] with all images regardless of image protection is executed and the camera returns to the playback mode. „ Formatting an SD/SDHC memory card overrides protection, and erases all the images. Select [Protect] with the c / d buttons...you want to remove the image protection. 1. Select [Set] with the c / d buttons, and press the button. „ Protection is applied to the image and the camera returns to the playback mode. „ The protect icon [ ] is displayed with the c / d buttons, and press the button. „ The removal of their protected...
Select [Cancel Protect] with all images regardless of image protection is executed and the camera returns to the playback mode. „ Formatting an SD/SDHC memory card overrides protection, and erases all the images. Select [Protect] with the c / d buttons...you want to remove the image protection. 1. Select [Set] with the c / d buttons, and press the button. „ Protection is applied to the image and the camera returns to the playback mode. „ The protect icon [ ] is displayed with the c / d buttons, and press the button. „ The removal of their protected...

User Manual
Page 32
..., never to increase it. Select the desired option item with newly compressed images. Compresses images down to half of a recorded image. To exit from the camera's internal memory to an SD/SDHC memory card. Press the [ ] button. 2. Playback Menu In the [ ] mode, choose which settings are to be used for further...
..., never to increase it. Select the desired option item with newly compressed images. Compresses images down to half of a recorded image. To exit from the camera's internal memory to an SD/SDHC memory card. Press the [ ] button. 2. Playback Menu In the [ ] mode, choose which settings are to be used for further...
User Manual
Page 33
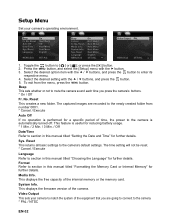
...useful for reducing battery usage. * 1 Min. / 2 Min. / 3 Min. / Off Date/Time Refer to enter its respective menu. 4. Toggle the button to the camera's default settings. or press the [ ] button. 2. No. Reset This returns all basic settings to [ ] or [ ]; The time setting will not be reset. *... section in this manual titled "Formatting the Memory Card or Internal Memory" for a specific period of the equipment that you press the camera's!buttons. * On / Off Fr. Format Refer to section in this manual titled "Choosing the Language" for further details. This displays...
...useful for reducing battery usage. * 1 Min. / 2 Min. / 3 Min. / Off Date/Time Refer to enter its respective menu. 4. Toggle the button to the camera's default settings. or press the [ ] button. 2. No. Reset This returns all basic settings to [ ] or [ ]; The time setting will not be reset. *... section in this manual titled "Formatting the Memory Card or Internal Memory" for a specific period of the equipment that you press the camera's!buttons. * On / Off Fr. Format Refer to section in this manual titled "Choosing the Language" for further details. This displays...

User Manual
Page 34
...Computer". 6. Double click on the DCIM folder to open it to an available USB port on your computer. 2. EN-33 Turn on the camera. 3. Typically, the camera will be assigned drive letter "e" or higher. 7. TRANSFERRING FILES TO YOUR COMPUTER System Requirement Windows „ Pentium III 800 or equivalent „...images and video clips will be inside these folders. 9. Copy & Paste or Drag-N-Drop image and video files to the USB terminal on your camera. Mac users: Double-click the "untitled" or "unlabeled" disk drive icon on your desktop. Connect one end of the USB cable to ...
...Computer". 6. Double click on the DCIM folder to open it to an available USB port on your computer. 2. EN-33 Turn on the camera. 3. Typically, the camera will be assigned drive letter "e" or higher. 7. TRANSFERRING FILES TO YOUR COMPUTER System Requirement Windows „ Pentium III 800 or equivalent „...images and video clips will be inside these folders. 9. Copy & Paste or Drag-N-Drop image and video files to the USB terminal on your camera. Mac users: Double-click the "untitled" or "unlabeled" disk drive icon on your desktop. Connect one end of the USB cable to ...
User Manual
Page 35
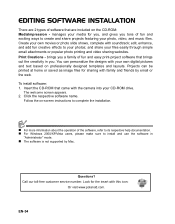
... projects featuring your own movies or photo slide shows, complete with this icon: Or visit www.polaroid.com. Look for you, and gives you . Print Creations - Create your photo, video, ...and music files. You can be printed at home or saved as image files for sharing with the camera into your CD-ROM drive. The welcome screen appears. 2. brings you a family of fun and...help documentation. „ For Windows 2000/XP/Vista users, please make sure to your own digital pictures and text based on professionally designed templates and layouts. Questions? and share your media for ...
... projects featuring your own movies or photo slide shows, complete with this icon: Or visit www.polaroid.com. Look for you, and gives you . Print Creations - Create your photo, video, ...and music files. You can be printed at home or saved as image files for sharing with the camera into your CD-ROM drive. The welcome screen appears. 2. brings you a family of fun and...help documentation. „ For Windows 2000/XP/Vista users, please make sure to your own digital pictures and text based on professionally designed templates and layouts. Questions? and share your media for ...
User Manual
Page 36
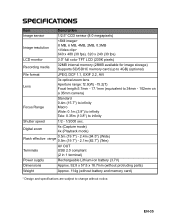
... - 17.1mm (equivalent to 34mm - 102mm on a 35mm camera) Focus Range Standard 0.4m (15.7") to infinity Macro Wide: 0.1m (3.9") to infinity Tele: 0.35m (13.8") to change without battery and memory card) * Design and specifications are subject to infinity Shutter speed 1/2 - 1/2000 sec. Digital zoom 4x (Capture mode) 4x (Playback mode) Flash effective...
... - 17.1mm (equivalent to 34mm - 102mm on a 35mm camera) Focus Range Standard 0.4m (15.7") to infinity Macro Wide: 0.1m (3.9") to infinity Tele: 0.35m (13.8") to change without battery and memory card) * Design and specifications are subject to infinity Shutter speed 1/2 - 1/2000 sec. Digital zoom 4x (Capture mode) 4x (Playback mode) Flash effective...

User Manual
Page 37
If you experience an error using a slower SD/SDHC memory card, you can set your camera's video recording to prevent auto stop or unexpected results. APPENDIX Possible Number of Shots Possible number of the internal memory and the SD/SDHC memory ...
If you experience an error using a slower SD/SDHC memory card, you can set your camera's video recording to prevent auto stop or unexpected results. APPENDIX Possible Number of Shots Possible number of the internal memory and the SD/SDHC memory ...


