Service Manual
Page 14
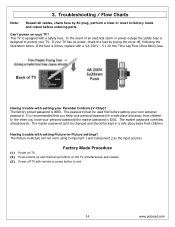
... buttons on your Parental Controls (V-Chip)? In the event of an electrical storm or power outage the safety fuse is designed to exit. 14 www.polaroid.com Having trouble with a 4 A 250 V - 5 x 20 mm Time Lag Fuse (Slow Blow) fuse. This password must be kept in a safe place... in -Picture will not work using Component 1 and Component 2 as the input sources. This TV is 0000. The master password overrides all cables, check fuse by prying the cover off TV with remote or power button to protect your personal password the master password is recommended that you loose your...
... buttons on your Parental Controls (V-Chip)? In the event of an electrical storm or power outage the safety fuse is designed to exit. 14 www.polaroid.com Having trouble with a 4 A 250 V - 5 x 20 mm Time Lag Fuse (Slow Blow) fuse. This password must be kept in a safe place... in -Picture will not work using Component 1 and Component 2 as the input sources. This TV is 0000. The master password overrides all cables, check fuse by prying the cover off TV with remote or power button to protect your personal password the master password is recommended that you loose your...

Service Manual
Page 30
Polaroid Model TLA-04641C Part Number 125-000-375POLAH 151-002-JL468UH 151-700-GF4611UAH 151-A00-GF469RUPH 154-501-GF370-AH 600-181-3200-LIH 621-181-2000JH ... POWER CORD VIDEO CABLE COMPONENT CABLE LVDS CABLE (SAMSUNG L03) 46 LCD PANEL (SAMSUNG L03) SPEAKER R-L 26-46 UNIVERSAL REMOTE SILV/BLK 26-46 FRONT/SIDE AV INPUT BD 26-46 IR BOARD ASSY 26-46 FRNT/SIDE CONTROL BTN BD 46 CNTRL BOX ASSY (SAMSUNG L03) Polaroid Model 4641-TLXB Part Number 125-000-375POLAH 151-000-IF467W000H...
Polaroid Model TLA-04641C Part Number 125-000-375POLAH 151-002-JL468UH 151-700-GF4611UAH 151-A00-GF469RUPH 154-501-GF370-AH 600-181-3200-LIH 621-181-2000JH ... POWER CORD VIDEO CABLE COMPONENT CABLE LVDS CABLE (SAMSUNG L03) 46 LCD PANEL (SAMSUNG L03) SPEAKER R-L 26-46 UNIVERSAL REMOTE SILV/BLK 26-46 FRONT/SIDE AV INPUT BD 26-46 IR BOARD ASSY 26-46 FRNT/SIDE CONTROL BTN BD 46 CNTRL BOX ASSY (SAMSUNG L03) Polaroid Model 4641-TLXB Part Number 125-000-375POLAH 151-000-IF467W000H...
User Guide
Page 7
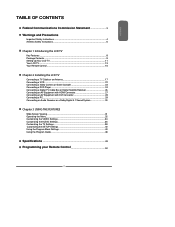
... Federal Communications Commission Statement 3 Warnings and Precautions Important Safety Instructions 4 Antenna Safety Instructions 6 Chapter 1 Introducing the LCD TV Key Features ...8 Package Contents ...9 Setting Up Your LCD TV 11 Your LCD TV...13 Your Remote Control 15 Chapter 2 Installing the LCD TV Connecting a TV Cable or an Antenna 17 Connecting a VCR ...22 Connecting a Video Camera or Game Console 23 Connecting a DVD...
... Federal Communications Commission Statement 3 Warnings and Precautions Important Safety Instructions 4 Antenna Safety Instructions 6 Chapter 1 Introducing the LCD TV Key Features ...8 Package Contents ...9 Setting Up Your LCD TV 11 Your LCD TV...13 Your Remote Control 15 Chapter 2 Installing the LCD TV Connecting a TV Cable or an Antenna 17 Connecting a VCR ...22 Connecting a Video Camera or Game Console 23 Connecting a DVD...

User Guide
Page 9
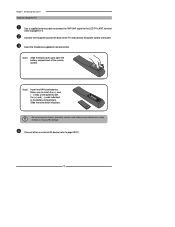
If you need to set up and operate the LCD TV in the package. LCD TV Bottom Stand / Screw Driver and Screws 4 ENGLISH Remote Control/ AAA Batteries x 2 SET UP TV CAB/ SAT DVD AUX SLEEP DVD MENU VOL CH PAGE MUTE ASPECT LAST GUIDE LIVE TV PIP MENU OK INFO CC EXIT DVR 1 2 3...Stand Assembly Guide Remote control Guide These items are all you are missing any items, please contact the Polaroid customer service department. 9 Make sure all of the above contents are included in its basic configuration. Package Contents Chapter 1 Introducing the LCD TV Make sure ...
If you need to set up and operate the LCD TV in the package. LCD TV Bottom Stand / Screw Driver and Screws 4 ENGLISH Remote Control/ AAA Batteries x 2 SET UP TV CAB/ SAT DVD AUX SLEEP DVD MENU VOL CH PAGE MUTE ASPECT LAST GUIDE LIVE TV PIP MENU OK INFO CC EXIT DVR 1 2 3...Stand Assembly Guide Remote control Guide These items are all you are missing any items, please contact the Polaroid customer service department. 9 Make sure all of the above contents are included in its basic configuration. Package Contents Chapter 1 Introducing the LCD TV Make sure ...
User Guide
Page 12
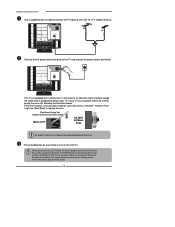
...back into place. Connect other an external AV device (refer to the LCD TV's ANT. Step2 Insert two AAA size batteries. Connect the AC power cord at the back of the remote control. Chapter 1 Introducing the LCD TV How to setup the TV Use a supplied antenna cable to connect the VHF/UHF signal to page19...-27). 12 Step1 Slide the back cover up to open the battery compartment of the TV and connect the power cord to ...
...back into place. Connect other an external AV device (refer to the LCD TV's ANT. Step2 Insert two AAA size batteries. Connect the AC power cord at the back of the remote control. Chapter 1 Introducing the LCD TV How to setup the TV Use a supplied antenna cable to connect the VHF/UHF signal to page19...-27). 12 Step1 Slide the back cover up to open the battery compartment of the TV and connect the power cord to ...

User Guide
Page 15
...; Change channel up your remote control, please see the "Programming Your Remote Control" section(refer to previously selected channel 11 GUIDE In TV mode, pressing GUIDE displays the Program Guide on and off SET UP Remote control universal code setup. ENGLISH Your Remote Control Chapter 1 Introducing the LCD TV This package includes a Polaroid remote that enables control of the...
...; Change channel up your remote control, please see the "Programming Your Remote Control" section(refer to previously selected channel 11 GUIDE In TV mode, pressing GUIDE displays the Program Guide on and off SET UP Remote control universal code setup. ENGLISH Your Remote Control Chapter 1 Introducing the LCD TV This package includes a Polaroid remote that enables control of the...

User Guide
Page 16
...video equipment connected to the video inputs of your LCD TV: TV/VIDEO1/ VIDEO2/VIDEO3/VIDEO4/VIDEO5/ VIDEO6/VIDEO7/COMPUTER ▪ In TV mode, use with 0-9 and ENTER buttons to select a digital channels Effective range: The remote can control the LCD TV from up to display a channel list 15 INFO.... Only for other devices function. Chapter 1 Introducing the LCD TV 12 PIP PIP function is not available. SET UP TV CAB/ SAT DVD AUX SLEEP DVD MENU 13 MENU Displays the OSD menu on the LCD TV MUTE ASPECT LAST LIVE TV 12 screen such as input source, channel, program title....
...video equipment connected to the video inputs of your LCD TV: TV/VIDEO1/ VIDEO2/VIDEO3/VIDEO4/VIDEO5/ VIDEO6/VIDEO7/COMPUTER ▪ In TV mode, use with 0-9 and ENTER buttons to select a digital channels Effective range: The remote can control the LCD TV from up to display a channel list 15 INFO.... Only for other devices function. Chapter 1 Introducing the LCD TV 12 PIP PIP function is not available. SET UP TV CAB/ SAT DVD AUX SLEEP DVD MENU 13 MENU Displays the OSD menu on the LCD TV MUTE ASPECT LAST LIVE TV 12 screen such as input source, channel, program title....
User Guide
Page 20
...only used for a long period of the TV and connect the power cord to wall outlet. Press the button on the remote to replace the fuse. HDTV/TV Air/CABLE VHF/UHF IN This TV is designed to the LCD TV's TV CABLE terminal. The POWER button on the LCD TV. If your local hardware store and ask... for switching the LCD TV into standby, it does not disconnect the device ...
...only used for a long period of the TV and connect the power cord to wall outlet. Press the button on the remote to replace the fuse. HDTV/TV Air/CABLE VHF/UHF IN This TV is designed to the LCD TV's TV CABLE terminal. The POWER button on the LCD TV. If your local hardware store and ask... for switching the LCD TV into standby, it does not disconnect the device ...
User Guide
Page 21
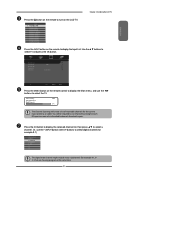
... (REAR) VIDEO3 (S-VIDEO) VIDEO4 (YPbPr1) VIDEO5 (YPbPr2) VIDEO6 (HDMI1) VIDEO7 (HDMI2) COMPUTER(VGA) Press the INPUT button on the remote to turn on the LCD TV. ENGLISH Chapter 2 Installing the LCD TV Press the button on the remote to display the Input List. Channel Scan Tuner Mode Channel Skip Favorite List Time Zone Cable Eastern Time...
... (REAR) VIDEO3 (S-VIDEO) VIDEO4 (YPbPr1) VIDEO5 (YPbPr2) VIDEO6 (HDMI1) VIDEO7 (HDMI2) COMPUTER(VGA) Press the INPUT button on the remote to turn on the LCD TV. ENGLISH Chapter 2 Installing the LCD TV Press the button on the remote to display the Input List. Channel Scan Tuner Mode Channel Skip Favorite List Time Zone Cable Eastern Time...
User Guide
Page 22
... a S-Video cable to connect the VCR's s-video output jack to the LCD TV's audio inputs. Turn on the LCD TV. Connect all AC power sources, before turning on the remote to the LCD TV's VIDEO2 IN jacks. Chapter 2 Installing the LCD TV Connecting a VCR Rear of the LCD TV or other connected equipment. To watch a videotape, press the INPUT button on...
... a S-Video cable to connect the VCR's s-video output jack to the LCD TV's audio inputs. Turn on the LCD TV. Connect all AC power sources, before turning on the remote to the LCD TV's VIDEO2 IN jacks. Chapter 2 Installing the LCD TV Connecting a VCR Rear of the LCD TV or other connected equipment. To watch a videotape, press the INPUT button on...
User Guide
Page 23
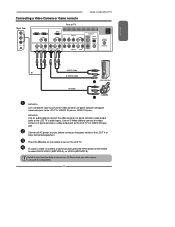
... the video camera's or game console's audio output jacks to the LCD TV's S-VIDEO IN input jack. To watch a video vis camera or game console, press the INPUT button on the LCD TV. Press the button on the remote to turn on the remote to select VIDEO2/VIDEO1( METHOD A), or VIDEO3 (METHOD B). Connect... all cameras have the ability to connect to the LCD TV's VIDEO2 IN jacks or VIDEO1 IN jacks. Not all AC...
... the video camera's or game console's audio output jacks to the LCD TV's S-VIDEO IN input jack. To watch a video vis camera or game console, press the INPUT button on the LCD TV. Press the button on the remote to turn on the remote to select VIDEO2/VIDEO1( METHOD A), or VIDEO3 (METHOD B). Connect... all cameras have the ability to connect to the LCD TV's VIDEO2 IN jacks or VIDEO1 IN jacks. Not all AC...

User Guide
Page 25
ENGLISH Chapter 2 Installing the LCD TV Connect all AC power sources, before turning on the remote to select VIDEO2( METHOD A), or VIDEO3 ( METHOD B), or VIDEO4/VIDEO5 (METHOD C). To watch a DVD, press the INPUT button on the remote to turn on the LCD TV. Press the button on the power switch of a composite video or S-video cable. 25 For best picture quality, if your equipment has component video output, use a component cable instead of the LCD TV or other connected equipment.
ENGLISH Chapter 2 Installing the LCD TV Connect all AC power sources, before turning on the remote to select VIDEO2( METHOD A), or VIDEO3 ( METHOD B), or VIDEO4/VIDEO5 (METHOD C). To watch a DVD, press the INPUT button on the remote to turn on the LCD TV. Press the button on the power switch of a composite video or S-video cable. 25 For best picture quality, if your equipment has component video output, use a component cable instead of the LCD TV or other connected equipment.

User Guide
Page 26
... cable to connect the satellite receiver's/TV Cable Box's component audio jacks to the LCD TV's component input jacks. Press the button on the remote to turn on the remote to select VIDEO4/VIDEO5. 26 Chapter 2 Installing the LCD TV Connecting a Digital TV Cable Box or Digital Satellite Receiver Rear of the LCD TV or other connected equipment. Connect all...
... cable to connect the satellite receiver's/TV Cable Box's component audio jacks to the LCD TV's component input jacks. Press the button on the remote to turn on the remote to select VIDEO4/VIDEO5. 26 Chapter 2 Installing the LCD TV Connecting a Digital TV Cable Box or Digital Satellite Receiver Rear of the LCD TV or other connected equipment. Connect all...
User Guide
Page 27
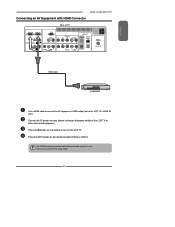
... audio signals, it's not necessary to the LCD TV's HDMI IN jacks. Press the INPUT button on the LCD TV. ENGLISH Chapter 2 Installing the LCD TV Connecting an AV Equipment with HDMI Connector Rear of the LCD TV or other connected equipment. Press the button on the remote to turn on the remote to select VIDEO6 or VIDEO7. Connect all...
... audio signals, it's not necessary to the LCD TV's HDMI IN jacks. Press the INPUT button on the LCD TV. ENGLISH Chapter 2 Installing the LCD TV Connecting an AV Equipment with HDMI Connector Rear of the LCD TV or other connected equipment. Press the button on the remote to turn on the remote to select VIDEO6 or VIDEO7. Connect all...

User Guide
Page 28
... the INPUT button on the LCD TV. If the LCD TV is connected to AV equipment's DVI connector, you will need an HDMI-to LCD TV's HDMI AUDIO jacks. Press the button on the remote to turn on the remote to the LCD TV's HDMI IN jacks. Chapter 2 Installing the LCD TV Connecting an AV Equipment with ...DVI Connector Rear of the LCD TV or other connected equipment. Use an audio cable...
... the INPUT button on the LCD TV. If the LCD TV is connected to AV equipment's DVI connector, you will need an HDMI-to LCD TV's HDMI AUDIO jacks. Press the button on the remote to turn on the remote to the LCD TV's HDMI IN jacks. Chapter 2 Installing the LCD TV Connecting an AV Equipment with ...DVI Connector Rear of the LCD TV or other connected equipment. Use an audio cable...

User Guide
Page 29
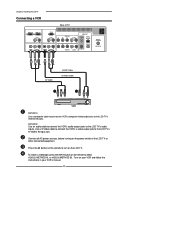
... to select COMPUTER. 29 Connect all AC power sources, before turning on the LCD TV. Press the button on the remote to the LCD TV's VGA input jack. Press the Input button on the remote to LCD TV's. ENGLISH Connecting a PC Rear of TV Chapter 3 Using the LCD TV HDMI 2 IN HDMI 1 IN AUDIO L R VGA IN AUDIO L R VIDEO L R AUDIO VIDEO2 IN...
... to select COMPUTER. 29 Connect all AC power sources, before turning on the LCD TV. Press the button on the remote to the LCD TV's VGA input jack. Press the Input button on the remote to LCD TV's. ENGLISH Connecting a PC Rear of TV Chapter 3 Using the LCD TV HDMI 2 IN HDMI 1 IN AUDIO L R VGA IN AUDIO L R VIDEO L R AUDIO VIDEO2 IN...
User Guide
Page 30
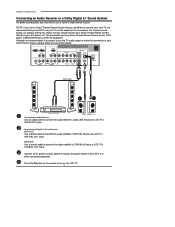
... output to your DVD player, Cable/Satellite box or other connected equipment. Connect all AC power sources, before turning on the remote to LCD TV's OPTICAL OUT jacks. HDMI 2 IN HDMI 1 IN AUDIO L R VGA IN AUDIO L R L R VIDEO AUDIO VIDEO2 IN S-VIDEO L AUDIO R S-VIDEO IN YPbPr1 IN Y Pb Pr ... System: METHOD A: Use a optical cable to connect the audio amplifier's OPTICAL IN jacks to turn on the LCD TV. 30 Press the button on the power switch of the LCD TV or other AV equipment. NOTE: If you have a Home Theater/Stereo System that you would like to use with your...
... output to your DVD player, Cable/Satellite box or other connected equipment. Connect all AC power sources, before turning on the remote to LCD TV's OPTICAL OUT jacks. HDMI 2 IN HDMI 1 IN AUDIO L R VGA IN AUDIO L R L R VIDEO AUDIO VIDEO2 IN S-VIDEO L AUDIO R S-VIDEO IN YPbPr1 IN Y Pb Pr ... System: METHOD A: Use a optical cable to connect the audio amplifier's OPTICAL IN jacks to turn on the LCD TV. 30 Press the button on the power switch of the LCD TV or other AV equipment. NOTE: If you have a Home Theater/Stereo System that you would like to use with your...
User Guide
Page 32
...you to make adjustments to your picture settings. ▪ If the signal source is TV/VIDEO/S-VIDEO/YPbPr/ HDMI, the VIDEO MENU appears as: ▪ If the signal... Reduction Medium AUDIO MENU: Allows you to select your main menu option. Press the MENU button on the remote control,the on-screen menu will appear on . Use the ◄► buttons to customize the audio ...VIDEO/YPbPr/ HDMI/VGA, the AUDIO MENU appears as: Video Select Exit ▪ If the signal source is TV, the AUDIO MENU appears as: Bass Treble Balance Sound Effect Speaker Surround On 50 Bass 50 50 Treble 50...
...you to make adjustments to your picture settings. ▪ If the signal source is TV/VIDEO/S-VIDEO/YPbPr/ HDMI, the VIDEO MENU appears as: ▪ If the signal... Reduction Medium AUDIO MENU: Allows you to select your main menu option. Press the MENU button on the remote control,the on-screen menu will appear on . Use the ◄► buttons to customize the audio ...VIDEO/YPbPr/ HDMI/VGA, the AUDIO MENU appears as: Video Select Exit ▪ If the signal source is TV, the AUDIO MENU appears as: Bass Treble Balance Sound Effect Speaker Surround On 50 Bass 50 50 Treble 50...
User Guide
Page 34
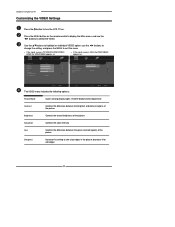
... edges 34 Chapter 3 Using the LCD TV Customizing the VIDEO Settings Press the button to see crisp edges in the picture; Use the ▲▼buttons to highlight an individual VIDEO option, use the ◄► buttons to select the VIDEO. Press the MENU button on the remote control to display the Main... menu, and use the ◄► buttons to change the setting, and press the MENU to exit the menu ▪ If the signal source is TV/VIDEO/S-VIDEO/YPbPr/ HDMI, the VIDEO MENU appears as: ▪...
... edges 34 Chapter 3 Using the LCD TV Customizing the VIDEO Settings Press the button to see crisp edges in the picture; Use the ▲▼buttons to highlight an individual VIDEO option, use the ◄► buttons to select the VIDEO. Press the MENU button on the remote control to display the Main... menu, and use the ◄► buttons to change the setting, and press the MENU to exit the menu ▪ If the signal source is TV/VIDEO/S-VIDEO/YPbPr/ HDMI, the VIDEO MENU appears as: ▪...

User Guide
Page 36
... use the ◄► buttons to high-fidelity stereo sound while watching TV ▪ Stereo: Use separate audio tracks for left and right speakers, if ... the AUDIO. Chapter 3 Using the LCD TV Customizing the AUDIO Settings Press the button to turn the LCD TV on the remote control to display the Main menu, ...and use the ◄► buttons to change the setting, and press the MENU to exit the menu ▪ If the signal source is VIDEO/S-VIDEO/YPbPr/ HDMI/VGA, the AUDIO MENU appears as: ▪ If the signal source is TV...
... use the ◄► buttons to high-fidelity stereo sound while watching TV ▪ Stereo: Use separate audio tracks for left and right speakers, if ... the AUDIO. Chapter 3 Using the LCD TV Customizing the AUDIO Settings Press the button to turn the LCD TV on the remote control to display the Main menu, ...and use the ◄► buttons to change the setting, and press the MENU to exit the menu ▪ If the signal source is VIDEO/S-VIDEO/YPbPr/ HDMI/VGA, the AUDIO MENU appears as: ▪ If the signal source is TV...


