Service Manual
Page 3
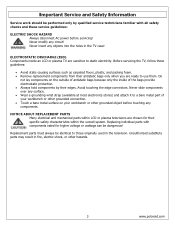
...DISCHARGE (ESD) Components inside of antistatic bags because only the inside an LCD or plasma TV are ready to those originally used in the TV case! Unauthorized substitute parts may result in fire, electric shock, or other... Always hold components by qualified service technicians familiar with components rated for their specific safety characteristics within LCD or plasma televisions are chosen for higher voltage or wattage can be performed only by their antistatic bags... a bare metal surface on your workbench or other hazards. 3 www.polaroid.com Never modify any components.
...DISCHARGE (ESD) Components inside of antistatic bags because only the inside an LCD or plasma TV are ready to those originally used in the TV case! Unauthorized substitute parts may result in fire, electric shock, or other... Always hold components by qualified service technicians familiar with components rated for their specific safety characteristics within LCD or plasma televisions are chosen for higher voltage or wattage can be performed only by their antistatic bags... a bare metal surface on your workbench or other hazards. 3 www.polaroid.com Never modify any components.
Service Manual
Page 12
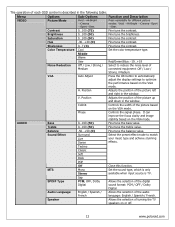
.... H. Speaker Allows the selection of turning the TV speakers on the VGA mode. VGA Auto Adjust Press the OK button to automatically adjust the display settings to optimize the performance based on or off. 12 www.polaroid.com V. It can improve the focus clarity and... mode. Treble 0...100 (50) Fine tune the treble value. Sharpness 0...7 (4) Fine tune the contrast. The operation of each OSD control is TV. Middle Warm User Red/Green/Blue: -19...+19 Noise Reduction Off / Low / Strong / Medium Select to match your music type and achieve...
.... H. Speaker Allows the selection of turning the TV speakers on the VGA mode. VGA Auto Adjust Press the OK button to automatically adjust the display settings to optimize the performance based on or off. 12 www.polaroid.com V. It can improve the focus clarity and... mode. Treble 0...100 (50) Fine tune the treble value. Sharpness 0...7 (4) Fine tune the contrast. The operation of each OSD control is TV. Middle Warm User Red/Green/Blue: -19...+19 Noise Reduction Off / Low / Strong / Medium Select to match your music type and achieve...
Service Manual
Page 13
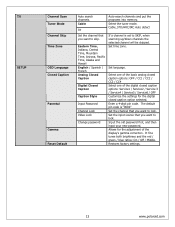
... want to lock. The default pin code is set to lock. It fine tunes both brightness and the red / green / blue ratios: On / Off / Middle. TV SETUP Channel Scan Tuner Mode Channel Skip Time Zone OSD Language Closed Caption Parental Gamma Reset Default Auto search channels. Select one of the basic... old password first, and then input your new password. Cable Air Auto-search channels and put the programs into memory. Restores factory settings. 13 www.polaroid.com Select the tuner mode.
... want to lock. The default pin code is set to lock. It fine tunes both brightness and the red / green / blue ratios: On / Off / Middle. TV SETUP Channel Scan Tuner Mode Channel Skip Time Zone OSD Language Closed Caption Parental Gamma Reset Default Auto search channels. Select one of the basic... old password first, and then input your new password. Cable Air Auto-search channels and put the programs into memory. Restores factory settings. 13 www.polaroid.com Select the tuner mode.
Service Manual
Page 14
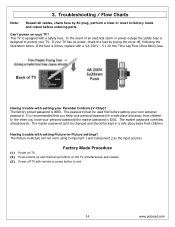
The factory preset password is designed to exit. 14 www.polaroid.com Having trouble with a 4 A 250 V - 5 x 20 mm Time Lag Fuse (Slow Blow) fuse. Can't power on the TV simultaneously and release. (3) Power off , following the illustration below. In the event of an electrical storm or power ... passwords. It is equipped with setting your own personal password. Having trouble with a safety fuse. The Picture-in -Picture settings? 3. If your TV has no power, check the fuse by AC plug, perform a clear or reset in a safe place and away from children. The master password ...
The factory preset password is designed to exit. 14 www.polaroid.com Having trouble with a 4 A 250 V - 5 x 20 mm Time Lag Fuse (Slow Blow) fuse. Can't power on the TV simultaneously and release. (3) Power off , following the illustration below. In the event of an electrical storm or power ... passwords. It is equipped with setting your own personal password. Having trouble with a safety fuse. The Picture-in -Picture settings? 3. If your TV has no power, check the fuse by AC plug, perform a clear or reset in a safe place and away from children. The master password ...
Service Manual
Page 18
These defective cells can be controlled. 4. Polaroid Display Cell Defect Specification In some cases, a panel may have defective cells that cannot be categorized into two types; (1) Non-lighting or dark cell defect: ...defect in which the cell is always off (2) Non-extinguishing or bright cell defect: defect in which the cell is always on The Polaroid Display Cell Defect Specifications below define the allowed limits for display cell defects and are used as the criteria in determining whether an...
These defective cells can be controlled. 4. Polaroid Display Cell Defect Specification In some cases, a panel may have defective cells that cannot be categorized into two types; (1) Non-lighting or dark cell defect: ...defect in which the cell is always off (2) Non-extinguishing or bright cell defect: defect in which the cell is always on The Polaroid Display Cell Defect Specifications below define the allowed limits for display cell defects and are used as the criteria in determining whether an...
Service Manual
Page 20
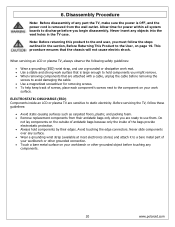
...static-causing surfaces such as carpeted floors, plastic, and packing foam. • Remove replacement components from the wall outlet. When servicing an LCD or plasma TV, always observe the following safety guidelines: • Wear a grounding (ESD) wrist strap, and use them. Allow time for power within... on your work surface that is removed from their edges. ELECTROSTATIC DISCHARGE (ESD) Components inside of any components. 20 www.polaroid.com Never slide components over any objects into the vent holes in the section, Before Returning This Product to the User, ...
...static-causing surfaces such as carpeted floors, plastic, and packing foam. • Remove replacement components from the wall outlet. When servicing an LCD or plasma TV, always observe the following safety guidelines: • Wear a grounding (ESD) wrist strap, and use them. Allow time for power within... on your work surface that is removed from their edges. ELECTROSTATIC DISCHARGE (ESD) Components inside of any components. 20 www.polaroid.com Never slide components over any objects into the vent holes in the section, Before Returning This Product to the User, ...
Service Manual
Page 21
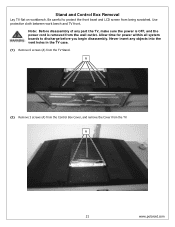
... objects into the vent holes in the TV case. (1) Remove 6 screws (A) from being scratched. A 21 www.polaroid.com Allow time for power within all system boards to protect the front bezel and LCD screen from the TV Stand. Never insert any part the TV, make sure the power is OFF,... and the power cord is removed from the TV. A (2) Remove 3 screws (A) from...
... objects into the vent holes in the TV case. (1) Remove 6 screws (A) from being scratched. A 21 www.polaroid.com Allow time for power within all system boards to protect the front bezel and LCD screen from the TV Stand. Never insert any part the TV, make sure the power is OFF,... and the power cord is removed from the TV. A (2) Remove 3 screws (A) from...

Service Manual
Page 22
A Note: Before returning this product to the end user, you must follow the steps outlined in the section, Before Returning This Product to unhook it. (5) Remove the aluminum foil and bracket from the TV. Unplug the 2 cables (A) from the Control Box, and remove the Box from the end of the TV to the User, on page 19. This procedure ensures that the chassis will not cause electric shock. 22 www.polaroid.com A (4) Lift the Control Box upwards, and then towards the bottom of the Control Box. (3) Remove 6 screws (A) from the Control Box.
A Note: Before returning this product to the end user, you must follow the steps outlined in the section, Before Returning This Product to unhook it. (5) Remove the aluminum foil and bracket from the TV. Unplug the 2 cables (A) from the Control Box, and remove the Box from the end of the TV to the User, on page 19. This procedure ensures that the chassis will not cause electric shock. 22 www.polaroid.com A (4) Lift the Control Box upwards, and then towards the bottom of the Control Box. (3) Remove 6 screws (A) from the Control Box.
Service Manual
Page 23
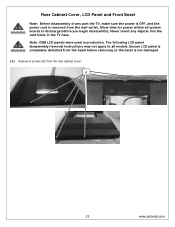
...polaroid.com Allow time for power within all system boards to all models. Ensure LCD panel is completely detached from the bezel before you begin disassembly. The following LCD panel disassembly/removal instructions may not apply to discharge before removing so the bezel is removed from the rear cabinet cover. Rear Cabinet Cover, LCD... Panel and Front Bezel Note: Before disassembly of any objects into the vent holes in production. Never insert any part the TV, make sure the power is OFF, and the power cord is...
...polaroid.com Allow time for power within all system boards to all models. Ensure LCD panel is completely detached from the bezel before you begin disassembly. The following LCD panel disassembly/removal instructions may not apply to discharge before removing so the bezel is removed from the rear cabinet cover. Rear Cabinet Cover, LCD... Panel and Front Bezel Note: Before disassembly of any objects into the vent holes in production. Never insert any part the TV, make sure the power is OFF, and the power cord is...
Service Manual
Page 24
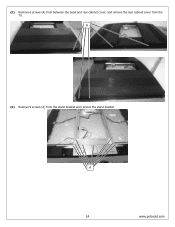
A (3) Remove 9 screws (A) from the TV. A 24 www.polaroid.com (2) Remove 6 screws (A) from between the bezel and rear cabinet cover, and remove the rear cabinet cover from the stand bracket and remove the stand bracket.
A (3) Remove 9 screws (A) from the TV. A 24 www.polaroid.com (2) Remove 6 screws (A) from between the bezel and rear cabinet cover, and remove the rear cabinet cover from the stand bracket and remove the stand bracket.

Service Manual
Page 27
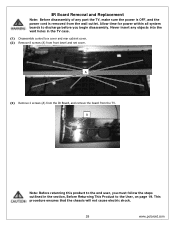
A (11) Unplug the inverter cable (A) and remove 3 screws (B) from the TV. Note: Before returning this product to the end user, you must follow the steps outlined in the section, Before Returning This Product to lift the LCD Panel from one side of the panel. This procedure ensures that the chassis will not cause electric shock. 27 www.polaroid.com A B (12) Remove the LCD panel from the other side of the panel. (10) Remove 3 screws (A) from the TV. NOTE: To avoid damage, TWO PEOPLE ARE REQUIRED to the User, on page 19.
A (11) Unplug the inverter cable (A) and remove 3 screws (B) from the TV. Note: Before returning this product to the end user, you must follow the steps outlined in the section, Before Returning This Product to lift the LCD Panel from one side of the panel. This procedure ensures that the chassis will not cause electric shock. 27 www.polaroid.com A B (12) Remove the LCD panel from the other side of the panel. (10) Remove 3 screws (A) from the TV. NOTE: To avoid damage, TWO PEOPLE ARE REQUIRED to the User, on page 19.
Service Manual
Page 28
... to the User, on page 19. Allow time for power within all system boards to discharge before you must follow the steps outlined in the TV case. (1) Disassemble control box cover and rear cabinet cover. (2) Remove 8 screws (A) from front bezel and net cover. This procedure ensures that the chassis will not...
... to the User, on page 19. Allow time for power within all system boards to discharge before you must follow the steps outlined in the TV case. (1) Disassemble control box cover and rear cabinet cover. (2) Remove 8 screws (A) from front bezel and net cover. This procedure ensures that the chassis will not...
Service Manual
Page 29
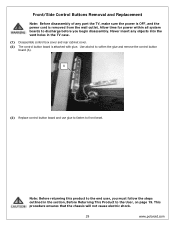
Never insert any part the TV, make sure the power is OFF, and the power cord is attached with glue. Note: Before ...User, on page 19. This procedure ensures that the chassis will not cause electric shock. 29 www.polaroid.com A (3) Replace control button board and use glue to fasten to discharge before you must follow the steps outlined in the... TV case. (1) Disassemble control box cover and rear cabinet cover. (2) The control button board is removed from the wall...
Never insert any part the TV, make sure the power is OFF, and the power cord is attached with glue. Note: Before ...User, on page 19. This procedure ensures that the chassis will not cause electric shock. 29 www.polaroid.com A (3) Replace control button board and use glue to fasten to discharge before you must follow the steps outlined in the... TV case. (1) Disassemble control box cover and rear cabinet cover. (2) The control button board is removed from the wall...
User Guide
Page 2
.... Manufactured under license from Dolby Laboratories. Presence of Dolby Laboratories. For service, support and warranty information, visit www.polaroid.com. This product contains electrical or electronic materials. "Dolby" and the double-D symbol are periodically made to properly dispose... of this product is disposed of Polaroid Corporation, Waltham, MA, USA. Confidential unpublished works. © 1992 -1997 Dolby Laboratories, Inc. This TV incorporates High-Definition Multimedia Interface (HDMITM) technology. HDMI, ...
.... Manufactured under license from Dolby Laboratories. Presence of Dolby Laboratories. For service, support and warranty information, visit www.polaroid.com. This product contains electrical or electronic materials. "Dolby" and the double-D symbol are periodically made to properly dispose... of this product is disposed of Polaroid Corporation, Waltham, MA, USA. Confidential unpublished works. © 1992 -1997 Dolby Laboratories, Inc. This TV incorporates High-Definition Multimedia Interface (HDMITM) technology. HDMI, ...
User Guide
Page 3
... energy and, if not installed and used in a particular installation. Increase the separation between the equipment and receiver. 3. Consult the dealer or an experienced radio/TV technician for compliance could void the user authority to provide reasonable protection against harmful interference in a residential installation. However, there is connected to. 4. Reorient/Relocate...
... energy and, if not installed and used in a particular installation. Increase the separation between the equipment and receiver. 3. Consult the dealer or an experienced radio/TV technician for compliance could void the user authority to provide reasonable protection against harmful interference in a residential installation. However, there is connected to. 4. Reorient/Relocate...
User Guide
Page 7
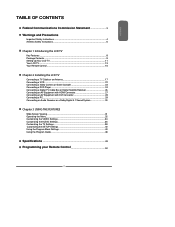
... Federal Communications Commission Statement 3 Warnings and Precautions Important Safety Instructions 4 Antenna Safety Instructions 6 Chapter 1 Introducing the LCD TV Key Features ...8 Package Contents ...9 Setting Up Your LCD TV 11 Your LCD TV...13 Your Remote Control 15 Chapter 2 Installing the LCD TV Connecting a TV Cable or an Antenna 17 Connecting a VCR ...22 Connecting a Video Camera or Game Console 23 Connecting...
... Federal Communications Commission Statement 3 Warnings and Precautions Important Safety Instructions 4 Antenna Safety Instructions 6 Chapter 1 Introducing the LCD TV Key Features ...8 Package Contents ...9 Setting Up Your LCD TV 11 Your LCD TV...13 Your Remote Control 15 Chapter 2 Installing the LCD TV Connecting a TV Cable or an Antenna 17 Connecting a VCR ...22 Connecting a Video Camera or Game Console 23 Connecting...
User Guide
Page 8
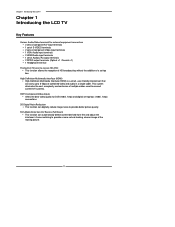
... of Audio(L/R) output terminals ▪ 2 SPDIF output terminals (Optical x 1 /Coaxial x 1) ▪ 1 Headphone terminal The built-in TV tuner to 5 Gbps of combined video and audio in a single cable. Chapter 1 Introducing the LCD TV Chapter 1 Introducing the LCD TV Key Features Various Audio/Video terminals for DVD(1080i, 720p) and digital set-top-box (1080i, 720p...
... of Audio(L/R) output terminals ▪ 2 SPDIF output terminals (Optical x 1 /Coaxial x 1) ▪ 1 Headphone terminal The built-in TV tuner to 5 Gbps of combined video and audio in a single cable. Chapter 1 Introducing the LCD TV Chapter 1 Introducing the LCD TV Key Features Various Audio/Video terminals for DVD(1080i, 720p) and digital set-top-box (1080i, 720p...

User Guide
Page 9
...need to set up and operate the LCD TV in the package. Package Contents Chapter 1 Introducing the LCD TV Make sure all of the above contents are all of the following contents are missing any items, please contact the Polaroid customer service department. 9 LCD TV Bottom Stand / Screw Driver and Screws... 4 ENGLISH Remote Control/ AAA Batteries x 2 SET UP TV CAB/ SAT DVD AUX SLEEP DVD MENU VOL CH PAGE MUTE ASPECT ...
...need to set up and operate the LCD TV in the package. Package Contents Chapter 1 Introducing the LCD TV Make sure all of the above contents are all of the following contents are missing any items, please contact the Polaroid customer service department. 9 LCD TV Bottom Stand / Screw Driver and Screws... 4 ENGLISH Remote Control/ AAA Batteries x 2 SET UP TV CAB/ SAT DVD AUX SLEEP DVD MENU VOL CH PAGE MUTE ASPECT ...
User Guide
Page 10
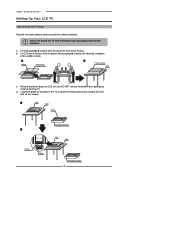
...Stand Packaging material Unit Table Packaging material 10 Lift LCD out of the box. a Stand Shipping box b Protective bag Table c. Lift foam packaging material from the TV. Locate the place on the back of the TV to the LCD with all instructions before continuing with the stand installation.... Remove protective bag from LCD unit, but DO NOT remove the bottom foam packaging material from...
...Stand Packaging material Unit Table Packaging material 10 Lift LCD out of the box. a Stand Shipping box b Protective bag Table c. Lift foam packaging material from the TV. Locate the place on the back of the TV to the LCD with all instructions before continuing with the stand installation.... Remove protective bag from LCD unit, but DO NOT remove the bottom foam packaging material from...
User Guide
Page 11
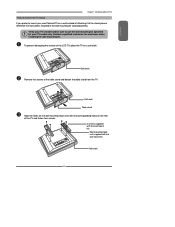
...mounting hook units with the corresponding holes on a soft cloth. Soft cloth Remove the screws of the TV and fasten four screws. 4 screws (supplied with the wall mount kit) Wall mounting hook unit (... the wall mount kit) Soft cloth 11 ENGLISH Chapter 1 Introducing the LCD TV How to remove the TV Stand If you prefer to mount your TV's model and be sure to the stand, please reference the instructions included...installing the wall mounting kit. Verify your new Polaroid TV on a wall instead of the LCD TV, place the TV on the rear of the table stand and detach the table stand from ...
...mounting hook units with the corresponding holes on a soft cloth. Soft cloth Remove the screws of the TV and fasten four screws. 4 screws (supplied with the wall mount kit) Wall mounting hook unit (... the wall mount kit) Soft cloth 11 ENGLISH Chapter 1 Introducing the LCD TV How to remove the TV Stand If you prefer to mount your TV's model and be sure to the stand, please reference the instructions included...installing the wall mounting kit. Verify your new Polaroid TV on a wall instead of the LCD TV, place the TV on the rear of the table stand and detach the table stand from ...


