User Guide
Page 1
...how to properly dispose of this product is disposed of properly. However, there is no guarantee that this product, please go to www.polaroid.com and click on the product means it should not be disposed of as unsorted waste and must be determined by the manufacturer responsible ... energy and, if not installed and used in a particular installation. These limits are responsible for help. Consult the dealer or an experienced radio/TV technician for ensuring that interference will not occur in accordance with the limits of a class B digital device, pursuant to Part 15 of the ...
...how to properly dispose of this product is disposed of properly. However, there is no guarantee that this product, please go to www.polaroid.com and click on the product means it should not be disposed of as unsorted waste and must be determined by the manufacturer responsible ... energy and, if not installed and used in a particular installation. These limits are responsible for help. Consult the dealer or an experienced radio/TV technician for ensuring that interference will not occur in accordance with the limits of a class B digital device, pursuant to Part 15 of the ...

User Guide
Page 5
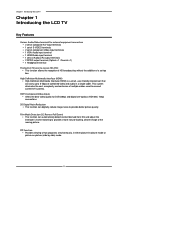
...and Precautions Important Safety Instructions 2 Antenna Safety Instructions 4 Chapter 1 Introducing the LCD TV Key Features ...6 Package Contents ...7 Setting Your LCD TV...8 Your LCD TV...10 Your Remote Control 12 Chapter 2 Installing the LCD TV Connecting a TV Cable or an Antenna 14 Connecting a VCR ...18 Connecting a Video Camera or... FEATURES Using Picture-In-Picture ...27 Wide Screen Viewing...29 Operating the Menu...30 Setting up the HDTV Function ...32 Customizing the VIDEO Settings...35 Customizing the AUDIO Settings...36 Customizing the SETUP Settings ...37 Using the V-CHIP Settings...
...and Precautions Important Safety Instructions 2 Antenna Safety Instructions 4 Chapter 1 Introducing the LCD TV Key Features ...6 Package Contents ...7 Setting Your LCD TV...8 Your LCD TV...10 Your Remote Control 12 Chapter 2 Installing the LCD TV Connecting a TV Cable or an Antenna 14 Connecting a VCR ...18 Connecting a Video Camera or... FEATURES Using Picture-In-Picture ...27 Wide Screen Viewing...29 Operating the Menu...30 Setting up the HDTV Function ...32 Customizing the VIDEO Settings...35 Customizing the AUDIO Settings...36 Customizing the SETUP Settings ...37 Using the V-CHIP Settings...
User Guide
Page 6
Chapter 1 Introducing the LCD TV Chapter 1 Introducing the LCD TV Key Features Various Audio/Video terminals for external equipment connection ▪ 2 set of composite A/V input terminals ▪ 1 set of S-VIDEO terminals ▪ 2 set of ...terminal ▪ 1 HDMI/Auido input terminal ▪ 1 sets of Audio(L/R) output terminals ▪ 2 SPDIF output terminal (Optical x 1 /Coaxial x 1) ▪ 1 Headphone terminal The built-in TV tuner to receive HD ATSC ▪ This function allows the reception of HD broadcasting without the addition of multiple cables used to connect current A/V systems...
Chapter 1 Introducing the LCD TV Chapter 1 Introducing the LCD TV Key Features Various Audio/Video terminals for external equipment connection ▪ 2 set of composite A/V input terminals ▪ 1 set of S-VIDEO terminals ▪ 2 set of ...terminal ▪ 1 HDMI/Auido input terminal ▪ 1 sets of Audio(L/R) output terminals ▪ 2 SPDIF output terminal (Optical x 1 /Coaxial x 1) ▪ 1 Headphone terminal The built-in TV tuner to receive HD ATSC ▪ This function allows the reception of HD broadcasting without the addition of multiple cables used to connect current A/V systems...
User Guide
Page 7
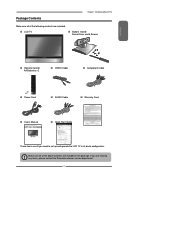
LCD TV Bottom Stand / Screw Driver and 6 Screws ENGLISH Remote Control/ AA Batteries x 2 VIDEO Cable Component Cable Power Cord AUDIO Cable Warranty Card User's Manual Quick Start Guide These items are all you are missing any items, please contact the Polaroid customer service department. 7 Package Contents Chapter 1 Introducing the LCD TV Make sure all of the following contents are included. Make sure all of the above contents are included in its basic configuration. If you need to set up and operate the LCD TV in the package.
LCD TV Bottom Stand / Screw Driver and 6 Screws ENGLISH Remote Control/ AA Batteries x 2 VIDEO Cable Component Cable Power Cord AUDIO Cable Warranty Card User's Manual Quick Start Guide These items are all you are missing any items, please contact the Polaroid customer service department. 7 Package Contents Chapter 1 Introducing the LCD TV Make sure all of the following contents are included. Make sure all of the above contents are included in its basic configuration. If you need to set up and operate the LCD TV in the package.

User Guide
Page 8
... the bottom foam packaging material still attached, and place onto a stable furface. Chapter 1 Introducing the LCD TV Setting Up Your LCD TV Attach the Stand If you prefer to mount your new Polaroid TV on the back of the TV to attach the stand. Read all six screws. 8 d) Locate the place on a wall instead of the box...
... the bottom foam packaging material still attached, and place onto a stable furface. Chapter 1 Introducing the LCD TV Setting Up Your LCD TV Attach the Stand If you prefer to mount your new Polaroid TV on the back of the TV to attach the stand. Read all six screws. 8 d) Locate the place on a wall instead of the box...
User Guide
Page 9
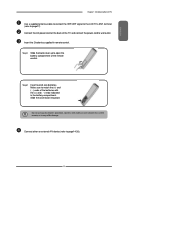
... cord at the back of the batteries with the (+) and ( - ) ends indicated in remote control. Step2 Insert two AA size batteries. ENGLISH Chapter 1 Introducing the LCD TV Use a supplied antenna cable to connect the VHF/UHF signal to wall outlet. Step1 Slide the back cover up to match the (+) and ( - ) ends of...
... cord at the back of the batteries with the (+) and ( - ) ends indicated in remote control. Step2 Insert two AA size batteries. ENGLISH Chapter 1 Introducing the LCD TV Use a supplied antenna cable to connect the VHF/UHF signal to wall outlet. Step1 Slide the back cover up to match the (+) and ( - ) ends of...

User Guide
Page 10
... and change values for private listening. VIDEO L AUDIO R VIDEO1 IN MENU Press once to display the OSD (on and into standby mode. 10 Turns the LCD TV on screen display), press again to turn the OSD off. IR Infrared Receiver VOLUME▲▼ Adjusts the volume up and down . Chapter 1 Introducing the...
... and change values for private listening. VIDEO L AUDIO R VIDEO1 IN MENU Press once to display the OSD (on and into standby mode. 10 Turns the LCD TV on screen display), press again to turn the OSD off. IR Infrared Receiver VOLUME▲▼ Adjusts the volume up and down . Chapter 1 Introducing the...

User Guide
Page 11
...DVI connection. S-VIDEO IN Connects to the S-VIDEO and AUDIO(L/R) output jacks on AV equipment. Rear View and Jacks Chapter 1 Introducing the LCD TV ENGLISH VIDEO2 IN Connects to the composite VIDEO and AUDIO(L/R) output jacks on the digital/standard 5.1 audio system. VHF/UHF IN-HDTV-AIR Connects... L R VIDEO L R AUD IO VIDEO2 IN L R S-VIDEO AUD IO S-VIDEO IN AUD IO OUT YPbPr1 IN Y Pb Pr AUD IO STEREO DIGITAL OPTICAL TV CABLE HDTV AIR L R L Y Pb Pr AUD IO COAXIAL L R R YPbPr2 IN VHF/UHF IN YPbPr1 IN/YPbPr2 IN Connects to the OPTICAL AUDIO jack...
...DVI connection. S-VIDEO IN Connects to the S-VIDEO and AUDIO(L/R) output jacks on AV equipment. Rear View and Jacks Chapter 1 Introducing the LCD TV ENGLISH VIDEO2 IN Connects to the composite VIDEO and AUDIO(L/R) output jacks on the digital/standard 5.1 audio system. VHF/UHF IN-HDTV-AIR Connects... L R VIDEO L R AUD IO VIDEO2 IN L R S-VIDEO AUD IO S-VIDEO IN AUD IO OUT YPbPr1 IN Y Pb Pr AUD IO STEREO DIGITAL OPTICAL TV CABLE HDTV AIR L R L Y Pb Pr AUD IO COAXIAL L R R YPbPr2 IN VHF/UHF IN YPbPr1 IN/YPbPr2 IN Connects to the OPTICAL AUDIO jack...

User Guide
Page 12
.../ZOOM. 11 LAST Returns to four devices. To select a device, simply select one of the following device mode controls: TV, CBL/SAT, DVD/VCR, or AUDIO. 1 Turns the LCD TV on and off . 14 MENU Displays the OSD menu on the screen. 12 PIP 13 Turns PIP/POP on and off... 13 OFF/30/60/90/120 mins. 12 14 6 ► Other device function keys 15 7 VOL+- Chapter 1 Introducing the LCD TV Your Remote Control This package includes a Polaroid remote control that enables you to control up to previously selected channel. 20 12 GUIDE In HDTV mode, pressing GUIDE displays the Program Guide...
.../ZOOM. 11 LAST Returns to four devices. To select a device, simply select one of the following device mode controls: TV, CBL/SAT, DVD/VCR, or AUDIO. 1 Turns the LCD TV on and off . 14 MENU Displays the OSD menu on the screen. 12 PIP 13 Turns PIP/POP on and off... 13 OFF/30/60/90/120 mins. 12 14 6 ► Other device function keys 15 7 VOL+- Chapter 1 Introducing the LCD TV Your Remote Control This package includes a Polaroid remote control that enables you to control up to previously selected channel. 20 12 GUIDE In HDTV mode, pressing GUIDE displays the Program Guide...

User Guide
Page 13
ENGLISH Chapter 2 Installing the LCD TV OK Cycles through OSD options and selects 15 individual menu items. OK confirms option settings. 2 1 OK In HDTV mode, pressing OK to display a 3 4 .... 15 20 INPUT Pressing INPUT to display a source list, use ▲▼buttons to select the video equipment connected to the video inputs of your LCD TV: TV/HDTV/VIDEO1/ 16 VIDEO2/VIDEO3/VIDEO4/VIDEO5/ 17 18 VIDEO6/COMPUTER. 19 20 Effective range: The remote can control the...
ENGLISH Chapter 2 Installing the LCD TV OK Cycles through OSD options and selects 15 individual menu items. OK confirms option settings. 2 1 OK In HDTV mode, pressing OK to display a 3 4 .... 15 20 INPUT Pressing INPUT to display a source list, use ▲▼buttons to select the video equipment connected to the video inputs of your LCD TV: TV/HDTV/VIDEO1/ 16 VIDEO2/VIDEO3/VIDEO4/VIDEO5/ 17 18 VIDEO6/COMPUTER. 19 20 Effective range: The remote can control the...
User Guide
Page 14
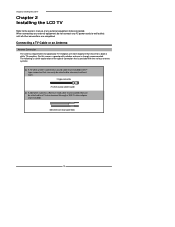
Chapter 2 Installing the LCD TV Chapter 2 Installing the LCD TV Refer to the owner's manual of connection that is provided with the various antenna systems. ■ A 75-ohm system is generally a round cable (not included) ...) that can be connected. F-type connector 75-ohm coaxial cable (round) ■ A 300-ohm system is strongly recommended. Connecting a TV Cable or an Antenna Antenna Connection The antenna requirements for good color TV reception are completed. When connecting any external equipment, do not connect any external equipment to be attached to wall...
Chapter 2 Installing the LCD TV Chapter 2 Installing the LCD TV Refer to the owner's manual of connection that is provided with the various antenna systems. ■ A 75-ohm system is generally a round cable (not included) ...) that can be connected. F-type connector 75-ohm coaxial cable (round) ■ A 300-ohm system is strongly recommended. Connecting a TV Cable or an Antenna Antenna Connection The antenna requirements for good color TV reception are completed. When connecting any external equipment, do not connect any external equipment to be attached to wall...

User Guide
Page 15
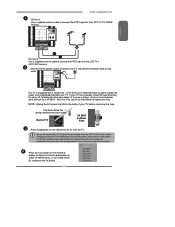
ENGLISH Chapter 2 Installing the LCD TV Use one of the following two diagrams when connecting an outdoor antenna. Separate VHF and/or UHF antennas UHF Antenna Combiner (not included) O U T IN 300-ohm twinlead cable 75-ohm coaxial cable 300-ohm twinlead cable VHF Antenna 15 A. B: Shows how to use a separate VHF and/or UHF outdoor antenna. Combination VHF/UHF antenna VHF/UHF Antenna 300/75-ohm adapter (not included) 300-ohm twinlead cable VHF/UHF Antenna 75-ohm coaxial cable B. A: Shows how to use a VHF/UHF combination outdoor antenna.
ENGLISH Chapter 2 Installing the LCD TV Use one of the following two diagrams when connecting an outdoor antenna. Separate VHF and/or UHF antennas UHF Antenna Combiner (not included) O U T IN 300-ohm twinlead cable 75-ohm coaxial cable 300-ohm twinlead cable VHF Antenna 15 A. B: Shows how to use a separate VHF and/or UHF outdoor antenna. Combination VHF/UHF antenna VHF/UHF Antenna 300/75-ohm adapter (not included) 300-ohm twinlead cable VHF/UHF Antenna 75-ohm coaxial cable B. A: Shows how to use a VHF/UHF combination outdoor antenna.
User Guide
Page 16
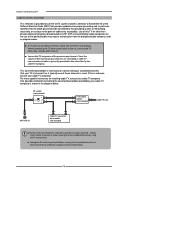
...LCD TV Cable TV (CATV) Connection This reminder is provided to call the CATV system installer's attention to Article 820-40 of the National Electrical Code (NEC) that the cable ground shall be connected to the set, connect the 75ohm cable into the set signal splitter (not included) Cable TV ...ohm coaxial cable connector is shown in particular, specifies that provides guidelines for proper grounding and, in the diagram below. If this TV for easy hookup. When connecting the 75-ohm coaxial cable to the grounding system of the building accurately, or as possible. terminal. &#...
...LCD TV Cable TV (CATV) Connection This reminder is provided to call the CATV system installer's attention to Article 820-40 of the National Electrical Code (NEC) that the cable ground shall be connected to the set, connect the 75ohm cable into the set signal splitter (not included) Cable TV ...ohm coaxial cable connector is shown in particular, specifies that provides guidelines for proper grounding and, in the diagram below. If this TV for easy hookup. When connecting the 75-ohm coaxial cable to the grounding system of the building accurately, or as possible. terminal. &#...
User Guide
Page 17
...of an electrical storm or power outage the safety fuse is equipped with a safety fuse. If your TV. TV CABLE HDTV AIR VHF/UHF IN This TV is designed to replace the fuse. Always disconnect the LCD TV from the main voltage. Press the Input button on the front panel is blown, visit your local... hardware store and ask for switching the LCD TV into standby, it does not disconnect the device from the main voltage when the LCD TV will not be used for a 4A 250V - 5x20mm Time Lag Fuse (Slow Blow) to protect your...
...of an electrical storm or power outage the safety fuse is equipped with a safety fuse. If your TV. TV CABLE HDTV AIR VHF/UHF IN This TV is designed to replace the fuse. Always disconnect the LCD TV from the main voltage. Press the Input button on the front panel is blown, visit your local... hardware store and ask for switching the LCD TV into standby, it does not disconnect the device from the main voltage when the LCD TV will not be used for a 4A 250V - 5x20mm Time Lag Fuse (Slow Blow) to protect your...
User Guide
Page 18
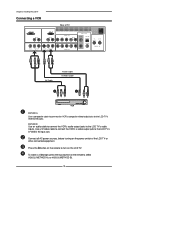
... cable to connect the VCR's s-video output jack to turn on the remote to the LCD TV's S-VIDEO IN input jack. Press the button on the LCD TV. To watch a videotape, press the Input button on the power switch of TV HDMI IN AUD IO L R VGA IN AUD IO L R VIDEO L R AUD IO ...Cable A B METHOD A: Use a composite cable to connect the VCR's composite video/audio jacks to the LCD TV's VIDEO2 IN jacks. Connect all AC power sources, before turning on the remote to the LCD TV's audio inputs. METHOD B: Use an audio cable to connect the VCR's audio output jacks to select VIDEO2...
... cable to connect the VCR's s-video output jack to turn on the remote to the LCD TV's S-VIDEO IN input jack. Press the button on the LCD TV. To watch a videotape, press the Input button on the power switch of TV HDMI IN AUD IO L R VGA IN AUD IO L R VIDEO L R AUD IO ...Cable A B METHOD A: Use a composite cable to connect the VCR's composite video/audio jacks to the LCD TV's VIDEO2 IN jacks. Connect all AC power sources, before turning on the remote to the LCD TV's audio inputs. METHOD B: Use an audio cable to connect the VCR's audio output jacks to select VIDEO2...
User Guide
Page 19
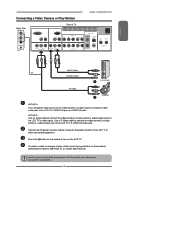
... to connect the video camera's or play station's audio output jacks to the LCD TV's VIDEO2 IN jacks or VIDEO1 IN jacks. Not all AC power sources, before turning on the remote to the LCD TV's S-VIDEO IN input jack. Please check your video camera user guide for compatibility.... 19 ENGLISH Connecting a Video Camera or Play Station Chapter 2 Installing the LCD TV Right Side VIDEO L AUDIO R VIDEO1 IN Rear of the LCD TV or other connected equipment. METHOD B: Use an audio cable to connect the video camera's or play station's composite...
... to connect the video camera's or play station's audio output jacks to the LCD TV's VIDEO2 IN jacks or VIDEO1 IN jacks. Not all AC power sources, before turning on the remote to the LCD TV's S-VIDEO IN input jack. Please check your video camera user guide for compatibility.... 19 ENGLISH Connecting a Video Camera or Play Station Chapter 2 Installing the LCD TV Right Side VIDEO L AUDIO R VIDEO1 IN Rear of the LCD TV or other connected equipment. METHOD B: Use an audio cable to connect the video camera's or play station's composite...
User Guide
Page 20
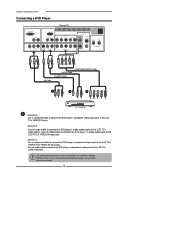
... DVD player's user guide. 20 Use an audio cable to connect the DVD player's component audio jacks to the LCD TV's YPbPr1 IN or YPbPr2 IN input jacks. Chapter 2 Installing the LCD TV Connecting a DVD Player Rear of component video, see your DVD player are sometimes labeled YPbPr, or YCbCr. Use ...a S-Video cable to connect the DVD player's s-video output jack to the LCD TV's VIDEO2 IN jacks. For an explanation of TV HDMI IN AUD IO L R VGA IN AUD IO L R VIDEO L R AUD IO VIDEO2 IN L R S-VIDEO AUD IO S-VIDEO...
... DVD player's user guide. 20 Use an audio cable to connect the DVD player's component audio jacks to the LCD TV's YPbPr1 IN or YPbPr2 IN input jacks. Chapter 2 Installing the LCD TV Connecting a DVD Player Rear of component video, see your DVD player are sometimes labeled YPbPr, or YCbCr. Use ...a S-Video cable to connect the DVD player's s-video output jack to the LCD TV's VIDEO2 IN jacks. For an explanation of TV HDMI IN AUD IO L R VGA IN AUD IO L R VIDEO L R AUD IO VIDEO2 IN L R S-VIDEO AUD IO S-VIDEO...
User Guide
Page 21
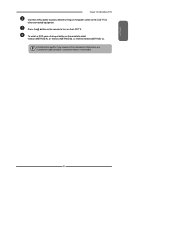
To watch a DVD, press the Input button on the power switch of a composite video or S-video cable. 21 ENGLISH Chapter 2 Installing the LCD TV Connect all AC power sources, before turning on the remote to turn on the LCD TV. For best picture quality, if your equipment has component video output, use a component cable instead of the LCD TV or other connected equipment. Press the button on the remote to select VIDEO2( METHOD A), or VIDEO3 ( METHOD B), or VIDEO4/VIDEO5 (METHOD C).
To watch a DVD, press the Input button on the power switch of a composite video or S-video cable. 21 ENGLISH Chapter 2 Installing the LCD TV Connect all AC power sources, before turning on the remote to turn on the LCD TV. For best picture quality, if your equipment has component video output, use a component cable instead of the LCD TV or other connected equipment. Press the button on the remote to select VIDEO2( METHOD A), or VIDEO3 ( METHOD B), or VIDEO4/VIDEO5 (METHOD C).
User Guide
Page 22
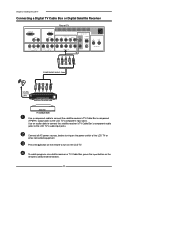
... COMPONENT/AUDIO Cable Pb Pr Use a component cable to connect the satellite receiver's/TV Cable Box's component (YPbPr1) output jacks to turn on the remote to the LCD TV's component input jacks. Use an audio cable to connect the satellite receiver's/TV Cable Box's component audio jacks to select VIDEO4/VIDEO5. 22 Press the...
... COMPONENT/AUDIO Cable Pb Pr Use a component cable to connect the satellite receiver's/TV Cable Box's component (YPbPr1) output jacks to turn on the remote to the LCD TV's component input jacks. Use an audio cable to connect the satellite receiver's/TV Cable Box's component audio jacks to select VIDEO4/VIDEO5. 22 Press the...
User Guide
Page 23
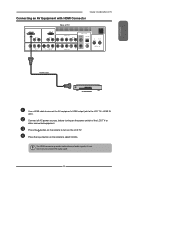
Press the button on the LCD TV. The HDMI connector provides both video and audio signals, it's not necessary to turn on the remote to connect the audio cable. 23 Connect all AC power sources, before turning on the remote to the LCD TV's HDMI IN jacks. Press the Input button on the power ...switch of TV HDMI IN AUD IO L R VGA IN AUD IO L R VIDEO L R AUD IO VIDEO2 IN L R S-VIDEO AUD IO S-VIDEO IN ...
Press the button on the LCD TV. The HDMI connector provides both video and audio signals, it's not necessary to turn on the remote to connect the audio cable. 23 Connect all AC power sources, before turning on the remote to the LCD TV's HDMI IN jacks. Press the Input button on the power ...switch of TV HDMI IN AUD IO L R VGA IN AUD IO L R VIDEO L R AUD IO VIDEO2 IN L R S-VIDEO AUD IO S-VIDEO IN ...


