User Guide
Page 1
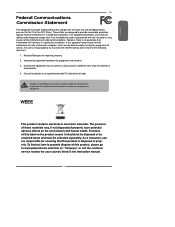
... to www.polaroid.com and click on "Company" or call the customer service number for ensuring that interference will not occur in the instruction manual. 1 Reorient/Relocate the receiving antenna. 2. The presence of these materials may cause harmful interference to radio communications. These limits are responsible for your country listed in a particular installation. If this product is connected to. 4. However...
... to www.polaroid.com and click on "Company" or call the customer service number for ensuring that interference will not occur in the instruction manual. 1 Reorient/Relocate the receiving antenna. 2. The presence of these materials may cause harmful interference to radio communications. These limits are responsible for your country listed in a particular installation. If this product is connected to. 4. However...
User Guide
Page 4
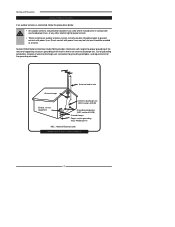
... 810 of National Electrical Code (NEC) provides information with respect to grounding electrodes, and requirements for the grounding electrode. Warnings and Precautions Outdoor Antenna Safety Instructions If an outdoor antenna is connected, follow the precautions below: ▪ An outdoor antenna should not be located in any other electric light or power circuits. ▪ When installing an outdoor antenna system, extreme caution...
... 810 of National Electrical Code (NEC) provides information with respect to grounding electrodes, and requirements for the grounding electrode. Warnings and Precautions Outdoor Antenna Safety Instructions If an outdoor antenna is connected, follow the precautions below: ▪ An outdoor antenna should not be located in any other electric light or power circuits. ▪ When installing an outdoor antenna system, extreme caution...

User Guide
Page 5
...10 Your Remote Control 12 Chapter 2 Installing the LCD TV Connecting a TV Cable or an Antenna 14 Connecting a VCR ...18 Connecting a Video Camera or Play Station 19 Connecting a DVD Player 20 Connecting a Digital TV Cable Box or Digital Satellite Receiver 22 Connecting an AV Equipment with HDMI Connector 23 Connecting an AV Equipment with DVI Connector 24 Connecting a PC...25 Connecting an Audio Receiver or a Dolby Digital 5.1 Sound System 26 Chapter 3 USING THE FEATURES Using Picture-In-Picture ...27 Wide Screen Viewing...29 Operating the Menu...30 Setting up the HDTV Function ...32...
...10 Your Remote Control 12 Chapter 2 Installing the LCD TV Connecting a TV Cable or an Antenna 14 Connecting a VCR ...18 Connecting a Video Camera or Play Station 19 Connecting a DVD Player 20 Connecting a Digital TV Cable Box or Digital Satellite Receiver 22 Connecting an AV Equipment with HDMI Connector 23 Connecting an AV Equipment with DVI Connector 24 Connecting a PC...25 Connecting an Audio Receiver or a Dolby Digital 5.1 Sound System 26 Chapter 3 USING THE FEATURES Using Picture-In-Picture ...27 Wide Screen Viewing...29 Operating the Menu...30 Setting up the HDTV Function ...32...
User Guide
Page 6
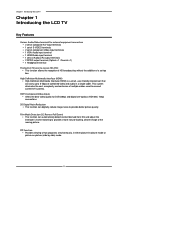
... LCD TV Key Features Various Audio/Video terminals for DVD(480p) and digital set-top-box (HD1080i, 720p) connections. 3D Digital Noise Reduction ▪ This function can automatically detect content derived from film and adjust the interlacer's frame matching to 5 Gbps of the moving picture. This system eliminates the cost, complexity and confusion of multiple cables used to connect current A/V systems. HDTV Component Video Inputs ▪ Offers the best video...
... LCD TV Key Features Various Audio/Video terminals for DVD(480p) and digital set-top-box (HD1080i, 720p) connections. 3D Digital Noise Reduction ▪ This function can automatically detect content derived from film and adjust the interlacer's frame matching to 5 Gbps of the moving picture. This system eliminates the cost, complexity and confusion of multiple cables used to connect current A/V systems. HDTV Component Video Inputs ▪ Offers the best video...
User Guide
Page 7
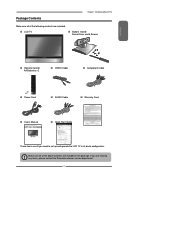
If you are all you need to set up and operate the LCD TV in the package. Package Contents Chapter 1 Introducing the LCD TV Make sure all of the following contents are included. Make sure all of the above contents are included in its basic configuration. LCD TV Bottom Stand / Screw Driver and 6 Screws ENGLISH Remote Control/ AA Batteries x 2 VIDEO Cable Component Cable Power Cord AUDIO Cable Warranty Card User's Manual Quick Start Guide These items are missing any items, please contact the Polaroid customer service department. 7
If you are all you need to set up and operate the LCD TV in the package. Package Contents Chapter 1 Introducing the LCD TV Make sure all of the following contents are included. Make sure all of the above contents are included in its basic configuration. LCD TV Bottom Stand / Screw Driver and 6 Screws ENGLISH Remote Control/ AA Batteries x 2 VIDEO Cable Component Cable Power Cord AUDIO Cable Warranty Card User's Manual Quick Start Guide These items are missing any items, please contact the Polaroid customer service department. 7

User Guide
Page 10
... main-menu item and change values for private listening. Selects sub-menu item when in the OSD mode. Turns the LCD TV on screen display), press again to turn the OSD off. Chapter 1 Introducing the LCD TV Your LCD TV Front/Right Side View and Controls LED The LED light indicates when the LCD TV is activated. INPUT Chooses from different input signal sources. EARPHONE Connects to the composite Video and Audio output jacks on external video equipment. VIDEO L AUDIO R VIDEO1 IN MENU Press...
... main-menu item and change values for private listening. Selects sub-menu item when in the OSD mode. Turns the LCD TV on screen display), press again to turn the OSD off. Chapter 1 Introducing the LCD TV Your LCD TV Front/Right Side View and Controls LED The LED light indicates when the LCD TV is activated. INPUT Chooses from different input signal sources. EARPHONE Connects to the composite Video and Audio output jacks on external video equipment. VIDEO L AUDIO R VIDEO1 IN MENU Press...

User Guide
Page 11
... S-VIDEO and AUDIO(L/R) output jacks on AV equipment. VHF/UHF IN-TV-CABLE Connects RF input from VHF/UHF antenna or cable to receive high/standard definition television. The AUDIO(L/R) of HDMI IN is for DVI connection. AUDIO OUT-DIGITAL-OPTICAL/COAXIAL Connects to the OPTICAL AUDIO jack on external video equipment. AC IN Connects to the DVD player, Digital Set-Top-Box, or other AV equipment with HDMI connector.HDMI supports enhanced, high-definition video and two-channel digital audio. Rear View...
... S-VIDEO and AUDIO(L/R) output jacks on AV equipment. VHF/UHF IN-TV-CABLE Connects RF input from VHF/UHF antenna or cable to receive high/standard definition television. The AUDIO(L/R) of HDMI IN is for DVI connection. AUDIO OUT-DIGITAL-OPTICAL/COAXIAL Connects to the OPTICAL AUDIO jack on external video equipment. AC IN Connects to the DVD player, Digital Set-Top-Box, or other AV equipment with HDMI connector.HDMI supports enhanced, high-definition video and two-channel digital audio. Rear View...

User Guide
Page 12
... up to previously selected channel. 20 12 GUIDE In HDTV mode, pressing GUIDE displays the Program Guide on the screen. 12 PIP 13 Turns PIP/POP on and off . 2 1 3 4 2 SET Remote control universal code setup.For more information on setting up and down. 16 17 18 9 MUTE Pressing once mutes audio. Change channel up your 5 remote control, please see the "Programming Your Remote Control" section. 6 3 TV Controls this LCD TV. 4 CBL Controls Cable Converter or Satellite Receiver. 7 8 DVD Controls DVD player or Video player. 10 AUX Controls Audio Amplifier...
... up to previously selected channel. 20 12 GUIDE In HDTV mode, pressing GUIDE displays the Program Guide on the screen. 12 PIP 13 Turns PIP/POP on and off . 2 1 3 4 2 SET Remote control universal code setup.For more information on setting up and down. 16 17 18 9 MUTE Pressing once mutes audio. Change channel up your 5 remote control, please see the "Programming Your Remote Control" section. 6 3 TV Controls this LCD TV. 4 CBL Controls Cable Converter or Satellite Receiver. 7 8 DVD Controls DVD player or Video player. 10 AUX Controls Audio Amplifier...

User Guide
Page 13
... 12 14 In HDTV mode, use with 0-9 and ENTER buttons to select a digital channels. 15 20 INPUT Pressing INPUT to display a source list, use ▲▼buttons to select the video equipment connected to the video inputs of your LCD TV: TV/HDTV/VIDEO1/ 16 VIDEO2/VIDEO3/VIDEO4/VIDEO5/ 17 18 VIDEO6/COMPUTER. 19 20 Effective range: The remote can control the LCD TV from up to 5m away, if pointed directly at the receiver. 13
... 12 14 In HDTV mode, use with 0-9 and ENTER buttons to select a digital channels. 15 20 INPUT Pressing INPUT to display a source list, use ▲▼buttons to select the video equipment connected to the video inputs of your LCD TV: TV/HDTV/VIDEO1/ 16 VIDEO2/VIDEO3/VIDEO4/VIDEO5/ 17 18 VIDEO6/COMPUTER. 19 20 Effective range: The remote can control the LCD TV from up to 5m away, if pointed directly at the receiver. 13
User Guide
Page 16
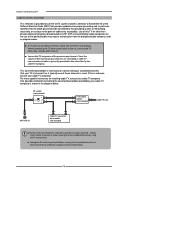
... the signals of these channels is used. If this TV for normal viewing of scrambled channels. (Set your cable TV company. When connecting the 75-ohm coaxial cable to the set, connect the 75ohm cable into the set signal splitter (not included) Cable TV Line VHF/UHF IN Cable TV converter/ descrambler (not included) ■ The RF switch (not included) is required to provide two inputs (A and B). Chapter 2 Installing the LCD TV Cable TV (CATV) Connection This reminder...
... the signals of these channels is used. If this TV for normal viewing of scrambled channels. (Set your cable TV company. When connecting the 75-ohm coaxial cable to the set, connect the 75ohm cable into the set signal splitter (not included) Cable TV Line VHF/UHF IN Cable TV converter/ descrambler (not included) ■ The RF switch (not included) is required to provide two inputs (A and B). Chapter 2 Installing the LCD TV Cable TV (CATV) Connection This reminder...
User Guide
Page 17
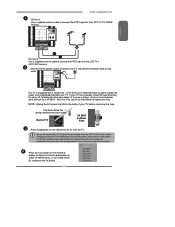
... wall outlet. Press the Input button on the front panel is blown, visit your TV before removing the fuse. Input TV(CABLE/AIR) HDTV (CABLE/AIR) VIDEO1 (SIDE) VIDEO2 (REAR) VIDEO3 (S-VIDEO) VIDEO4 (YPbPr1) VIDEO5 (YPbPr2) VIDEO6 (HDMI) COMPUTER (VGA) 17 In the event of time. Use the ▲► buttons to display the Input List. Firm Plastic Prying Tool D (Using a metal tool may cause shock) Back of the TV and connect the power cord...
... wall outlet. Press the Input button on the front panel is blown, visit your TV before removing the fuse. Input TV(CABLE/AIR) HDTV (CABLE/AIR) VIDEO1 (SIDE) VIDEO2 (REAR) VIDEO3 (S-VIDEO) VIDEO4 (YPbPr1) VIDEO5 (YPbPr2) VIDEO6 (HDMI) COMPUTER (VGA) 17 In the event of time. Use the ▲► buttons to display the Input List. Firm Plastic Prying Tool D (Using a metal tool may cause shock) Back of the TV and connect the power cord...
User Guide
Page 18
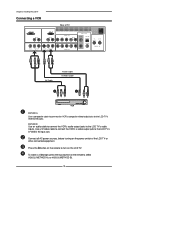
... the LCD TV's audio inputs. Press the button on the remote to the LCD TV's VIDEO2 IN jacks. Chapter 2 Installing the LCD TV Connecting a VCR Rear of the LCD TV or other connected equipment. To watch a videotape, press the Input button on the power switch of TV HDMI IN AUD IO L R VGA IN AUD IO L R VIDEO L R AUD IO VIDEO2 IN L R S-VIDEO AUD IO S-VIDEO IN AUD IO OUT YPbPr1 IN Y Pb Pr AUD IO STEREO DIGITAL OPTICAL TV CABLE HDTV...
... the LCD TV's audio inputs. Press the button on the remote to the LCD TV's VIDEO2 IN jacks. Chapter 2 Installing the LCD TV Connecting a VCR Rear of the LCD TV or other connected equipment. To watch a videotape, press the Input button on the power switch of TV HDMI IN AUD IO L R VGA IN AUD IO L R VIDEO L R AUD IO VIDEO2 IN L R S-VIDEO AUD IO S-VIDEO IN AUD IO OUT YPbPr1 IN Y Pb Pr AUD IO STEREO DIGITAL OPTICAL TV CABLE HDTV...
User Guide
Page 19
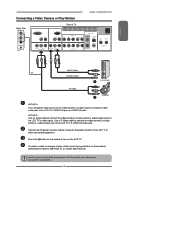
... LCD TV. Press the button on the remote to turn on the power switch of TV HDMI IN AUD IO L R VGA IN AUD IO L R VIDEO L R AUD IO VIDEO2 IN L R S-VIDEO AUD IO S-VIDEO IN AUD IO OUT YPbPr1 IN Y Pb Pr AUD IO STEREO DIGITAL OPTICAL TV CABLE HDTV AIR L R L Y Pb Pr AUD IO COAXIAL L R R YPbPr2 IN VHF/UHF IN AUDIO Cable or S-VIDEO Cable PLAY STATION B AV Cable A METHOD A: Use a composite cable to connect the video...
... LCD TV. Press the button on the remote to turn on the power switch of TV HDMI IN AUD IO L R VGA IN AUD IO L R VIDEO L R AUD IO VIDEO2 IN L R S-VIDEO AUD IO S-VIDEO IN AUD IO OUT YPbPr1 IN Y Pb Pr AUD IO STEREO DIGITAL OPTICAL TV CABLE HDTV AIR L R L Y Pb Pr AUD IO COAXIAL L R R YPbPr2 IN VHF/UHF IN AUDIO Cable or S-VIDEO Cable PLAY STATION B AV Cable A METHOD A: Use a composite cable to connect the video...

User Guide
Page 31
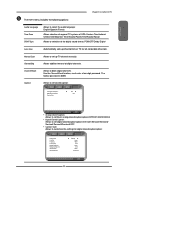
..., Closed Caption, factory reset, V-Chip, Parental Control sleep timer. While in adjustment mode, and use the ◄► buttons to change the value of the sub-menu, and press the OK button. Press the MENU button to edit and label channels. Audio Language Time Zone SPDIF Type Auto Scan Manual Scan Channel Skip Channel Block Caption ◄ English ► Eastern Time PCM Scan Press Press Press Press HDTV Select Exit Use the ▲▼ buttons to set up the HDTV program function. Searching Tuner Mode Channel Skip Channel Name Cable-STD...
..., Closed Caption, factory reset, V-Chip, Parental Control sleep timer. While in adjustment mode, and use the ◄► buttons to change the value of the sub-menu, and press the OK button. Press the MENU button to edit and label channels. Audio Language Time Zone SPDIF Type Auto Scan Manual Scan Channel Skip Channel Block Caption ◄ English ► Eastern Time PCM Scan Press Press Press Press HDTV Select Exit Use the ▲▼ buttons to set up the HDTV program function. Searching Tuner Mode Channel Skip Channel Name Cable-STD...
User Guide
Page 32
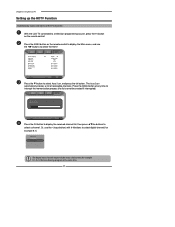
... LCD TV connected to a television programming source, press the TV button on the remote control to display the Main menu, and use the ▪ (Input button) with 0-9 buttons to select digital channel( for example 9.1) Channel List 9-1 KQED-HD 9-2 KOED-SD The digital main channel might include many subchannels (for example 9-1, 9-2..) that are showing program at any time to interrupt the memorization process.(the list cannot be created if interrupted) Status: Scanning.. Audio Language Time Zone SPDIF Type Auto Scan Manual Scan Channel Skip Channel Block Caption...
... LCD TV connected to a television programming source, press the TV button on the remote control to display the Main menu, and use the ▪ (Input button) with 0-9 buttons to select digital channel( for example 9.1) Channel List 9-1 KQED-HD 9-2 KOED-SD The digital main channel might include many subchannels (for example 9-1, 9-2..) that are showing program at any time to interrupt the memorization process.(the list cannot be created if interrupted) Status: Scanning.. Audio Language Time Zone SPDIF Type Auto Scan Manual Scan Channel Skip Channel Block Caption...
User Guide
Page 33
... up channel list on TV for digital closed caption options:Service1/Service2/Service3/ Service4/Service5/Service6/OFF ▪ Caption Style: Allows to set digital closed caption option: Caption Style Font Size Font Color Font Opacity Background Color Background Opacity Window Color Window Opacity ◄ Custom ► Large White Solid Black Solid Black Translucent HDTV Select Back 33 Channel Skip Allows addition/removal of the digital sound format: PCM/OFF/Dolby Digital Auto Scan Automatically sets up TV channel manually. The factory password is 0000. Manual Scan...
... up channel list on TV for digital closed caption options:Service1/Service2/Service3/ Service4/Service5/Service6/OFF ▪ Caption Style: Allows to set digital closed caption option: Caption Style Font Size Font Color Font Opacity Background Color Background Opacity Window Color Window Opacity ◄ Custom ► Large White Solid Black Solid Black Translucent HDTV Select Back 33 Channel Skip Allows addition/removal of the digital sound format: PCM/OFF/Dolby Digital Auto Scan Automatically sets up TV channel manually. The factory password is 0000. Manual Scan...

User Guide
Page 37
... the unit's power cord is removed, ▪ Time: you want the TV to turn off /once the timer (each day). ▪ Confirm: Selects to confirm and set it for 3:00 p.m., you need to reset your language of a 12-hour scale. Use the ▲▼buttons to highlight an individual SETUP option, use the ◄► buttons to change the setting, and press the MENU to exit...
... the unit's power cord is removed, ▪ Time: you want the TV to turn off /once the timer (each day). ▪ Confirm: Selects to confirm and set it for 3:00 p.m., you need to reset your language of a 12-hour scale. Use the ▲▼buttons to highlight an individual SETUP option, use the ◄► buttons to change the setting, and press the MENU to exit...
User Guide
Page 42
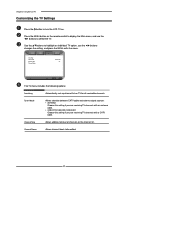
... TV menu includes the following options: Searching Automatically sets up channel list on the channel list. Use the ▲▼buttons to select the TV. Tuner Mode Allows selection between CATV cable and antenna signal sources: ▪ ANTENNA Choose this setting if you are receiving TV channels with an antenna cable. ▪ CABLE STD/CABLE IRC/CABLE HRC Choose this setting if you are receiving TV channels with a CATV cable. Channel Name Allows channel labels to turn the LCD TV on the remote control to display the Main menu, and use...
... TV menu includes the following options: Searching Automatically sets up channel list on the channel list. Use the ▲▼buttons to select the TV. Tuner Mode Allows selection between CATV cable and antenna signal sources: ▪ ANTENNA Choose this setting if you are receiving TV channels with an antenna cable. ▪ CABLE STD/CABLE IRC/CABLE HRC Choose this setting if you are receiving TV channels with a CATV cable. Channel Name Allows channel labels to turn the LCD TV on the remote control to display the Main menu, and use...

User Guide
Page 45
... code again. 5. A Quick Look at Programming a Device To control VCR or DVD, Cable or Satellite Receivers, Amplifier or Tuner, and Auxiliary devices, follow the instructions in "Searching for the other device codes, repeat steps 1 to control your brand until the red LED blinks twice; NOTE: To program a DVD Player, TV/DVD Combo, TV/VCR/DVD Combo, portable DVD player, or mobile DVD player, use , compact unit. Repeat steps 1-5 for Your Code", you may need to the remote...
... code again. 5. A Quick Look at Programming a Device To control VCR or DVD, Cable or Satellite Receivers, Amplifier or Tuner, and Auxiliary devices, follow the instructions in "Searching for the other device codes, repeat steps 1 to control your brand until the red LED blinks twice; NOTE: To program a DVD Player, TV/DVD Combo, TV/VCR/DVD Combo, portable DVD player, or mobile DVD player, use , compact unit. Repeat steps 1-5 for Your Code", you may need to the remote...
User Guide
Page 46
... devices. Enter 9-9-0. To view the code for example, TV). However, you may change the Volume Lock setting to Global Volume Lock so that , you want to control volume (for the first digit, press 1. Unlocking a Single Device's Volume Control 1. Enter 9-9-3 and then press VOL-. The LED blinks four times. PROBLEM: LED blinks when you press a key. PROBLEM: LED blinks one device's volume will operate these functions. PROBLEM: Remote does not control devices or commands are not working properly. Make sure...
... devices. Enter 9-9-0. To view the code for example, TV). However, you may change the Volume Lock setting to Global Volume Lock so that , you want to control volume (for the first digit, press 1. Unlocking a Single Device's Volume Control 1. Enter 9-9-3 and then press VOL-. The LED blinks four times. PROBLEM: LED blinks when you press a key. PROBLEM: LED blinks one device's volume will operate these functions. PROBLEM: Remote does not control devices or commands are not working properly. Make sure...


