Owner's Manual
Page 1
6-Disc Multi-DVD Player ENGLISH Owner's Manual XDV-P90 This product conforms to nCeEwMcAocrdorcdocloorlso.rs.
6-Disc Multi-DVD Player ENGLISH Owner's Manual XDV-P90 This product conforms to nCeEwMcAocrdorcdocloorlso.rs.
Owner's Manual
Page 4
...Working with the Information Display 2 of a DVD 30 - Specifying Chapter - Still Playback - Selecting Audio, Subtitle and Angle Operating with the Menu Screen Chapter and Track Advance/Return 20 - Contents Be sure to Use This Manual - How to read this. Removing the ... Discs Compatible with this Product 9 - What the Marks on DVDs Indicate - Skipping to the Previous Chapter/Track Specifying Title/Chapter/Track (Direct Search 21 - Switching Discs - To Ensure Safe Driving - About This Manual - Resetting the Microprocessor Key Finder 7 Using the Remote Controller ...
...Working with the Information Display 2 of a DVD 30 - Specifying Chapter - Still Playback - Selecting Audio, Subtitle and Angle Operating with the Menu Screen Chapter and Track Advance/Return 20 - Contents Be sure to Use This Manual - How to read this. Removing the ... Discs Compatible with this Product 9 - What the Marks on DVDs Indicate - Skipping to the Previous Chapter/Track Specifying Title/Chapter/Track (Direct Search 21 - Switching Discs - To Ensure Safe Driving - About This Manual - Resetting the Microprocessor Key Finder 7 Using the Remote Controller ...

Owner's Manual
Page 6
...page, together with the same video systems. If it is divided into the sections shown below. When connecting other operations. About This Manual We recommend that you familiarize yourself with Information Explanations of the discs the explanations apply to operate this product's SET UP MENU. ...heading is printed vertically at the top of a Connected Component This product is an index at the edge of how to Use This Manual This manual is not, images will not be sure components are compatible with indications of how to . There is NTSC system compatible. Before ...
...page, together with the same video systems. If it is divided into the sections shown below. When connecting other operations. About This Manual We recommend that you familiarize yourself with Information Explanations of the discs the explanations apply to operate this product's SET UP MENU. ...heading is printed vertically at the top of a Connected Component This product is an index at the edge of how to Use This Manual This manual is not, images will not be sure components are compatible with indications of how to . There is NTSC system compatible. Before ...
Owner's Manual
Page 8
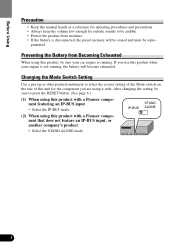
... the Battery from moisture. • If the battery is disconnected, the preset memory will become exhausted. If you are using it with a Pioneer component featuring an IP-BUS input • Select the IP-BUS mode. grammed. After changing the setting, be repro- Before Using Precaution •...; Keep this manual handy as a reference for operating procedures and precautions. • Always keep the volume low enough for the component you use this product ...
... the Battery from moisture. • If the battery is disconnected, the preset memory will become exhausted. If you are using it with a Pioneer component featuring an IP-BUS input • Select the IP-BUS mode. grammed. After changing the setting, be repro- Before Using Precaution •...; Keep this manual handy as a reference for operating procedures and precautions. • Always keep the volume low enough for the component you use this product ...
Owner's Manual
Page 20
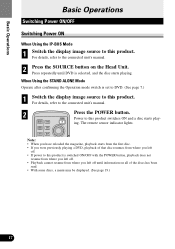
... switches ON and a disc starts play- Power to the connected unit's manual. 2 Press the POWER button. The remote sensor indicator lights. When Using the STAND ALONE Mode Operate after confirming the Operation mode switch is set to DVD. (See page 7.) 1 Switch the display image source to this product ...the disc starts playing. Note: • When you have reloaded the magazine, playback starts from the first disc. • If you were previously playing a DVD, playback of the discs has been read. • With some discs, a menu may be displayed. (See page 19.) 17 For details, refer to ...
... switches ON and a disc starts play- Power to the connected unit's manual. 2 Press the POWER button. The remote sensor indicator lights. When Using the STAND ALONE Mode Operate after confirming the Operation mode switch is set to DVD. (See page 7.) 1 Switch the display image source to this product ...the disc starts playing. Note: • When you have reloaded the magazine, playback starts from the first disc. • If you were previously playing a DVD, playback of the discs has been read. • With some discs, a menu may be displayed. (See page 19.) 17 For details, refer to ...
Owner's Manual
Page 32
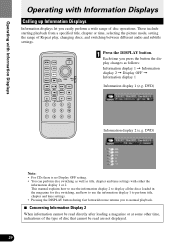
DVD) Information display 2 (e.g. DVD) Note: • For CDs there is no Display OFF setting. • You can perform disc switching as well as follows: Information display 1 = Information display 2 = Display ... perform title, chapter and time settings. • Pressing the DISPLAY button during fast forward/reverse returns you easily perform a wide range of disc operations. This manual explains how to use the information display 2 to display all the discs loaded in the magazine for disc switching, and how to use the information...
DVD) Information display 2 (e.g. DVD) Note: • For CDs there is no Display OFF setting. • You can perform disc switching as well as follows: Information display 1 = Information display 2 = Display ... perform title, chapter and time settings. • Pressing the DISPLAY button during fast forward/reverse returns you easily perform a wide range of disc operations. This manual explains how to use the information display 2 to display all the discs loaded in the magazine for disc switching, and how to use the information...
Owner's Manual
Page 51
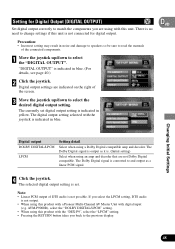
... for Digital Output (DIGITAL OUTPUT) VD Set digital output correctly to the previous display. 48 Digital output settings are using this product with a Pioneer Multi-Channel AV Master Unit with the joystick is indicated in blue. Precaution: • Incorrect setting may result in yellow. AVM-P9000R), select... DTS audio is no need to and output as it is indicated in noise and damage to speakers so be sure to read the manuals of the screen. 3 Move the joystick up /down to select the "DIGITAL OUTPUT". The Dolby Digital signal is converted to change ...
... for Digital Output (DIGITAL OUTPUT) VD Set digital output correctly to the previous display. 48 Digital output settings are using this product with a Pioneer Multi-Channel AV Master Unit with the joystick is indicated in blue. Precaution: • Incorrect setting may result in yellow. AVM-P9000R), select... DTS audio is no need to and output as it is indicated in noise and damage to speakers so be sure to read the manuals of the screen. 3 Move the joystick up /down to select the "DIGITAL OUTPUT". The Dolby Digital signal is converted to change ...

Owner's Manual
Page 52
... to a 48 kHz signal. (Initial setting) Select this unit. Precaution: • If the setting is converted to match the components you back to read the manuals of the audio sampling frequency. "OUT SELECTION" is output regardless of the con- The selected audio output setting is output. • When using this setting...
... to a 48 kHz signal. (Initial setting) Select this unit. Precaution: • If the setting is converted to match the components you back to read the manuals of the audio sampling frequency. "OUT SELECTION" is output regardless of the con- The selected audio output setting is output. • When using this setting...
Owner's Manual
Page 56
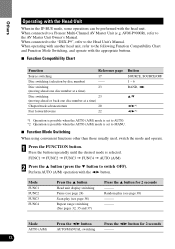
...Disc switching (selection by disc number) -- Press the button repeatedly until the desired mode is set to the Head Unit's Manual. Mode AUTO (A/M) Press the 2/3 button AUTO/MANUAL switching Press the 2/3 button for 2 seconds --- Mode FUNC1 FUNC2 FUNC3 FUNC4 Press the 5 button Head unit display switching Pause... with the Head Unit When in the IP-BUS mode, some operations can be performed with the 2/3 button. AVM-P9000R), refer to a Pioneer Multi-Channel AV Master Unit (e.g. Disc switching 23 (moving ahead one disc number at a time) Disc switching 23 (moving ahead or back one...
...Disc switching (selection by disc number) -- Press the button repeatedly until the desired mode is set to the Head Unit's Manual. Mode AUTO (A/M) Press the 2/3 button AUTO/MANUAL switching Press the 2/3 button for 2 seconds --- Mode FUNC1 FUNC2 FUNC3 FUNC4 Press the 5 button Head unit display switching Pause... with the Head Unit When in the IP-BUS mode, some operations can be performed with the 2/3 button. AVM-P9000R), refer to a Pioneer Multi-Channel AV Master Unit (e.g. Disc switching 23 (moving ahead one disc number at a time) Disc switching 23 (moving ahead or back one...
Owner's Manual
Page 57
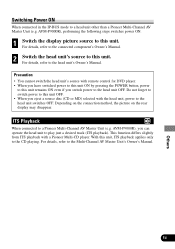
...Do not forget to switch power to this unit OFF. • When you eject a source disc (CD or MD) selected with remote control for DVD player. • When you have switched power to this unit ON by pressing the POWER button, power to this unit remains ON even if you ...disappear. ITS Playback When connected to this unit. AVM-P9000R), you switch power to the head unit's Owner's Manual. For details, refer to the connected component's Owner's Manual. 2 Switch the head unit's source to a Pioneer Multi-Channel AV Master Unit (e.g. Switching Power ON When connected in the IP-BUS mode to this unit...
...Do not forget to switch power to this unit OFF. • When you eject a source disc (CD or MD) selected with remote control for DVD player. • When you have switched power to this unit ON by pressing the POWER button, power to this unit remains ON even if you ...disappear. ITS Playback When connected to this unit. AVM-P9000R), you switch power to the head unit's Owner's Manual. For details, refer to the connected component's Owner's Manual. 2 Switch the head unit's source to a Pioneer Multi-Channel AV Master Unit (e.g. Switching Power ON When connected in the IP-BUS mode to this unit...
Owner's Manual
Page 66
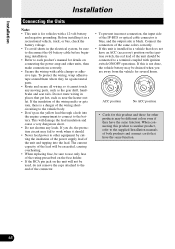
This will not be used, do , the protection circuit may fail to work when it should be connected to each product's manual for vehicles with cable clamps or adhesive tape. If the insulation of the IP-BUS or optical cable connector is blue, and the output side ... ACC (accessory) position on the ignition switch, the red lead of the unit and tapping into the engine compartment to connect to the supplied Installation manuals of the same colors correctly. • If this is for details on the unit will damage the lead insulation and cause a very dangerous short. •...
This will not be used, do , the protection circuit may fail to work when it should be connected to each product's manual for vehicles with cable clamps or adhesive tape. If the insulation of the IP-BUS or optical cable connector is blue, and the output side ... ACC (accessory) position on the ignition switch, the red lead of the unit and tapping into the engine compartment to connect to the supplied Installation manuals of the same colors correctly. • If this is for details on the unit will damage the lead insulation and cause a very dangerous short. •...
Owner's Manual
Page 67
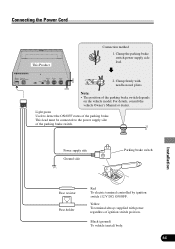
... brake switch Installation Fuse resistor Fuse holder Red To electric terminal controlled by ignition switch (12 V DC) ON/OFF. For details, consult the vehicle Owner's Manual or dealer.
... brake switch Installation Fuse resistor Fuse holder Red To electric terminal controlled by ignition switch (12 V DC) ON/OFF. For details, consult the vehicle Owner's Manual or dealer.


